|
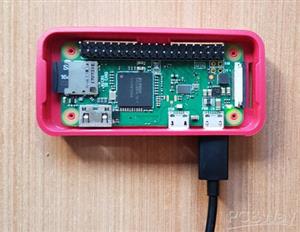
RASPBERRY PI ZERO W |
x 1 | |
|
|
28BYJ-48 Stepper Motor with ULN2003 DriverELEGOO
|
x 1 | |
|
|
RivetsT.K.Excellent
|
x 1 | |
|
|
Transparent Vinyl sheetsStyleTech
|
x 1 | |
|
|
Logitech C920 HD Pro WebcamLogitech
|
x 1 |
Automatic Lens Cleaner
Nowadays there are cameras everywhere. A particular scenario were cameras have been proved to be very helpful are street cameras: they allow us to see the trafic, monitor for people behavior and much, much more. It is commom to place these cameras outdoors, which means that they are exposed to weather conditions such as wind, rain, small debries, bird poop and other elements that can make the camera's len dirt and blur the video.
There are some products that can be used as protective layer as well as plastic protections and enclousures for the cameras. Howerver, even with these options it is commom to see lens getting dirty and someone has to manually clean the lens.
Inspired by the technology used in Formula 1 cars, I created a small prototype that automatic clean the lens of a camera. The ideia is to use some form of clear plastic sheet (i.e. transparent vinyl) that will be placed in from of the lens of the camera. When someone that is looking in the camera video feed note that the lens are dirty they just have to press a button and a small stepper motor will scrool the transparent material and clean the view. It is important to note that the material must be clear to not interfere with the video feed. After a while the material can be cleanned and replaced.
To test this ideia I developed a simple prototype using a Raspberry Pi Zero W. This device is very handy, has a small form factor and allow us to connect with the motor. Unfortunately a did not have any other Raspberry Pi, so I have to use the RPI Zero W. Nevertheless, the new RPI Pico can be used in this project.

Next I choosed the motor. I used the 28BYJ-48 stepper motor with a driver because they are reliable, have a strong torque and came in a small form factor. For this prototype I did not required external power, which means I could use the 5V provided by the RPI Zero W to power the motor.

It is very simple to connect the motor with the RPI: you just need to connect the power + ground pins (do not forget to set the 5V using the provided jumpers) and the connect the 4 signal cables to the GPIOs of the RPI. The following image shows the schematic.

The next step was to choose the webcam. For this prototype I used a simple Logitech webcam, but you can adapt the project to other cameras, including the ones used in CCTV (Closed Circuit Televition). The webcam I used is the C920 and I have to make use of lube in the corners to make the plastic material scroll smoothly.

The next step was to place the transparent material into some kind of roll that can be scrolled. For the prototype I used a straw and a small woden stick, but I would like to recommend rivets. Yes, these rivets have some form o "cap" that you can unplug and use them to curl the material and hold the pin in such a way it scrolls.

Here is a photo of the straw connected in the shaft of the stepper motor. Again, this was just to test and in a finalized version of the project you can replace the straw with some more permanent (and water proff) shaft.

The next step is the transparent material. I would recommend a stiff transparent plastic, like vinyl or an acrilic sheet. However, I just have at my disposal a kitchen plastic wrap. This material fold easily and make a lot of wrikles, but at least it worked for the first prototype.

Next I just have to curl up the material in the straw and the wodden stick. This part was easy, but to place the components in the webcam was not. In fact, this is a job for a 3D print case or enclouse that fits well with the format of the camera case. For the first prototype I just used soldering arms that help me place the components in a suitable position.


Again, the transparent plastic material I used have a lot of folds and wrinkles. Howerver, it somewhat worked: I could just make the motor rotate clockwise and the the sheet of plastic scroll, which was the intented effect.
I have a lot of lesons learned in this project and I think it has some interesting use cases. If anyone want to replicate that, please fell free to change the code that I attached here. Also, please try to make the sheet as close as possoble of the camera lens, so it wont create any kind of shadow or other effect in the video.

Automatic Lens Cleaner
- Comments(0)
- Likes(1)
-
 Engineer
Oct 01,2024
- 0 USER VOTES
- YOUR VOTE 0.00 0.00
- 1
- 2
- 3
- 4
- 5
- 6
- 7
- 8
- 9
- 10
- 1
- 2
- 3
- 4
- 5
- 6
- 7
- 8
- 9
- 10
- 1
- 2
- 3
- 4
- 5
- 6
- 7
- 8
- 9
- 10
- 1
- 2
- 3
- 4
- 5
- 6
- 7
- 8
- 9
- 10
 More by MauroPIchiliani
-
-
-
kmMiniSchield MIDI I/O - IN/OUT/THROUGH MIDI extension for kmMidiMini
125 0 0 -
DIY Laser Power Meter with Arduino
182 0 2 -
-
-
Box & Bolt, 3D Printed Cardboard Crafting Tools
165 0 2 -


