Blinking Christmas Ornament
Hey everyone, and Merry Christmas, in advance.
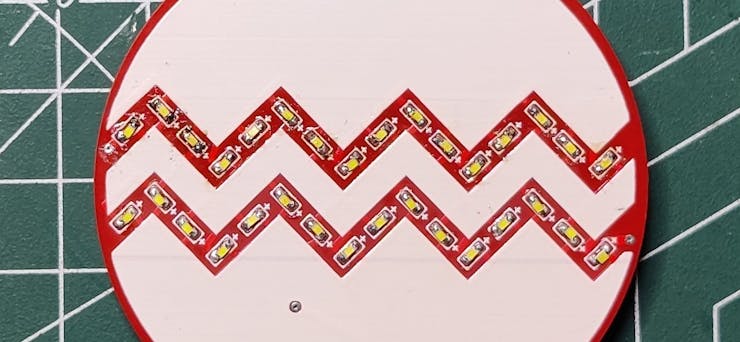
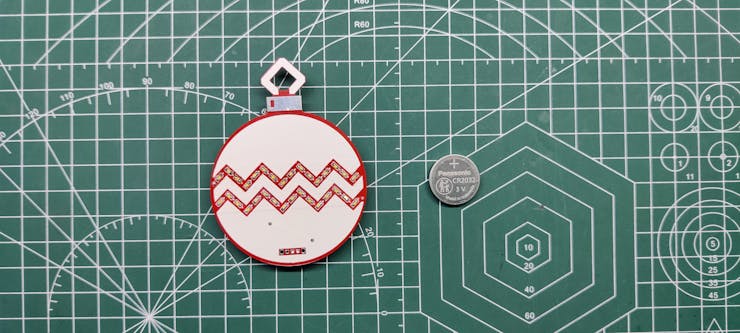
Christmas is coming next month, so here's an enjoyable Christmas-themed project that involves PCB art used for the decoration of the Christmas tree, a PCB ornament that has SMD LEDs on the front side.
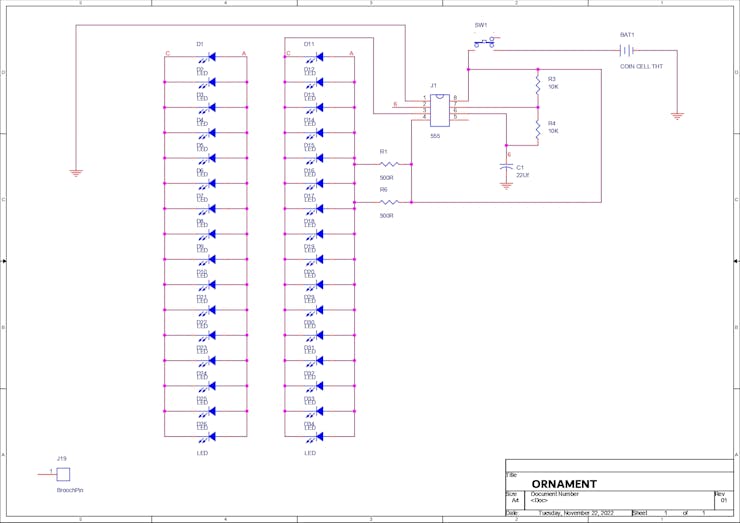
These LEDs blink with the help of a 555 timer IC.


This project is a simple one; a 555 timer IC is added on the bottom side of this ornament board, 555 timer IC is configured in an astable multivibrator circuit, which is a configuration in which the output will never be in a stable state, it will turn HIGH and LOW repetitively.
As for the LEDs, 32 white LEDs are used in this project, and they are all connected in parallel, The power source is a single CR2032 cell, so we don't have to worry about the high current usage of these LEDs, meaning they won't short out by taking too much current and burning themselves.
MATERIALS REQUIRED
following are the things required in this built-
- 555 timer IC
- Custom PCB
- 10K Resistor
- 500 Ohms Resistors
- Coin cell holder
- CR2032 Coin cell
- 22uf Capacitor
- Slide Switch
- WHITE 0603 LEDs
CIRCUIT DESIGN


The schematic was prepared first using the timer IC set in an Astable multivibrator configuration.
A multivibrator circuit oscillates between a “high” state and a “low” state, producing a continuous output. Astable multivibrators generally have an even 50% duty cycle, that is, for 50% of the cycle time the output is "HIGH,” and for the remaining 50% of the cycle time the output is "OFF."
That is, all LEDs connected to the D3 pin will blink or turn on and off for a fixed period of time.
The blinking rate is controlled by the capacitor value.
After preparing the schematic, we export the netlist and prepare a board file.
For the artistic aspect of this project, we first have to find a suitable ornament image for the silkscreen layer.
I selected the simple black-and-white image and imported it into the PCB design and added LEDs on the top side of the board, the rest of the components are moved to the bottom layer.
PCBWAY SERVICE


After placing everything and finalizing the board, I send its Gerber data to PCBWAY for samples.
I used PCBWAY PCB Service for this project. I uploaded the Gerber file for this project on PCBWAY's quote page. For this ornament board, I went with red Soldermask and white silkscreen.
After placing the order, I received the PCBs within a week, and the PCB quality was pretty great. The silkscreen I used is completely random and asymmetrical, so it's pretty hard to make, but they did an awesome job of making this PCB with no errors whatsoever.
You guys can check out PCBWAY If you want Great PCB Service at an Affordable rate and low price.
PCB ASSEMBLY
- LED ASSEMBLY (TOP LAYER)
- COMPONENTS ASSEMBLY (BOTTOM LAYER)
Components are added on both the TOP and BOTTOM layers, which means we have to perform some steps like solder paste dispensing and the pick & place process twice and with caution.
SOLDER PASTE DISPENSING PROCESS- TOP LAYER

We start first with the TOP layer LED assembly by adding solder paste to each led pad one by one.
We use regular Sn-Pb solder paste that has a melting temperature of 140° to 270°C, and to apply the solder paste, a solder paste syringe with a wide nozzle is used.
PICK AND PLACE PROCESS

We then used an ESD tweaker to carefully pick and place all the SMD LEDs in their assigned places one by one, which took like 30 seconds tops, but the result was a perfect PCB with all the components placed in their locations.
HOTPLATE REFLOW


After the "pick and place process, " we carefully lifted the whole circuit board and placed it on my new Mini Hotplate.
The hotplate heats the PCB from below up to the solder paste melting temperature. As a result, the solder paste melts and components get solder on their pads.
RESULT SO FAR

Here's the result so far: all 32 LEDs have been reflowed properly, and now we need to add SMD components to the other side of the board, but there's a problem.
The problem is, we cannot use a hotplate for reflowing SMD components on the bottom side as we already have LEDs on the top side. The hotplate will melt the LEDs if we place the board upside down to reflow the bottom layer.
SOLDER PASTE DISPENSING PROCESS- BOTTOM LAYER

We add solder paste to each component pad like we did on TOP Layer, same Sn-Pb solder paste is being used here.
PICK AND PLACE PROCESS

Then, using an ESD tweezer, we carefully pick and place all of the SMD components one by one.
HOT GUN REFLOW PROCESS


We set the hot air station to 200 °C so the board's TOP side didn't get too hot and the solder paste of the leds melted, and we slowly moved the air gun around, melting the solder paste on the bottom side.
After doing this step, the board is complete.
POWER SOURCE

As for the power source, we use a CR2032 lithium coin cell, which has a capacity of 240 mAh and works at 3 volts.
Because it has added two 500-ohm resistors in parallel with the load (LEDs), they don't draw too much current while blinking, and this whole setup lasts more than a day of continuous usage.
RESULT


Here's the overall result: a "Blinking Christmas Ornament" for decorating the Christmas tree of an electronics engineer. My idea is to make a bunch of these ornaments and give them as Christmas presents to my friends and relatives.
The reason for using a 555 timer IC in this project was to make it simpler and easier to remake, A microcontroller would be better for adding LED blinking animations or fancy RGB effects, but that would've been an overkill setup.
Maybe I'll prepare the overkill version of this ornament next Christmas.
I hope this article was useful, if yes, then leave a comment.
Special thanks to PCBWAY for supporting this project; do check them out for great PCB service at a lower cost.
Thanks again, and I will be back with a new project soon.

Blinking Christmas Ornament
*PCBWay community is a sharing platform. We are not responsible for any design issues and parameter issues (board thickness, surface finish, etc.) you choose.
- Comments(0)
- Likes(1)
-
 Engineer
Jan 24,2024
- 0 USER VOTES
- YOUR VOTE 0.00 0.00
- 1
- 2
- 3
- 4
- 5
- 6
- 7
- 8
- 9
- 10
- 1
- 2
- 3
- 4
- 5
- 6
- 7
- 8
- 9
- 10
- 1
- 2
- 3
- 4
- 5
- 6
- 7
- 8
- 9
- 10
- 1
- 2
- 3
- 4
- 5
- 6
- 7
- 8
- 9
- 10
 More by Arnov Arnov sharma
-
 Pocket SNES
Greetings everyone, and welcome back! Today, I’ve got something fun and tiny to share—the Pocket SNE...
-
 Batocera Arcade Box
Greetings everyone and welcome back, Here's something. Fun and nostalgic. Right now, we are using ou...
-
 64x32 Matrix Panel Setup with PICO 2
Greetings everyone and welcome back.So here's something fun and useful: a Raspberry Pi Pico 2-powere...
-
 Portable Air Quality Meter
Hello everyone, and welcome back! Today, I have something incredibly useful for you—a Portable Air Q...
-
 WALKPi PCB Version
Greetings everyone and welcome back, This is the WalkPi, a homebrew audio player that plays music fr...
-
 Delete Button XL
Greetings everyone and welcome back, and here's something fun and useful.In essence, the Delete Butt...
-
 Arduino Retro Game Controller
Greetings everyone and welcome back. Here's something fun.The Arduino Retro Game Controller was buil...
-
 Super Power Buck Converter
Greetings everyone and welcome back!Here's something powerful, The SUPER POWER BUCK CONVERTER BOARD ...
-
 Pocket Temp Meter
Greetings and welcome back.So here's something portable and useful: the Pocket TEMP Meter project.As...
-
 Pico Powered DC Fan Driver
Hello everyone and welcome back.So here's something cool: a 5V to 12V DC motor driver based around a...
-
 Mini Solar Light Project with a Twist
Greetings.This is the Cube Light, a Small and compact cube-shaped emergency solar light that boasts ...
-
 PALPi V5 Handheld Retro Game Console
Hey, Guys what's up?So this is PALPi which is a Raspberry Pi Zero W Based Handheld Retro Game Consol...
-
 DIY Thermometer with TTGO T Display and DS18B20
Greetings.So this is the DIY Thermometer made entirely from scratch using a TTGO T display board and...
-
 Motion Trigger Circuit with and without Microcontroller
GreetingsHere's a tutorial on how to use an HC-SR505 PIR Module with and without a microcontroller t...
-
 Motor Driver Board Atmega328PU and HC01
Hey, what's up folks here's something super cool and useful if you're making a basic Robot Setup, A ...
-
 Power Block
Hey Everyone what's up!So this is Power block, a DIY UPS that can be used to power a bunch of 5V Ope...
-
 Goku PCB Badge V2
Hey everyone what's up!So here's something SUPER cool, A PCB Board themed after Goku from Dragon Bal...
-
 RGB Mixinator V2
Hey Everyone how you doin!So here's a fun little project that utilizes an Arduino Nano, THE MIXINATO...
-
-
mammoth-3D SLM Voron Toolhead – Manual Drill & Tap Edition
230 0 0 -
-
AEL-2011 Power Supply Module
755 0 2 -
AEL-2011 50W Power Amplifier
627 0 2 -
-
-
Custom Mechanical Keyboard
823 0 0 -
Tester for Touch Screen Digitizer without using microcontroller
448 2 2 -
Audio reactive glow LED wristband/bracelet with NFC / RFID-Tags
400 0 1 -
-


