|
OrCad Cadance |
Gengar PCB Art
Hey guys and how you doing!
So this is the GENGAR PCB Badge or a Blinky Board which is based around 555 Timer IC.
The idea here was to make a GENGAR which is a character from the Pokemon Series and make a PCB Art based on it.

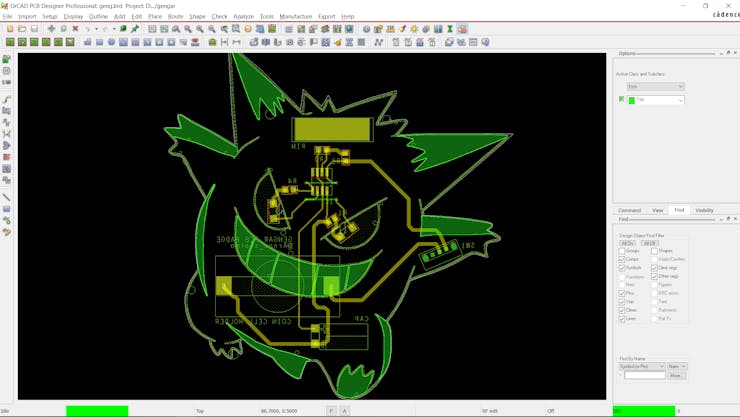
On one side of the board, I've added the custom silkscreen and soldermask opening to create the character's shape and body features.
The bottom side contains the 555 Bi Flasher setup that blinks two SMD LEDs whose glow can be observed from TOP Side.
I made this setup as a soldering challenge kit for my students, We solder all the SMD components with a soldering iron and the result will be a complete Bi-Flasher working circuit, pretty fun stuff.
In this article, I'm gonna show you guys how I made and assemble this kit, so let's get started.
Material Required


- Custom Gengar PCB
- 555 timer IC
- 10K Resistor
- SMD Coin cell holder
- CR2032 Coin cell
- 22uf Capacitor
- Slide Switch
- RED 0805 LEDs
- Soldering Iron
Basic Idea

Here's what I wanted to build, a simple circuit that anyone who is not an engineer can assemble and play around with.
My whole approach here was minimalism, I could use a Microcontroller to drive the onboard LEDs but I choose the 555 Bi Flasher setup as it was proper old school electronics and requires few components.
I reuse one of my old project circuit which was this-
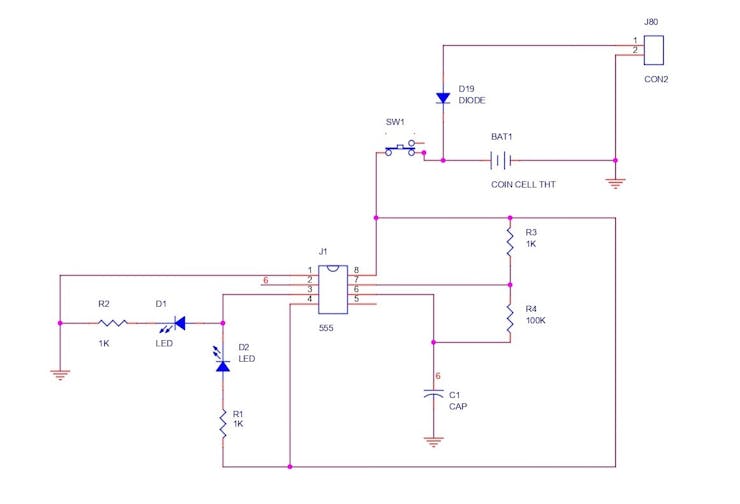
The main component here is the Mightly 555 timer ic which is set up in a Bi Flasher Mode. This means at the output Pin, two LEDs are connected in such a way that when a positive signal gets out of Pin 3 this will make LED 2 Glow and LED 1 will remain LOW, and when the positive signals don't get out of Pin 3 LED 2 will become LOW and LED1 will start glowing.
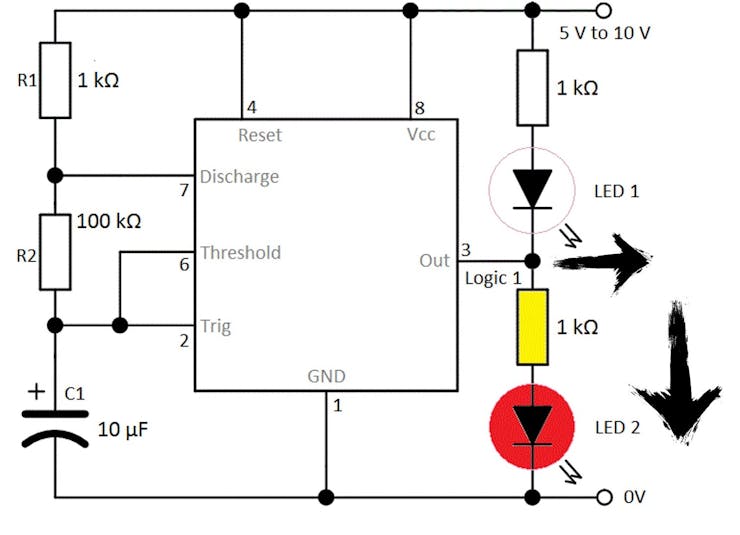
Bi Flasher constantly turns Both LEDs ON and OFF by repetitive biasing of both LEDs through pin 3.
The flashing rate can be controlled by changing the value of the capacitor connected between Pin 2 and GND. right now I'm using a 22uf 16V capacitor but if we use a 10uf capacitor, the flash rate will increase, to decrease the flash rate, we can use a higher capacitance capacitor like 47uF, 30uF, etc.
GENGAR SILKSCREEN
After finalizing the Schematic, I started the PCB Designing process.

I first searched around for a black and white Gengar image that I could convert into a BMP image and then import it into my CAD Software for editing.
I Imported the image into my PCB Suite and placed all the componenets on the BOTTOM side and the art layer is at the front.
I also left the Soldermask opening in the eyes, the goal was to make them glow from the BOTTOM side and its glow will be visible from TOP through the Soldermask opening.
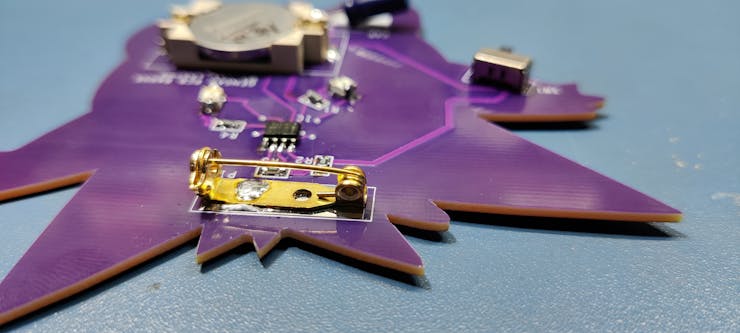
Also, I've added a Brooch Pin pad to this board so it can be a wearable device.
After placing everything and finalizing the board, I send its Gerber data to PCBWAY for samples.
Getting PCBs from PCBWAY

I used PCBWAY PCB Service for this project. I uploaded the Gerber file of this project on PCBWAY's quote page. For this PCB ART BOARD, I went with purple soldermask with white silkscreen.
I choose purple because GENGAR's skin color is purple.

After placing the order, I received the PCBs in a week and the PCB quality was pretty great, the silkscreen I used is completely random and asymmetrical so it's pretty hard to make but they did an awesome job of making this PCB with no error whatsoever.
You guys can check out PCBWAY If you want Great PCB Service at an Affordable rate and low price.
PCB ASSEMBLY
Now this project has SMD Componenets and it's better to use Solderpaste and reflow technique while dealing with SMD Componenets but because this kit is for freshlings, I will use solder iron instead.
#1 ADDING SOLDER TO ONE SIDE FIRST

- First set up your soldering station with an Iron Tip Temp of 316°- 343°C.
- We start by adding solder to each component pad first, just on one side.
#2 ADDING IC & RESISTORS
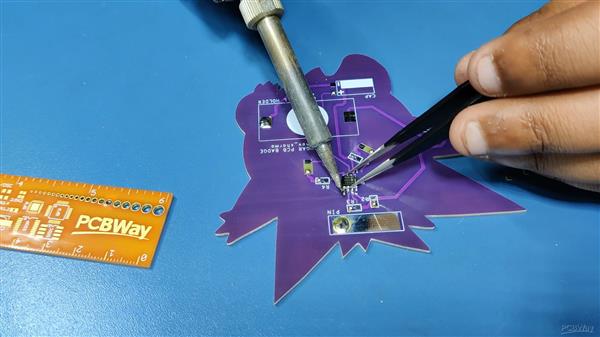

- We now add the timer IC in its place and all the 10K Resistors by picking them up with a tweezer and heating the solder we added on one side of the board
- this will hold the component from one side, we then later add solder to the other side of the component
#3 ADDING LEDs


- Now we add LEDs in its place.
- Here's a little twist, I've placed a custom LED Pad that has a soldermask opening in the middle and the pad is pretty wide.
- We place LED Upside down and its glow will be visible from TOPSIDE.
- The soldering process for these LEDs is also the same but a little tricky, we place LEDs upside down in right polarity, then hold the LED with a tweezer and then add solder paste to one side. then after the LEDs are locked in their place, we add solder to another pad which permanently attaches the LED to the given Pad.
#4 ADDING THT COMPONENTS


- After placing LEDs, I added all the remaining THT components that includes the coin cell holder, Pin, Slide switch, and capacitor.
- After placing all the THT Components the badge is now completed.
RESULT


For powering this badge, we have to add a CR2032 Lithium Coin cell in its holder and turn on the switch. Both LEDs will start flickering in a chasing sequence, the first led will glow and the second will stay low, then the second led will turn HIGH and the first led will turn LOW, and this process will get repeated over and over.
I've made similar projects with this same circuit which are these-
https://www.pcbway.com/project/shareproject/C_3PO_Blinky_Board.html
https://www.pcbway.com/project/shareproject/Eren_Yeager_PCB_ART_46715511.html
https://www.pcbway.com/project/shareproject/Ghost_Badge_made_from_555_Timer_IC.html
This is it for today folks, Leave a comment if you need any help.
Peace out and have a nice day!
Gengar PCB Art
*PCBWay community is a sharing platform. We are not responsible for any design issues and parameter issues (board thickness, surface finish, etc.) you choose.
- Comments(0)
- Likes(2)
-
 Darren Bassett
Jun 23,2023
-
 Engineer
Feb 10,2023
- 0 USER VOTES
- YOUR VOTE 0.00 0.00
- 1
- 2
- 3
- 4
- 5
- 6
- 7
- 8
- 9
- 10
- 1
- 2
- 3
- 4
- 5
- 6
- 7
- 8
- 9
- 10
- 1
- 2
- 3
- 4
- 5
- 6
- 7
- 8
- 9
- 10
- 1
- 2
- 3
- 4
- 5
- 6
- 7
- 8
- 9
- 10
 More by Arnov Arnov sharma
-
 Pocket SNES
Greetings everyone, and welcome back! Today, I’ve got something fun and tiny to share—the Pocket SNE...
-
 Batocera Arcade Box
Greetings everyone and welcome back, Here's something. Fun and nostalgic. Right now, we are using ou...
-
 64x32 Matrix Panel Setup with PICO 2
Greetings everyone and welcome back.So here's something fun and useful: a Raspberry Pi Pico 2-powere...
-
 Portable Air Quality Meter
Hello everyone, and welcome back! Today, I have something incredibly useful for you—a Portable Air Q...
-
 WALKPi PCB Version
Greetings everyone and welcome back, This is the WalkPi, a homebrew audio player that plays music fr...
-
 Delete Button XL
Greetings everyone and welcome back, and here's something fun and useful.In essence, the Delete Butt...
-
 Arduino Retro Game Controller
Greetings everyone and welcome back. Here's something fun.The Arduino Retro Game Controller was buil...
-
 Super Power Buck Converter
Greetings everyone and welcome back!Here's something powerful, The SUPER POWER BUCK CONVERTER BOARD ...
-
 Pocket Temp Meter
Greetings and welcome back.So here's something portable and useful: the Pocket TEMP Meter project.As...
-
 Pico Powered DC Fan Driver
Hello everyone and welcome back.So here's something cool: a 5V to 12V DC motor driver based around a...
-
 Mini Solar Light Project with a Twist
Greetings.This is the Cube Light, a Small and compact cube-shaped emergency solar light that boasts ...
-
 PALPi V5 Handheld Retro Game Console
Hey, Guys what's up?So this is PALPi which is a Raspberry Pi Zero W Based Handheld Retro Game Consol...
-
 DIY Thermometer with TTGO T Display and DS18B20
Greetings.So this is the DIY Thermometer made entirely from scratch using a TTGO T display board and...
-
 Motion Trigger Circuit with and without Microcontroller
GreetingsHere's a tutorial on how to use an HC-SR505 PIR Module with and without a microcontroller t...
-
 Motor Driver Board Atmega328PU and HC01
Hey, what's up folks here's something super cool and useful if you're making a basic Robot Setup, A ...
-
 Power Block
Hey Everyone what's up!So this is Power block, a DIY UPS that can be used to power a bunch of 5V Ope...
-
 Goku PCB Badge V2
Hey everyone what's up!So here's something SUPER cool, A PCB Board themed after Goku from Dragon Bal...
-
 RGB Mixinator V2
Hey Everyone how you doin!So here's a fun little project that utilizes an Arduino Nano, THE MIXINATO...
-
-
mammoth-3D SLM Voron Toolhead – Manual Drill & Tap Edition
214 0 0 -
-
AEL-2011 Power Supply Module
736 0 2 -
AEL-2011 50W Power Amplifier
610 0 2 -
-
-
Custom Mechanical Keyboard
814 0 0 -
Tester for Touch Screen Digitizer without using microcontroller
442 2 2 -
Audio reactive glow LED wristband/bracelet with NFC / RFID-Tags
395 0 1 -
-


