|
|
NTC 10k |
x 1 |
HeatSolder
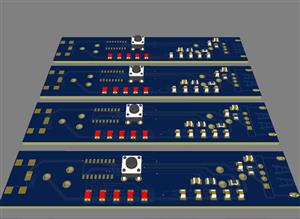
It is an innovative heating and control card that enables precise soldering of SMD (Surface-Mount Device) components. With its user-friendly OLED screen and integrated keypad, it allows you to easily set the ideal temperature for the soldering process. This board allows you to place and solder your SMD components perfectly by heating the surface according to the temperature value you specify.
code used:
#include <Wire.h>
#include <Adafruit_GFX.h>
#include <Adafruit_SSD1306.h>
#define SCREEN_WIDTH 128
#define SCREEN_HEIGHT 32
#define OLED_RESET -1
Adafruit_SSD1306 display(SCREEN_WIDTH, SCREEN_HEIGHT, &Wire, OLED_RESET);
const int thermistorPin = A3;
const int seriesResistor = 10000; // Seri bağlı direnç (10kΩ)
const float BETA = 3950; // NTC termistörün B değeri (bu değeri datasheet'ten alabilirsiniz)
const float T0 = 298.15; // 25°C'ye karşılık gelen sıcaklık (K cinsinden)
const float R0 = 10000; // 25°C'de termistörün direnç değeri (10kΩ)
// Push butonlar için pinler
const int buttonUpPin = 7; // Hedef sıcaklık arttırma butonu
const int buttonDownPin = 8; // Hedef sıcaklık azaltma butonu
const int buttonResetPin = 9; // Hedef sıcaklık sıfırlama butonu
// Hedef sıcaklık ve diğer değişkenler
float targetTemperature = 25.0; // Başlangıç hedef sıcaklık (25°C)
// MOSFET'in bağlı olduğu pin
const int mosfetPin = 5; // Mosfet'i kontrol etmek için dijital pin
unsigned long lastButtonPress = 0;
const unsigned long debounceDelay = 200; // Butonlar için debounce süresi
// Fonksiyon: Termistörden gelen analog değeri sıcaklığa dönüştürür
float readTemperature() {
int analogValue = analogRead(thermistorPin);
float resistance = seriesResistor * (1023.0 / analogValue - 1.0);
// Termistörün sıcaklık formülünü kullanarak sıcaklığı hesapla
float temperature = 1.0 / (log(resistance / R0) / BETA + 1.0 / T0) - 273.15; // °C cinsinden sıcaklık
return temperature;
}
void setup() {
// Seri haberleşmeyi başlat
Serial.begin(9600);
// OLED ekranı başlat
if (!display.begin(SSD1306_I2C_ADDRESS, OLED_RESET)) {
Serial.println(F("Ekran başlatılamadı"));
while (1);
}
// Ekranı temizle
display.clearDisplay();
display.setTextSize(1);
display.setTextColor(SSD1306_WHITE);
display.setCursor(0, 0);
display.print(F("Isı Degeri"));
display.display();
delay(2000);
// Buton pinlerini giriş olarak ayarla
pinMode(buttonUpPin, INPUT_PULLUP);
pinMode(buttonDownPin, INPUT_PULLUP);
pinMode(buttonResetPin, INPUT_PULLUP);
// MOSFET pinini çıkış olarak ayarla
pinMode(mosfetPin, OUTPUT);
digitalWrite(mosfetPin, HIGH); // Başlangıçta MOSFET açık (Isıtıcı çalışıyor)
}
void loop() {
// Sıcaklık değeri oku
float currentTemperature = readTemperature();
// Butonları kontrol et
unsigned long currentMillis = millis();
if (currentMillis - lastButtonPress > debounceDelay) {
if (digitalRead(buttonUpPin) == LOW) {
targetTemperature += 1.0; // Hedef sıcaklığı 1°C arttır
lastButtonPress = currentMillis;
}
if (digitalRead(buttonDownPin) == LOW) {
targetTemperature -= 1.0; // Hedef sıcaklığı 1°C azalt
lastButtonPress = currentMillis;
}
if (digitalRead(buttonResetPin) == LOW) {
targetTemperature = 25.0; // Hedef sıcaklığı 25°C olarak sıfırla
lastButtonPress = currentMillis;
}
}
// Ekranı temizle
display.clearDisplay();
// Mevcut sıcaklık ve hedef sıcaklık değerlerini ekrana yazdır
display.setCursor(0, 0);
display.print(F("Mevcut Sicaklik: "));
display.print(currentTemperature, 1); // 1 ondalıklı gösterim
display.print(F(" C"));
display.setCursor(0, 16); // 32x128 ekran için uygun bir yer
display.print(F("Hedef Sicaklik: "));
display.print(targetTemperature, 1); // 1 ondalıklı gösterim
display.print(F(" C"));
// Ekranı güncelle
display.display();
// Seri port üzerinden de veriyi yazdır
Serial.print("Mevcut Sicaklik: ");
Serial.print(currentTemperature);
Serial.print(" C, Hedef Sicaklik: ");
Serial.print(targetTemperature);
Serial.println(" C");
// Hedef sıcaklığa ulaşıldığında MOSFET'i kapat
if (currentTemperature >= targetTemperature) {
digitalWrite(mosfetPin, LOW); // MOSFET'i kapat (Isıtıcıyı durdur)
} else {
digitalWrite(mosfetPin, HIGH); // MOSFET'i aç (Isıtıcıyı çalıştır)
}
// 1 saniye bekle
delay(1000);
}
HeatSolder
*PCBWay community is a sharing platform. We are not responsible for any design issues and parameter issues (board thickness, surface finish, etc.) you choose.
- Comments(0)
- Likes(1)
-
 Engineer
Nov 24,2024
- 0 USER VOTES
- YOUR VOTE 0.00 0.00
- 1
- 2
- 3
- 4
- 5
- 6
- 7
- 8
- 9
- 10
- 1
- 2
- 3
- 4
- 5
- 6
- 7
- 8
- 9
- 10
- 1
- 2
- 3
- 4
- 5
- 6
- 7
- 8
- 9
- 10
- 1
- 2
- 3
- 4
- 5
- 6
- 7
- 8
- 9
- 10
 More by Semih_Cngts
-
 Drone Board
brushed drone control board built using atmega328p and mpu6050.
-
 HeatSolder
It is an innovative heating and control card that enables precise soldering of SMD (Surface-Mount De...
-
 PLANE _ RECE?VER
It is a module made using NRF24L01 mini, it works 5V from esc.
-
 Smart_Home_1C(V-2.0)
Circuit that can be used to control 220v electricity over the internet for smart home systems
-
 ESP12-LED-STR?P-CONTROLLER
This project, which we created using esp 12-f, was created to control led strips over the internet.
-
 OWL_DRONE RECE?VER
Receiver made using nrf24l01-mini.
-
 OWLDU?NO(Arduino copy)
is a copy of the arduino
-
 OWL_DRONE_TRNSM?TTER
NOTE: turn off the switch when programming.
-
 Smart Home 2C
Upload the required code to espinstal the blynk appmake adjustmentsPay attention to 220v electricity
-
 Smart Home 5C
Esp'ye gerekli kodu yükleyinblynk uygulamas?n? yükleayarlamalar? yapmak220v elektri?e dikkat edin
-
 Smart Home 1Channle
Upload the required code to espinstal the blynk appmake adjustmentsPay attention to 220v electricity
-
 1x18650 PowerBank board
Charged with micro usb(5V-1A)
-
-
mammoth-3D SLM Voron Toolhead – Manual Drill & Tap Edition
231 0 0 -
-
AEL-2011 Power Supply Module
756 0 2 -
AEL-2011 50W Power Amplifier
630 0 2 -
-
-
Custom Mechanical Keyboard
824 0 0 -
Tester for Touch Screen Digitizer without using microcontroller
448 2 2 -
Audio reactive glow LED wristband/bracelet with NFC / RFID-Tags
402 0 1 -
-


