


|
Raspberry Pi 4 Model B 4GB |
x 1 | |

|
DHT11 Temperature and Relative Humidity Sensor Module |
x 1 | |

|
LCD1602 LCD Display with IIC I2C Serial Interface Adapter Module |
x 1 |
|
|
Raspbian |
|
|
|
Thonny Python |
|
|
|
KiCAD |
Real-time temperature and humidity monitoring using Raspberry Pi and DHT11 (LCD I2C)
Hello!
I want to introduce you to one of the first Raspberry Pi projects, and the next project I will present aims to teach you how to use certain components together with a Raspberry Pi platform. I started learning a few commands in Python (if statements, for or while loops), then, slowly I made the first assembly with a Raspberry Pi and an LED and a resistor. Later, I added other components, which I had in my office drawer; it would be useful for me to have an LCD display (with I2C it's even better) to display some text messages on it; a DHT11 module that measures the temperature and humidity in the room I was in. To carry out this project, I searched the internet for information on how to use the ports on the Raspberry Pi, how to use an LCD display with I2C, or how to use a DHT11 module; then, slowly, I tried to make them work together.
I started using an LED, and found some information; thus, it is necessary to write some commands in the Terminal Window window (as in Figure 1):
sudo apt-get update
sudo apt-get upgrade
sudo apt-get install python3-pip
sudo pip3 install --upgrade setuptools
We enter the commands one by one, after each command we press Enter and wait for the action to be completed.

Figure 1
You can also access the following link for more information https://learn.adafruit.com/circuitpython-on-raspberrypi-linux/installing-circuitpython-on-raspberry-pi .
In order to use a DHT11 module, it is necessary to write some commands again in Terminal Window (Figure 2):
pip3 install adafruit-circuitpython-dht
sudo apt-get install libgpiod2
We enter the commands one by one, after each command we press Enter and wait for the action to be completed.
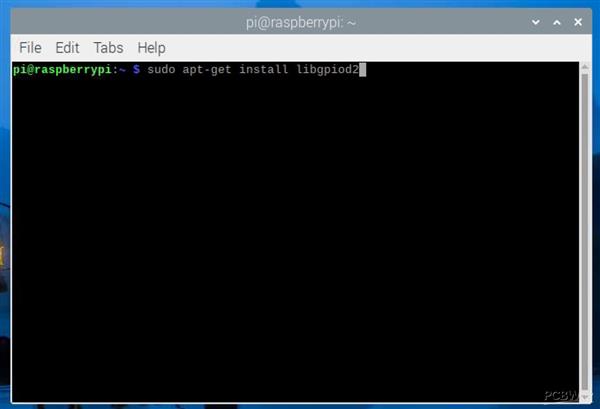
Figure 2
You can also access the following link for more information https://learn.adafruit.com/dht-humidity-sensing-on-raspberry-pi-with-gdocs-logging/python-setup .
Now, we are going to configure the LCD display with I2C interface.
You must enable I2C communication; in Terminal Window we type the command:
sudo raspi-config
The window will open:

Figure 3
Select Interface Options:

Figure 4.
Then I have to enable I2C and press Finish.
From us, in Terminal Wndows we write the following commands:
sudo apt-get install i2c-tools
sudo apt-get install python-smbus
Now, we need to connect the LCD display with the I2C interface to the Raspberry Pi, I am attaching an image to help us:

Figure 5.
Now, connect the I2C LCD to the Raspberry Pi according to the diagram below:

Figure 6.
The SDA pin from the I2C LCD connects to the physical pin no. 3 on the Raspberry Pi platform (GPIO2, which has the SDA function), and the SCL pin from the LCD I2C connects to the physical pin no. 5 (GPIO3, which has the SCL function)
After making the connections, in Terminal Window we write the command below to find the address of our I2C mode (for me it is 0x27):
i2cdetect -y 1.

Figure 7
Now we need to write a code in a file (as the program is too long, I attach this link where you can copy the program https://www.circuitbasics.com/raspberry-pi-i2c-lcd-set-up-and -programming /). Copy the program to Thonny and save the file named I2C_LCD_driver. Don't forget to write to ADDRESS = 0x27 the address from your I2C. Also at this link, you can find some example programs, very useful for a beginner like me.
These are the necessary settings for the project I am going to present to you.
The electronic scheme in which I use a Raspberry Pi, a DHT 11 module, an I2C LCD display and two LEDs, is as follows (Figure 8):

Figure 8.
I recommend using a separate power supply for the I2C LCD, DHT11 (don't forget the ground wire).
This project displays temperatures in degrees Celsius and humidity measured with a DHT11 on an LCD display with I2C interface; also, use two LEDs, if the temperature is higher than 25 degrees Celsius, it means that the room is quite warm and the red indicator light lights up. If the temperature in the room is lower than 25 degrees Celsius, it means that it is good and the green LED lights up.
I hope you enjoyed this little tutorial.
And, the physically made circuit looks like this:

Figure 9
The program can also be run in Thonny, by pressing Run, or in Terminal Window.
Copy the program to Thonny and save the file with any name you want. An important aspect, in order to be able to use the I2C LCD display in this project, these two files must be in the same directory.
Thanks to the PCBWay team!


Real-time temperature and humidity monitoring using Raspberry Pi and DHT11 (LCD I2C)


- Comments(2)
- Likes(0)
 More by cris 🙂
-
 Dynamic decoration with LEDs and more
Hello everyone!As you can see in the title, we have a circuit with LEDs, many LEDs, it's a 4x4 LEDs ...
Dynamic decoration with LEDs and more
Hello everyone!As you can see in the title, we have a circuit with LEDs, many LEDs, it's a 4x4 LEDs ...
-
 LEDs Stars
Hello everyone! I'm signing up for this competition with a small project designed to attract your a...
LEDs Stars
Hello everyone! I'm signing up for this competition with a small project designed to attract your a...
-
 Audio amplifier with LM386 (and BASS boost)
Hello everyone!Circuit descriptionThe LM386 is quite a ve...
Audio amplifier with LM386 (and BASS boost)
Audio amplifier with LM386 (and BASS boost)Hello everyone!Circuit descriptionThe LM386 is quite a ve...
-
 Audio amplifier 25W TDA2030
A fairly well-known and interesting montagePresentationThe presented audi...
Audio amplifier 25W TDA2030
Audio amplifier 25W TDA2030A fairly well-known and interesting montagePresentationThe presented audi...
-
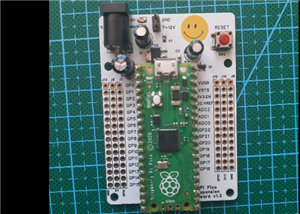 Raspberry Pi Pico Expansion Board
Hello everyone!UPDATE!!!I made some changes, routing in particular, and freed up the board of a few ...
Raspberry Pi Pico Expansion Board
Hello everyone!UPDATE!!!I made some changes, routing in particular, and freed up the board of a few ...
-
 Adjustable voltage power supply
Among the most important electronic devices in the electronics laboratory is the voltage source. Thi...
Adjustable voltage power supply
Among the most important electronic devices in the electronics laboratory is the voltage source. Thi...
-
 Digital Clock with AT89C2051
Circuit OperationShort SW2 presses cycle through displaying the current time in HH:MM and MM:SS form...
Digital Clock with AT89C2051
Circuit OperationShort SW2 presses cycle through displaying the current time in HH:MM and MM:SS form...
-
 Switch based light sensor
Hi!The circuit shown can be used to turn on the light in the garden, or some light panels / advertis...
Switch based light sensor
Hi!The circuit shown can be used to turn on the light in the garden, or some light panels / advertis...
-
 LM3909 flashing indicator
I present to you a circuit which is a little outdated, but quite pleasant for some, I saw that this ...
LM3909 flashing indicator
I present to you a circuit which is a little outdated, but quite pleasant for some, I saw that this ...
-
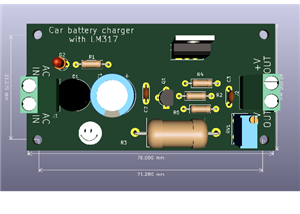 A DIY charger for 12V battery
Hello everyone!I present to you a project that really didn't reach its final state, until recently. ...
A DIY charger for 12V battery
Hello everyone!I present to you a project that really didn't reach its final state, until recently. ...
-
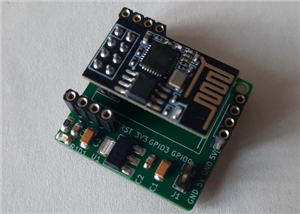 ESP01 board
Hello PCBWayers!You probably know that ESP01S/01 boards can be a little difficult to use in an easie...
ESP01 board
Hello PCBWayers!You probably know that ESP01S/01 boards can be a little difficult to use in an easie...
-
 ESP12F Board
Hello makers!Some time ago I had a shopping coupon and I thought about making some simple PCBs with ...
ESP12F Board
Hello makers!Some time ago I had a shopping coupon and I thought about making some simple PCBs with ...
-
 ATMega32 Board
Hi !I remembered this simple project I made for myself, you can use it with an ATMega32 or ATMega16 ...
ATMega32 Board
Hi !I remembered this simple project I made for myself, you can use it with an ATMega32 or ATMega16 ...
-
 AT90CAN128
Hello makers!Here is a guy who likes to build various, small, electronic circuits, and through this ...
AT90CAN128
Hello makers!Here is a guy who likes to build various, small, electronic circuits, and through this ...
-
 PCBWay 11th Badge Design
Hello PCBwayers!I'm here to participate in the PCBWay 11th Badge Design Contest and after a few idea...
PCBWay 11th Badge Design
Hello PCBwayers!I'm here to participate in the PCBWay 11th Badge Design Contest and after a few idea...
-
 The use of IoT technology for monitoring specific electrical parameters of autonomous power systems
Hello everyone!A brief introduction of this project.What you see presented here is a home made (or D...
The use of IoT technology for monitoring specific electrical parameters of autonomous power systems
Hello everyone!A brief introduction of this project.What you see presented here is a home made (or D...
-
 ESP32 Expansion Board
Expansion board for ESP32Hello everyone!This is my new PCB design. I wanted to share it with you on ...
ESP32 Expansion Board
Expansion board for ESP32Hello everyone!This is my new PCB design. I wanted to share it with you on ...
-
 4 Digits 7 Segments CC Display Module with 74HC595
Hello! This time I want to present an 7-segment four digit display controlled by two 74HC595.The LED...
4 Digits 7 Segments CC Display Module with 74HC595
Hello! This time I want to present an 7-segment four digit display controlled by two 74HC595.The LED...
-
-
-
-
Tester for Touch Screen Digitizer without using microcontroller
323 2 2 -
Audio reactive glow LED wristband/bracelet with NFC / RFID-Tags
306 0 1 -
-
-


