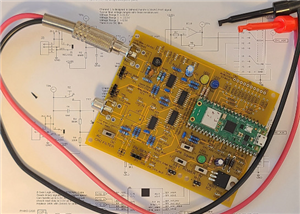
Water Piano - 555 Timer Project
The Water Piano is a classic electronics project. The user spreads a thin layer of water on the tabletop and places a lead from H1 in the water. While holding the other lead (H2), the user touches the water with their finger. The further they contact the water from H1, the higher the resistance of the body+water combination, resulting in a lower frequency tone from the 555. By sliding their finger along the water the user can create beautiful music.
Well, some users can create beautiful music... mostly it is just joyous noise. :-)
The extra 0.130" holes in the board are for use as either mounting points or as strain reliefs for the wires. The most common point of failure on the circuit is wire damage due to metal fatigue... always use stranded wire and ensure the wires are strain relieved to create a durable product.
This circuit certainly isn't my design... it has been around for decades, but this is the board I made for my students. More detail on how it works (including instructions on how to breadboard it, and simulate it on Falstad's Circuit Simulator) at https://botshop.wordpress.com/2017/11/02/the-water-piano/
Water Piano - 555 Timer Project
*PCBWay community is a sharing platform. We are not responsible for any design issues and parameter issues (board thickness, surface finish, etc.) you choose.
- Comments(0)
- Likes(0)
- 0 USER VOTES
- YOUR VOTE 0.00 0.00
- 1
- 2
- 3
- 4
- 5
- 6
- 7
- 8
- 9
- 10
- 1
- 2
- 3
- 4
- 5
- 6
- 7
- 8
- 9
- 10
- 1
- 2
- 3
- 4
- 5
- 6
- 7
- 8
- 9
- 10
- 1
- 2
- 3
- 4
- 5
- 6
- 7
- 8
- 9
- 10
 More by Jason
-
 PiWiBot One
Tethered Mini Sumo robots are a great "Tech Ed" project for high school age students. But what if yo...
-
 RPi Color Organ V2 Gerbers Sept 5
An educational project for Audio, using an XY-P40W Bluetooth receiver as the audio source. The circu...
-
 Scoppy Front End - Mostly Through Hole
The Scoppy Oscilloscope project (https://oscilloscope.fhdm.xyz/) is a very cool 2MS/s Raspberry Pi P...
-
 Water Piano - 555 Timer Project
The Water Piano is a classic electronics project. The user spreads a thin layer of water on the tabl...
-
 Boombot V2 - Edge Board
See the main Boombot V2 - Control Board for details.
-
 Boombot V2 - Joystick Board
See the main project board for more details.
-
 Boombot V2 - Control Board
I haven't completed all of the documentation yet, but will be providing a link to it when I do. Shee...
-
-
mammoth-3D SLM Voron Toolhead – Manual Drill & Tap Edition
201 0 0 -
-
AEL-2011 Power Supply Module
728 0 2 -
AEL-2011 50W Power Amplifier
606 0 2 -
-
-
Custom Mechanical Keyboard
810 0 0 -
Tester for Touch Screen Digitizer without using microcontroller
438 2 2 -
Audio reactive glow LED wristband/bracelet with NFC / RFID-Tags
390 0 1 -
-


