Drawbot Wifi ESP32 GRBL - Drawing Robot Plotter Pen
Overview
The Drawbot is a drawing art robot that can draw. You will needs two stepper motors, a micro servo motor to lift the pen. And of course, you’re going to need the electronic bits to drive it all.
The firmware Drawbot is based on the cool Grbl_Esp32 project of bdring
This project was done for being a good introduction to CNC machines because you can clearly see and learn all the firmware and hardware concepts that involves them in a fun way.
Parts List

Part List of ESP32 Drawing Robot Shield:
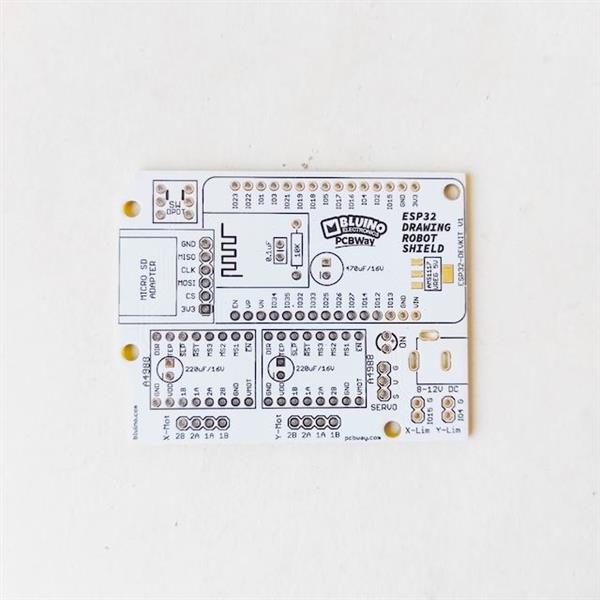
- 1 x PCB ESP32 Drawing Robot Shield
- 1x ESP32 DEVKIT V1 board
- 2x Driver Stepper Motor A4988
- 2x Micro-SD Adapter module
- 1x LED 3mm
- 1x V-Regulator 5V AMS1117 (SMD)
- 1x Resistor 10K Ohm
- 1x Capacitor 0.1uF
- 2x Capacitor 100uF/16V
- 1x Capacitor 1000uF/16V
- 1x DPDT Lock Switch 8.5x8.5mm
- 1x Barel Socket DC
- 2x Female Header 15 pin
- 4x Female Header 8 pin
- 2x Male Header 4 pin
- 1x Male Header 3 pin
- 2x Male Header 2 pin

You can download design file Drawbot frame for 3D printed part here thingiverse.com/thing:2349232
Part List of Eggbot:
- 1x Controller ESP32 + A4988 + Shield Drawbot
- 2x Stepper Motor Nema17
- 1x Servo MG90
- 1x MicroSD 8GB
- 2x micro Limit switch + cable X & Y
- 5x Bearing
- 8x Sliding Bearing 8mm
- 1x GT2 Belt 2Meter
- 1x Power supply 3A 8V
- 1x Frame Set Acrylic Hitam
- 4x Stainless Shaft diameter 8mm
- 1x Stainless Shaft M8
- 2 x Stainless Shaft diameter 3mm
- 1x Set Support 3D Printed part
- Set Baud and Nut M2, M3, M4, M8
- 1x Marker/Pen
Circuit Diagram

PCB (PCBWay)
This article is proudly sponsored by PCBWAY.
To make this project you need to order a prototype PCB on PCBWAY. How to order is very easy and you will get 10 Pcs PCB for $5 with very great PCB quality.

Soldering SMD
This shield has one SMD component, it is not too difficult to solder because the size of the SMD component is quite large, so don't worry. You will need tweezers as a tool to hold the components when soldered.

Soldering MicroSD Module
Solder 8 pin male header to microSD adapter module.

Remove plastic holder use pliers

Attach microSD adapter with male header soldered to PCB.

Solder pins male header on the back of PCB.

Cut the long legs male header.

Soldering Components
After finish solder SMD component and microSD adapter, next attach other trough hole components on the PCB following the pictures and symbols on the PCB.

Solder all the component legs on the back of the PCB.
Cut all the long legs of the component wire.

Attach Modules
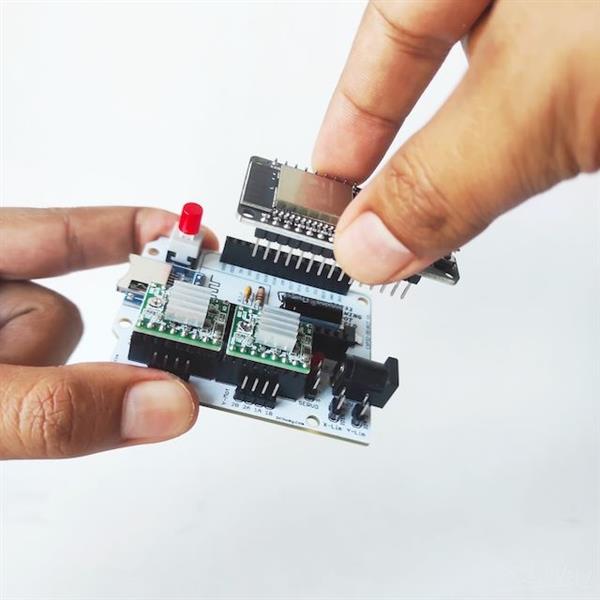
Attach the ESP32 board and two Driver Stepper Motor A4988 into the female header socket as shown, look at the pin name dont get the wrong orientation.


Drawbot Wifi ESP32 GRBL - Drawing Robot Plotter Pen
*PCBWay community is a sharing platform. We are not responsible for any design issues and parameter issues (board thickness, surface finish, etc.) you choose.
- Comments(3)
- Likes(9)
-
 Javier Alejandro Ortmann
Mar 30,2025
-
 ayhani
Aug 12,2024
-
 Engineer
Jul 29,2024
-
 Engineer
Feb 01,2024
-
 Engineer
Dec 19,2023
-
 ChanchalSakarde
Jun 30,2023
-
 Engineer
Oct 16,2022
-
 myjo12
Sep 18,2022
-
 Andreas Spinos
Mar 12,2022
- 1 USER VOTES
- YOUR VOTE 0.00 0.00
- 1
- 2
- 3
- 4
- 5
- 6
- 7
- 8
- 9
- 10
- 1
- 2
- 3
- 4
- 5
- 6
- 7
- 8
- 9
- 10
- 1
- 2
- 3
- 4
- 5
- 6
- 7
- 8
- 9
- 10
- 1
- 2
- 3
- 4
- 5
- 6
- 7
- 8
- 9
- 10
-
10design
-
10usability
-
10creativity
-
7content
 More by Bluino Bluino
-
 ESP32 IoT Starter Shield Version 3
Learn Basic IoT use ESP32 boards is very easy with ESP32 IoT Starter Kit board and following the 110...
-
 ESP32-Cam Motor Driver Shield L293D
Android App: ESP32 Camera Wifi Robot CarTutorial Assembly:https://www.instructables.com/DIY-ESP32-Ca...
-
 LED Blinking Robot Badge - Soldering Kit
This article is proudly sponsored by PCBWAY.PCBWAY make high quality prototyping PCBs for people all...
-
 3 Panel LED Dot Matrix MAX7219 for Common Anode Dot Matrix
Part List per Panel:1 x PCB LED Dot Matrix MAX7219 (PCBWay)1 x Led Dot Matrix 8x8 Common Anode1 x IC...
-
 2 Panel LED Dot Matrix MAX7219 for Common Anode Dot Matrix
Part List per Panel:1 x PCB LED Dot Matrix MAX7219 (PCBWay)1 x Led Dot Matrix 8x8 Common Anode1 x IC...
-
 IoT Basic Kit ESP8266 Wemos D1 Mini
Part List:1 x PCB IoT Basic Kit (PCBWay)1 x ESP8266 Wemos D1 Mini board1 x OLED I2C 128x641 x Humidi...
-
 ESP32 IoT Basic Shield
Part List:1 x PCB ESP32 Basic Shield (PCBWay)1 x ESP32 DEV KIT V1 board1 x LED 5mm1 x LED 3mm1 x Act...
-
 Nodemcu Amica ESP8266 IoT Starter Shield
Learn Basic IoT use ESP8266 boards is very easy with Nodemcu IoT Starter Shield board and following ...
-
 ESP32 Motor Shield 2WD
Control Robot Car 4WD Mecanum Wheel use app Android, install app here:https://play.google.com/store/...
-
 ESP32 Motor Shield 4WD Mecanum Wheel
Control Robot Car 4WD Mecanum Wheel use app Android, install app here:https://play.google.com/store/...
-
 ESP32 IoT Starter Shield Ver 2.0
The difference from the previous version is that there is an additional slot for the HCSR04 ultrason...
-
 nanBluino - DIY Arduino Nano USB Type-C
Overview"Arduino is an open-source electronics prototyping platform based on flexible, easy-to-use h...
-
 Drawbot Wifi ESP32 GRBL - Drawing Robot Plotter Pen
OverviewThe Drawbot is a drawing art robot that can draw. You will needs two stepper motors, a micro...
-
 Topeduino - DIY Arduino Uno USB Type-C use Solder Paste Stencil
Overview"Arduino is an open-source electronics prototyping platform based on flexible, easy-to-use h...
-
 Eggbot Wifi ESP32 - Drawing Robot Plotter Pen
OverviewThe Eggbot is a drawing art robot that can draw on spherical or egg-shaped objects. You coul...
-
 ESP32 Balancing Robot Shield
Part list:1 x PCB ESP32 Balancing Robot Shield (PCBWay)1 x ESP32 DEVKIT V1 board2 x Stepper Motor Dr...
-
 Pi Pico Starter Shield
Easy Way to Started learn Raspberry Pi Pico, based on official tutorial download Get Started Pi Pico...
-
 ESP32 IoT Starter Kit
Learn Basic IoT use ESP32 boards is very easy with ESP32 IoT Starter Kit board and following the 110...
-
-
AEL-2011 Power Supply Module
528 0 2 -
AEL-2011 50W Power Amplifier
492 0 2 -
-
-
Custom Mechanical Keyboard
700 0 0 -
Tester for Touch Screen Digitizer without using microcontroller
331 2 2 -
Audio reactive glow LED wristband/bracelet with NFC / RFID-Tags
312 0 1 -
-
-


