|
|
LEDS 3MM |
x 5 | |
|
|
CR2032 BATTERY HOLDER |
x 1 |
Happy Halloween Badge #Badgelife Cute Ghost
Hey , it has been half a month doing no projects and no blogs due to the pandemic n-cov19 . I hope you all are fine and safe , warm wishes to all my supporters and friends .
Well today i would like to add some joy to all the families , relations and friendship by sharing a simple project the HAPPY HALLOWEEN BADGE . During this time we might not be able to get together with our friends and near ones for the Halloween 2020 but we can celebrate it with our wishes , gifts and surprises , we can add lights to our joy and make it decorated as much as we can .
I am excited to share the HAPPY HALLOWEEN BADGE that has a cute ghost shaped structure and a witched hat . The simple circuit in this Badge makes it more special .
5 leds of 3mm which can be bought from pcbway itself , how??? its simple just visit the link and purchase it for beans or coupons , 500pcs of 5 different colours can really blow your mind.
Back to project - This badge can be used as a decorated piece in your house or workplace. I have been continously upgrading myself on the creation of badges and that's how i now used the compact 20mm CR2032 Coin cell battery socket which can be seen on the top (circle) on the pcb.
Currently i couldn't find a badge butterfly pin here in my country so i have planned to use a safety pin or a small dress pin to keep the badge intact with my clothes :)
So keeping in mind that this badge can be internationally used i have made an exposed copper space for soldering the pin to the badge , if you have the butterfly brotch pin available you can solder the base pin there on the copper space.

3D DESIGN OF THE BADGE , i used a RGB leds at the base but you can solder any colour led according to your need.

The arrow in the below photo shows the Positive terminals that i have marked too.

How is build this project?? and how did i planned it??
I am quite excited for halloween celebrations and that's how i started working on this 2 months before . i started with a halloween Pumpkin Badge , after a couple of days i realized that pumpkin as a badge doesn't suits my excitement.
After few days i was busy giving the examinations and so i summed up with one month with no work on this badge . From september 10 I decided to make a witch with a magical broom in her hand but that also rised an issue that i cant fix the CR2032 battery in a small sized pcb since the Pcb size was just 20mm by 25mm later i increased the dimensions, edited the layers and finalized it but unfortunately i couldnt fix the error .
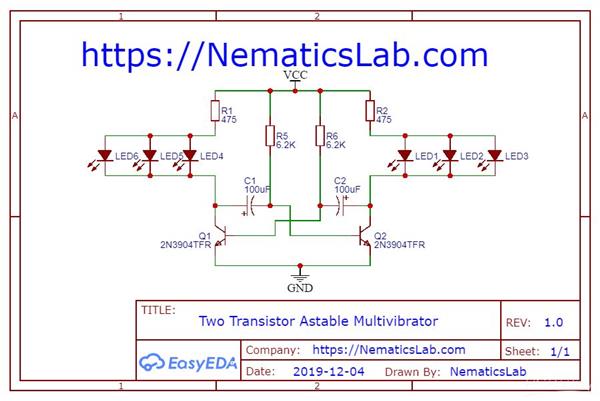
Finally after exploring the web i came to a circuit by Nematics.

https://nematicslab.com/how-to-make-custom-pcb-badge-diy/
This guy used an astable two transistor circuit which made me quite excited to work with , then i though of using this circuit but the problem i faced is that i dont have money to buy a SMD soldering kit , which bought me to an end that i layered a cute ghost and added the very simple circuitry of 5 3mm DIP LEDS and The CR2032 battery socket.
And the idea of using the 3MM LEDS i thought of is because these LEDS were available in the PCBWAY's Free gift shop and they were quite worth for 500pcs.
Also you can learn to solder the SMD coin cell holder and The THT leds so is it a solder kit?? :)
I know i am late sharing this project but i believe pcbway's 24hours speed of manufacturing capability can fulfill this order at the earliest for you ..
Your support for this project can help me upgrade my badge-making capability in future ...
I have also ordered this pcb and must reach me in a good time span , i will be updating you with the project photos and some videos !!!
as a conclusion i can say this project was a huge experience to me...
Thanks for your eye on this blog.
Wish you and your family a good health , stay safe stay tuned
Regards
Amit
PsElectroBot

Happy Halloween Badge #Badgelife Cute Ghost
*PCBWay community is a sharing platform. We are not responsible for any design issues and parameter issues (board thickness, surface finish, etc.) you choose.
- Comments(0)
- Likes(2)
-
 Ernie Suarez
Dec 26,2021
-
 PsElectroBot
Oct 15,2020
- 0 USER VOTES
- YOUR VOTE 0.00 0.00
- 1
- 2
- 3
- 4
- 5
- 6
- 7
- 8
- 9
- 10
- 1
- 2
- 3
- 4
- 5
- 6
- 7
- 8
- 9
- 10
- 1
- 2
- 3
- 4
- 5
- 6
- 7
- 8
- 9
- 10
- 1
- 2
- 3
- 4
- 5
- 6
- 7
- 8
- 9
- 10
 More by PsElectroBot
-
 NeoPixel Desk Light
Hi there,Very much excited to discuss that I have successfully completed the last project of the yea...
-
 Happy Halloween Badge #Badgelife Cute Ghost
Hey , it has been half a month doing no projects and no blogs due to the pandemic n-cov19 . I hope y...
-
 WS2812b ESP8266 PCB
What is it?This is a PCB kit that teaches you smd soldering the capacitors , resistors , ESP8266MOD ...
-
 ESP8266 12F/12E MODULE BASED RGB CONTROLLER
This project is based on ESP8266 12F/12E WIFI MODULE.. This project is my first project on ESP8266MO...
-
 RFID BASED ARDUINO UNO LCD 1602 PROJECT PCB
#### What is it?This is an Arduino uno based RFID RC522 lcd 1602 prototype PCB, the PCB design is be...
-
 Arduino nano based battery capacity tester
This is a modified project which was originally made by open green energy. i designed the PCB to my ...
-
-
mammoth-3D SLM Voron Toolhead – Manual Drill & Tap Edition
258 0 0 -
-
AEL-2011 Power Supply Module
783 0 2 -
AEL-2011 50W Power Amplifier
651 0 2 -
-
-
Custom Mechanical Keyboard
844 0 0 -
Tester for Touch Screen Digitizer without using microcontroller
468 2 2 -
Audio reactive glow LED wristband/bracelet with NFC / RFID-Tags
416 0 1 -
-


