
|
arduino IDEArduino
|
Make a PoV Display with ATtiny13 for $1
PoV Display with ATtiny13 for $1
I was browsing through AliExpress sometime back and this particular listing caught my attention.
5 Pcs of ATtiny13 microcontrollers for ?124, that's like $1.5.
That's like $0.3 (?25) per MCU.
Isn't that amazing, a programmable microcontroller! for ?25.
I googled "ATtiny13 Arduino" and yes, ATtiny13 is supported by Arduino. AWESOME.
So I immediately placed the order.AliExpress takes a heck load of time to deliver to India.I almost forgot that I even placed the order.After one month or so the package arrived.
ATtiny13 has limited library support, so I was not able to do anything with it, other than blink an LED.
A project that I did a long time ago came to my mind as I thought of what more I could do.It was a PoV display using ATtiny85.PoV Displays are basically a bunch of blinking LEDs with some carefully placed delay.Both ATtiny85 and ATtiny13 have the same pinout.
The total cost of the components for this project is under $1. If you are in India you can get the ATtiny Microcontroller from this link.
You will be needing these components for this project
1 x ATtiny13
5 x 3mm LEDs (5mm LED will also work, 3mm looks better as you can put them much closer in PCB)
1 x CR2012 Battery
1 x CR2012 Battery holder
1 x Slide Switch
Prototyping PCB or My Custom PCB
Soldering Iron
What are PoV Displays and how do they work?
According to Wikipedia, the Persistence of vision is the optical illusion that occurs when visual perception of an object does not cease for some time after the rays of light proceeding from it have ceased to enter the eye.
If you look at a normal display the pixels are arranged in a matrix fashion.But in a PoV display Pixels/LEDs are arranged as an array.How does it display anything you may ask, that's where the Persistence of vision comes into play.Our eyes won't be seeing different columns of LEDs, they would see what appears to be a proper image.

Setting up Arduino IDE for ATtiny13
You might be looking at the ATtiny13 and wondering "How the heck am I supposed to program this thing, it doesn't have any USB port like an Arduino".
Well to program this Microcontroller you need another Arduino, something like Arduino Nano or Arduino Uno.
Download and install Arduino IDE from this link.
Connect your Arduino Nano / Uno to the computer using a USB cable.
Open Tools -> Boards and Select your board (Uno / Nano not ATtiny13).
Open Tools -> Boards and Select your board (Uno / Nano not ATtiny13).
Now we need to convert our Arduino into a programmer (Yeah, we can do that)
In Arduino IDE,
Open File -> Examples -> 11.ArduinoISP -> ArduinoISP
Open File -> Examples -> 11.ArduinoISP -> ArduinoISP
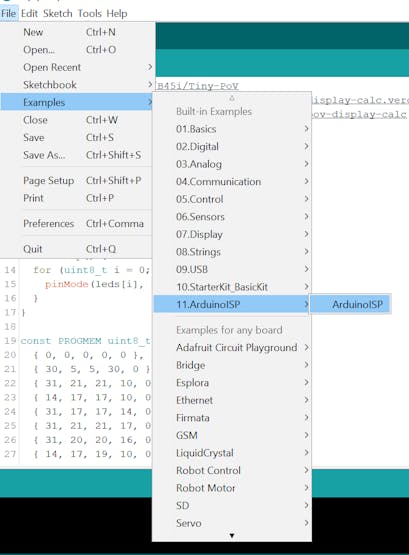
and click Upload Button.
If the upload is successful then you can use your Arduino to program other microcontrollers.
Now we need to install the hardware package for ATtiny13 on Arduino IDE as the IDE doesn't support ATtiny13 by default.
Open File -> Preferences -> Additional Boards Manager URLs
Open File -> Preferences -> Additional Boards Manager URLs
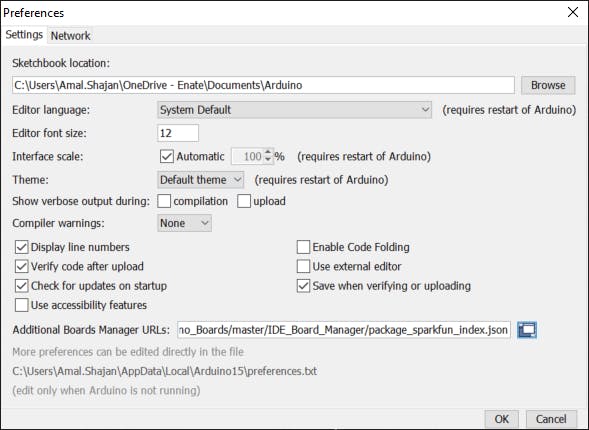
and paste this
https://mcudude.github.io/MicroCore/package_MCUdude_MicroCore_index.json
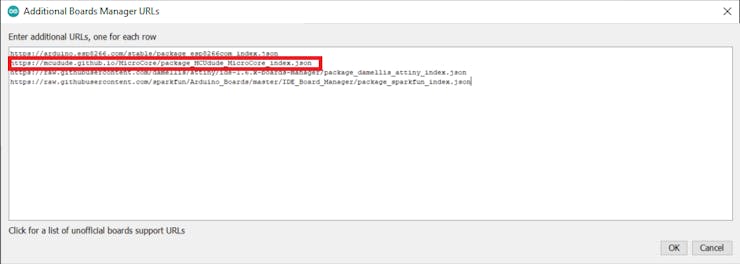
Then
Open Tools -> Board -> Boards manager.
Open Tools -> Board -> Boards manager.
Find MicroCore from the list and click install.
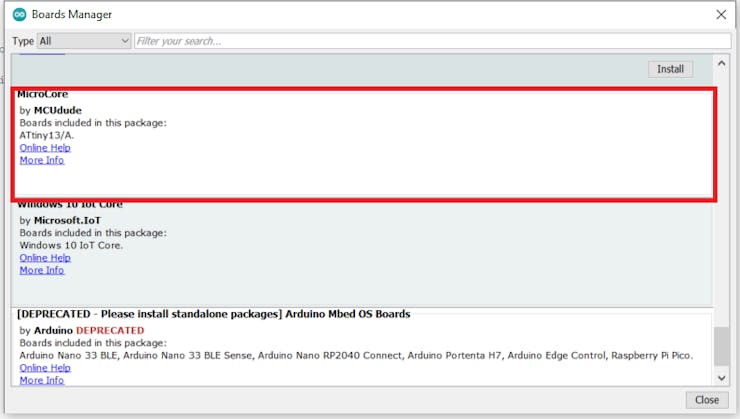
Now you will be able to select ATtiny13 from arduino IDE
Select Tools -> Board -> MicroCore -> ATtiny13
Select Tools -> Board -> MicroCore -> ATtiny13
We need to change few more options in Arduino IDE
Open Tools
Open Tools
and set the following values
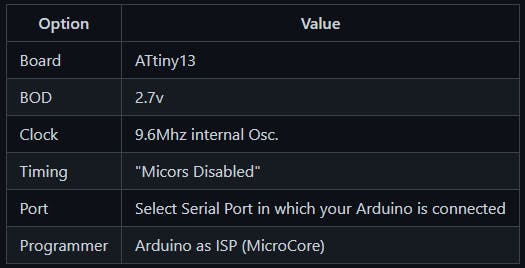
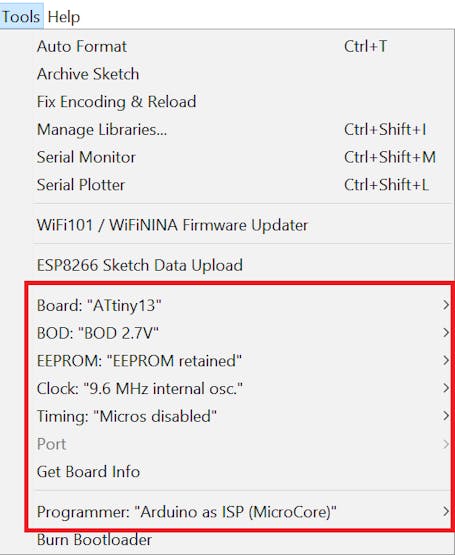
Programming the ATtiny13
Now it's time to connect ATtiny to our Arduino.
Connect ATtiny to Arduino as follows (In ATtiny Pin 1 will be marked using a dot .)
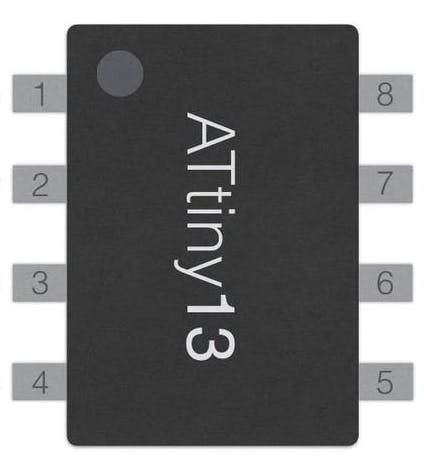
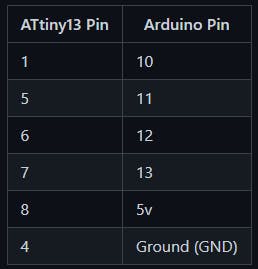
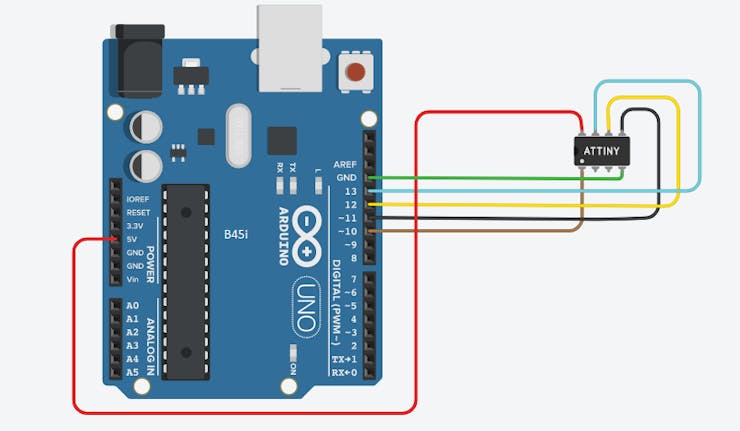
Burning Bootloader to ATtiny13
This is a one time setup, you DON'T have to repeat it every time you upload code to ATtiny
Click Tools -> Burn Bootloader
Click Tools -> Burn Bootloader
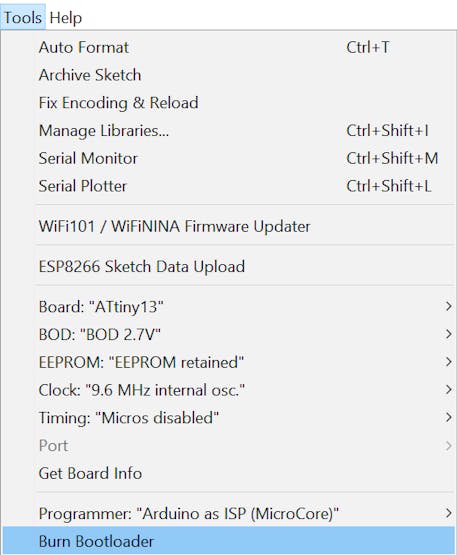
This will burn the bootloader to the ATtiny, now you can upload programs to ATtiny using Arduino IDE.
Uploading PoV program to ATtiny
Open a new Sketch in Arduino.
Copy code from this link and paste it into the newly created sketch.
If you want to change the text change the text on this line:
displayString("HELLO 123 "); // replace with your text
Based on the speed of the motor you are going to use, you might want to adjust the code, update variables DELAY_TIME and CHAR_BREAK
Code Explanation
You might be staring at the code and wondering how some random numbers can represent a character, how we can use them to blink LEDs properly.
You might be familiar with using an array to represent characters and images.Something Like this:
int a[][5] = {
{0, 1, 1, 0, 0},
{1, 0, 0, 1, 0},
{1, 1, 1, 1, 0},
{1, 0, 0, 1, 0},
{1, 0, 0, 1, 0},
};
for (int i = 0; i < 5; i++) {
for (int j = 0; j < 5; j++) {
digitalWrite(LEDs[j], a[j][i]);
}
}
But this method will take up lots of memory, And we’ll have to use multiple loops to iterate over them.
Now, that’s not a great approach for an ATtiny13 which doesn't have much processing power.
Flagged Enums to the rescue !
Instead of representing a character using a matrix, we represent it using an array.Our PoV display has 5 rows and 5 columns, so we will use an array of length 5.
Each element in that array will tell us if we need to turn on a particular led or not.
We assign a number (enum) to each LEDs, these numbers will be powers of 2.
LED Enum LED 1 20 = 1 LED 2 21 = 2 LED 3 22 = 4 LED 4 23 = 8 LED 5 24 = 16
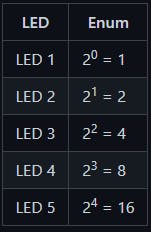
These numbers have a speciality, no matter what the combination, you will get a unique number if you add them.
For Eg: If we add 2, 4 and 8 we will get 14, no other combination of these numbers will generate 14.
If an LED is off, we represent it using 0.
Let's look at how we can represent the letter "A".

In the first column, we have to turn off LED1 and turn on all other ones. So, we can represent it using 0 (LED1 is off )+ 2 + 4 + 8 + 16 = 30.
Elements in array will be:
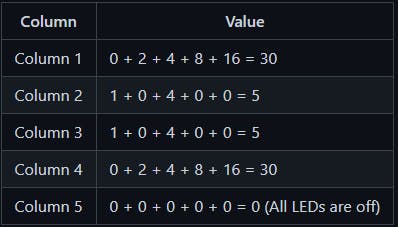
It’s simple, You do a bitwise AND operation with the number and the enum for the LED, if the results are enum then we need to turn on the corresponding LED.
Let’s consider number 30
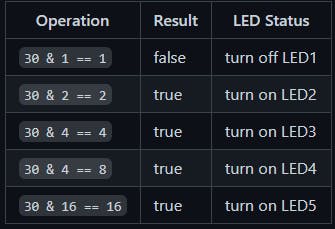
This concept is commonly known as flagged enums.
You can add more than just alphabets and numbers.
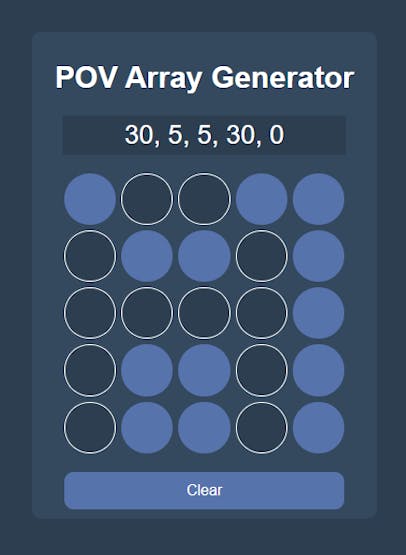
Manually generating these arrays is hard. so I made not one but two apps for this.
The first one is written in Preact and it was specifically made for this project, it supports up to 5 LEDs.
The second one is written in Angular and it can support n number of LEDs,
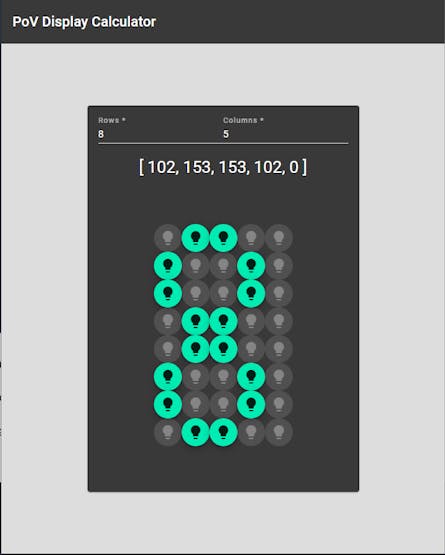
You can use these apps to generate code for other PoV projects as well
Just generate arrays using these apps and add that code to the array in the sketch.
Building PoV Display Circuit
The PoV display Circuit is fairly simple.You can wire up the circuit using the following circuit diagram.
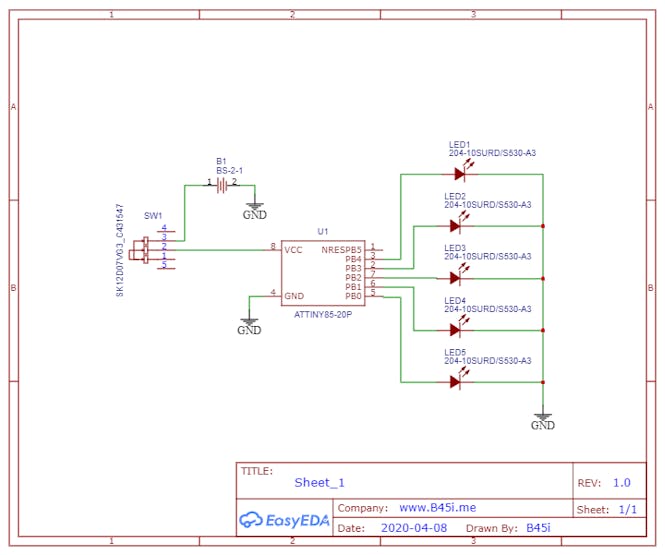
You can use a Prototyping PCB to solder the circuit.
I've designed a PCB for this circuit.If you are using the PCB, then you don't have to do any wiring, just solder the components.
You can order the PCBs from here if you’d like to.
or you can download the PCB files form here and order them from your favourite fab house.
Solder everything, Add battery, Turn on the switch and attach it to something that rotates, like a mini motor or even fan(Don't forget to adjust the delay in code based on the angular velocity, this might take some trial and error).
And that's it, now you have a PoV display, you will be able to see the letters on a moving object Have fun.
Make a PoV Display with ATtiny13 for $1
*PCBWay community is a sharing platform. We are not responsible for any design issues and parameter issues (board thickness, surface finish, etc.) you choose.
- Comments(0)
- Likes(11)
- 2 USER VOTES
- YOUR VOTE 0.00 0.00
- 1
- 2
- 3
- 4
- 5
- 6
- 7
- 8
- 9
- 10
- 1
- 2
- 3
- 4
- 5
- 6
- 7
- 8
- 9
- 10
- 1
- 2
- 3
- 4
- 5
- 6
- 7
- 8
- 9
- 10
- 1
- 2
- 3
- 4
- 5
- 6
- 7
- 8
- 9
- 10
-
10design
-
10usability
-
10creativity
-
10content

-
10design
-
10usability
-
10creativity
-
10content
 More by Amal S
-
 Make a PoV Display with ATtiny13 for $1
PoV Display with ATtiny13 for $1I was browsing through AliExpress sometime back and this particular ...
-
 ESP8266 IoT Relay Board for Home Automation
Will be added later
-
 Talking Smart Glass For Blind
There are multiple smart accessories such as smart glasses, smart watch...
Talking Smart Glass For Blind
Talking Smart Glass For BlindThere are multiple smart accessories such as smart glasses, smart watch...
-
-
AEL-2011 Power Supply Module
525 0 2 -
AEL-2011 50W Power Amplifier
485 0 2 -
-
-
Custom Mechanical Keyboard
693 0 0 -
Tester for Touch Screen Digitizer without using microcontroller
330 2 2 -
Audio reactive glow LED wristband/bracelet with NFC / RFID-Tags
310 0 1 -
-
-


