
|
arduino IDEArduino
|
|

|
Thonny IDE |
|

|
PyCharm |
|

|
MicroPython |
|

|
Arduino Web Editor |
STM32F4 black pill EByte LoRa E32 E22 E220 shield v1.0
Detailed information on my site
For LoRa E32, LoRa E22 and LoRa E220
I start using STM32 microcontrollers, and I find they a superior quality. But I need some prototyping board to do my work faster.
So here is a prototype board to develop the LoRa application. As usual, I use EByte modules, and this board is fully compatible with E32, E22, and E220.
STM32F4 black-pill pinout
As you can see in the pinout diagram you can find more than one Serial interface. In this board, I add jumpers to select Serial1 (Tx -> PA9, Rx->PA10) and Serial2 (Tx -> PA2, and Rx->PA3) interface.
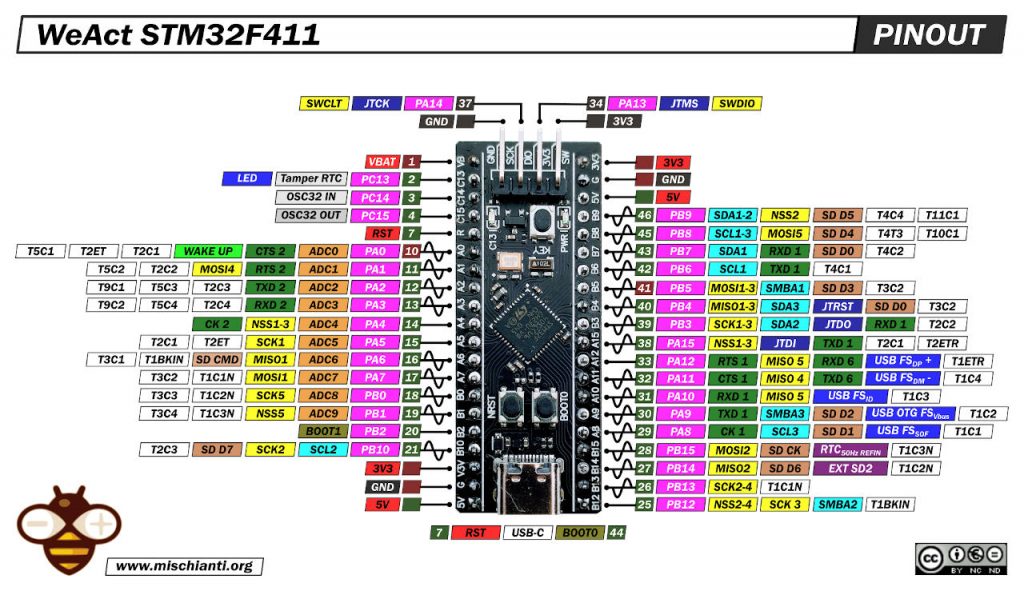
The selectable pins are also AUX, M0 and M1.
Here my selection of STM32 STM32F103C8T6 STM32F401 STM32F411 ST-Link v2 ST-Link v2 official
For AUX I put PA0 (or WAKE pin) and PA1, for M0 you can select B0 and B1, for M1 the B2 and B10.
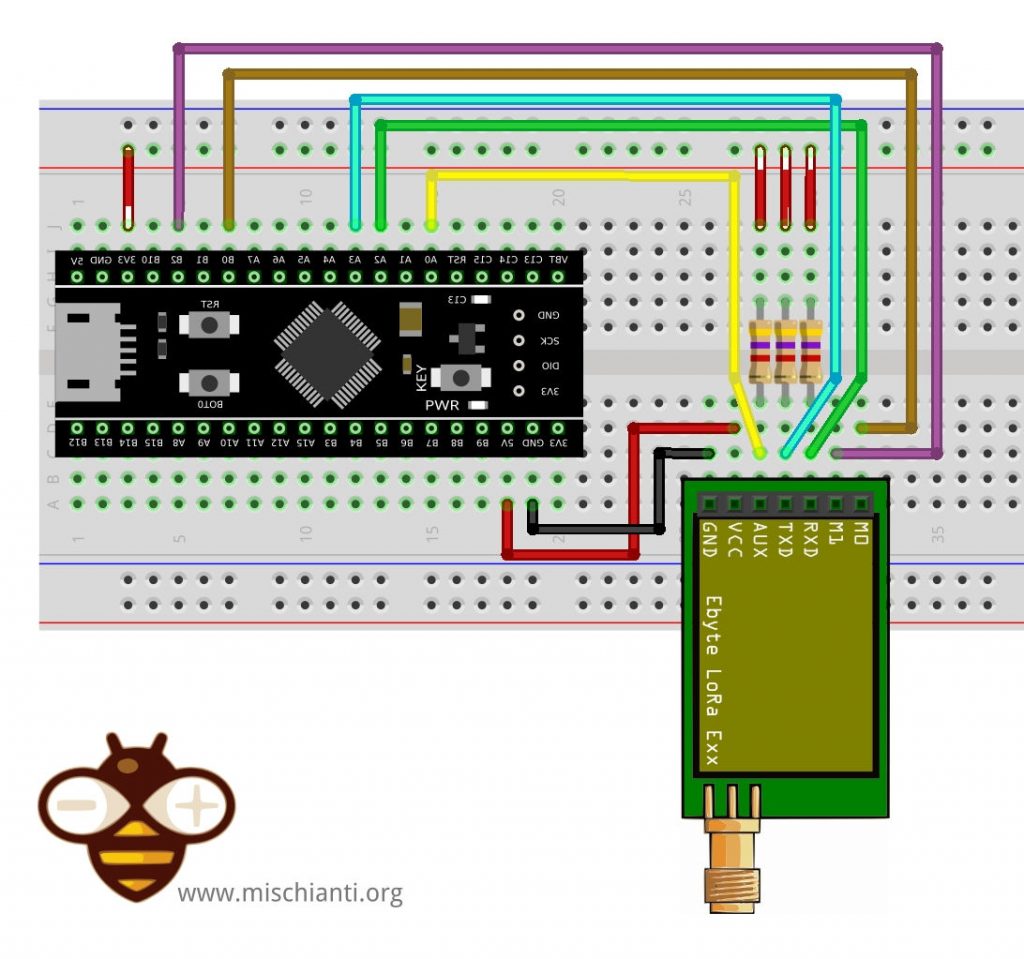
You can also put M0 and M1 in fixed mode and select the static status in the DIP-switch.
PCB
As usual, I create a PCB that can be milled, so when I send It to the factory for production, I’m sure that it works correctly.
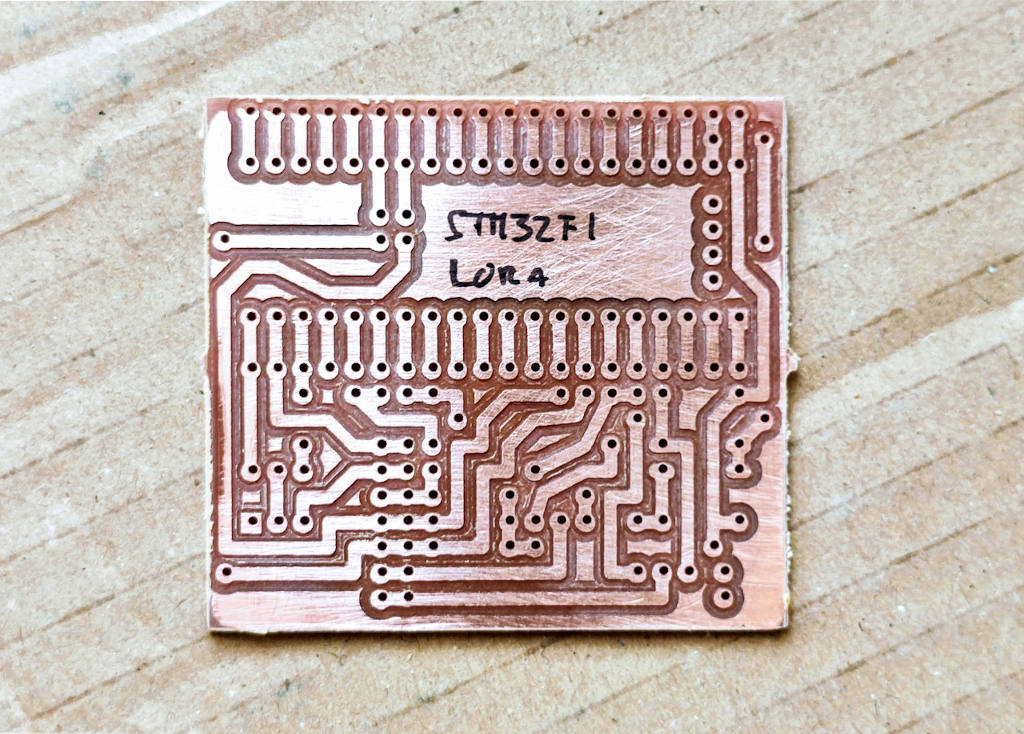
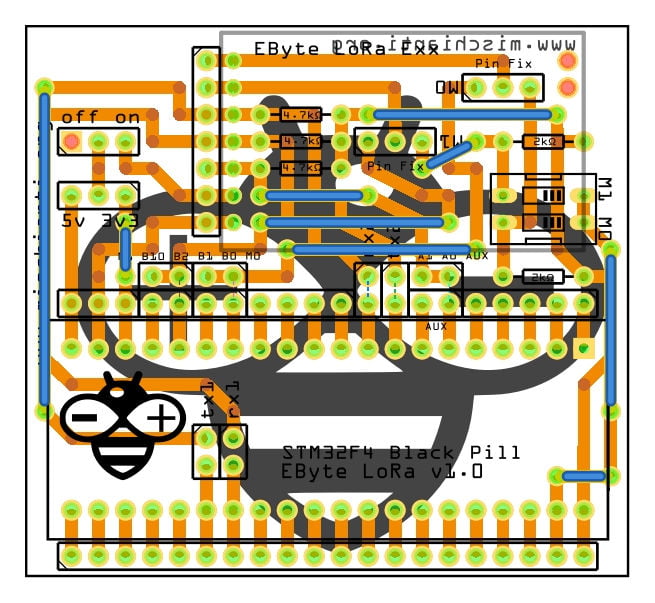
The design is quite simple, you can check the connection in the PCB schema:
HardwareSerial Serial2(USART2); // PA3 (RX) PA2 (TX) LoRa_E32 e32ttl(&Serial2, PA0, PB0, PB10); // Serial2 AUX M0 M1
But, as already described, you can select with the jumpers other configuration:
Serial1 (Tx->PA9, Rx->PA10) or Serial2 (Tx->PA2, Rx->PA3);
AUX with PA0 (or WAKE pin) and PA1;
M0 you can select B0 and B1;
M1 you can select B2 and B10.
Here is the PCB description to better understand.
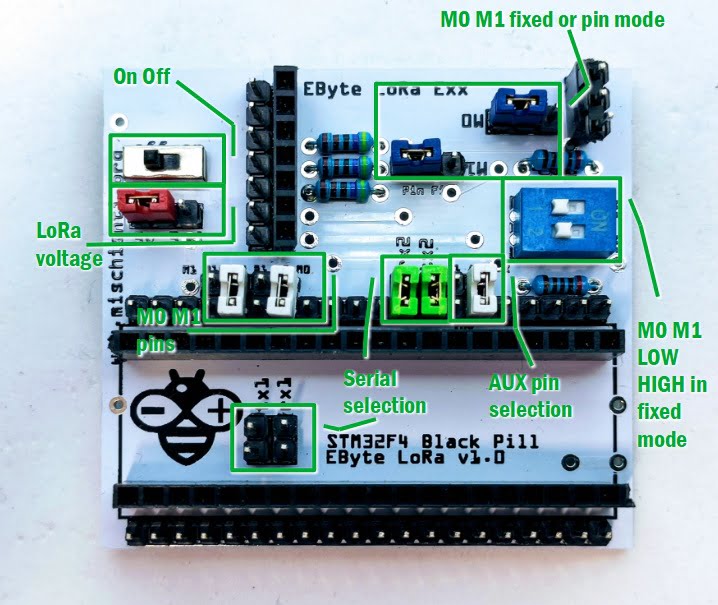
Configuration
Here is the standard configuration for the relative library
HardwareSerial Serial2(USART2); // PA3 (RX) PA2 (TX) ?LoRa_E32 e32ttl(&Serial2, PA0, PB0, PB10); // Serial2 AUX M0 M1
Example with Arduino EByte LoRa E220 library
/* * LoRa E220 * Get configuration. * You must uncommend the correct constructor. * * by Renzo Mischianti <https://www.mischianti.org> * * https://www.mischianti.org * * E220 ----- WeMos D1 mini ----- esp32 ----- Arduino Nano 33 IoT ----- Arduino MKR ----- Raspberry Pi Pico ----- stm32 ----- ArduinoUNO * M0 ----- D7 (or 3.3v) ----- 19 (or 3.3v) ----- 4 (or 3.3v) ----- 2 (or 3.3v) ----- 10 (or 3.3v) ----- PB0 (or 3.3v) ----- 7 Volt div (or 3.3v) * M1 ----- D6 (or 3.3v) ----- 21 (or 3.3v) ----- 6 (or 3.3v) ----- 4 (or 3.3v) ----- 11 (or 3.3v) ----- PB10 (or 3.3v) ----- 6 Volt div (or 3.3v) * TX ----- D3 (PullUP) ----- TX2 (PullUP) ----- TX1 (PullUP) ----- 14 (PullUP) ----- 8 (PullUP) ----- PA2 TX2 (PullUP) ----- 4 (PullUP) * RX ----- D4 (PullUP) ----- RX2 (PullUP) ----- RX1 (PullUP) ----- 13 (PullUP) ----- 9 (PullUP) ----- PA3 RX2 (PullUP) ----- 5 Volt div (PullUP) * AUX ----- D5 (PullUP) ----- 18 (PullUP) ----- 2 (PullUP) ----- 0 (PullUP) ----- 2 (PullUP) ----- PA0 (PullUP) ----- 3 (PullUP) * VCC ----- 3.3v/5v ----- 3.3v/5v ----- 3.3v/5v ----- 3.3v/5v ----- 3.3v/5v ----- 3.3v/5v ----- 3.3v/5v * GND ----- GND ----- GND ----- GND ----- GND ----- GND ----- GND ----- GND * */ #include "Arduino.h" #include "LoRa_E220.h" // ---------- esp8266 pins -------------- //LoRa_E220 e220ttl(RX, TX, AUX, M0, M1); // Arduino RX <-- e220 TX, Arduino TX --> e220 RX //LoRa_E220 e220ttl(D3, D4, D5, D7, D6); // Arduino RX <-- e220 TX, Arduino TX --> e220 RX AUX M0 M1 //LoRa_E220 e220ttl(D2, D3); // Config without connect AUX and M0 M1 //#include <SoftwareSerial.h> //SoftwareSerial mySerial(D2, D3); // Arduino RX <-- e220 TX, Arduino TX --> e220 RX //LoRa_E220 e220ttl(&mySerial, D5, D7, D6); // AUX M0 M1 // ------------------------------------- // ---------- Arduino pins -------------- //LoRa_E220 e220ttl(4, 5, 3, 7, 6); // Arduino RX <-- e220 TX, Arduino TX --> e220 RX AUX M0 M1 //LoRa_E220 e220ttl(4, 5); // Config without connect AUX and M0 M1 //#include <SoftwareSerial.h> //SoftwareSerial mySerial(4, 5); // Arduino RX <-- e220 TX, Arduino TX --> e220 RX //LoRa_E220 e220ttl(&mySerial, 3, 7, 6); // AUX M0 M1 // ------------------------------------- // ------------- Arduino Nano 33 IoT ------------- // LoRa_E220 e220ttl(&Serial1, 2, 4, 6); // RX AUX M0 M1 // ------------------------------------------------- // ------------- Arduino MKR WiFi 1010 ------------- // LoRa_E220 e220ttl(&Serial1, 0, 2, 4); // RX AUX M0 M1 // ------------------------------------------------- // ---------- esp32 pins -------------- // LoRa_E220 e220ttl(&Serial2, 15, 21, 19); // RX AUX M0 M1 //LoRa_E220 e220ttl(&Serial2, 22, 4, 18, 21, 19, UART_BPS_RATE_9600); // esp32 RX <-- e220 TX, esp32 TX --> e220 RX AUX M0 M1 // ------------------------------------- // ---------- Raspberry PI Pico pins -------------- // LoRa_E220 e220ttl(&Serial2, 2, 10, 11); // RX AUX M0 M1 // ------------------------------------- // ---------------- STM32 -------------------- HardwareSerial Serial2(USART2); // PA3 (RX) PA2 (TX) LoRa_E220 e220ttl(&Serial2, PA0, PB0, PB10); // RX AUX M0 M1 // ------------------------------------------------- void printParameters(struct Configuration configuration); void printModuleInformation(struct ModuleInformation moduleInformation); void setup() { Serial.begin(9600); while(!Serial){}; delay(500); Serial.println(); // Startup all pins and UART e220ttl.begin(); ResponseStructContainer c; c = e220ttl.getConfiguration(); // It's important get configuration pointer before all other operation Configuration configuration = *(Configuration*) c.data; Serial.println(c.status.getResponseDescription()); Serial.println(c.status.code); printParameters(configuration); ResponseStructContainer cMi; cMi = e220ttl.getModuleInformation(); // It's important get information pointer before all other operation ModuleInformation mi = *(ModuleInformation*)cMi.data; Serial.println(cMi.status.getResponseDescription()); Serial.println(cMi.status.code); printModuleInformation(mi); } void loop() { } void printParameters(struct Configuration configuration) { Serial.println("----------------------------------------"); Serial.print(F("HEAD : ")); Serial.print(configuration.COMMAND, HEX);Serial.print(" ");Serial.print(configuration.STARTING_ADDRESS, HEX);Serial.print(" ");Serial.println(configuration.LENGHT, HEX); Serial.println(F(" ")); Serial.print(F("AddH : ")); Serial.println(configuration.ADDH, HEX); Serial.print(F("AddL : ")); Serial.println(configuration.ADDL, HEX); Serial.println(F(" ")); Serial.print(F("Chan : ")); Serial.print(configuration.CHAN, DEC); Serial.print(" -> "); Serial.println(configuration.getChannelDescription()); Serial.println(F(" ")); Serial.print(F("SpeedParityBit : ")); Serial.print(configuration.SPED.uartParity, BIN);Serial.print(" -> "); Serial.println(configuration.SPED.getUARTParityDescription()); Serial.print(F("SpeedUARTDatte : ")); Serial.print(configuration.SPED.uartBaudRate, BIN);Serial.print(" -> "); Serial.println(configuration.SPED.getUARTBaudRateDescription()); Serial.print(F("SpeedAirDataRate : ")); Serial.print(configuration.SPED.airDataRate, BIN);Serial.print(" -> "); Serial.println(configuration.SPED.getAirDataRateDescription()); Serial.println(F(" ")); Serial.print(F("OptionSubPacketSett: ")); Serial.print(configuration.OPTION.subPacketSetting, BIN);Serial.print(" -> "); Serial.println(configuration.OPTION.getSubPacketSetting()); Serial.print(F("OptionTranPower : ")); Serial.print(configuration.OPTION.transmissionPower, BIN);Serial.print(" -> "); Serial.println(configuration.OPTION.getTransmissionPowerDescription()); Serial.print(F("OptionRSSIAmbientNo: ")); Serial.print(configuration.OPTION.RSSIAmbientNoise, BIN);Serial.print(" -> "); Serial.println(configuration.OPTION.getRSSIAmbientNoiseEnable()); Serial.println(F(" ")); Serial.print(F("TransModeWORPeriod : ")); Serial.print(configuration.TRANSMISSION_MODE.WORPeriod, BIN);Serial.print(" -> "); Serial.println(configuration.TRANSMISSION_MODE.getWORPeriodByParamsDescription()); Serial.print(F("TransModeEnableLBT : ")); Serial.print(configuration.TRANSMISSION_MODE.enableLBT, BIN);Serial.print(" -> "); Serial.println(configuration.TRANSMISSION_MODE.getLBTEnableByteDescription()); Serial.print(F("TransModeEnableRSSI: ")); Serial.print(configuration.TRANSMISSION_MODE.enableRSSI, BIN);Serial.print(" -> "); Serial.println(configuration.TRANSMISSION_MODE.getRSSIEnableByteDescription()); Serial.print(F("TransModeFixedTrans: ")); Serial.print(configuration.TRANSMISSION_MODE.fixedTransmission, BIN);Serial.print(" -> "); Serial.println(configuration.TRANSMISSION_MODE.getFixedTransmissionDescription()); Serial.println("----------------------------------------"); } void printModuleInformation(struct ModuleInformation moduleInformation) { Serial.println("----------------------------------------"); Serial.print(F("HEAD: ")); Serial.print(moduleInformation.COMMAND, HEX);Serial.print(" ");Serial.print(moduleInformation.STARTING_ADDRESS, HEX);Serial.print(" ");Serial.println(moduleInformation.LENGHT, DEC); Serial.print(F("Model no.: ")); Serial.println(moduleInformation.model, HEX); Serial.print(F("Version : ")); Serial.println(moduleInformation.version, HEX); Serial.print(F("Features : ")); Serial.println(moduleInformation.features, HEX); Serial.println("----------------------------------------"); }
STM32F4 black pill EByte LoRa E32 E22 E220 shield v1.0
*PCBWay community is a sharing platform. We are not responsible for any design issues and parameter issues (board thickness, surface finish, etc.) you choose.
- Comments(0)
- Likes(2)
-
 Engineer
Sep 02,2025
-
 Eyup Saglam
Aug 01,2024
- 0 USER VOTES
- YOUR VOTE 0.00 0.00
- 1
- 2
- 3
- 4
- 5
- 6
- 7
- 8
- 9
- 10
- 1
- 2
- 3
- 4
- 5
- 6
- 7
- 8
- 9
- 10
- 1
- 2
- 3
- 4
- 5
- 6
- 7
- 8
- 9
- 10
- 1
- 2
- 3
- 4
- 5
- 6
- 7
- 8
- 9
- 10
 More by Renzo Mischianti
-
 WeMos D1 (esp8266) Ebyte LoRa shield (10Km) with HardwareSerial and 5V switch
HardwareSerial shield 5v versionAfter a while, I understand that to have a good range, I need to pow...
-
 WeMos D1 (esp8266) Ebyte LoRa shield (10Km) with HardwareSerial and voltage regulator
The new shield is similar but has more features here than the breadboard schema, even if it is limit...
-
 Inverter Aurora ABB (Power One) Web Monitor (WIM): server PCB
If you have trouble with the price check the Min Track/Spacing, It must be greater or equal than 6/6...
-
 Arduino NANO 33 IoT SPI Flash memory shield
Like the Arduino MKR WiFi 1010, the NANO 33 IoT doesn’t have Flash memory to store data. I wrote an ...
-
 STM32F4 black pill EByte LoRa E32 E22 E220 shield v1.0
Detailed information on my siteFor LoRa E32, LoRa E22 and LoRa E220I start using STM32 microcontroll...
-
 STM32F4 Black-pill: WiFi shield (WiFiNINA)
STM32F1 Blue-pill: WiFi shield (WiFiNINA)Complete tutorial here.First of all, read the article “STM3...
-
 STM32F1 Blue-pill: WiFi shield (WiFiNINA)
First of all, read the article “STM32: use WiFiNINA with ESP32 WiFi Co-Processor”, where there are a...
-
 STM32F1 blue pill EByte LoRa E32 E22 E220 shield v1.0
Full documentation of the PCBEByte E32 tutorialEByte E22 tutorialEByte E220 tutorialI start using ST...
-
 LoRa remote water level and pump controller: Battery powered client (ReWaL)
ArticlesLoRa remote water tank level and pump controller: introLoRa remote water level and pump cont...
-
 LoRa remote water level and pump controller: Server
ArticlesLoRa remote water tank level and pump controller: introLoRa remote water level and pump cont...
-
 ESP32 WeMos LOLIN32 EByte LoRa E32, E22 and E220 shield (10Km)
Full articleFinally, I’m going to publish my LoRa shield for WeMos LOLIN32. This is one of my prefer...
-
 Arduino MKR WiFi 1010 SPI Flash memory shield
Arduino SAMD (NANO 33 and MKR): SPI flash memory FAT FSI have a couple of Arduino MKR WiFi 1010, and...
-
 WeMos D1 (esp8266) relay shield
WeMos D1 3v module relay shield at work main.One of my project’s most used components is undoubtedly...
-
 WeMos D1 (esp8266) with pcf8574 multiplexer to manage encoder, buttons or other
For fast prototyping, I will create a set of shields for the WeMos D1 mini; the first is a service b...
-
 MKS WiFi module
This is a simple PCB to create a WiFi module for 3D printer that use MKS Robin Nano v1 mainboard.I t...
-
 Ciclop 3D scanner board v1.2
ElectronicI create a board with PTC Resettable Fuse, (1.85A 30V) this simple component protect your ...
-
 esp32-wroom-32 esp32-S programming board
Full article and specs on my site www.mischianti.orgESP32-wroom-32, esp32-S: flash, pinout, specs an...
-
 esp-12 esp-07 (esp8266) programming board
You can find detailed information on my site When I went to use esp12 and esp07, and the first probl...
-
-
mammoth-3D SLM Voron Toolhead – Manual Drill & Tap Edition
174 0 0 -
-
AEL-2011 Power Supply Module
693 0 2 -
AEL-2011 50W Power Amplifier
590 0 2 -
-
-
Custom Mechanical Keyboard
788 0 0 -
Tester for Touch Screen Digitizer without using microcontroller
412 2 2 -
Audio reactive glow LED wristband/bracelet with NFC / RFID-Tags
376 0 1 -
-


