BEHERIT PCB Necklace
How are you all? The BEHERIT Astable Vibrator Circuit, which is built on a 555 Timer IC and a few other components, is an intriguing project that is intended to exactly resemble BEHERIT, also known as EGG of King from the Berserk series.


The BEHERIT in "Berserk" is a mystical artifact that triggers a dark and tragic event, known as the Eclipse, and grants immense power to those who activate it by offering a significant sacrifice. It is a symbol of despair, fate, and the destructive forces present within the world of "Berserk."
This PCB badge/necklace is entirely driven by a straightforward 555 timer IC, and this post will describe how the circuit, including the PCB design and assembly, was put together. Let's get started with the construction.
Materials Required
following are the things required in this built-
- 555 timer IC
- Custom PCB
- 10K Resistor
- 500 Ohms Resistors
- Coin cell holder
- CR2032 Coin cell
- 22uf Capacitor
- Slide Switch
- RED 3mm LED
Custom Silkscreen

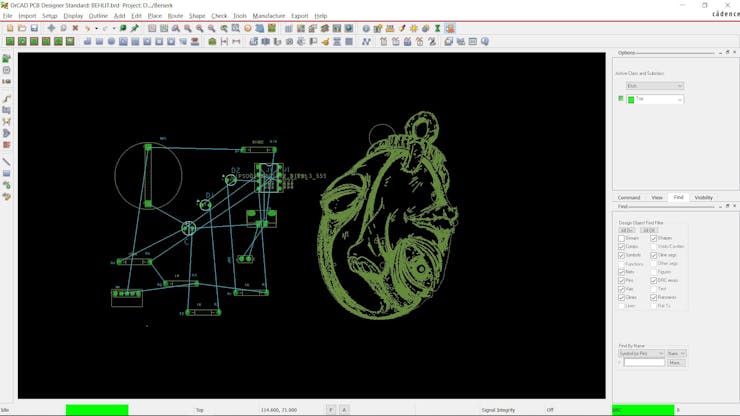
All began with a drawing of BEHERIT that I discovered online, created by an unknown artist. It looks really cool, so I had to turn it into a PCB.
In order to load the image into the PCB Design, we first had to convert it from JPG to monochromatic BMP.
My PCB CAD software finds this step tedious because it only supports importing BMP images, but other programs like Altium or KiCad support importing PNG or even JPEG images.
We only need to import the image as a silkscreen top or bottom layer; the import steps remain the same.
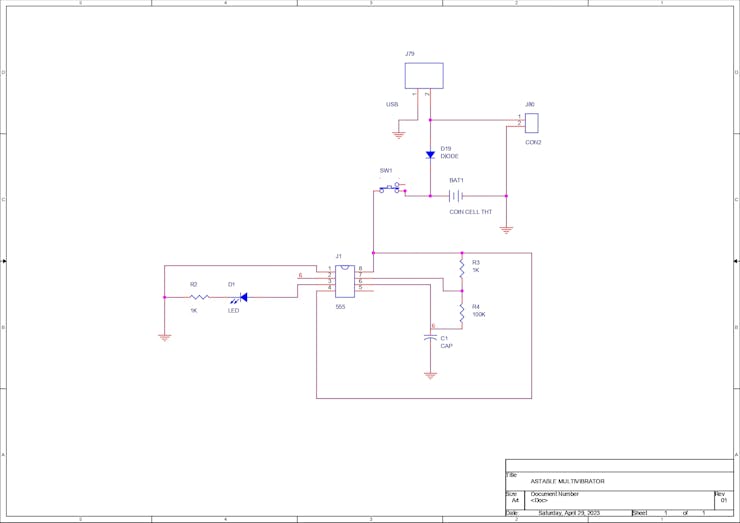
ASTABLE MONOVIBRATOR CIRCUIT

The 555 timer IC's astable multivibrator mode is also known as the free running or self-triggering mode. In contrast to monostable multivibrator mode, it only has two quasi-stable states (HIGH and LOW).
In astable mode, a rectangular waveform is produced without the need for external triggering because it automatically switches between its two states at regular intervals. The external resistors (R1 and R2) and a capacitor have determined this HIGH and LOW output time period (C1).
In our example, R1 and R2 are both set to 10K, while C1 is set to 10uF, which causes the LED to blink more quickly.
A Coin Cell Holder (CR2032) with a sliding switch in series between VCC and the positive of the cell and a connection between GND and the negative of the Cell Holder is added to the PCB design.
An extra component, which we can add if we don't want to use a CR2032 Cell to power the entire setup, consists of an additional Micro USB with a diode in series with the VCC of the timer IC.
PCB Design

After the schematic is complete, we translate it into a PCB design and begin arranging the components on the board.
The board outline is created using the BEHERIT silkscreen outer lines, and all the components are then placed inside the BEHERIT shape.
Only the LED is added from the TOP side of the board because it is located in the design's eye region, while the rest of the components are placed on the bottom side of the board.
We finish the design process by connecting the tracks and carefully wiring the connectors on the board.
PCBWAY


After placing everything and finalizing the board, I send its Gerber data to PCBWAY for samples.
I used PCBWAY PCB Service for this project. I uploaded the Gerber file for this project on PCBWAY's quote page. For this board, I went with red Soldermask and white silkscreen.
After placing the order, I received the PCBs within a week, and the PCB quality was pretty great. The silkscreen I used is completely random and asymmetrical, so it's pretty hard to make, but they did an awesome job of making this PCB with no errors whatsoever.
You guys can check out PCBWAY if you want great PCB service at an affordable rate.
PCB ASSEMBLY


- Prior to beginning the PCB assembly procedure, we gather all of the THT components and arrange them in accordance with the schematic.
- Next, we solder their pads using a soldering iron.
- After soldering all the components, we trim their leads using a wire trimmer.
- We then place the LED in its place from the top side of the board and soder its pads from bottom side.
- Once a CR2032 coin cell is inserted into the cell holder and the slide switch is activated, the board is now complete.
RESULT


BEHERIT from Berserk is the result of this tiny build.
Although BEHELIT is a necklace, we must add a chain to it in order to complete the project, which makes the construction procedure more difficult.
The 555 timer IC circuit is simple, and the blink rate of the LED may be altered by adjusting the values of R1, R2, and C1.
As for the rationale behind utilizing a timer IC, it's just to keep things simple. Well, we could have used an 8 bit MCU with low memory to drive more LEDs here, but that would have resulted in a significant increase in battery consumption. Without writing any code, it is simple to order the PCB, add the necessary components, and solder the component pads together to create this low-power arrangement.
We'll have to wait and see whether there is a version of this project that has been overengineered in the future.
If you made it this far, thanks a bunch!
I hope this article was useful, if yes, then leave a comment.
Special thanks to PCBWAY for supporting this project; do check them out for great PCB service at a lower cost.
Thanks again, and I will be back with a new project soon.

BEHERIT PCB Necklace
*PCBWay community is a sharing platform. We are not responsible for any design issues and parameter issues (board thickness, surface finish, etc.) you choose.
- Comments(0)
- Likes(0)
- 0 USER VOTES
- YOUR VOTE 0.00 0.00
- 1
- 2
- 3
- 4
- 5
- 6
- 7
- 8
- 9
- 10
- 1
- 2
- 3
- 4
- 5
- 6
- 7
- 8
- 9
- 10
- 1
- 2
- 3
- 4
- 5
- 6
- 7
- 8
- 9
- 10
- 1
- 2
- 3
- 4
- 5
- 6
- 7
- 8
- 9
- 10
 More by Arnov Arnov sharma
-
 Pocket SNES
Greetings everyone, and welcome back! Today, I’ve got something fun and tiny to share—the Pocket SNE...
-
 Batocera Arcade Box
Greetings everyone and welcome back, Here's something. Fun and nostalgic. Right now, we are using ou...
-
 64x32 Matrix Panel Setup with PICO 2
Greetings everyone and welcome back.So here's something fun and useful: a Raspberry Pi Pico 2-powere...
-
 Portable Air Quality Meter
Hello everyone, and welcome back! Today, I have something incredibly useful for you—a Portable Air Q...
-
 WALKPi PCB Version
Greetings everyone and welcome back, This is the WalkPi, a homebrew audio player that plays music fr...
-
 Delete Button XL
Greetings everyone and welcome back, and here's something fun and useful.In essence, the Delete Butt...
-
 Arduino Retro Game Controller
Greetings everyone and welcome back. Here's something fun.The Arduino Retro Game Controller was buil...
-
 Super Power Buck Converter
Greetings everyone and welcome back!Here's something powerful, The SUPER POWER BUCK CONVERTER BOARD ...
-
 Pocket Temp Meter
Greetings and welcome back.So here's something portable and useful: the Pocket TEMP Meter project.As...
-
 Pico Powered DC Fan Driver
Hello everyone and welcome back.So here's something cool: a 5V to 12V DC motor driver based around a...
-
 Mini Solar Light Project with a Twist
Greetings.This is the Cube Light, a Small and compact cube-shaped emergency solar light that boasts ...
-
 PALPi V5 Handheld Retro Game Console
Hey, Guys what's up?So this is PALPi which is a Raspberry Pi Zero W Based Handheld Retro Game Consol...
-
 DIY Thermometer with TTGO T Display and DS18B20
Greetings.So this is the DIY Thermometer made entirely from scratch using a TTGO T display board and...
-
 Motion Trigger Circuit with and without Microcontroller
GreetingsHere's a tutorial on how to use an HC-SR505 PIR Module with and without a microcontroller t...
-
 Motor Driver Board Atmega328PU and HC01
Hey, what's up folks here's something super cool and useful if you're making a basic Robot Setup, A ...
-
 Power Block
Hey Everyone what's up!So this is Power block, a DIY UPS that can be used to power a bunch of 5V Ope...
-
 Goku PCB Badge V2
Hey everyone what's up!So here's something SUPER cool, A PCB Board themed after Goku from Dragon Bal...
-
 RGB Mixinator V2
Hey Everyone how you doin!So here's a fun little project that utilizes an Arduino Nano, THE MIXINATO...
-
-
mammoth-3D SLM Voron Toolhead – Manual Drill & Tap Edition
162 0 0 -
-
AEL-2011 Power Supply Module
678 0 2 -
AEL-2011 50W Power Amplifier
581 0 2 -
-
-
Custom Mechanical Keyboard
782 0 0 -
Tester for Touch Screen Digitizer without using microcontroller
406 2 2 -
Audio reactive glow LED wristband/bracelet with NFC / RFID-Tags
368 0 1 -
-


