|
Autodesk Fusion 360Autodesk
|
|

|
arduino IDEArduino
|
|
|
|
PrusaSlicerPrusa Research a.s.
|
Crystal RGB Mascot Display
Crystal RGB Mascot Display
A simple beginner-friendly project to create a bright, colourful and aesthetic addition to your office/home desk setup, especially with a customisable mascot of your choosing (in this case I used a low poly piggy I found on Printables - https://www.printables.com/model/509270-low-poly-piggy)!
Demo Video: https://youtube.com/shorts/Si8TMUFBHYk?feature=share
The project serves as a great beginner-friendly starting point to working with individually addressable LEDs, in this case using the adafruit neopixel library, and also has a high-degree of customisability - what mascot you'd like to display and what colour or animation you'd like to make your LEDs display. It's also my first time working with WS2812B LEDs and this project really helped me understand how to use them better.
Bill of Materials
The following is the list of materials I used for this project, excluding obvious things like my 3D printer and 3D Printer Filament.
- 1x Arduino Nano
- 1x 9V Battery
- 1x 9V Battery Adapter
- 1x Simple Rocker Switch
- 1x WS2812B LED
- 1x Keyboard Switch (I used a clicky Gateron Blue switch, but you could swap this out with a simple pushbutton.)
- DuPont Wires
Assembly Steps
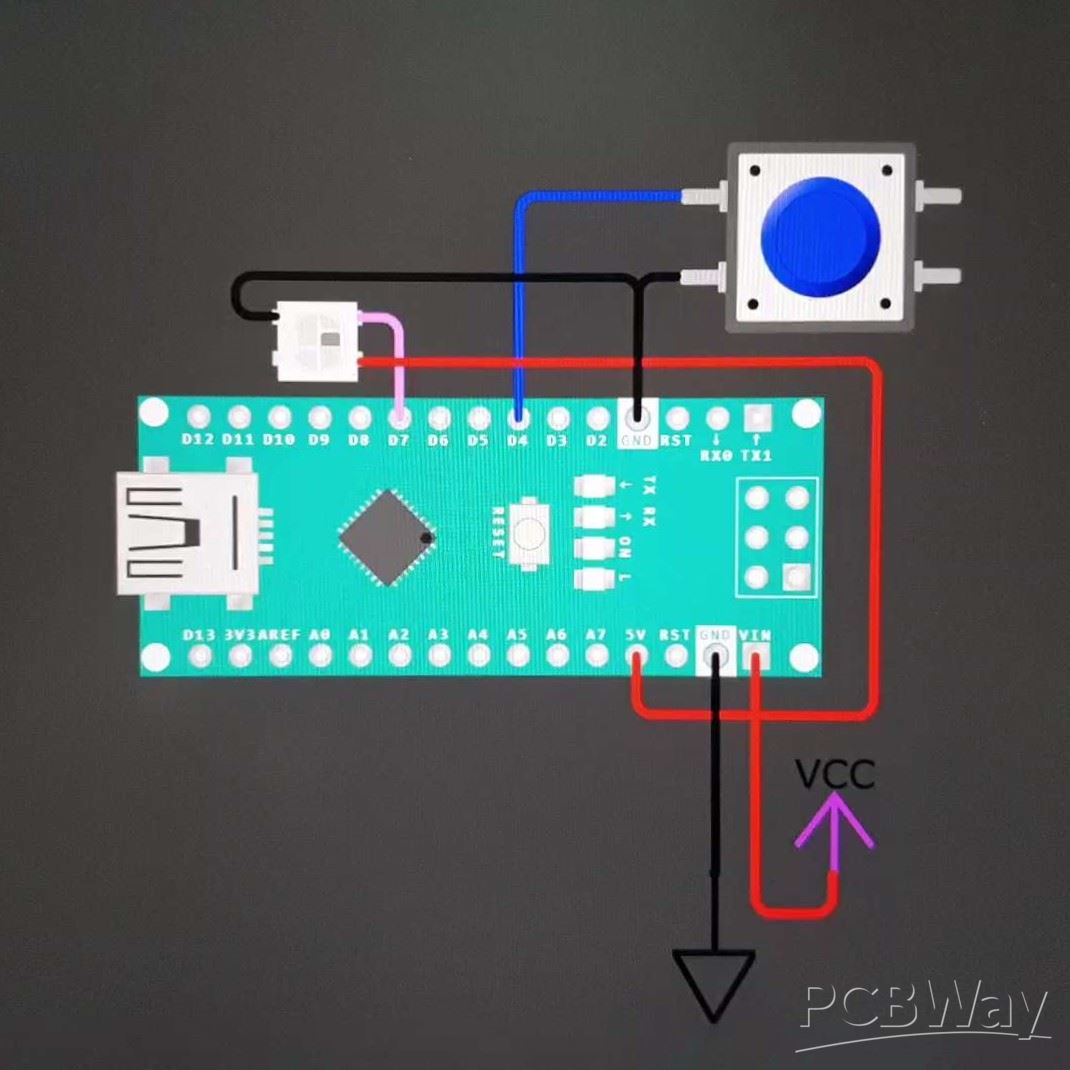
- Connect the hardware according to the attached electronic schematic in this project.
- 3D-print out the base, lid and the mascot. (Mascot should be printed in transparent filament (PETG/PLA) for the best light dispersion throughout the mascot)
- Slot the 9V battery into the sectioned area within the base and fit the rest of the electronics accordingly.
- Slot the WS2812B LED into the lid and use duct tape if needed to properly secure it.
- Close up the base, prop up your mascot and light it up!
Additional Notes
- For the recess in the lid to fit your mascot, what I did was import the model as a mesh on Fusion360 (or you can model it yourself), convert it into a solid body (not required it you hand-modelled it), trace out the bottom surface area that is going to stand on the lid and then extrude and cut into the lid to create the recess. Be sure to position the LED hole in the centre of the model as well for better light dispersion throughout the model.
- Feel free to let me know if you have any doubts or queries!

Crystal RGB Mascot Display
*PCBWay community is a sharing platform. We are not responsible for any design issues and parameter issues (board thickness, surface finish, etc.) you choose.

Raspberry Pi 5 7 Inch Touch Screen IPS 1024x600 HD LCD HDMI-compatible Display for RPI 4B 3B+ OPI 5 AIDA64 PC Secondary Screen(Without Speaker)
BUY NOW
ESP32-S3 4.3inch Capacitive Touch Display Development Board, 800×480, 5-point Touch, 32-bit LX7 Dual-core Processor
BUY NOW
Raspberry Pi 5 7 Inch Touch Screen IPS 1024x600 HD LCD HDMI-compatible Display for RPI 4B 3B+ OPI 5 AIDA64 PC Secondary Screen(Without Speaker)
BUY NOW- Comments(0)
- Likes(1)
 Log in to post comments.
-
 Engineer
Sep 29,2024
- 1 USER VOTES
- YOUR VOTE 0.00 0.00
- 1
- 2
- 3
- 4
- 5
- 6
- 7
- 8
- 9
- 10
- 1
- 2
- 3
- 4
- 5
- 6
- 7
- 8
- 9
- 10
- 1
- 2
- 3
- 4
- 5
- 6
- 7
- 8
- 9
- 10
- 1
- 2
- 3
- 4
- 5
- 6
- 7
- 8
- 9
- 10
-
10design
-
10usability
-
10creativity
-
10content
 More by Engineer
-
-
Commodore 64 1541-II 1581 Floppy Disk Drive C64 Power Supply Unit USB-C 5V 12V DIN connector 5.25
321 1 3 -
Easy to print simple stacking organizer with drawers
114 0 0 -
-
-
-
-
-
-
Modifying a Hotplate to a Reflow Solder Station
1215 1 6 -
MPL3115A2 Barometric Pressure, Altitude, and Temperature Sensor
693 0 1 -


