


|
|
EasyEDAEasyEDA
|
Spacecloner V3
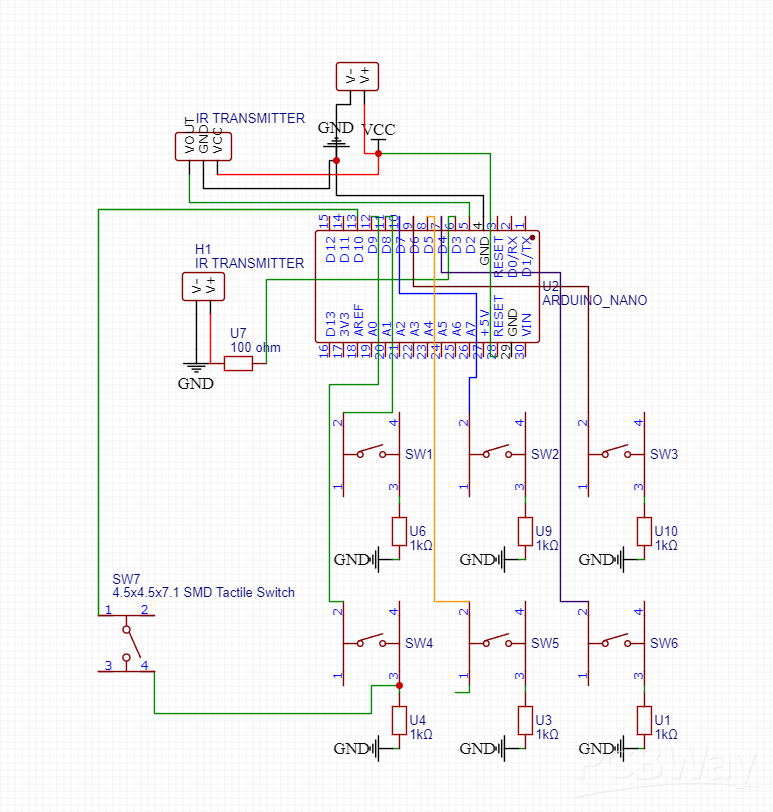
Hello again everyone! Say hello to the Spacecloner V3! (pictures have a different image but PCB files are exactly the same) Anyways, the Spacecloner is equipped with 6 programmable buttons, open-source programming, already made programming, and a nice case to go on the back of it. All of this is powered by a 9V battery. The use of the Spacecloner is to function as a fun, harmless prank that can control smart TV's, IR controlled LEDS, remote control speakers, and anything that can be controlled by IR signals! This is just a step-up from my previous build, the Spacecloner Mini, which is still in testing stages. But as of right now, this one, the V3 is fully functional and up for download! If any questions arise, please let me know in the comments. Like I said before, code is open source and the Spacecloner is fully programmable! So, you can make it do whatever you want, like a brute force... jammer... etc.
HOW TO USE:
=================================================================
Program one: <NOT RECCOMENDED AS OF RIGHT NOW>
- Hold the REC button and the button you want to program. (If you let go of the REC button, it will stop recording.) Also, pressing one of the playback buttons will take it out of recording mode until you reset the board.
- Aim at the devices remote you want to control. Try pointing the receiver directly at the remote and push the buttons on the remote you want to use. A white light should flash indicating a signal has been picked up.
- For multiple buttons, hold the REC button and another button you haven't programmed yet.
- Once you let go of the REC, it will enter playback mode after a button is pushed.
- Start sending signals!
Program two: <RECOMMENDED FOR STARTING OUT>
- Hold the REC button and aim at the remote emitting a signal. A white light will flash briefly meaning that a signal is detected and saved.
- Let go of the REC button once the light has turned off.
- Press switch 5 (labeled as SW5 on the PCB)
- Enjoy!
PS: if you want to rerecord a signal, just do step one - two again.
==================================================================
Thank you for supporting the project! Make sure you leave a like and review on it! Until next time!
(An explanatory video will be coming soon for those of you who struggle with reading.)
// Pin Definitions const int recordButtonPin = 10; // Pin for the record button const int buttonPins[] = {5, 6, 7, 8, 4, 9}; // Pins for the buttons to send IR signals const int irReceiverPin = 2; // Pin for the IR receiver const int ledPin = 13; // Onboard LED pin IRrecv irrecv(irReceiverPin); // Create an IR receiver object decode_results results; // Variable to hold the IR results IRsend irsend; // Create an IR sender object unsigned long lastIRValues[6] = {0}; // Store last IR signals for each button bool isRecording = false; // Flag to indicate if we are currently recording unsigned long buttonDebounceTime = 0; unsigned long debounceDelay = 200; // 200 ms debounce time void setup() { Serial.begin(9600); // Initialize serial communication pinMode(recordButtonPin, INPUT_PULLUP); // Record button for (int i = 0; i < 6; i++) { pinMode(buttonPins[i], INPUT_PULLUP); // Send buttons } pinMode(ledPin, OUTPUT); // Set onboard LED pin as output irrecv.enableIRIn(); // Start the IR receiver } void loop() { unsigned long currentMillis = millis(); // Check if the record button is pressed and debounced (LOW state) if (digitalRead(recordButtonPin) == LOW && (currentMillis - buttonDebounceTime) > debounceDelay) { buttonDebounceTime = currentMillis; // Update the debounce time // Start recording if not already recording if (!isRecording) { isRecording = true; // Start recording Serial.println("Recording mode active. Press a button to record."); } } else if (isRecording && digitalRead(recordButtonPin) == HIGH) { // Stop recording when record button is released isRecording = false; Serial.println("Exited recording mode."); } // Check for incoming IR signals if in recording mode if (isRecording && irrecv.decode(&results)) { // Check for a valid signal if (results.value != 0xFFFFFFFF) { // Store the recorded value in the respective button's slot based on which button is pressed for (int i = 0; i < 6; i++) { if (digitalRead(buttonPins[i]) == LOW) { lastIRValues[i] = results.value; // Store the IR signal in the respective index Serial.print("IR signal recorded for button "); Serial.print(i + 1); Serial.print(": "); Serial.println(lastIRValues[i], HEX); // Print the IR value in hexadecimal // Flash the onboard LED briefly digitalWrite(ledPin, HIGH); // Turn on the LED delay(100); // Wait for a short period digitalWrite(ledPin, LOW); // Turn off the LED break; // Exit loop after recording } } } irrecv.resume(); // Ready to receive the next value } // Check each send button for presses for (int i = 0; i < 6; i++) { // Debounce send button press if (digitalRead(buttonPins[i]) == LOW && (currentMillis - buttonDebounceTime) > debounceDelay) { buttonDebounceTime = currentMillis; // Update the debounce time // Send the stored signal if there is one recorded if (lastIRValues[i] != 0) { Serial.print("Sending stored IR signal from button "); Serial.print(i + 1); Serial.print(": "); Serial.println(lastIRValues[i], HEX); irsend.sendNEC(lastIRValues[i], 32); // Send the stored signal delay(1000); // Small delay to prevent fast re-triggering } } } // Check for IR signals even if not recording (to enable real-time feedback) if (!isRecording && irrecv.decode(&results)) { if (results.value != 0xFFFFFFFF) { Serial.print("Received IR signal: "); Serial.println(results.value, HEX); // Print received IR signal // Flash the onboard LED briefly digitalWrite(ledPin, HIGH); // Turn on the LED delay(100); // Wait for a short period digitalWrite(ledPin, LOW); // Turn off the LED irrecv.resume(); // Ready to receive the next value } } }
const int buttonPin = 10; // Pin D4 for the button to receive IR signals const int sendButtonPin = 4; // Pin D5 for the button to send the stored signal const int irReceiverPin = 2; // Pin for the IR receiver const int irEmitterPin = 3; // Pin for the IR emitter const int ledPin = 13; // Onboard LED pin IRrecv irrecv(irReceiverPin); // Create an IR receiver object decode_results results; // Variable to hold the IR results IRsend irsend; // Create an IR sender object unsigned long lastIRValue = 0; // Variable to store the last valid IR signal bool isRecording = false; // Flag to indicate if we are currently recording bool isSending = false; // Flag to indicate if we are currently sending unsigned long buttonDebounceTime = 0; unsigned long debounceDelay = 200; // 200 ms debounce time void setup() { Serial.begin(9600); // Initialize serial communication pinMode(buttonPin, INPUT_PULLUP); // Set button pin as input with internal pull-up pinMode(sendButtonPin, INPUT_PULLUP); // Set send button pin as input with internal pull-up pinMode(ledPin, OUTPUT); // Set onboard LED pin as output irrecv.enableIRIn(); // Start the IR receiver } void loop() { unsigned long currentMillis = millis(); // Check if the receive button is pressed and debounced (LOW state) if (digitalRead(buttonPin) == LOW && (currentMillis - buttonDebounceTime) > debounceDelay) { buttonDebounceTime = currentMillis; // Update the debounce time // Start recording if not already recording and not sending if (!isRecording && !isSending) { isRecording = true; // Start recording irrecv.resume(); // Enable the receiver } // Check for incoming IR signals if (irrecv.decode(&results)) { // Filter out the FFFFFFFFFF value if (results.value != 0xFFFFFFFF) { lastIRValue = results.value; // Save the valid IR value Serial.print("IR signal recorded: "); Serial.println(lastIRValue, HEX); // Print the IR value in hexadecimal // Flash the onboard LED for 1 second digitalWrite(ledPin, HIGH); // Turn on the LED delay(100); // Wait for 1 second digitalWrite(ledPin, LOW); // Turn off the LED } irrecv.resume(); // Ready to receive the next value } } else if (isRecording && digitalRead(buttonPin) == HIGH) { // Stop recording when button is released isRecording = false; } // Check if the send button is pressed and debounced (LOW state) if (digitalRead(sendButtonPin) == LOW && (currentMillis - buttonDebounceTime) > debounceDelay) { buttonDebounceTime = currentMillis; // Update the debounce time // Send the signal if there is one recorded if (!isSending && lastIRValue != 0) { isSending = true; // Start sending process Serial.print("Sending stored IR signal: "); Serial.println(lastIRValue, HEX); irsend.sendNEC(lastIRValue, 32); // Send the last IR signal delay(1000); // Small delay to prevent fast re-triggering isSending = false; // Done sending // Re-enable receiver after sending irrecv.enableIRIn(); } } }
Spacecloner V3
*PCBWay community is a sharing platform. We are not responsible for any design issues and parameter issues (board thickness, surface finish, etc.) you choose.


Raspberry Pi 5 7 Inch Touch Screen IPS 1024x600 HD LCD HDMI-compatible Display for RPI 4B 3B+ OPI 5 AIDA64 PC Secondary Screen(Without Speaker)
BUY NOW
ESP32-S3 4.3inch Capacitive Touch Display Development Board, 800×480, 5-point Touch, 32-bit LX7 Dual-core Processor
BUY NOW
Raspberry Pi 5 7 Inch Touch Screen IPS 1024x600 HD LCD HDMI-compatible Display for RPI 4B 3B+ OPI 5 AIDA64 PC Secondary Screen(Without Speaker)
BUY NOW


- Comments(0)
- Likes(3)
 Log in to post comments.
More by Liam Alvarado
-
 Spacecloner Mini
Hello all! I have presented you the Spacecloner Mini! It was inspired by a device I found on youtube...
Spacecloner Mini
Hello all! I have presented you the Spacecloner Mini! It was inspired by a device I found on youtube...
-
 Spacecloner V3
Hello again everyone! Say hello to the Spacecloner V3! (pictures have a different image but PCB file...
Spacecloner V3
Hello again everyone! Say hello to the Spacecloner V3! (pictures have a different image but PCB file...
-
 Spacecloner Mini Programmer
Just for ATTINY85 chips in general. Used with the Arduino Uno and the pins you have to connect the p...
Spacecloner Mini Programmer
Just for ATTINY85 chips in general. Used with the Arduino Uno and the pins you have to connect the p...
-
-
Commodore 64 1541-II 1581 Floppy Disk Drive C64 Power Supply Unit USB-C 5V 12V DIN connector 5.25
285 1 3 -
Easy to print simple stacking organizer with drawers
106 0 0 -
-
-
-
-
-
Modifying a Hotplate to a Reflow Solder Station
1197 1 6 -
MPL3115A2 Barometric Pressure, Altitude, and Temperature Sensor
681 0 1 -


