|
arduino IDEArduino
|
Squid Games Digital Business Card
Hi,
I am Vishal Soni , checkout my youtube channel for more videos.
Buy This :- Tindie
I made a digital business card, it is like a remote control in your pocket. It can automatically open all of your websites and write all your business details on a notepad.
Why i made this :-
In this digital era people are still using old business cards or visiting cards to introduce their business. So I was thinking of making an advanced card which can show all of the card information on the PC. The process I have used is very simple and easy to customize.
But why squid games business card :-
Actually, squid games is a famous web series, and the card used in that series was unique and well designed. I used a reference of that series to make this card, I have shared the pcb design of the card so this is also very customizable according to requirements.
This is a PCB based Digital Business Card, it has a usb interface to easily plug in and plug out. The card is based on the theme of a famous web series, which is Squid Games.
There is no need to connect the battery or any cell to this device, it will take power itself from usb. This easy to carry business card can contain all of your details in your hand. The card can be customized with a little bit of code knowledge.
Let's build it.
What We Gonna Do
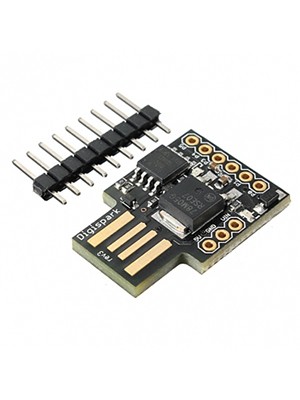
Firstly we will take Digispark Board, it has a built in usb driver so it can be directly programmed with PC.
Because this has a usb driver we can perform HID with it.
HID (HUMAN INTERFACE DEVICE) :-
The Human Interface Device Class (HID) is mainly used for devices that allow human control over a PC for example, keyboard and mouse is a human interface device, so humans can write and click inside the pc.
Secret:- people also use it as a rubber ducky.
By using this HID feature, I made a digital business card PCB. The PCB looks beautiful because it has the same look as the business card in the famous web series.
The PCB for This project is sent by PCBWay, checkout their website to order PCBs.
Order PCB :- https://www.pcbway.com/
Installing Digispark Board
If you are programming a Digispark board for the first time then you have to install the board in Arduino IDE.
Download the folder from my GitHub page from the link given below.
GitHub :- https://github.com/vishalsoniindia/Digital_Busine...
Extract the folder, in the folder there is a text file.
Open the text file and copy the link given in the text file or also the link is given below.
Digispark Board link :- http://digistump.com/package_digistump_index.json
Copy the link and open Arduino IDE.
In Arduino IDE go to the files and then preferences.
Paste the link in an additional board option, if there is another link then separate it by comma.
Click on ok, Now go to the Tools >> boards >> board manager, here type Digispark and install the board.
Programming the Digispark Board
Find the code in the same folder which is downloaded from GitHub.
Open the code and select the board as Digispark 16.5Mhz.
Click on upload.
When you connect your board below then connect Digispark board with PC.
After a sec you will see the code is uploaded successfully.
Customization of code is very simple, just replace the website to your website, and text of notepad with your text. If you comment the line, it will no longer execute in code.
GitHub :- https://github.com/vishalsoniindia/Digital_Busine...
Designing PCB for Squid Games Business Card
Firstly I made a schematic in kicad, and routed the PCB.
Every PCB trace and components are routed in such a way so it looks good on PCB.
After routing I have made some designs using silkscreen, solder mask, and copper finish.
The theme of the card is squid games so I made it the same as the card used in the series.
After designing the PCB uploaded the Gerber on PCBWay.
The thickness of the PCB is 2.4mm, so it is perfect for the usb slot. Also I selected a gold finish which looks cool.
Soldering of Squid Games Business Card
After arriving PCB,
I have transferred all the components from the Digispark board to the PCB.
I have recorded a stop motion of transferring components, but this is not what it looks like.
I have de-soldered all the components with soldering iron, it will be easy if you use a hot air rework station.
Then I soldered all components to our main PCB.
Testing HID With Attiny85
Wooo laaaa !!!!!
It's done now just put it in your PC and see the magic.
It will write all of your information and open all the websites.
If this will not work go through all the steps again to check if anything is wrong.
Bonus:- you can still program it ??, because the data bus is still connected to the pc.

Squid Games Digital Business Card
*PCBWay community is a sharing platform. We are not responsible for any design issues and parameter issues (board thickness, surface finish, etc.) you choose.

Raspberry Pi 5 7 Inch Touch Screen IPS 1024x600 HD LCD HDMI-compatible Display for RPI 4B 3B+ OPI 5 AIDA64 PC Secondary Screen(Without Speaker)
BUY NOW
ESP32-S3 4.3inch Capacitive Touch Display Development Board, 800×480, 5-point Touch, 32-bit LX7 Dual-core Processor
BUY NOW
Raspberry Pi 5 7 Inch Touch Screen IPS 1024x600 HD LCD HDMI-compatible Display for RPI 4B 3B+ OPI 5 AIDA64 PC Secondary Screen(Without Speaker)
BUY NOW- Comments(0)
- Likes(1)
 Log in to post comments.
-
 Radion Mynayev
Aug 23,2023
- 0 USER VOTES
- YOUR VOTE 0.00 0.00
- 1
- 2
- 3
- 4
- 5
- 6
- 7
- 8
- 9
- 10
- 1
- 2
- 3
- 4
- 5
- 6
- 7
- 8
- 9
- 10
- 1
- 2
- 3
- 4
- 5
- 6
- 7
- 8
- 9
- 10
- 1
- 2
- 3
- 4
- 5
- 6
- 7
- 8
- 9
- 10
 More by Vishal vishalsoniindia
-
 Squid Games Digital Business Card
Hi,I am Vishal Soni , checkout my youtube channel for more videos.Buy This :- TindieI made a digital...
-
 BCD Watch (binary coded decimal)
Hi,How are you? I hope everything is going well.Check out my youtube for more amazing projects.There...
-
 Batuni - The Talkative Messenger Robot
Hi, I am Vishal Soni.I am an electrical engineer, check out my youtube channel, I hope you will like...
-
Modifying a Hotplate to a Reflow Solder Station
176 0 2 -
MPL3115A2 Barometric Pressure, Altitude, and Temperature Sensor
131 0 1 -
-
Nintendo 64DD Replacement Shell
184 0 1 -
V2 Commodore AMIGA USB-C Power Sink Delivery High Efficiency Supply Triple Output 5V ±12V OLED display ATARI compatible shark 100W
377 4 1 -
How to measure weight with Load Cell and HX711
423 0 3 -
-
Instrumentation Input, high impedance with 16 bit 1MSPS ADC for SPI
531 0 0


