Tiny-Cairoduino Open-Source DIY Kit
Introduction And The Big Picture
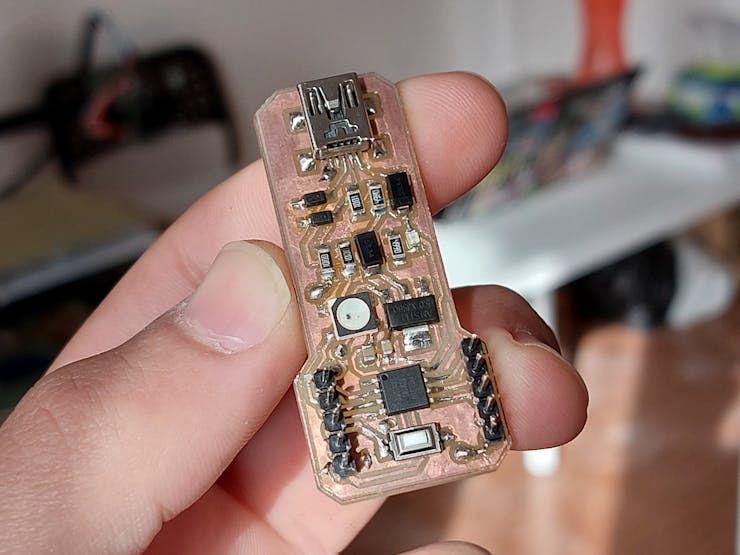
Tiny-Cairoduino is a small-sized Development board based on the beautiful ATtiny85 chip from Atmel. Don’t get fooled by its small size, it’s powerful with great potential and well-documented resources built around it. We wanted to make a small-sized and low-cost development board that fits in any project without hesitation. You don’t need to give up your expensive Arduino or Raspberry pi board anymore to build your project. Blow up your cheap Tiny-Cairoduino board and buy another one, EASY!

There are a lot of open-source Duinos out there, I’m building one more open-source Duino-inspired board but with some addons and features that I was searching for. Tiny-Cairoduino is mainly inspired by the Digispark and the Trinket boards. Thanks to the open-source community. The main goal of the Tiny-Cairoduino board is to integrate the strength points from all the available ATTiny85 based dev boards and come out with a new beast that is easy to program and easy to play with on the hardware level too. And, totally open-source!
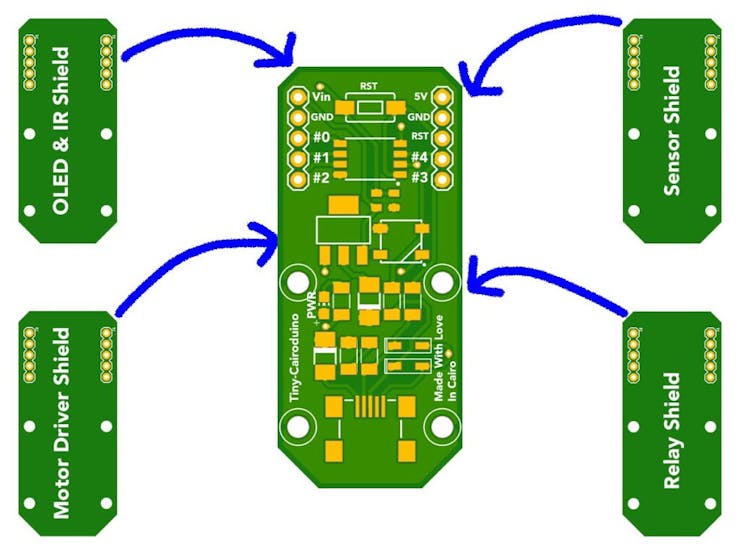
Our plan is to develop a whole set of shields that helps hobbyists and newbies to easily implement their hardware projects like if they are assembling lego bricks. We are currently working on that and we will be publishing these shields very soon.

I told you before, Don’t get fooled with its size! Despite being so small The Attiny85 chip has 8K bytes of flash memory and 5 I/O pins. All the 5 GPIO pins can be programmed as digital inputs or digital outputs. Including ADC(analog input) on four pins, PWM(analog outputs) on three pins -more can be achieved with software PWM-. It literally plug and play thanks to the preloaded bootloader that helps you to reprogram the board over USB like any Arduino board. Tiny-Cairoduino is also compatible with Arduino IDE. Even though you can program your Tiny-Cairoduino using the Arduino IDE, it’s not fully 100% Arduino-compatible. There are some things you trade-off for such a small and low-cost microcontroller!
- Tiny-Cairoduino does not have a Serial port connection for debugging so the serial port monitor will not be able to send/receive data. But, you still can reprogram your board through the USB connection.
Some computers’ USB v3 ports don’t recognize the Tiny-Cairoduino’s bootloader. Simply use a USB v2 port or a USB hub in between.
Tiny-Cairoduino specifications:
- Support for the Arduino IDE 1.0 and later (OS X, Windows, and Linux).
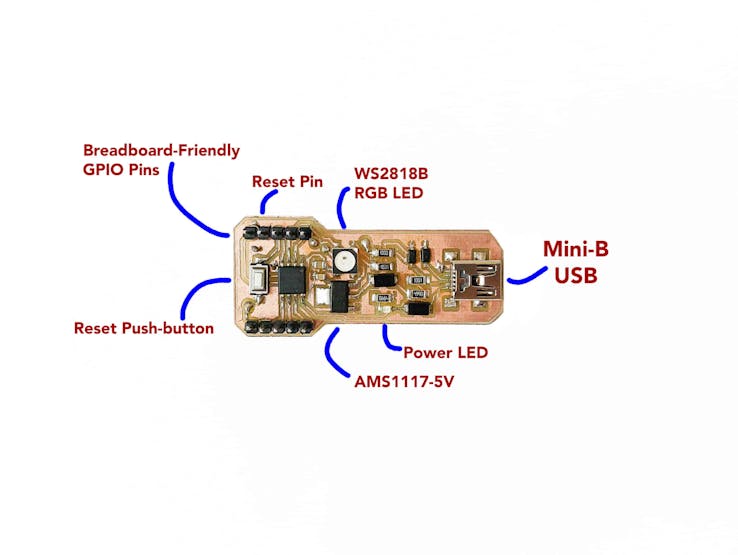
- Built-in USB for programming.
- 5 I/O pins (2 are used for USB only if your program actively communicates over USB, otherwise you can use all 5 even if you are programming via USB).
- 8 KB flash memory (about 6 KB after bootloader),
- I2C and SPI (vis USI).
- PWM on 3 pins (more possible with Software PWM).
- ADC on 4 pins.
- On-board power indicator LED.
- On-board WS2818B addressable RGB led (connected on pin 4).
- Keyboard or other HID devices emulation (mouse, gamepad …).
- Handy pinout header to easily connect your Tiny-Cairoduino with the outside world.
- On-board RESET button.
- A whole set of shields to maximize and expand the board functionality.
- Four mounting holes!

For all the technical details and the source files. Please check out makesomestuff.org/tiny-cairoduino-kit/
Tiny-Cairoduino Open-Source DIY Kit
*PCBWay community is a sharing platform. We are not responsible for any design issues and parameter issues (board thickness, surface finish, etc.) you choose.
- Comments(0)
- Likes(2)
-
 Ashish Adhikari
Feb 12,2022
-
 popo-first suie
Feb 10,2022
- 1 USER VOTES
- YOUR VOTE 0.00 0.00
- 1
- 2
- 3
- 4
- 5
- 6
- 7
- 8
- 9
- 10
- 1
- 2
- 3
- 4
- 5
- 6
- 7
- 8
- 9
- 10
- 1
- 2
- 3
- 4
- 5
- 6
- 7
- 8
- 9
- 10
- 1
- 2
- 3
- 4
- 5
- 6
- 7
- 8
- 9
- 10

-
9design
-
9usability
-
10creativity
-
10content
 More by Ahmed Ibrahim
-
 IoT Using Raspberry Pi and Python
StoryWhat We Will Build Today?Today we will learn how to build a local web server using raspberry pi...
-
 Tiny-Cairoduino Open-Source DIY Kit
Introduction And The Big PictureTiny-Cairoduino is a small-sized Development board based on the beau...
-
 Tiny AVR Programmer
 BackgroundToday I will build an AVR programmer based on the FabOptimus that buil...
Tiny AVR Programmer
Tiny AVR Programmer BackgroundToday I will build an AVR programmer based on the FabOptimus that buil...
-
 Arduino Motorized Camera Slider
Project OverviewFor someone who loves to shoot some random hobbyist videos, it’s somehow expensive t...
-
 Cairoduino Arduino Compatible Board
ATmega328P Bare minimum configurationBefore building our standalone ATmega328P chip Arduino compatib...
-
 Handclap AC Switch Control
IntroductionToday, we will learn how to control home light switches by just hand-clapping, Cool ha! ...
-
 IoT Using Raspberry Pi and Firebase and Android
IntroductionToday, we will learn how to control any R...
IoT Using Raspberry Pi and Firebase and Android
IoT Using Raspberry Pi and Firebase and AndroidIntroductionToday, we will learn how to control any R...
-
 IoT Using Arduino and ESP8266-01
IntroductionToday, we will build a device that connects to the internet and allow the user to contro...
-
-
mammoth-3D SLM Voron Toolhead – Manual Drill & Tap Edition
164 0 0 -
-
AEL-2011 Power Supply Module
683 0 2 -
AEL-2011 50W Power Amplifier
584 0 2 -
-
-
Custom Mechanical Keyboard
785 0 0 -
Tester for Touch Screen Digitizer without using microcontroller
409 2 2 -
Audio reactive glow LED wristband/bracelet with NFC / RFID-Tags
371 0 1 -
-


