|
OrCad Cadance |
|

|
Autodesk Fusion 360Autodesk
|
|

|
Ultimaker CURA |
Tulipa x RGB Edition
Hey guys whazzup!
So this is Tulipa x, a minimal RGB EDITION of the Darwin Hybrid Tulips which are some of the tallest tulips in the world. (spoilers, my setup isn't that tall)

Original idea was to grow some actual tulips but I have no clue how to do that, all I know is to make RGB Related stuff so I made my version of these Darwin Hybrid Tulips with 3D Printed parts and custom PCBs.
The brain of this project is an Attiny85 and it's controlling 49 WS2812B LEDs each soldered on their Breakout board which I made.

My goal here is to make a nice wall decorative light that looks like a tulip, I made this shape by molding a tulip doodle I found online.
In this post, I'm gonna show you guys how I made this Flower shaped lamp in few easy steps.
Let's get started!
MATERIAL REQUIRED
- 3D Printed parts
- Leaf base x1
- Leaf Cover x1
- Stalk base x1
- Stalk Cover x1
- Petal Base x1
- Petal Cover x1
Electronics
- RGB LEDs WS2812B LEDs x49
- Custom PCBs x 49 (provided by PCBWAY)
- 100nf Cap 0603 x49
- Solder paste
- Silver Copper wire
- Solder paste Dispenser
- Attiny85
- IN5399
- PERF BOARD
- DC Barrel Jack 5mm
- 5V 1A Charger
BASIC IDEA

SO this was the image that started this whole project, I saw this image and I was completely blown away by its simplicity and minimalistic layout.
CAD DESIGN

Next, I modeled the Tulip in Fusion360 by importing the above Image as a canvas and then marking its outline with Splines.
I Modeled the whole flower in three different parts.
- Petal
- Stalk
- Leaf
Each of the parts contains a base body and a lid which is a diffuser for LEDs.
After Modeling the Parts, I exported their 3MF files and then printed them on my ender 3.
3D Printed parts

For 3D Printing the Parts, I used Black and RED PLA for the Base and Transparent PLA for the diffuser part. However, the stalk lid is printed with Black PLA as the stalk won't contain any LEDs.

As for my Printer settings, I used a 0.5mm Nozzle with 0.2mm Layer height at 20% infill.
I'm using Cura slicer here.

After 3D Printing the parts, I prepared the LED Breakout board.
PCB Design

As for the PCB required for this project, I used a simple Attiny85 driven circuit in this project. Attiny85 D0 Pin will drive 23 LEDs in the Petal base and D1 will drive 26 LEDs in the Leaf area.
Generally, for such a project, two PCBs can be designed. one for petal base and one for leaf base.
But I Didn't make these two PCBs, because of cost reasons.
This flower is huge, 180mm x 150 mm is just for the petal and 100mm x 200mm for the leaf. If I made these two boards, the overall cost of PCB would be more so to cut the cost of this project, I designed a small polygon-shaped PCB for a single WS2812B LED which contains just the LED connected with a 100nf Capacitor.
PIXIE board
This is the PIXIE Board, it's a WS2812B Breakout Board that is shaped like a polygon.
My idea is to lay out this PIXIE board inside the Petal and Leaf base, then with the help of silver copper wire, I connected each board's VCC and GND together along with Din and Dout Sequence.
This was the plan, A simple plan.
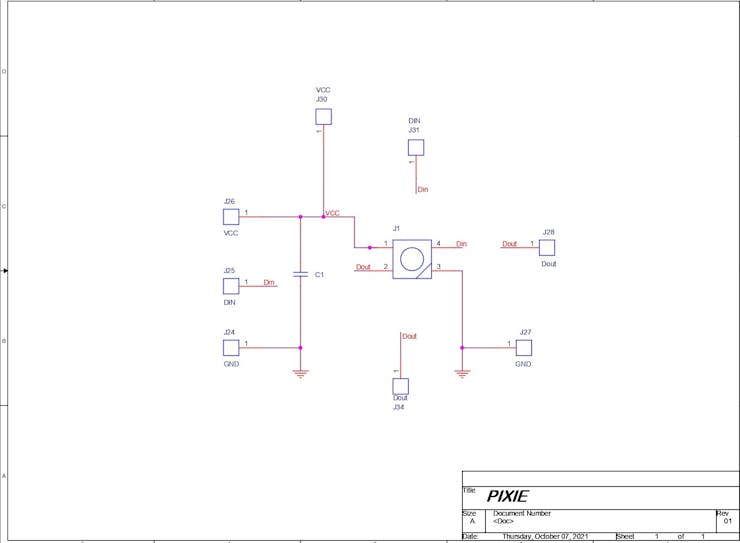
I first prepared a schematic for this PIXIE Board and then converted it into a Board file, then I prepared the basic shape of a polygon which was 14mm x 7mm long.
At the center of Polygon, I placed WS2812B LED along with the 100nF Cap and then arrange the VCC, GND, Din, and Dout Pads in the right way.
After finalizing the PCB, I exported its Gerber data and send it to PCBWAY for samples.
Getting the board from PCBWAY

I used PCBWAY PCB Service for this project. I uploaded the Gerber file of this project on PCBWAY's quote page.
For this PIXIE Board, I choose white solder mask color as I have added few round graphics on the TOP side of the Board. Black silkscreen would look awesome with white color.
I ordered a lot of boards as this project requires a lot of LEDs and each board was for each LED.

I received the PCBs in a week and the PCB quality was pretty great, This PCB is small and I like how the quality of these PCBs was not compromised because of quantity or size.
PCBWAY, you guys rock.
Check out PCBWAY service for great PCB service at less cost!
ASSEMBLY PROCESS for PCB

The Assembly process of the PIXIE Board includes mainly three steps
- solder paste dispensing process
- pick & place process
- hotplate reflow
SOLDER PASTE

First, we place solder paste on each components pad, I'm using a generic solder paste (SN-Pb Ratio 63-37) with a solder paste dispensing syringe.
Pick & Place Process
Then we add components to their assigned place one by one. You could see the schematic for the precise location of each component.
HOTPLATE Reflow


After adding components to their location, we carefully lift the PCB and put it on an SMT hotplate.
I made this Hotplate especially for making projects like these which require SMD soldering. hotplate available in the market were not exactly cheap so I made a minimal version of that which you can check out from here-
https://www.hackster.io/Arnov_Sharma_makes/diy-smt-hotplate-project-8157a5
But anyway, the hotplate heats the PCB from below up to the solder paste melting temp, as soon as the PCB reaches that temp, solder paste melts and all the components get soldered to their pads,
We carefully lift this PCB and try not to shake it as the solder paste is still melted and components might stray from their location if moved too much.
we lift the PCB and then place it on a cooler surface for a little bit, to cool down the heat of PCB.
REDO the whole process for 49 Boards


To make all 49 boards, we have to redo these three steps for all PIXEL Boards.
so I prepared the remaining PCBs which took a lot of time and effort but in the end, this was the result.
Next, I prepared this simple Arduino + Jumper set up to test each board.

Wiring for the testing Setup

- VCC of PIXEL Board goes to 5V
- GND to GND
- and Din of PIXEL Board to D3 of Arduino Nano
CODE for Testing Setup
#include <FastLED.h>
#define NUM_LEDS 1
#define DATA_PIN D3
#define CLOCK_PIN 13
CRGB leds[NUM_LEDS];

void setup() {
	Serial.begin(57600);
	Serial.println("resetting");
	LEDS.addLeds<WS2812,DATA_PIN,RGB>(leds,NUM_LEDS);
	LEDS.setBrightness(84);
}

void fadeall() { for(int i = 0; i < NUM_LEDS; i++) { leds[i].nscale8(250); } }

void loop() {
	static uint8_t hue = 0;
	Serial.print("x");
	for(int i = 0; i < NUM_LEDS; i++) {

		leds[i] = CHSV(hue++, 255, 255);
		 leds[i] = CRGB::Black;
		fadeall();
		delay(10);
	}
	Serial.print("x");


	for(int i = (NUM_LEDS)-1; i >= 0; i--) {
		leds[i] = CHSV(hue++, 255, 255);
		FastLED.show();
	        fadeall();
		delay(10);
	}
}
I added the above sketch to the board and manually tested each Board one by one and after making sure that each PIXEL is working, I started the assembly process.
MAIN BODY ASSEMBLY PROCESS


First, I prepared the Leaf portion of the project.
- I first arrange the PIXEL Boards in a proper alignment. by proper I mean in a better orientation so the soldering job would get easier.
- then I used hot glue and glue each PIXEL Board to its assigned location one by one. I used a total of 26 Boards for the leaf part and after gluing them to the leaf all that left to do is the wiring.
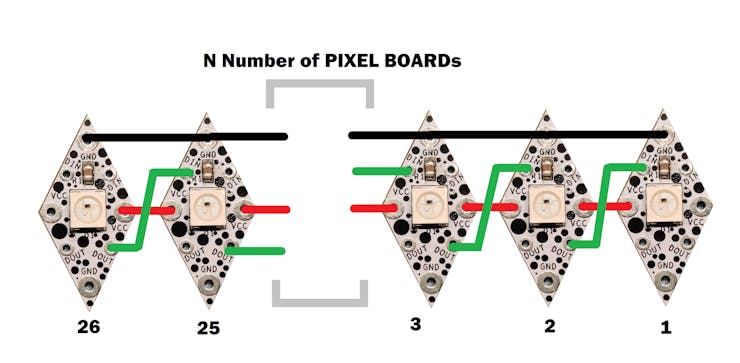
- Wiring of the Leaf part includes connecting all 26 Boards in parallel together and also arranging the Din and Dout of LED Boards.
Schematic of above connections
- I first connected the Dout of the first PIXEL to Din of Second board, then Dout of second board to Din of Third board, and then the Dout of the third to Din of Fourth, and the list goes on and on.
- then after this, I connected all the VCC and GND also.
- I used mainly Silver copper wire and remaining cutouts from LEDs and resistors which I collected for moments like this.
- Connecting wire to VCC and GND of each Pixel is a hellish work.


Next is to prepare the Petal Portion, I had to do the same process as before and the result was this Petal Base with Densely populated LEDs and so many wires.
Now after the soldering of silver copper wire, I tested both Leaf and Petal with the Arduino Nano setup that I used earlier to check each PIXIE Board.


- I connected VCC of RGB to 5V
- GND to GND
- and Din to D3 of Nano
Code will remain the same as last time, we only had to change the number of LEDs which was 26 for leaf and 23 for petals.
3D Printed Parts ASSEMBLY


Next, I gather all the bottom parts which were Petal, Stalk, Leaf, and then put them together with help of super glue.
I used Superglue to joint Petal with stalk first and then another end of the stalk to Leaf.
A total of two joints was superglued together.
After Superglueing all three parts together, we get a huge single Tulip that contains RGB LEDs inside.
Selecting the Right Microcontroller for Driving LEDs

The brain of this project is the mighty Attiny85 MCU.
The reason for using Attiny85 over the previously used Arduino nano is pretty simple actually. Cost and over-killness.
Attiny Cost very very very less in comparison with the Arduino Nano Board.
Also, in this project, the space of placing the circuit is an issue and an Arduino board will need more space. also, only two Digital pins are being used so why to choose a Microcontroller with 13 pins that would just sit idle.
To keep things simple and easy to use, I choose Attiny85 which is a low-power Microchip 8-bit AVR? The RISC-based microcontroller combines 8 KB ISP Flash memory, 512B EEPROM, 512B SRAM.
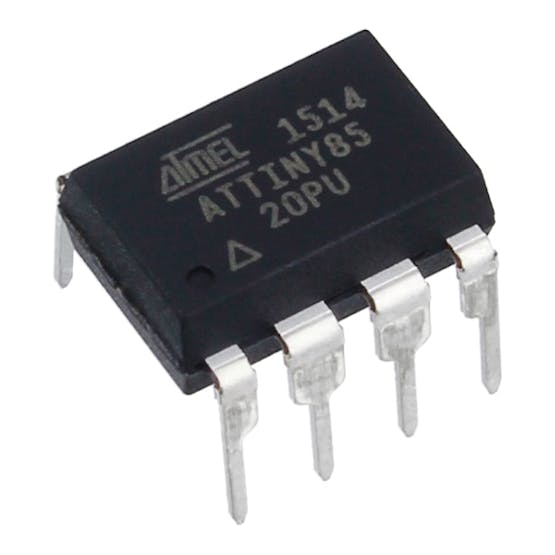
It has six IO Ports and operates between 2.7-5.5 volts which is ideal for our application which is to drive two separate WS2812B LED lines from D0 and D1 Pins.
I prepared a simple Perf board Setup according to the below schematic.
For Plugging and unplugging the Attiny85 on the circuit, I added a DIP8 Socket for convenience.
The idea here is to flash the Attiny85 before putting it on the IC socket, if in the future I want to alter the code, I can remove the IC from its place and Flash it, then put it back on.
Final CODE
#include <Adafruit_NeoPixel.h>
#define PIN1 0  //connect D0
#define PIN2 1  //connect D1

#define NUMPIXELS1 23
#define NUMPIXELS2 26

Adafruit_NeoPixel pixels1 = Adafruit_NeoPixel(NUMPIXELS1, PIN1, NEO_GRB + NEO_KHZ800);
Adafruit_NeoPixel pixels2 = Adafruit_NeoPixel(NUMPIXELS2, PIN2, NEO_GRB + NEO_KHZ800);

int delayval = 10; // timing delay
int redColor = 0;
int greenColor = 0;
int blueColor = 0;


void setup()  {
  pixels1.begin();
  pixels2.begin();

  pixels1.show();
  pixels2.show();

}

void loop() {

  ring1();
  ring2();
  delay(500);

}

void ring1() {
  setColor();

  for(int i=0;i<NUMPIXELS1;i++){

    // pixels.Color takes RGB values, from 0,0,0 up to 255,255,255
    pixels1.setPixelColor(i, pixels1.Color(redColor, 0, blueColor)); //color fluctuate         s between Red and Blue only

    pixels1.show(); // This sends the updated pixel color to the hardware.

    delay(delayval); // Delay for a period of time (in milliseconds).

    // Serial.println(i);

    if (i == NUMPIXELS1){
      i = 0; // start all over again!
        setColor();
    }

  }
}

void ring2() {
  setColor();

  for(int i=0;i<NUMPIXELS2;i++){

    // pixels.Color takes RGB values, from 0,0,0 up to 255,255,255
    pixels2.setPixelColor(i, pixels2.Color(0, 255, 10)); //  bright green color.

    pixels2.show(); // This sends the updated pixel color to the hardware.

    delay(delayval); // Delay for a period of time (in milliseconds).

    // Serial.println(i);

    if (i == NUMPIXELS2){
      i = 0; // start all over again!
        setColor();
    }

  }
}


void setColor(){
  redColor = random(0, 255);
  greenColor = random(0,255);
  blueColor = random(0, 255);
  Serial.print("red: ");
  Serial.println(redColor);
  Serial.print("green: ");
  Serial.println(greenColor);
  Serial.print("blue: ");
  Serial.println(blueColor);

}
Code for this project is a simple one to understand.
We first Define our Digital pins and the number of Neopixels that we will use, then in the loop section, we constantly run two functions which are Ring 1 and Ring 2.
In-Ring 1, I have set the RED and BLUE colors to high so color fluctuate between them at random.
In-Ring 2, the Green color is set throughout. it won't change.
In the end, there's the setColor function that does all the random "color-changing work".
If You have a different number of LEDs, just change the #define NUMPIXELS1 23
and #define NUMPIXELS2 26 according to the number of LEDs you have.
Next, we Flash this sketch into the Attiny85
Flashing Process with Arduino as ISP Programmer
As for the Flashing Process, we cannot directly program ATTINY85 through any USB, I mean there's a method for programming the Attiny straight from the USB port but I'm not doing that.
Instead, I'll be using the ISP flashing method which will utilize the SPI Pins of attiny85 to burn the bootloader in it and then Flash.
Getting Attiny13 Core Installed on Arduino IDE
Before starting the Flashing process, we first need to download and install the Attiny85 Core files in Arduino IDE.
https://github.com/SpenceKonde/ATTinyCore
- File->Preferences on a PC, or Arduino->Preferences on a Mac, enter the above URL in "Additional Boards Manager URLs
- Tools -> Boards -> Boards Manager... *If using 1.6.6, close boards manager and re-open it (see below)
- Select "ATTinyCore by Spence Konde" and click "Install".
AVRs chips usually come blank, they need to be set up to be Arduino IDE compatible but to do that you need an AVR programmer do to that, for example, a USBASP.
Fun Fact, you could make your own AVR Programer with an Arduino Uno or a Nano board in a very easy step.
- Connect your Arduino board with com port and select the following sketch
- Example>ArduinoISP upload this sketch onto your board
- After uploading, go to the tools menu and choose the Arduino as ISP option in the programmer section.
- Now for flashing Attiny85, we can select the Attiny85 in the Board section.
The programming process uses VCC, GND, and four data pins. Three pins connect MISO, MOSI, and SCK between the programming micro and the target micro, the fourth pin from the programming micro goes to the reset pin of the target.
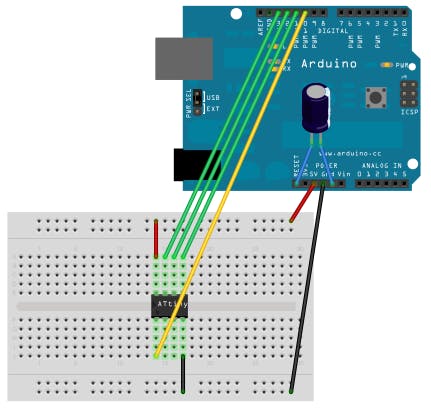
Wire the Attiny85 with Arduino in the above way. (also right after uploading ISP Sketch to your Arduino, do not forget to add a 10uf Cap between Reset and GND pins of your Arduino board)
Instead of using an Arduino UNO and a breadboard for this job, I will use my DIY Attiny Programmer which I made for flashing the Attiny or Atmega MCUs.

which you can check out from here-
https://www.hackster.io/Arnov_Sharma_makes/multiple-attiny85-13a-programmer-84adf8
- connect the Board to the Arduino as ISP Setup in the above wiring config
- choose the right port, right programmer (Arduino as ISP), and hit Burn Bootloader
- wait for few seconds, you will get done burning the bootloader message.
- Now Open the sketch that you want to upload to this Attiny
- Go to the Sketch menu and select Upload using the programmer.
- and your Sketch will get uploaded onto the attiny85.


Also, because the programmer I'm using has DIP sockets, I just plug the MCU in it and flash the code inside it, then removed the MCU.
Now after Flashing the MCU with the main code, I added the Attiny85 on the main circuit and started the final wiring process of this project.
FINAL WIRING

Here's the main wiring diagram of the overall setup.
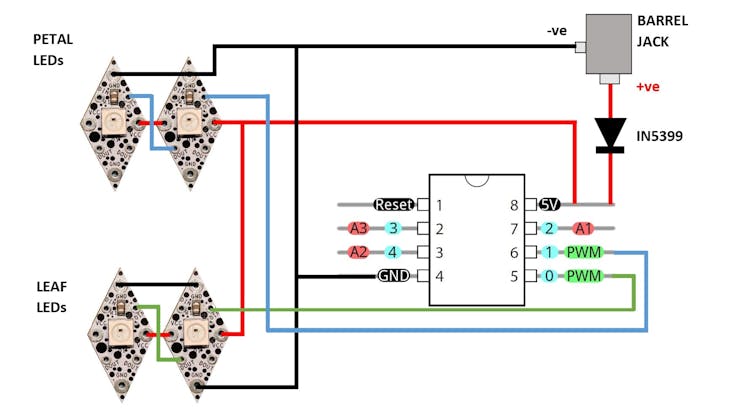
The goal here is to connect Attiny85's VCC to VCC of LEDs, GND to GND, D0 to Petal's RGB Din, and D0 to Leaf's RGB Din with wires.


Also, for powering this setup, I'm using a generic Barrel Jack connector.
I added an IN5399 Diode in between the VCC of Barrel jack and Attiny85 and connected its GND to the GND of Attiny85.
After this, the wiring is done, Now we put on the Lid on all three bodies and hang this setup on a wall.


POWER SOURCE
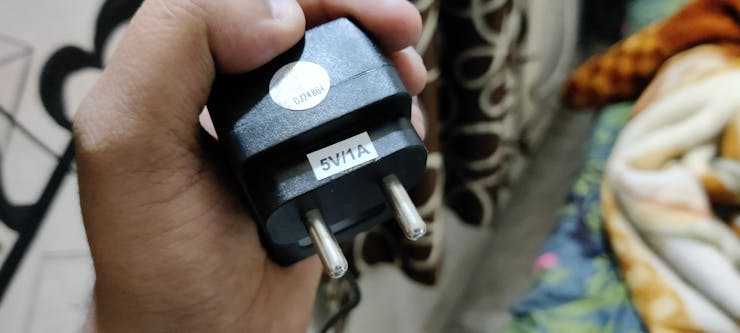
As for the power source, I used a 5V 1 A Charger to power this setup.
This setup only contains 49 RGB LEDs and each led consumes very little current so a 1A Charger will work without breaking any sweat.
RESULT
Here is the result.
This setup works something like this, so the green LED will stay on forever and the tulip LEDs will randomly shuffle between RED and BLUE shades.
This can be altered by tweaking the provided code or add a whole new code into this setup.
IMPROVEMENTS

As for the improvements required, I have to prepare a full-size leaf and petal PCB.
For saving cost, I prepared a small breakout board for single WS2812B LEDs, the setup did work but it was hard to make because of the manual soldering of VCC GND and Din-Dout Pads.
The wise choice here is to get a large size PCB for this project, they would cost more but we dont have to do the excess wiring required in this project.
Will be using the PCBWAY's service again for the V2 of this project!
Check out PCBWAY for getting high-quality PCB Service at a less and economic cost.
This is it for today, Leave a comment if you guys need any help, and I'll be back with another project soon!
Peace
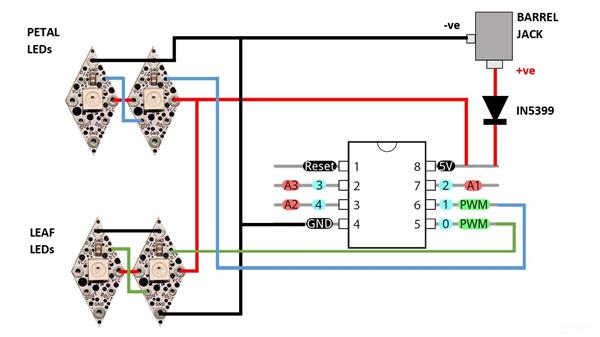
Tulipa x RGB Edition
*PCBWay community is a sharing platform. We are not responsible for any design issues and parameter issues (board thickness, surface finish, etc.) you choose.

Raspberry Pi 5 7 Inch Touch Screen IPS 1024x600 HD LCD HDMI-compatible Display for RPI 4B 3B+ OPI 5 AIDA64 PC Secondary Screen(Without Speaker)
BUY NOW
ESP32-S3 4.3inch Capacitive Touch Display Development Board, 800×480, 5-point Touch, 32-bit LX7 Dual-core Processor
BUY NOW
Raspberry Pi 5 7 Inch Touch Screen IPS 1024x600 HD LCD HDMI-compatible Display for RPI 4B 3B+ OPI 5 AIDA64 PC Secondary Screen(Without Speaker)
BUY NOW- Comments(2)
- Likes(2)
 Log in to post comments.
 Petrov IvanNov 26,20210 CommentsReply
-
 Engineer
Jul 07,2023
-
 Petrov Ivan
Nov 26,2021
- 1 USER VOTES
- YOUR VOTE 0.00 0.00
- 1
- 2
- 3
- 4
- 5
- 6
- 7
- 8
- 9
- 10
- 1
- 2
- 3
- 4
- 5
- 6
- 7
- 8
- 9
- 10
- 1
- 2
- 3
- 4
- 5
- 6
- 7
- 8
- 9
- 10
- 1
- 2
- 3
- 4
- 5
- 6
- 7
- 8
- 9
- 10

-
10design
-
10usability
-
10creativity
-
10content
 More by Arnov Arnov sharma
-
 Motion Trigger Circuit with and without Microcontroller
GreetingsHere's a tutorial on how to use an HC-SR505 PIR Module with and without a microcontroller t...
-
 Motor Driver Board Atmega328PU and HC01
Hey, what's up folks here's something super cool and useful if you're making a basic Robot Setup, A ...
-
 Power Block
Hey Everyone what's up!So this is Power block, a DIY UPS that can be used to power a bunch of 5V Ope...
-
 Goku PCB Badge V2
Hey everyone what's up!So here's something SUPER cool, A PCB Board themed after Goku from Dragon Bal...
-
 RGB Mixinator V2
Hey Everyone how you doin!So here's a fun little project that utilizes an Arduino Nano, THE MIXINATO...
-
 Gengar PCB Art
Hey guys and how you doing!So this is the GENGAR PCB Badge or a Blinky Board which is based around 5...
-
 Batocera Arcade Box
Greetings everyone and welcome back, Here's something. Fun and nostalgic. Right now, we are using ou...
-
 64x32 Matrix Panel Setup with PICO 2
Greetings everyone and welcome back.So here's something fun and useful: a Raspberry Pi Pico 2-powere...
-
 Portable Air Quality Meter
Hello everyone, and welcome back! Today, I have something incredibly useful for you—a Portable Air Q...
-
 WALKPi PCB Version
Greetings everyone and welcome back, This is the WalkPi, a homebrew audio player that plays music fr...
-
 Delete Button XL
Greetings everyone and welcome back, and here's something fun and useful.In essence, the Delete Butt...
-
 Arduino Retro Game Controller
Greetings everyone and welcome back. Here's something fun.The Arduino Retro Game Controller was buil...
-
 Super Power Buck Converter
Greetings everyone and welcome back!Here's something powerful, The SUPER POWER BUCK CONVERTER BOARD ...
-
 Pocket Temp Meter
Greetings and welcome back.So here's something portable and useful: the Pocket TEMP Meter project.As...
-
 Pico Powered DC Fan Driver
Hello everyone and welcome back.So here's something cool: a 5V to 12V DC motor driver based around a...
-
 Mini Solar Light Project with a Twist
Greetings.This is the Cube Light, a Small and compact cube-shaped emergency solar light that boasts ...
-
 PALPi V5 Handheld Retro Game Console
Hey, Guys what's up?So this is PALPi which is a Raspberry Pi Zero W Based Handheld Retro Game Consol...
-
 DIY Thermometer with TTGO T Display and DS18B20
Greetings.So this is the DIY Thermometer made entirely from scratch using a TTGO T display board and...
-
 Motion Trigger Circuit with and without Microcontroller
GreetingsHere's a tutorial on how to use an HC-SR505 PIR Module with and without a microcontroller t...
-
 Motor Driver Board Atmega328PU and HC01
Hey, what's up folks here's something super cool and useful if you're making a basic Robot Setup, A ...
-
 Power Block
Hey Everyone what's up!So this is Power block, a DIY UPS that can be used to power a bunch of 5V Ope...
-
 Goku PCB Badge V2
Hey everyone what's up!So here's something SUPER cool, A PCB Board themed after Goku from Dragon Bal...
-
 RGB Mixinator V2
Hey Everyone how you doin!So here's a fun little project that utilizes an Arduino Nano, THE MIXINATO...
-
 Gengar PCB Art
Hey guys and how you doing!So this is the GENGAR PCB Badge or a Blinky Board which is based around 5...
-
 Batocera Arcade Box
Greetings everyone and welcome back, Here's something. Fun and nostalgic. Right now, we are using ou...
-
 64x32 Matrix Panel Setup with PICO 2
Greetings everyone and welcome back.So here's something fun and useful: a Raspberry Pi Pico 2-powere...
-
 Portable Air Quality Meter
Hello everyone, and welcome back! Today, I have something incredibly useful for you—a Portable Air Q...
-
 WALKPi PCB Version
Greetings everyone and welcome back, This is the WalkPi, a homebrew audio player that plays music fr...
-
 Delete Button XL
Greetings everyone and welcome back, and here's something fun and useful.In essence, the Delete Butt...
-
 Arduino Retro Game Controller
Greetings everyone and welcome back. Here's something fun.The Arduino Retro Game Controller was buil...
-
-
Commodore 64 1541-II 1581 Floppy Disk Drive C64 Power Supply Unit USB-C 5V 12V DIN connector 5.25
166 1 3 -
Easy to print simple stacking organizer with drawers
87 0 0 -
-
-
-
Modifying a Hotplate to a Reflow Solder Station
1137 1 6 -
MPL3115A2 Barometric Pressure, Altitude, and Temperature Sensor
638 0 1 -
-
Nintendo 64DD Replacement Shell
495 0 2 -
V2 Commodore AMIGA USB-C Power Sink Delivery High Efficiency Supply Triple Output 5V ±12V OLED display ATARI compatible shark 100W
1442 4 3


