|
KiCADKicad
|
Vending Machine for Birds
A vending machine for birds that rewards them with food when they drop something in a hole. Electronics and enclosure materials cost <100 USD/EUR. I've designed a PCB and PVC pipe enclosure and dispenser (described below). The circuit is not complex, but I think a custom PCB makes it easier for people who are not electronics hobbyists to build this. I've made a few different enclosures out of scrap for this, but will share the PVC pipe enclosure details since it's sturdy, waterproof, and the materials can all be found at the hardware store.
There were two main inspirations for me to start and document this project
- Hans Forsberg - designed his own machine and was the first person I learned of that had birds (magpies) bringing items to deposit on thier own
- Josh Klein - makes his Crowbox designs freely available and supports people who want to build it
I would like to thank PCBWay for helping me get the PCB made.
MAIN FEATURES
- portable
- saves power until a warm body is present
- battery or mains powered
- one moving part
- accessible components and materials
- rodents can't break in and get the food
- cheap to build
- customizable
ELECTRONICS, SENSORS, AND POWER
The circuit is all analog, using four NE555 timers and one LM358 dual op amp. The sensors are all made using IR phototransistors and IR LEDs. The PCB has headers broken out so you can monitor and control it with a microcontroller or SBC. It runs on 5-6VDC (use 5V if planning to power a USB device with the vending machine)
Power Consumption
Power consumption at 5V is as follows (close, anyways):
Without RPi Zero W
- Idle with Powerbank Keep-Alive and TImer enabled: 18mA
- Timer uses 8mA
- Powerbank Keep-Alive uses 4mA
- ^With both of these disabed it uses 6 mA
- IR LEDs on: 320mA
- IR LEDs and motor on: 510mA
With RPi Zero W and wide-angle camera module
- Idle with Powerbank Keep-Alive and TImer enabled: 220mA
- IR LEDs on: 520mA
- IR LEDs and motor on: 820mA
So with the Rpi and camera you could get about 2 days out of a 20,000 mAh power bank. With just the vending machine you could get about 10 days.
Modules
- Powerbank Keep-Alive: 555 sinks current every 7-22 seconds for 0.7-2.2 seconds to keep USB power banks on while sensors are in standby - the powerbank keep-alive can be disabled.
- IR LED ON/OFF: 555 keeps the IR LEDs used by the sensors on for 22 seconds after the last PIR trigger
- Op Amps: LM358 used as comparators to adjust the threshold of the sensors and send signals when they are triggered
- Motor Controller: 555 turns on the dispenser vibration motor when the deposit sensors are triggered, tuns it off when the dispense sensor is triggered
- Timed Dispense: 555 dispenses food every 10-100min - timed dispense can be disabled
- Daytimer: Phototransistor that puts the timer in reset while it's dark outside - brightness threshold can be adjusted or disabled (Rev. B)
- PIR Sensor: Sends a signal to turn on the sensor IR LEDs
- Deposit/Dispense Sensors: IR phototransistors and IR LEDs used as proximity sensors to monitor the deposit and dispense chutes
- Hopper Level Sensor: IR phototransistor and IR LED to detect when the food level gets low (Rev. B)
- Monitoring/Control: lines for monitoring and triggering events with an external controller (Rev. B)
PCB, BOM AND GERBERS
Kicad Files (Github): https://github.com/src1138/VMFB
Gerbers, PCB and BOM (PCBWay): https://www.pcbway.com/project/shareproject/Vending_Machine_for_Birds_11f2a4da.html
Current Version is Rev. B Ver. 1.1.
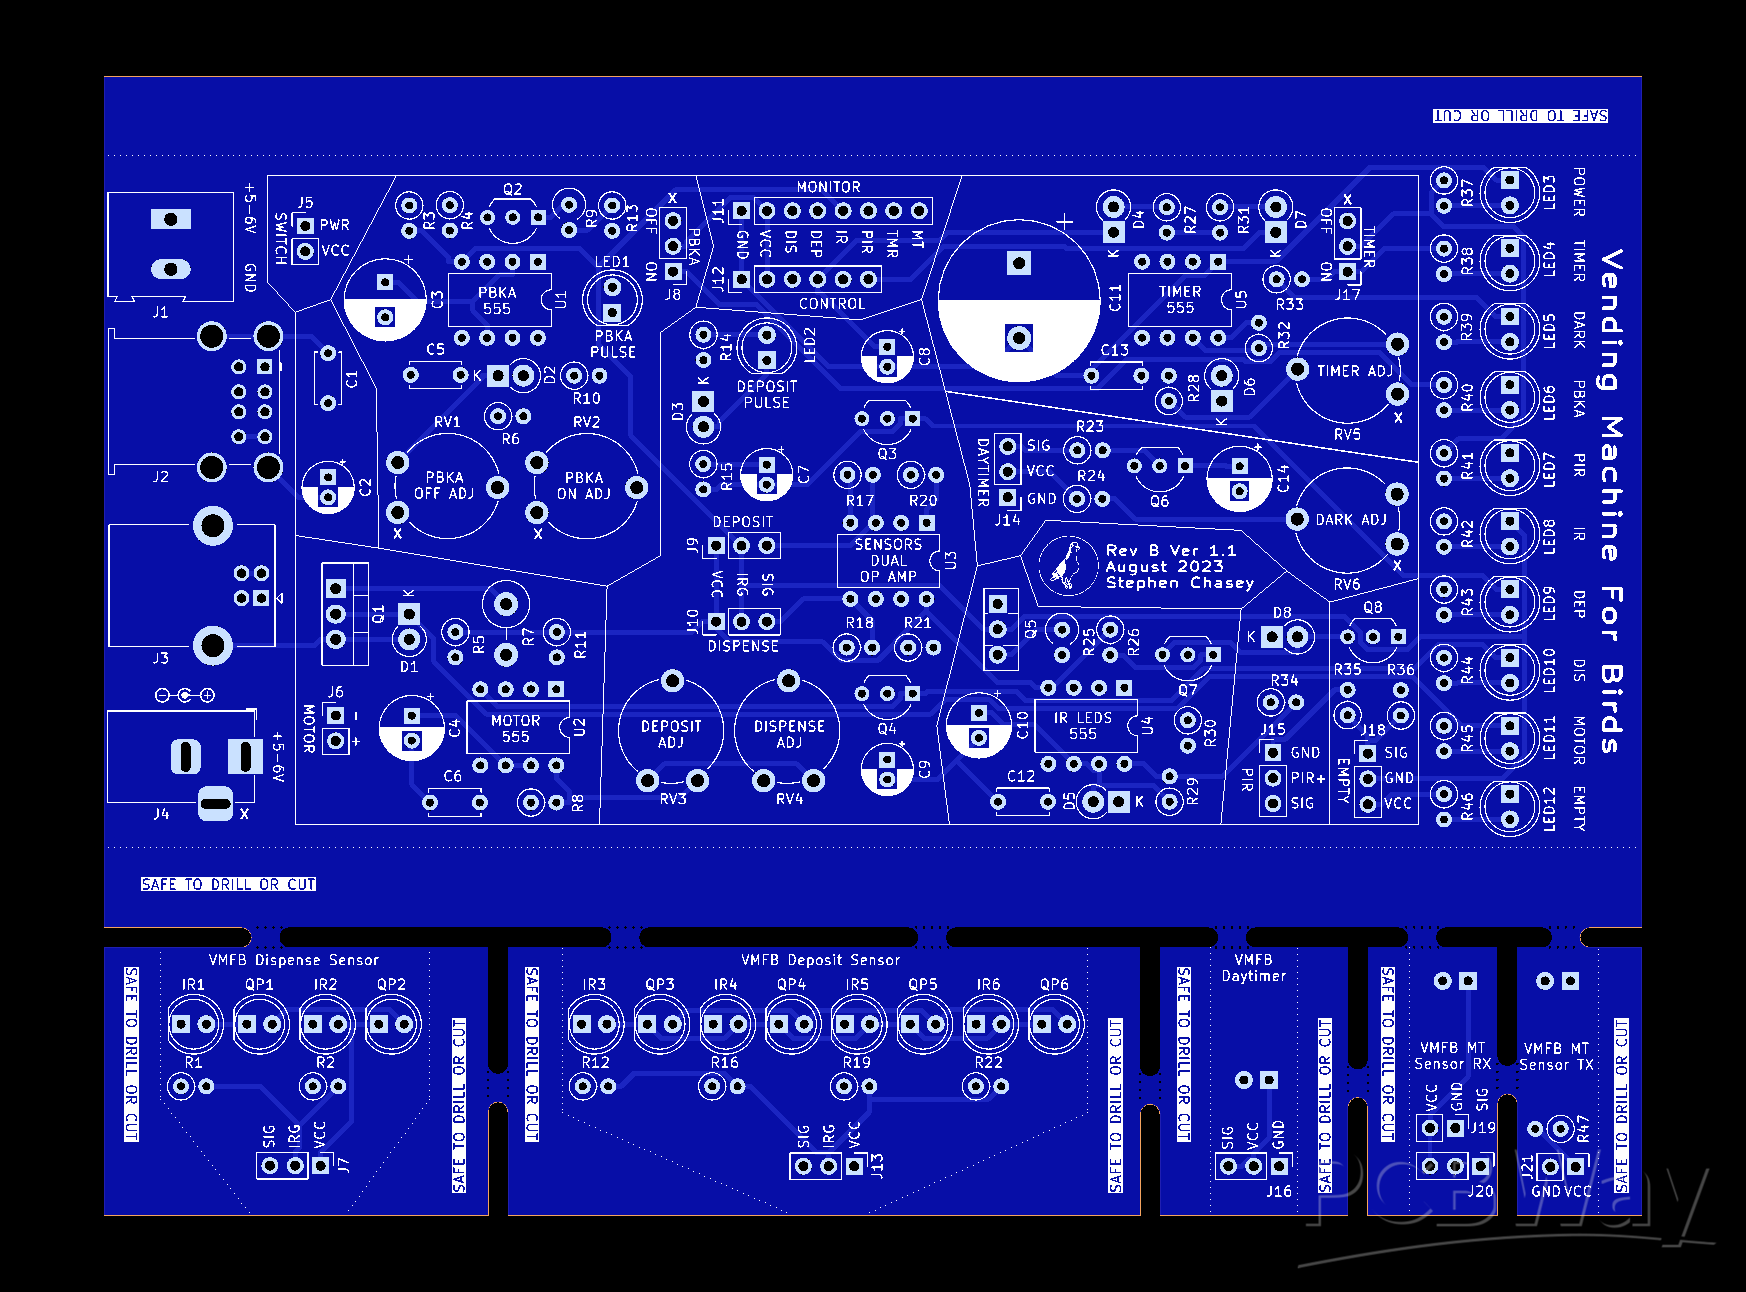
PCB Front
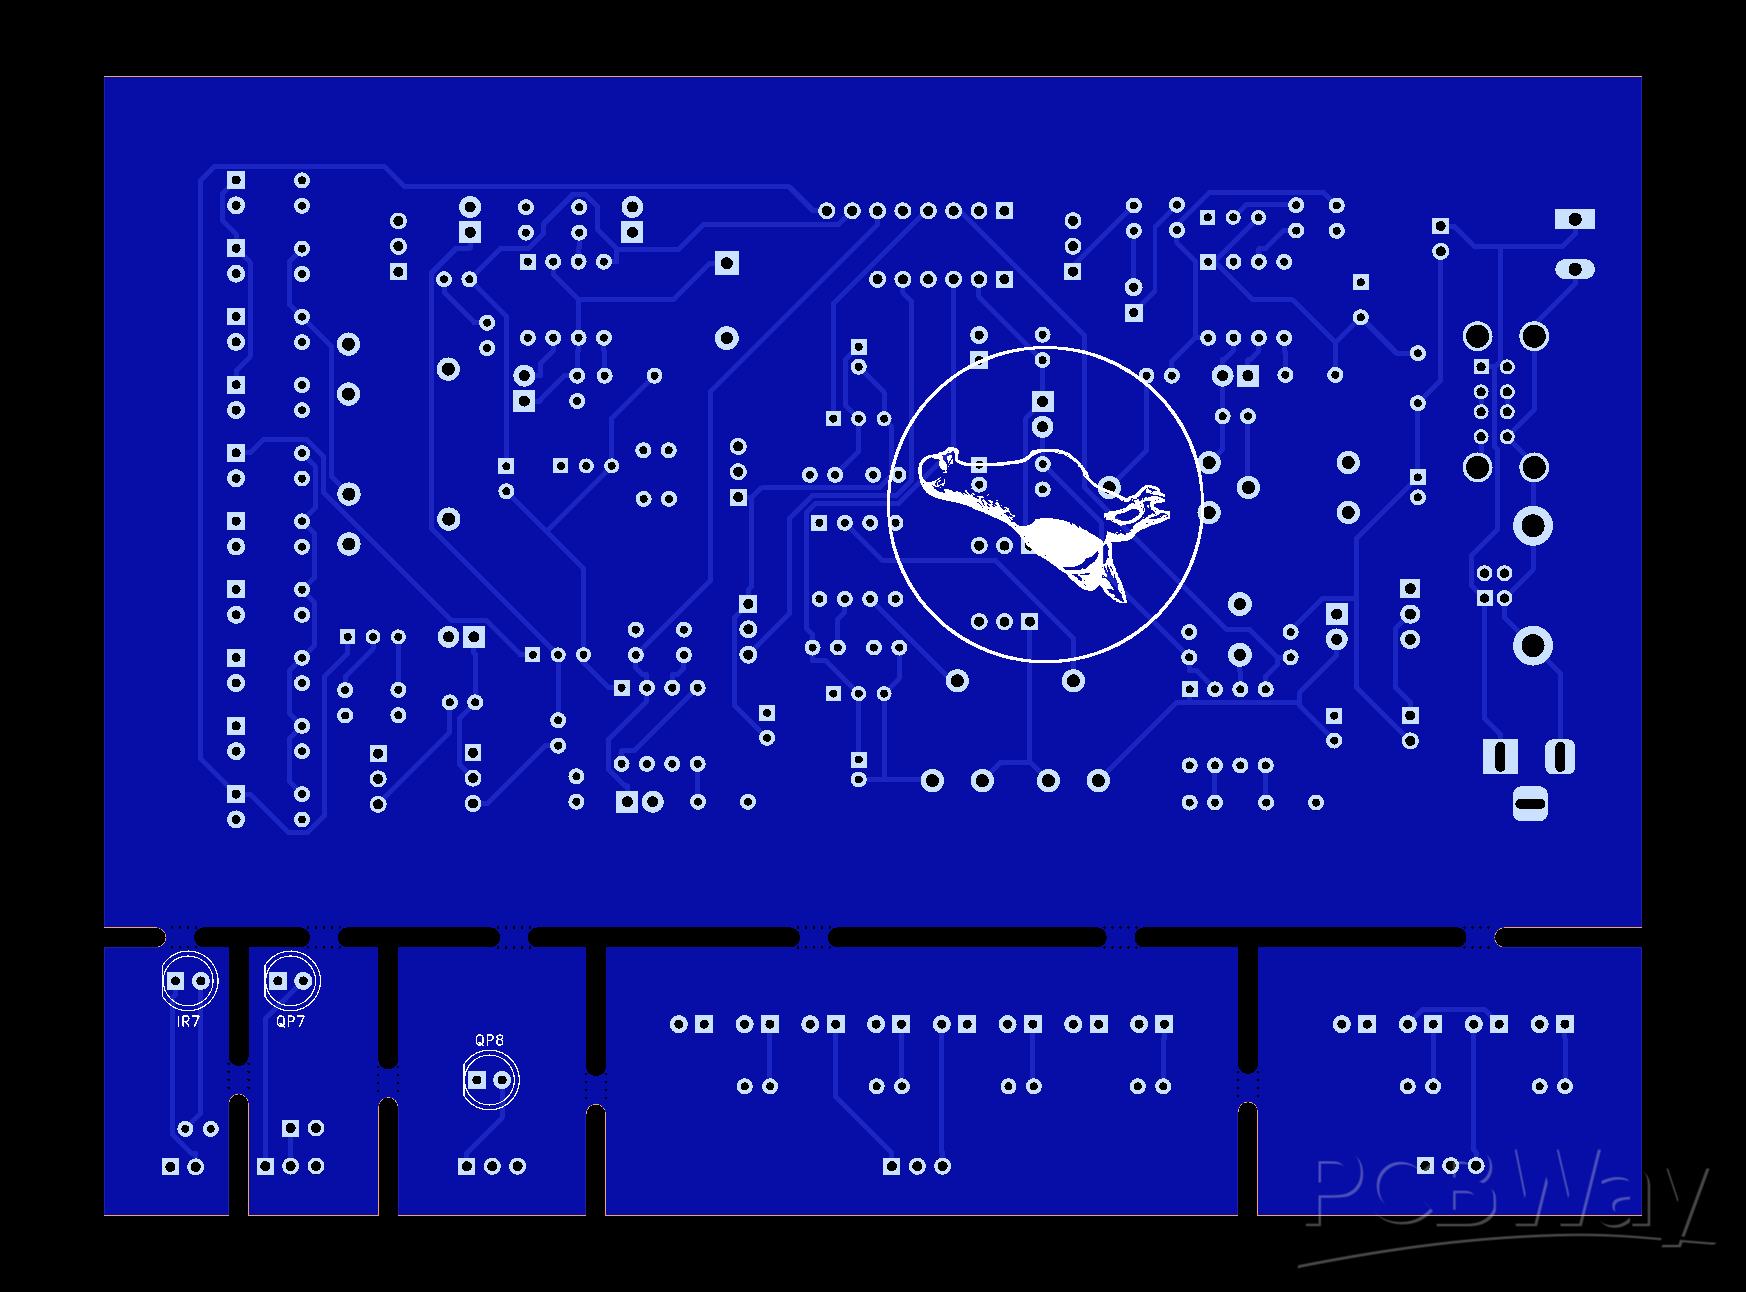
PCB Back
I priced the BOM for an earlier version of the board, including the PIR and motor for the vibration dispenser at Mouser and it came to 33.82 EUR. Mouser is not the cheapest source, but they have a pretty good selection of parts.
https://cdn.hackaday.io/files/1847547904515136/Winkelwagentje_jul28_0317.xls
If you shop around just a bit you could get the BOM for ~25 EUR. If you are an electronics hobbyist you probably have most if not all the parts on-hand.
CRITICAL COMPONENTS
This project uses commodity components, and you can confidently use alternatives with similar specs. There are a few points to keep in mind.
- For the phototransistors, they should have a photocurrent of around 10mA. If they have a lower photocurrent, you should replace the 10K resistors on the non-inverting op amp imputs with a higher value. For instance, if your phototransistors have a photocurrent of ~1mA, use a 100K resistor intead.
- I use NE555Ps here - you could use other models, but keep in mind that the transistors controlling the IR LEDs (BD139) and motor (TIP41C) need a bit of current to their base. If for instance you use the CMOS 555 that can only source about 10mA, you may need to replace these transistors with ones that have more gain.
- All resistors can be 1/4 watt except the 22R on the motor controller 555 output (1 watt) and the 47R on the IR LED 555 output (1/2 watt)
SHORTCUTS
- The PCB has footprints for USB type A, USB type B, barrel jack and screw terminal power input. You only need to populate the one(s) you will use.
- The Timer and Powerbank Keep-Alive are not essential and you don't have to populate the parts for them if you don't need/want to use them.
HOW IT WORKS
States
- Standby - No PIR trigger in the last 22 secs (IR LEDs are off)
- Sensors On - PIR was triggered in the last 22 secs (IR LEDs are on)
- Dispensing - Dispenser motor is on
Modes
- Normal (dispenses on deposit)
- Timer (dispenses every x minutes AND dispenses on deposit)
Event Sequence
- PIR sensor sees a warm body
- PIR triggers IR LED 555
- IR LED 555 turn on sensor IR LEDs for 22 secs after last PIR trigger
- When something is dropped in the deposit hole, the deposit sensor sees it
- The deposit side of the dual op amp sends a pulse to trigger the motor 555
- The motor 555 turns on the vibration dispenser motor - it times out after 11 secs
- When something is dispensed, the dispense sensor sees it
- The dispense side of the dual op amp sends a pulse to reset the motor 555
- The dispenser motor is stopped
When timed dispense is triggered, it sends a signal to turn on the sensor IR LEDs and triggers the motor controller to start the vibration dispenser. When something is dispensed, the motor stops.
FAILURE MODES
- Deposit sensor jammed: Sensor will not trigger a dispense event until it is unjammed. The sensor uses an inline capacitor to limit the signal to a pulse each time it is triggered.
- Dispense sensor jammed: Vending machine will not dispense until the sensor is unjammed.
- Peanut hopper jammed or empty: Dispense motor will stop after ~10 seconds.
MONITORING

I have been using a Raspberry Pi Zero W with a wide-angle camera module running MotionEyeOS with my vending machine just to record videos with motion detection. Now I am using the GPIO pins to monitor and log events, trigger video recording based on sensor status, show status information on a video overlay, and enable manual record/stop for vide and dispensing of a peanut via the web interface. The python and shell scripts for this are on GitHub: https://github.com/src1138/VMFB/tree/main/motioneye_scripts
DISPENSER
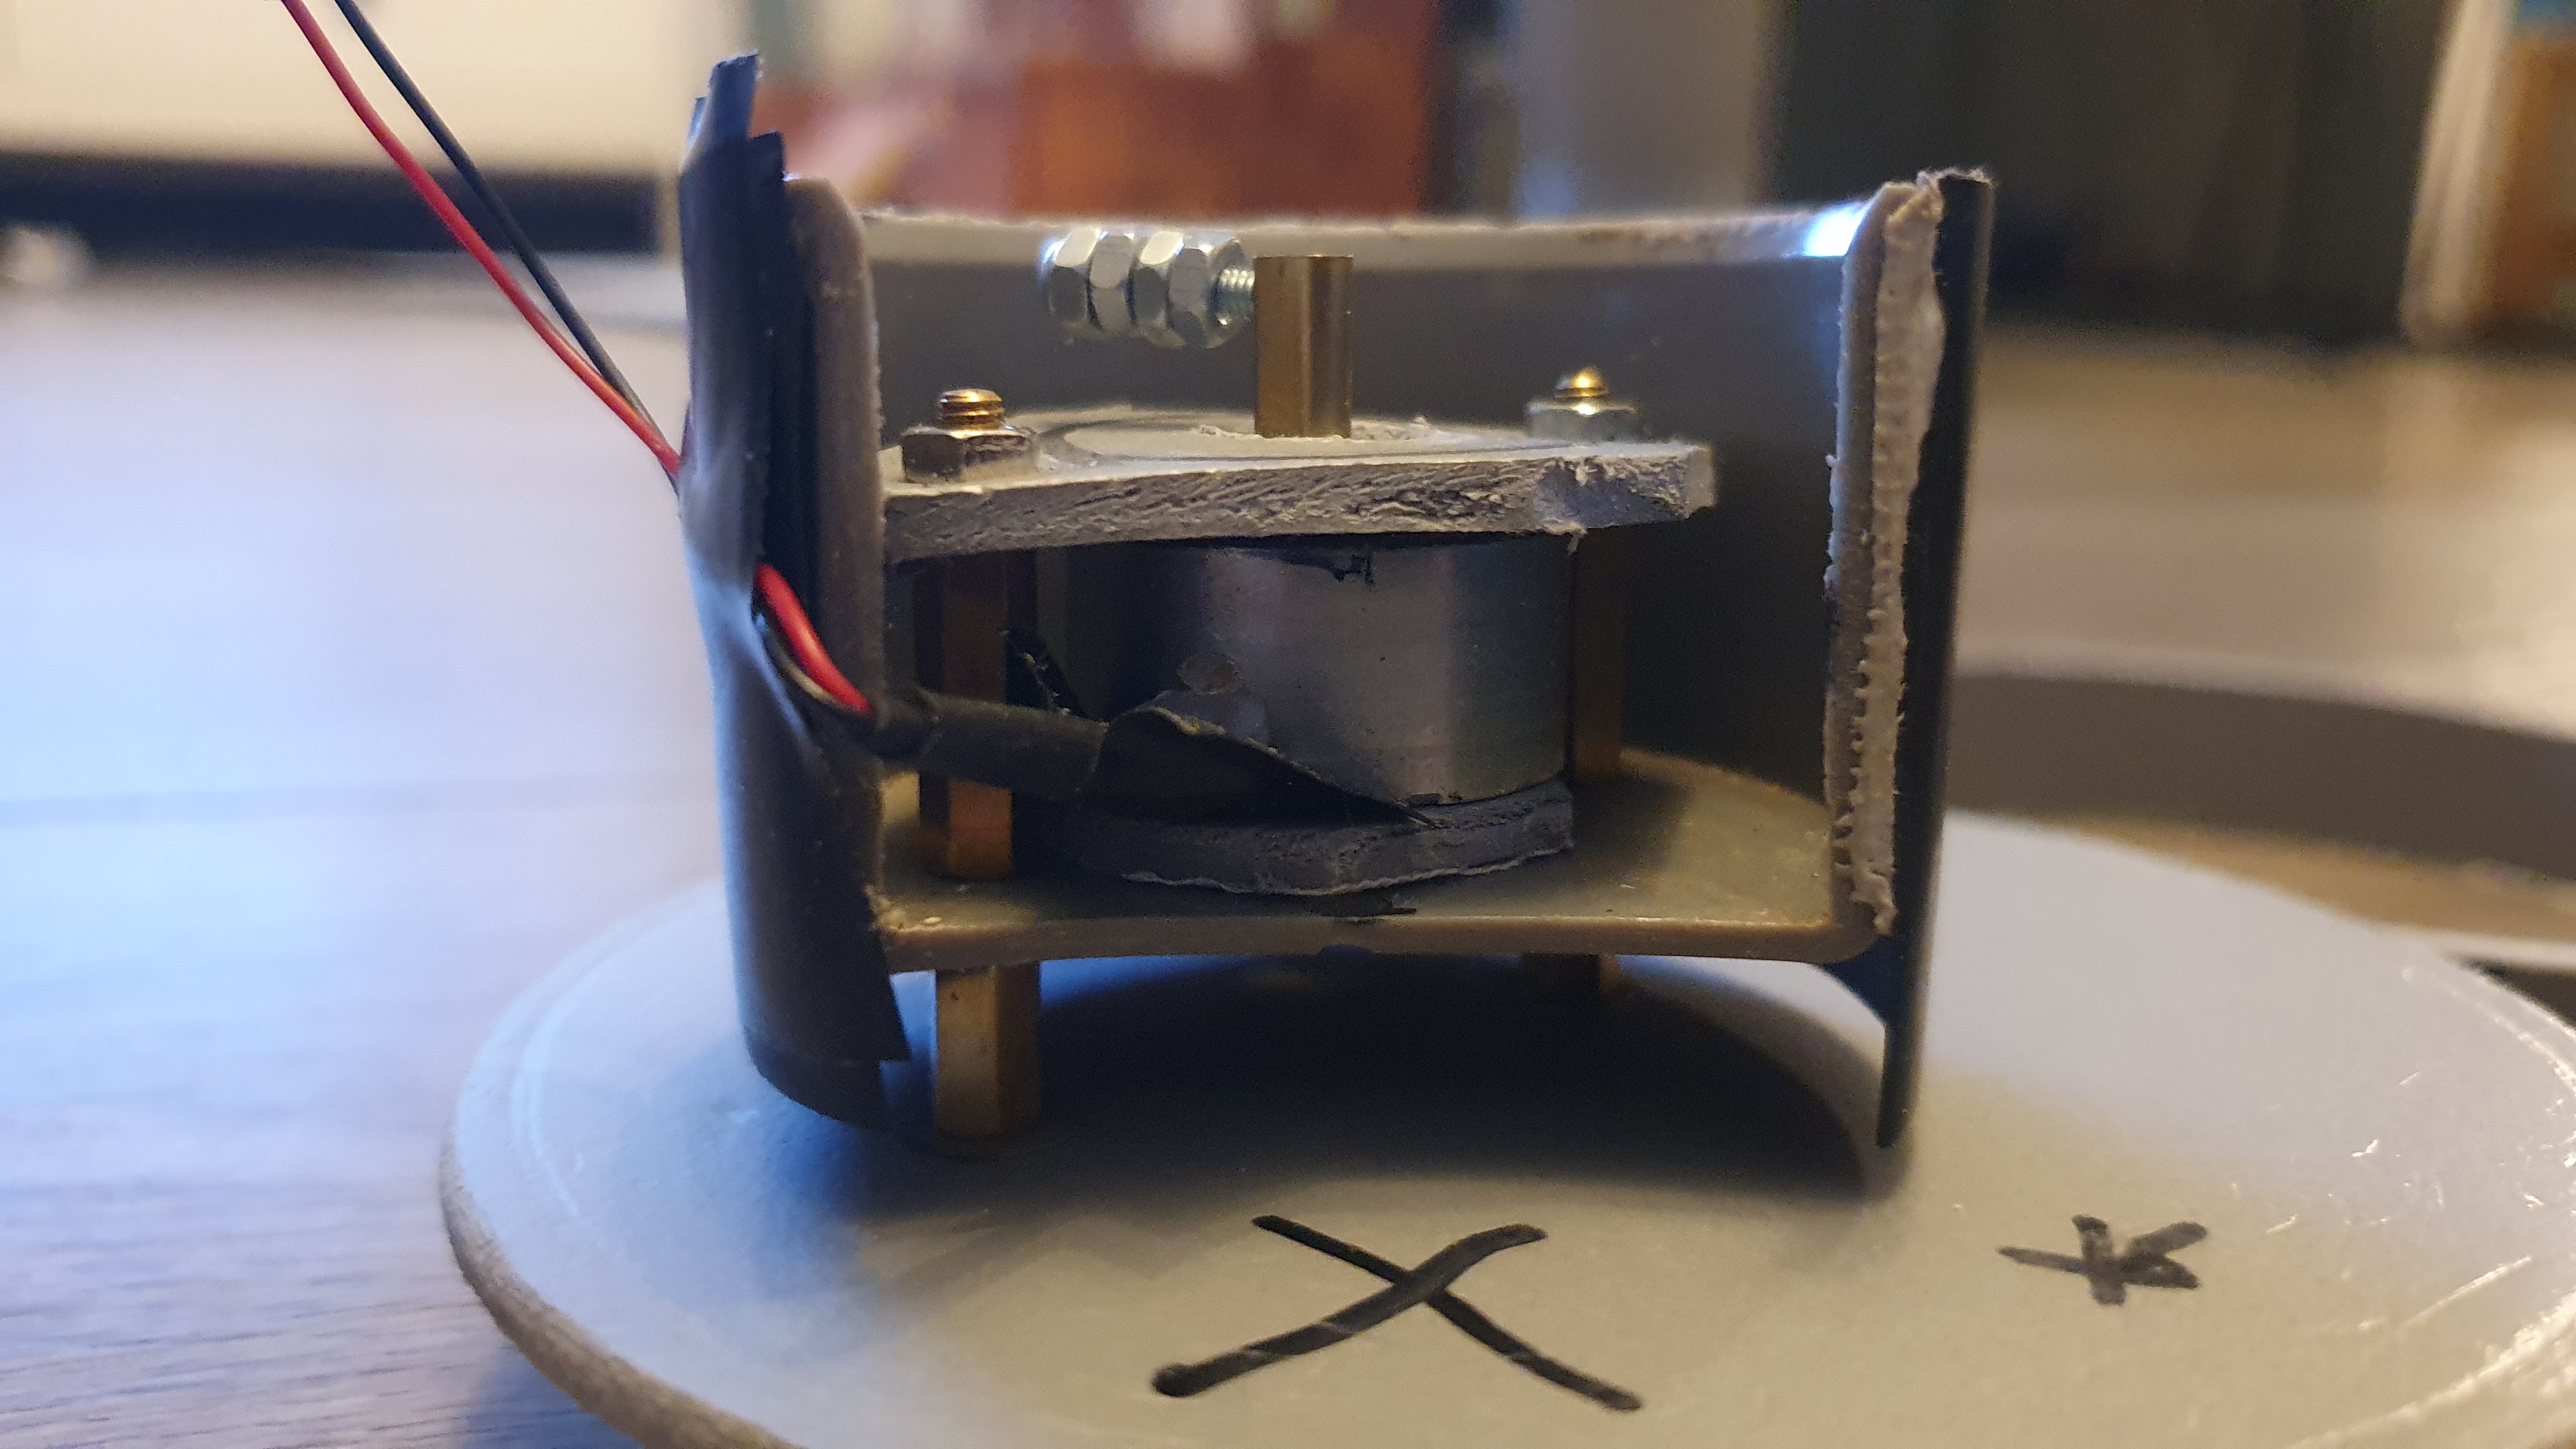
Dispenser: two-layer vibration platform with offset holes made from 3mm PVC sheet and 15mm M3 brass standoffs. I used a small 24x12mm 2VDC motor attached to the dispenser with brass standoffs and 3mm PVC sheet.
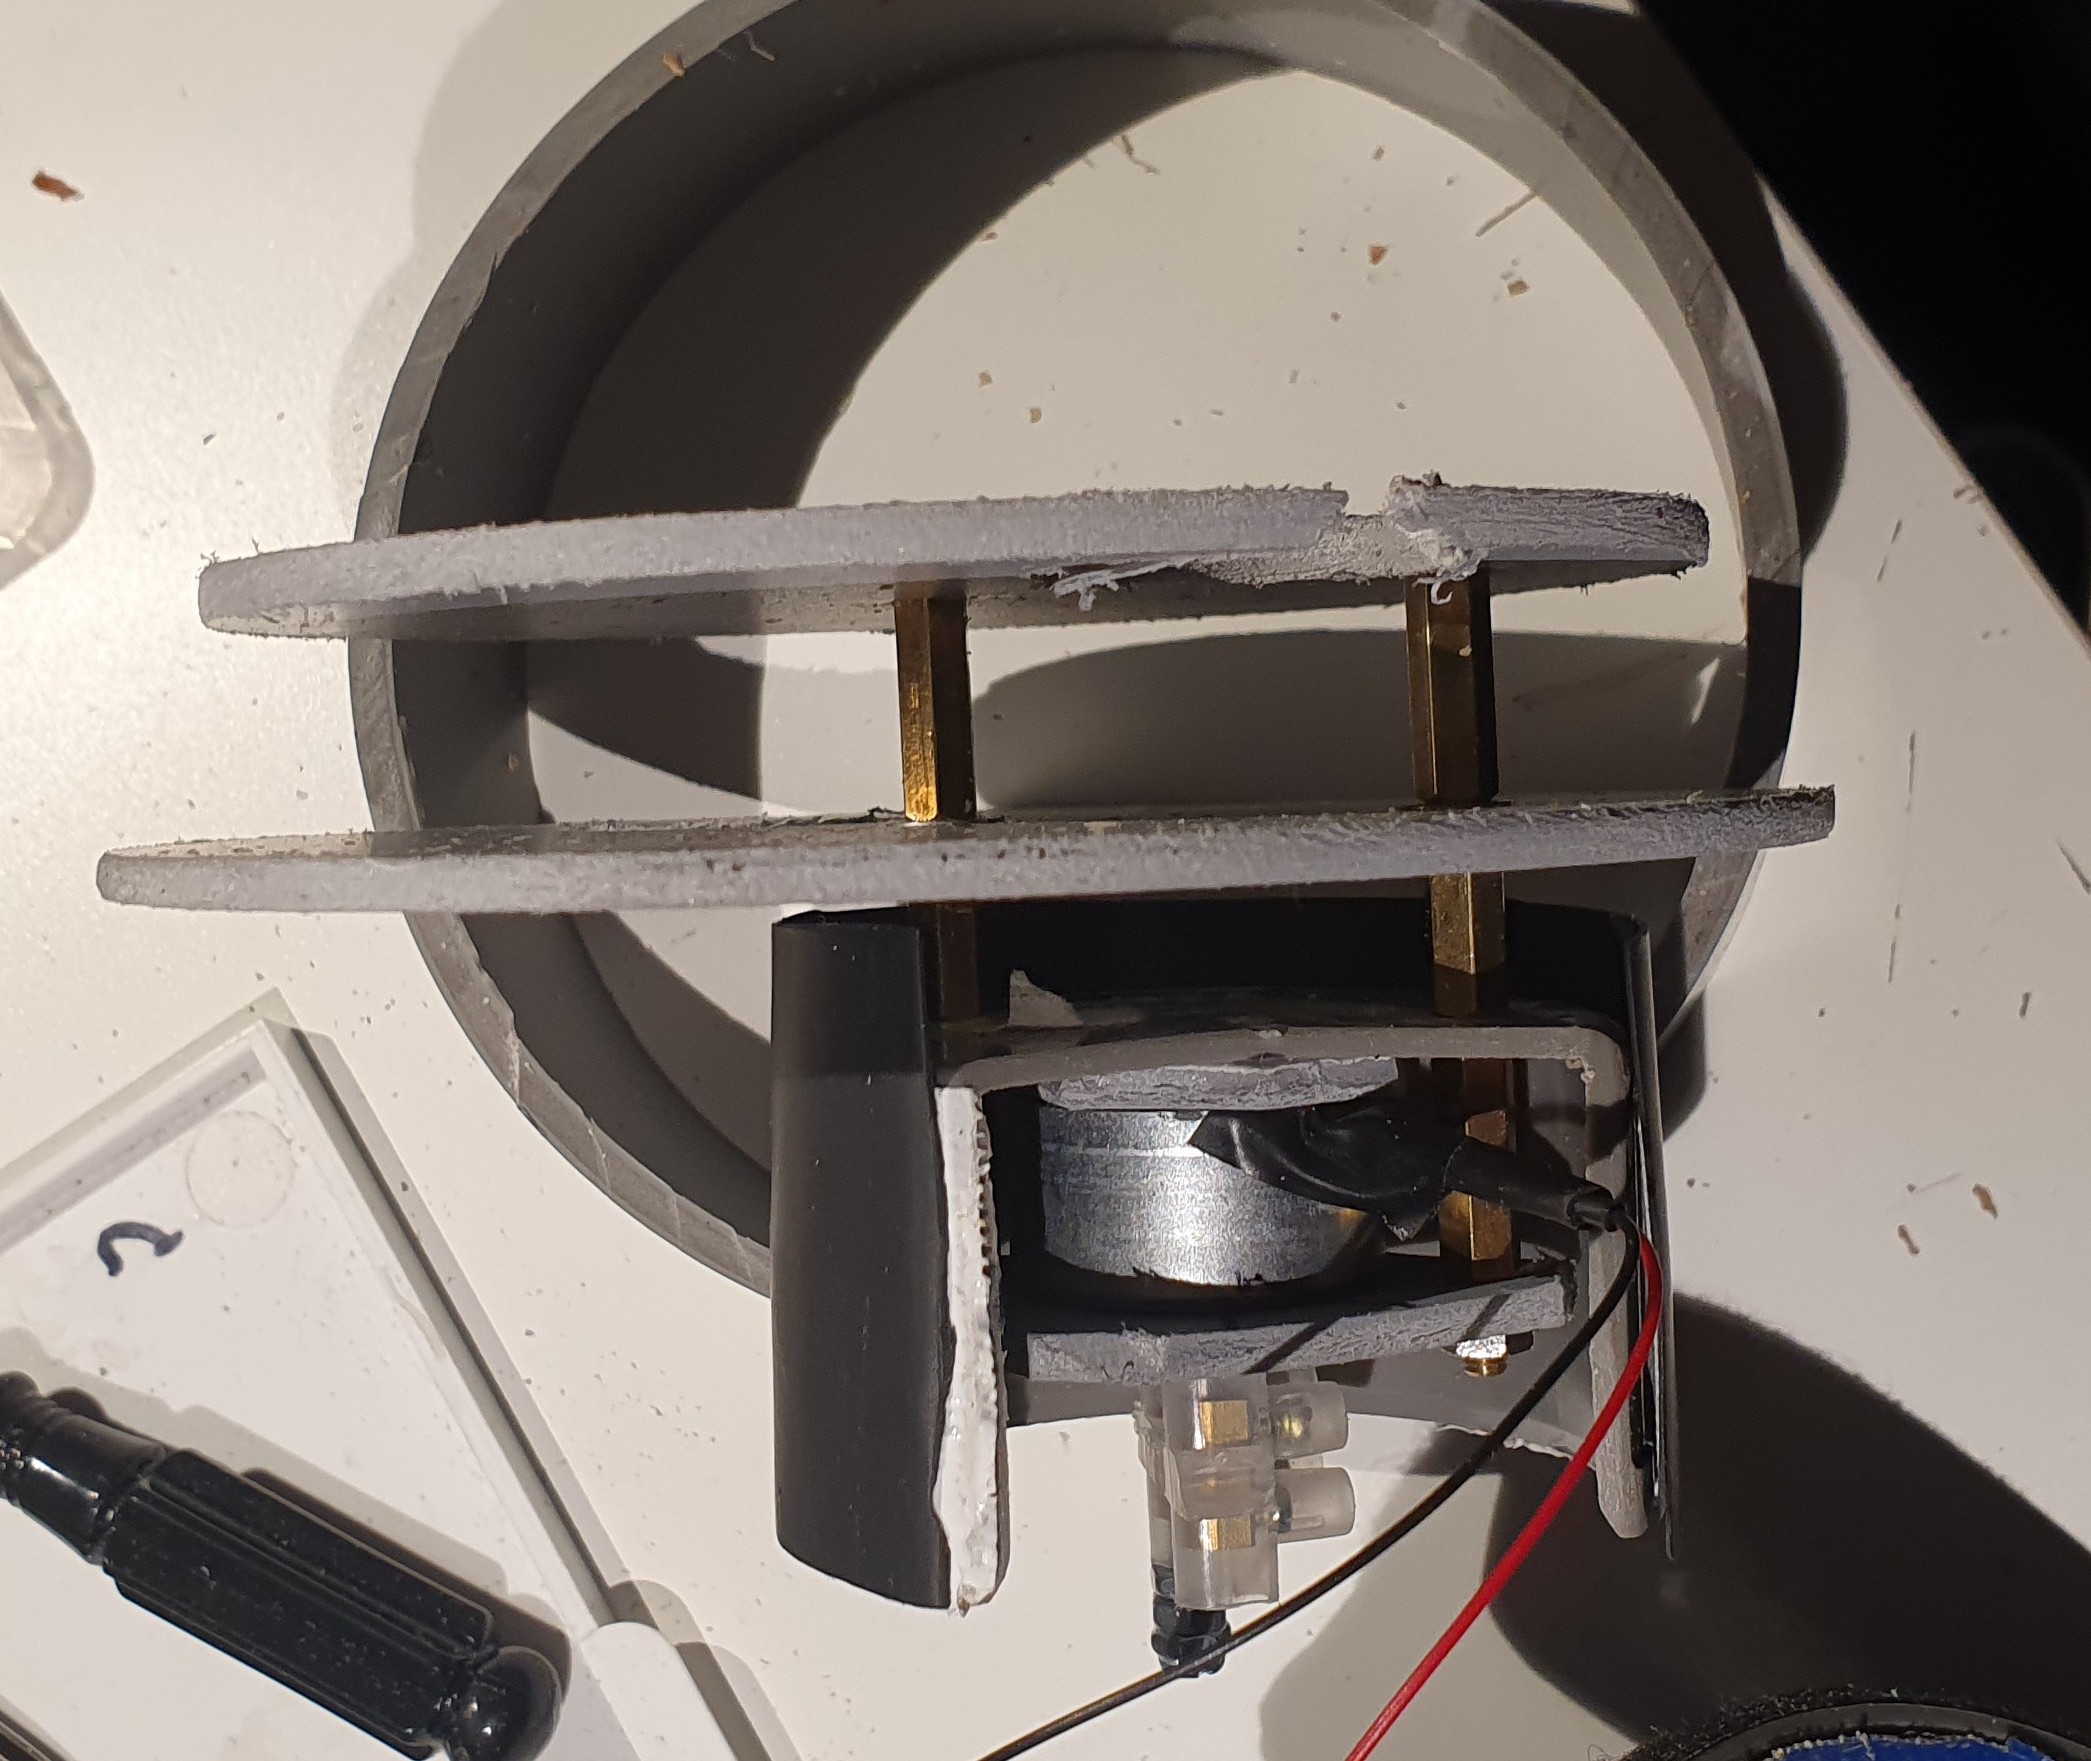
The dispenser typically dispenses a peanut or two within 3 seconds. Since it is a vibration dispenser, the enclosure should be level and mounted securely to insure relaible dispensing.
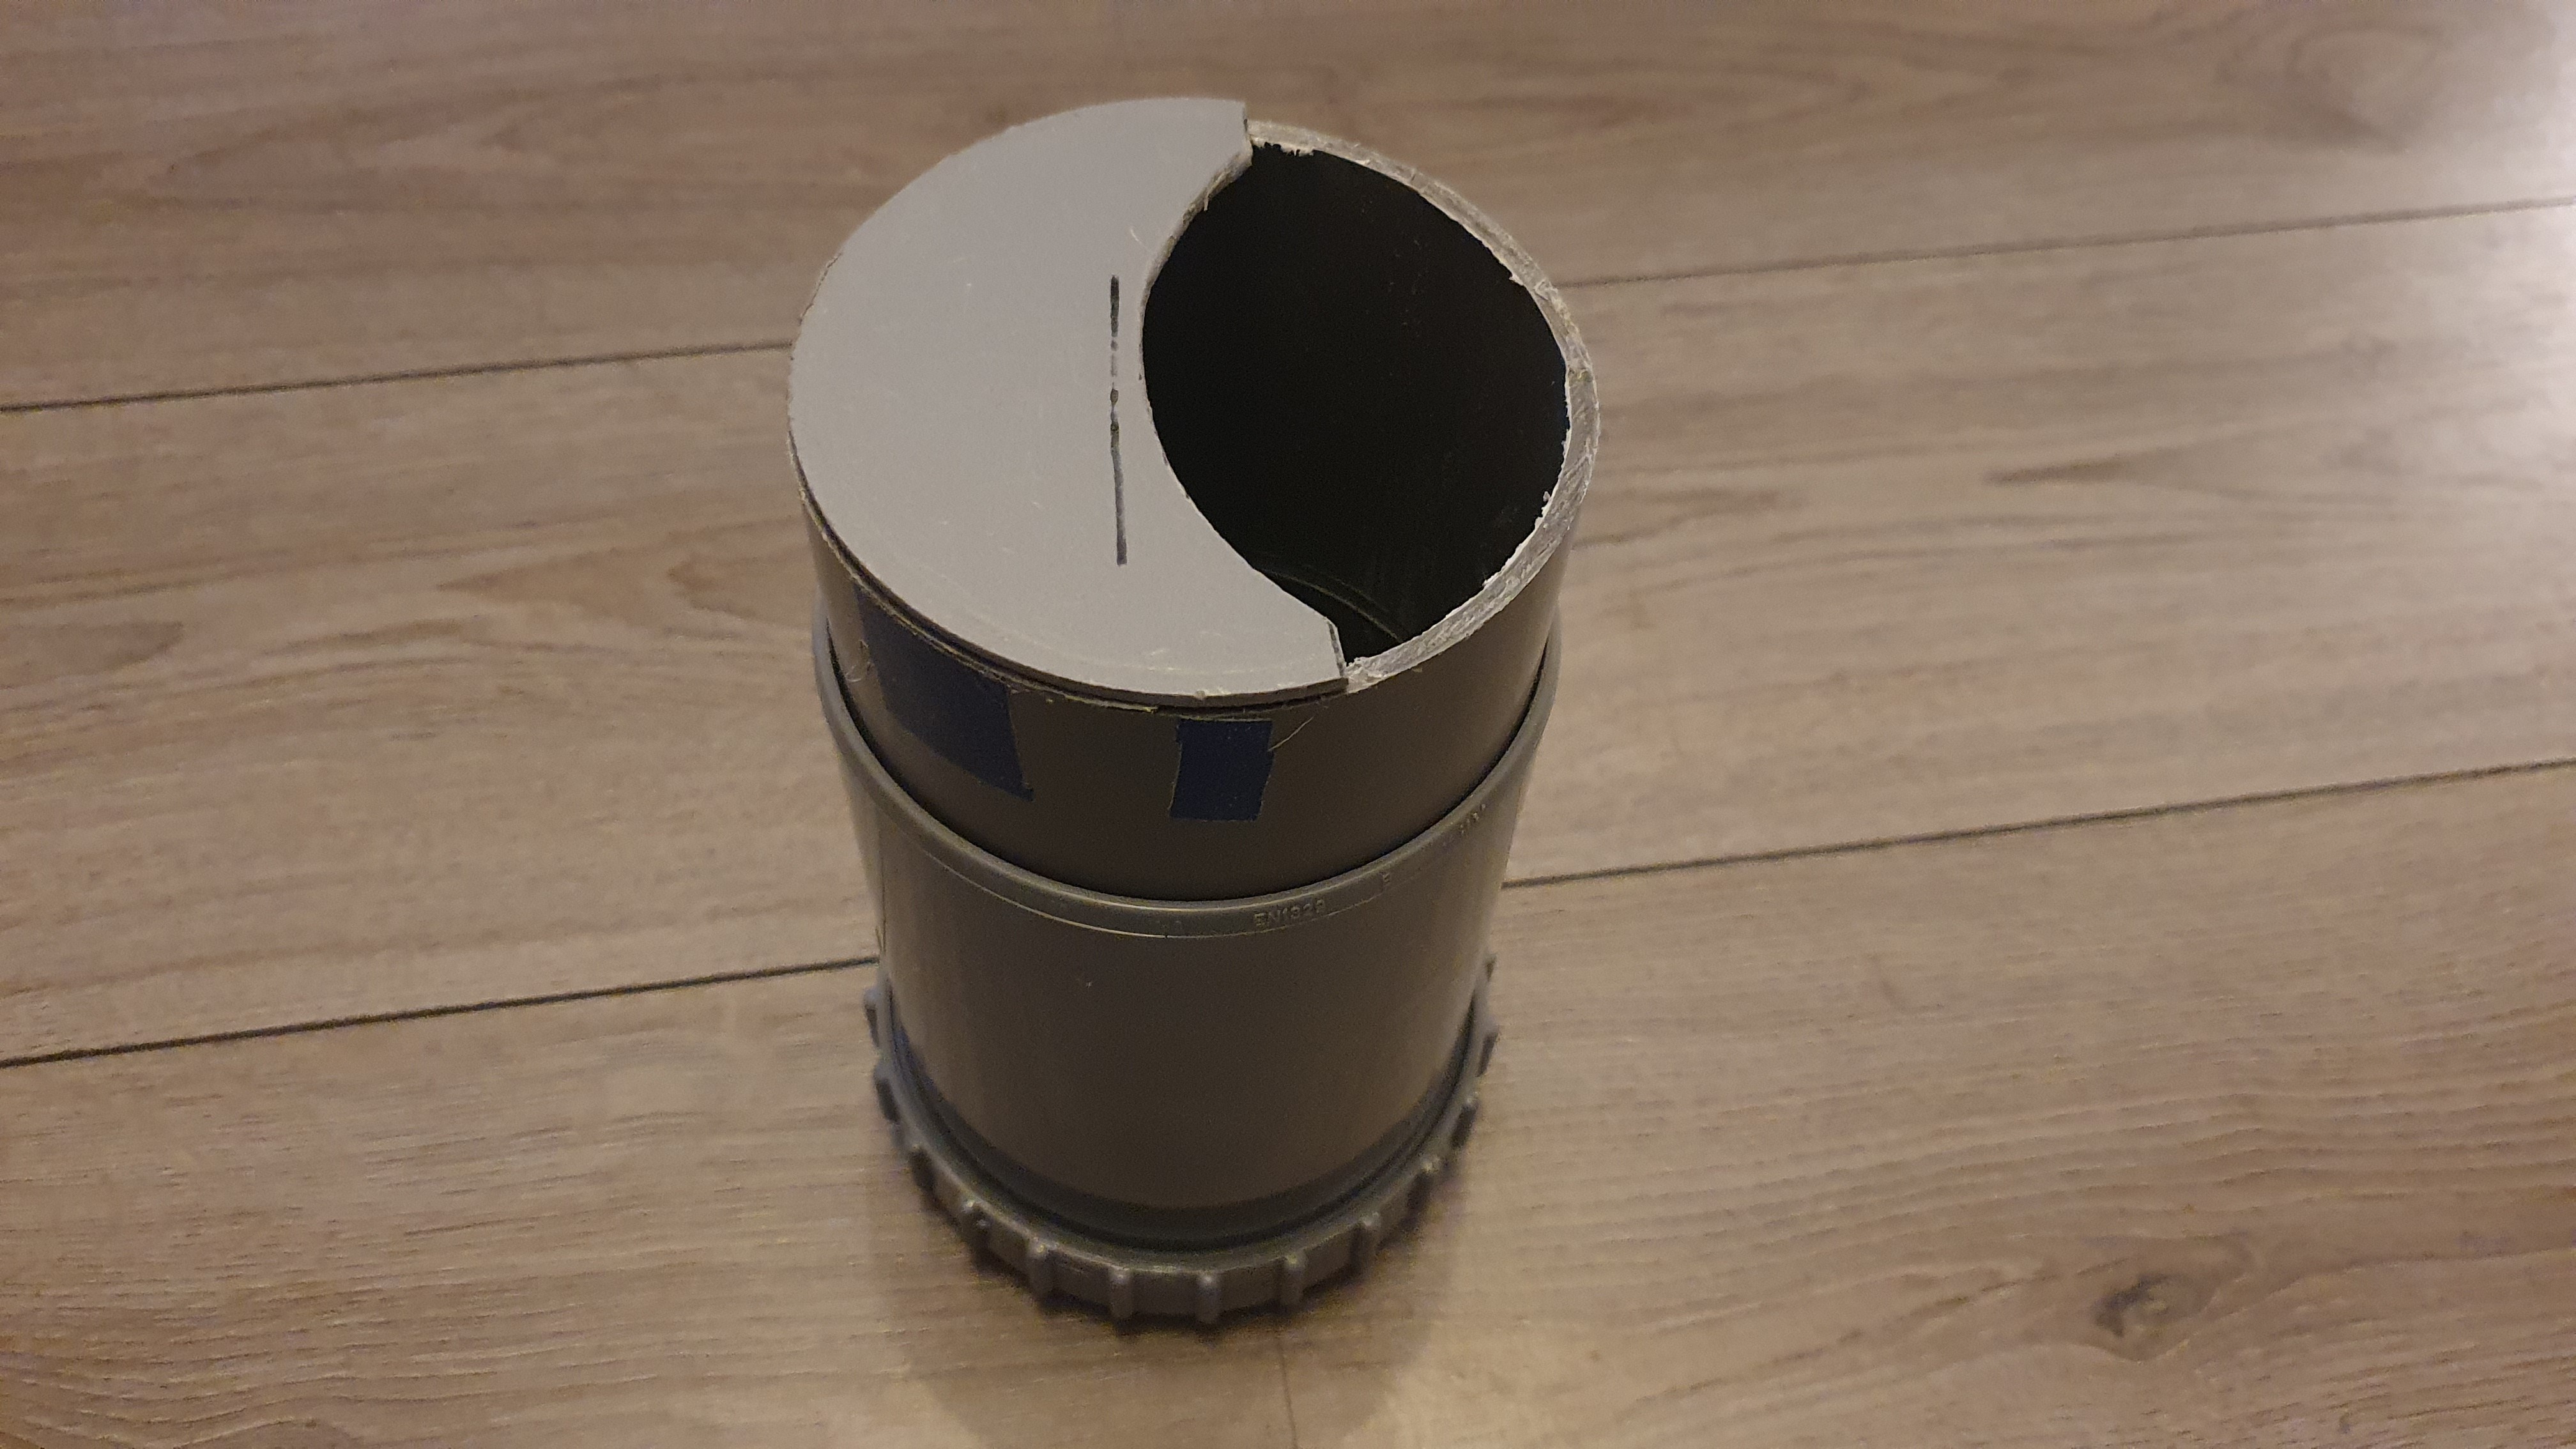
Here are some detail pics of the PVC pipe-based container and dispenser in the latest iteration of thie project. I cut away part of the coupler that holds it together to better show the assemblly.
Hopper and Dispenser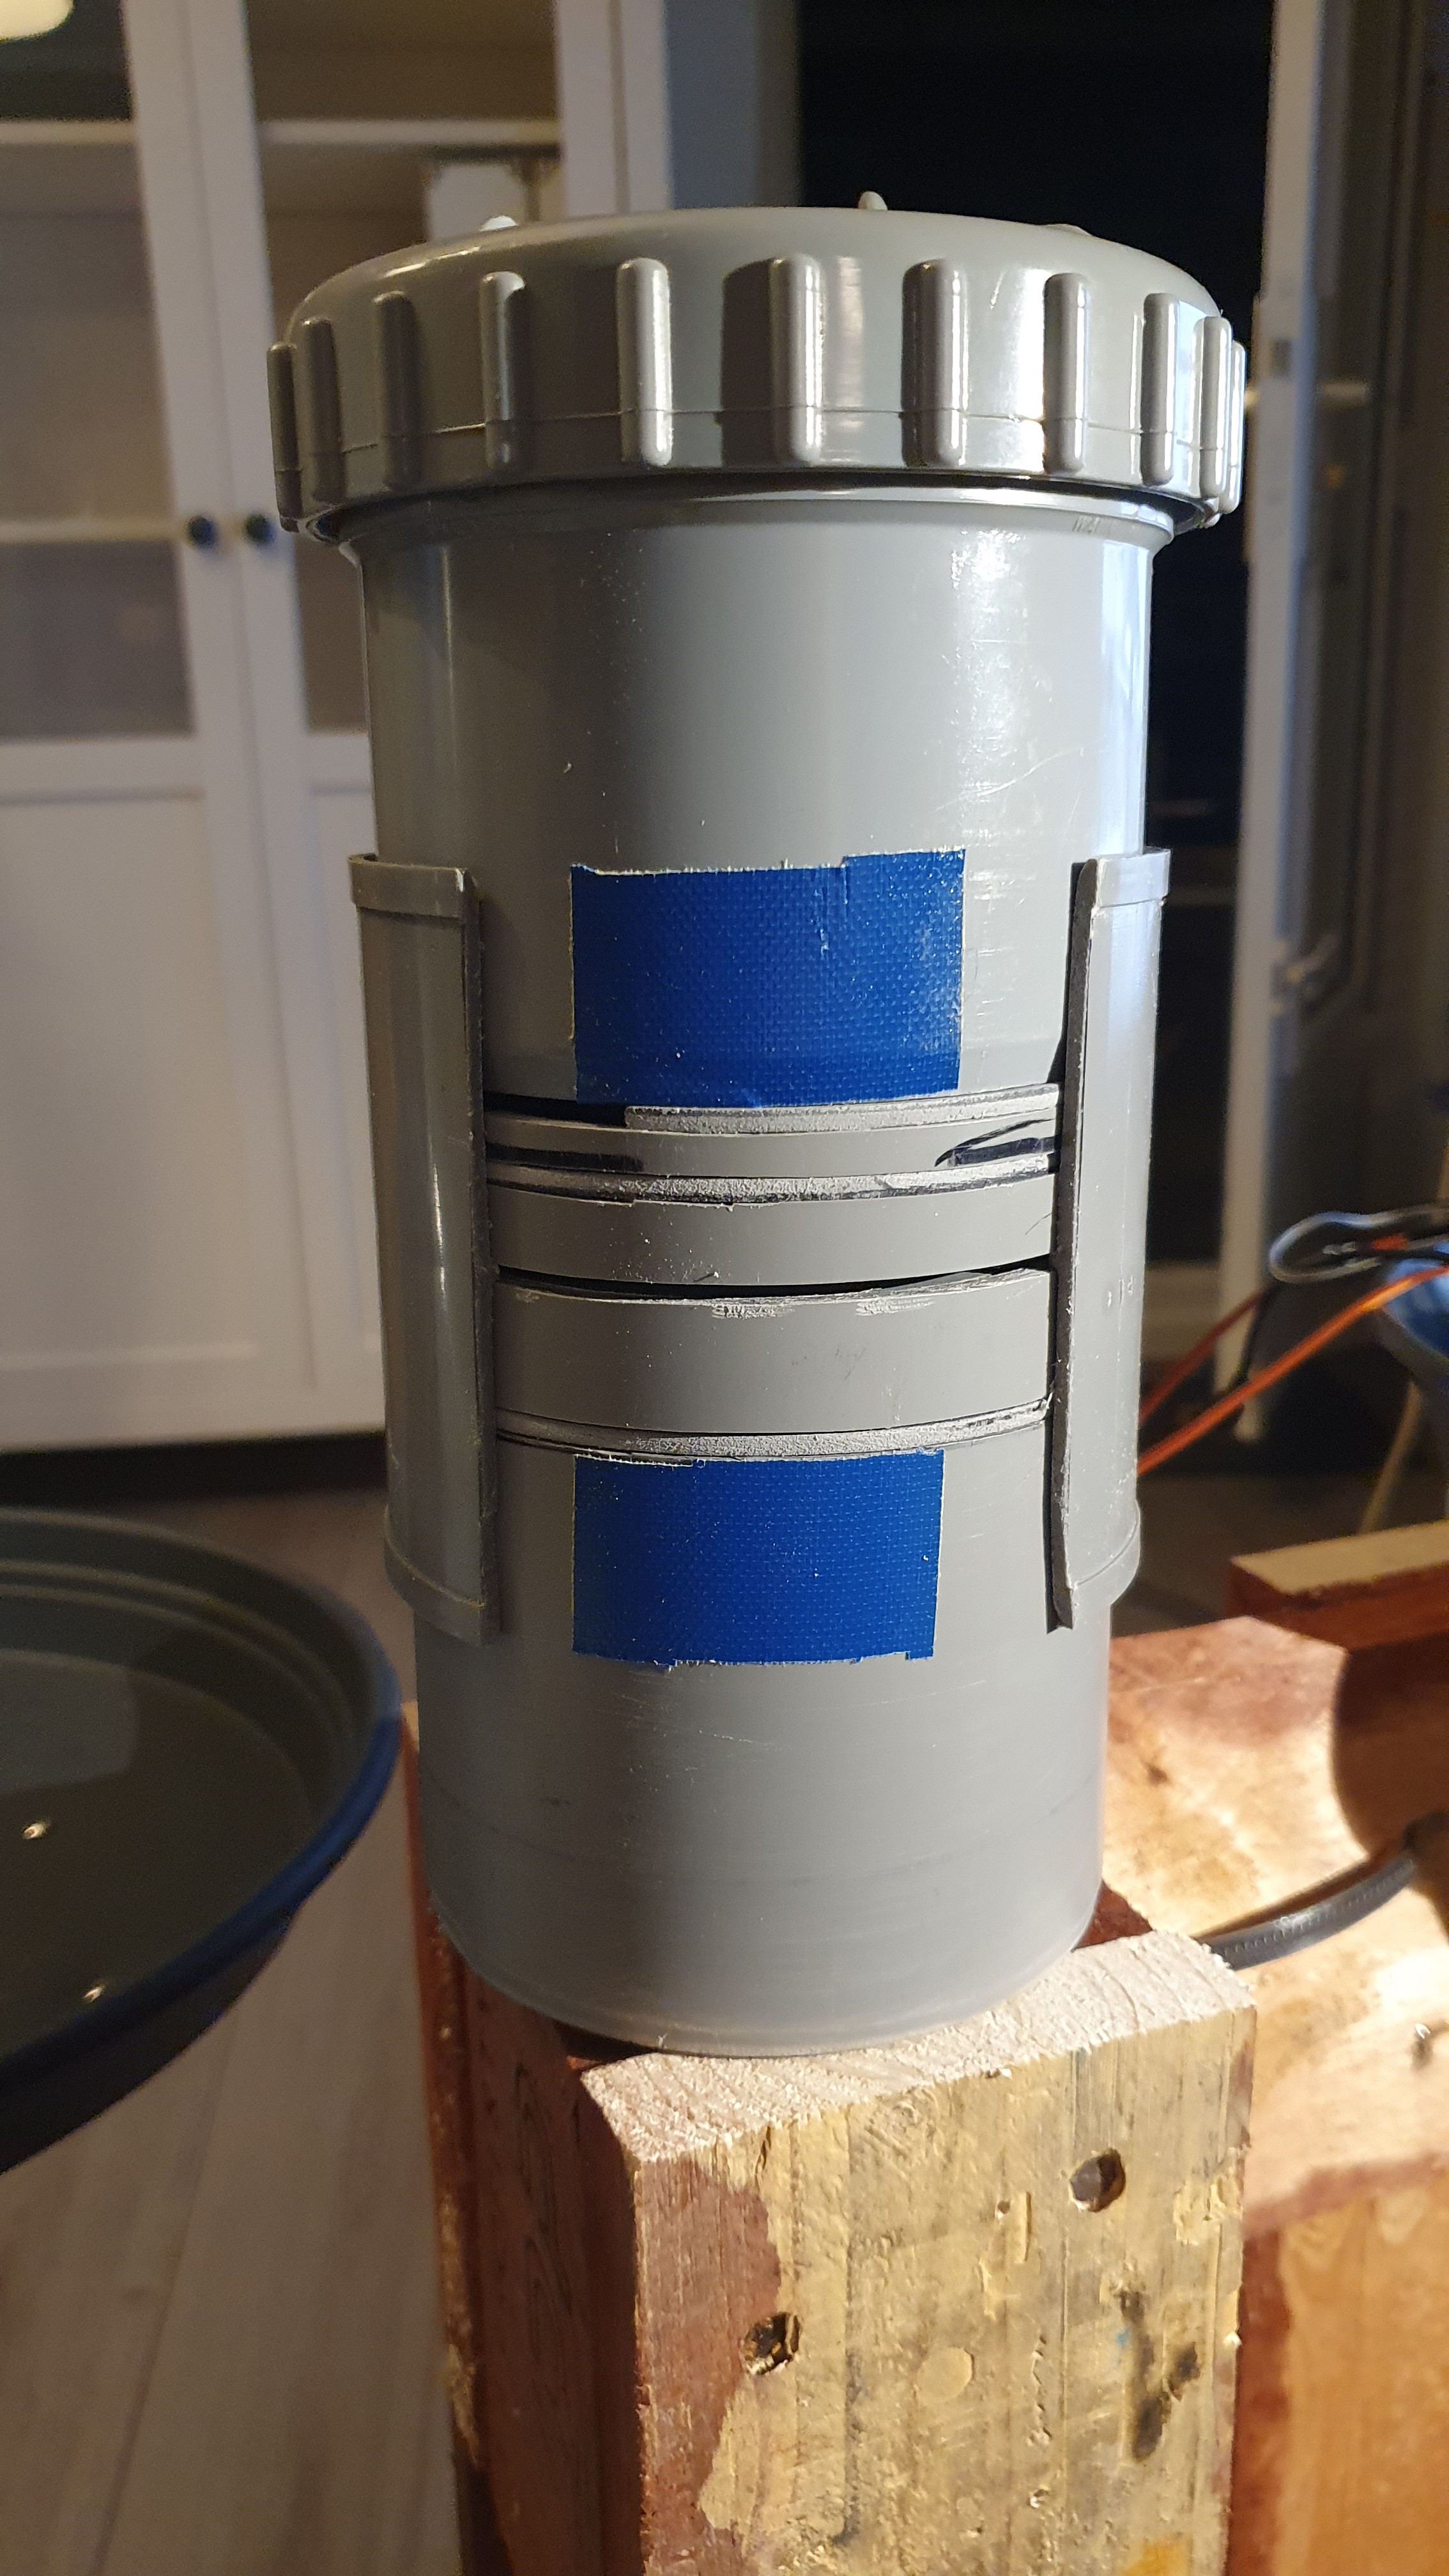
Top screw end cap removed
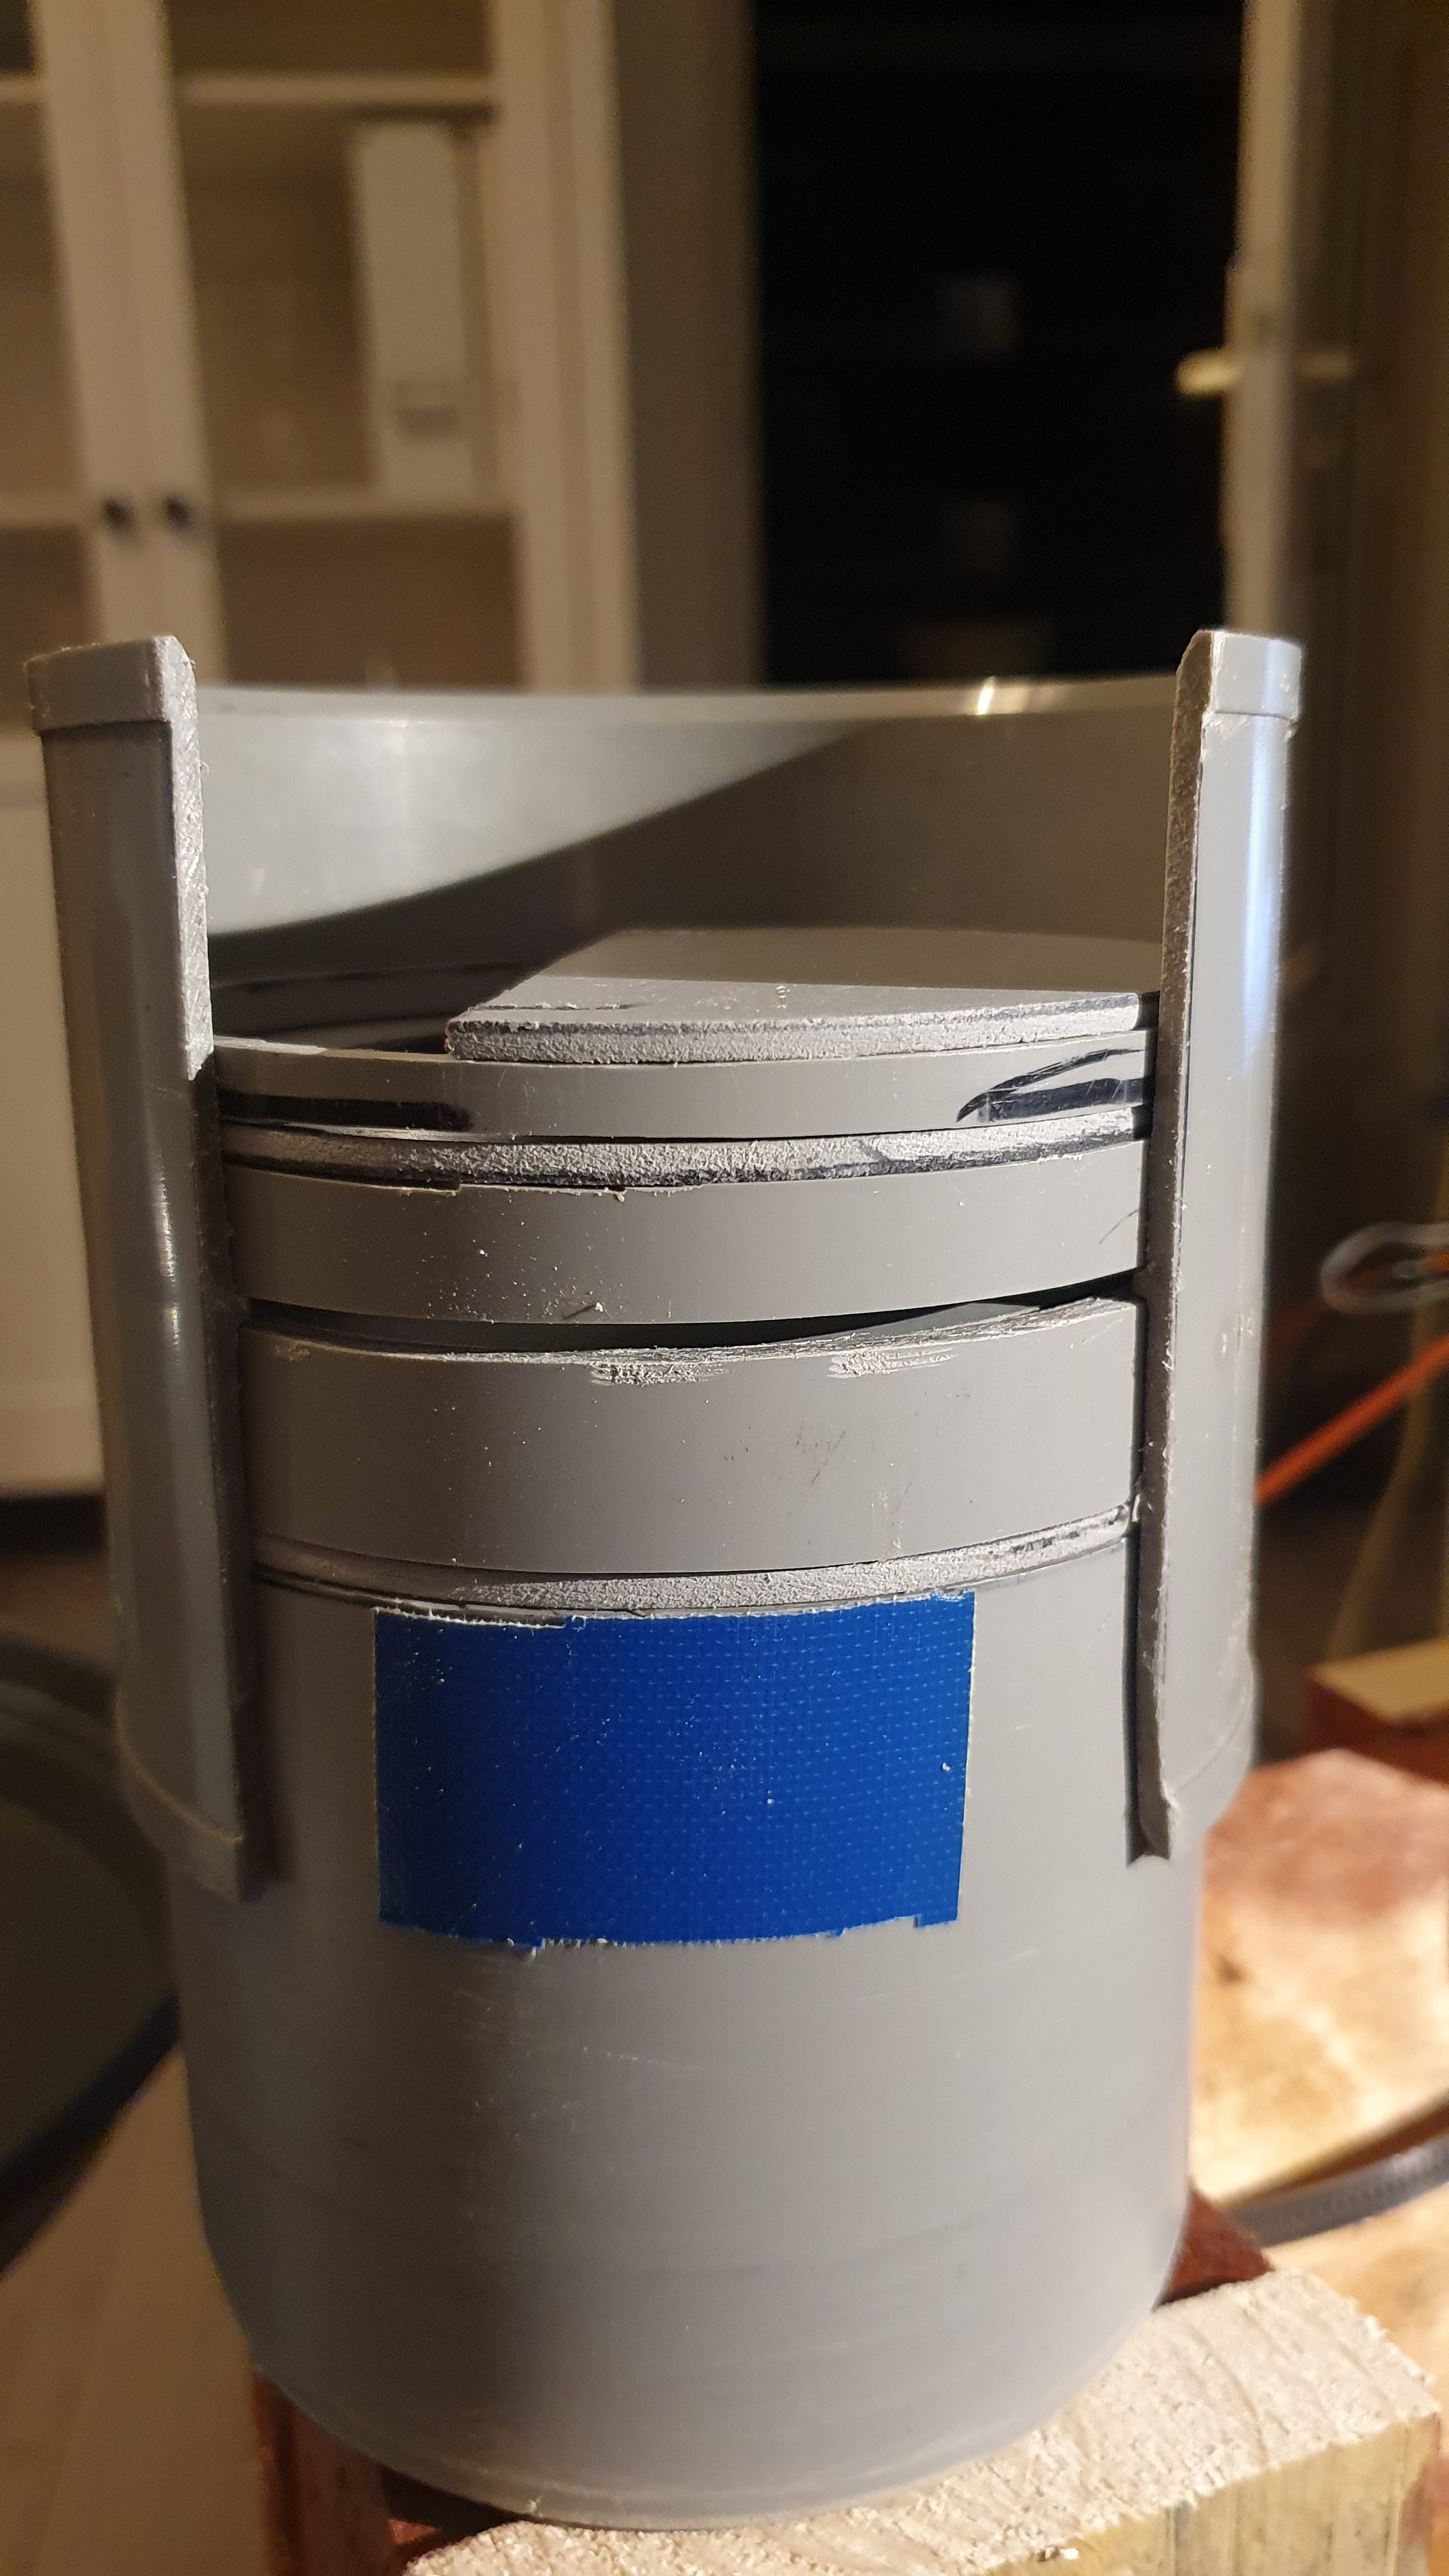
Top baffle and 5mm pipe slice removed
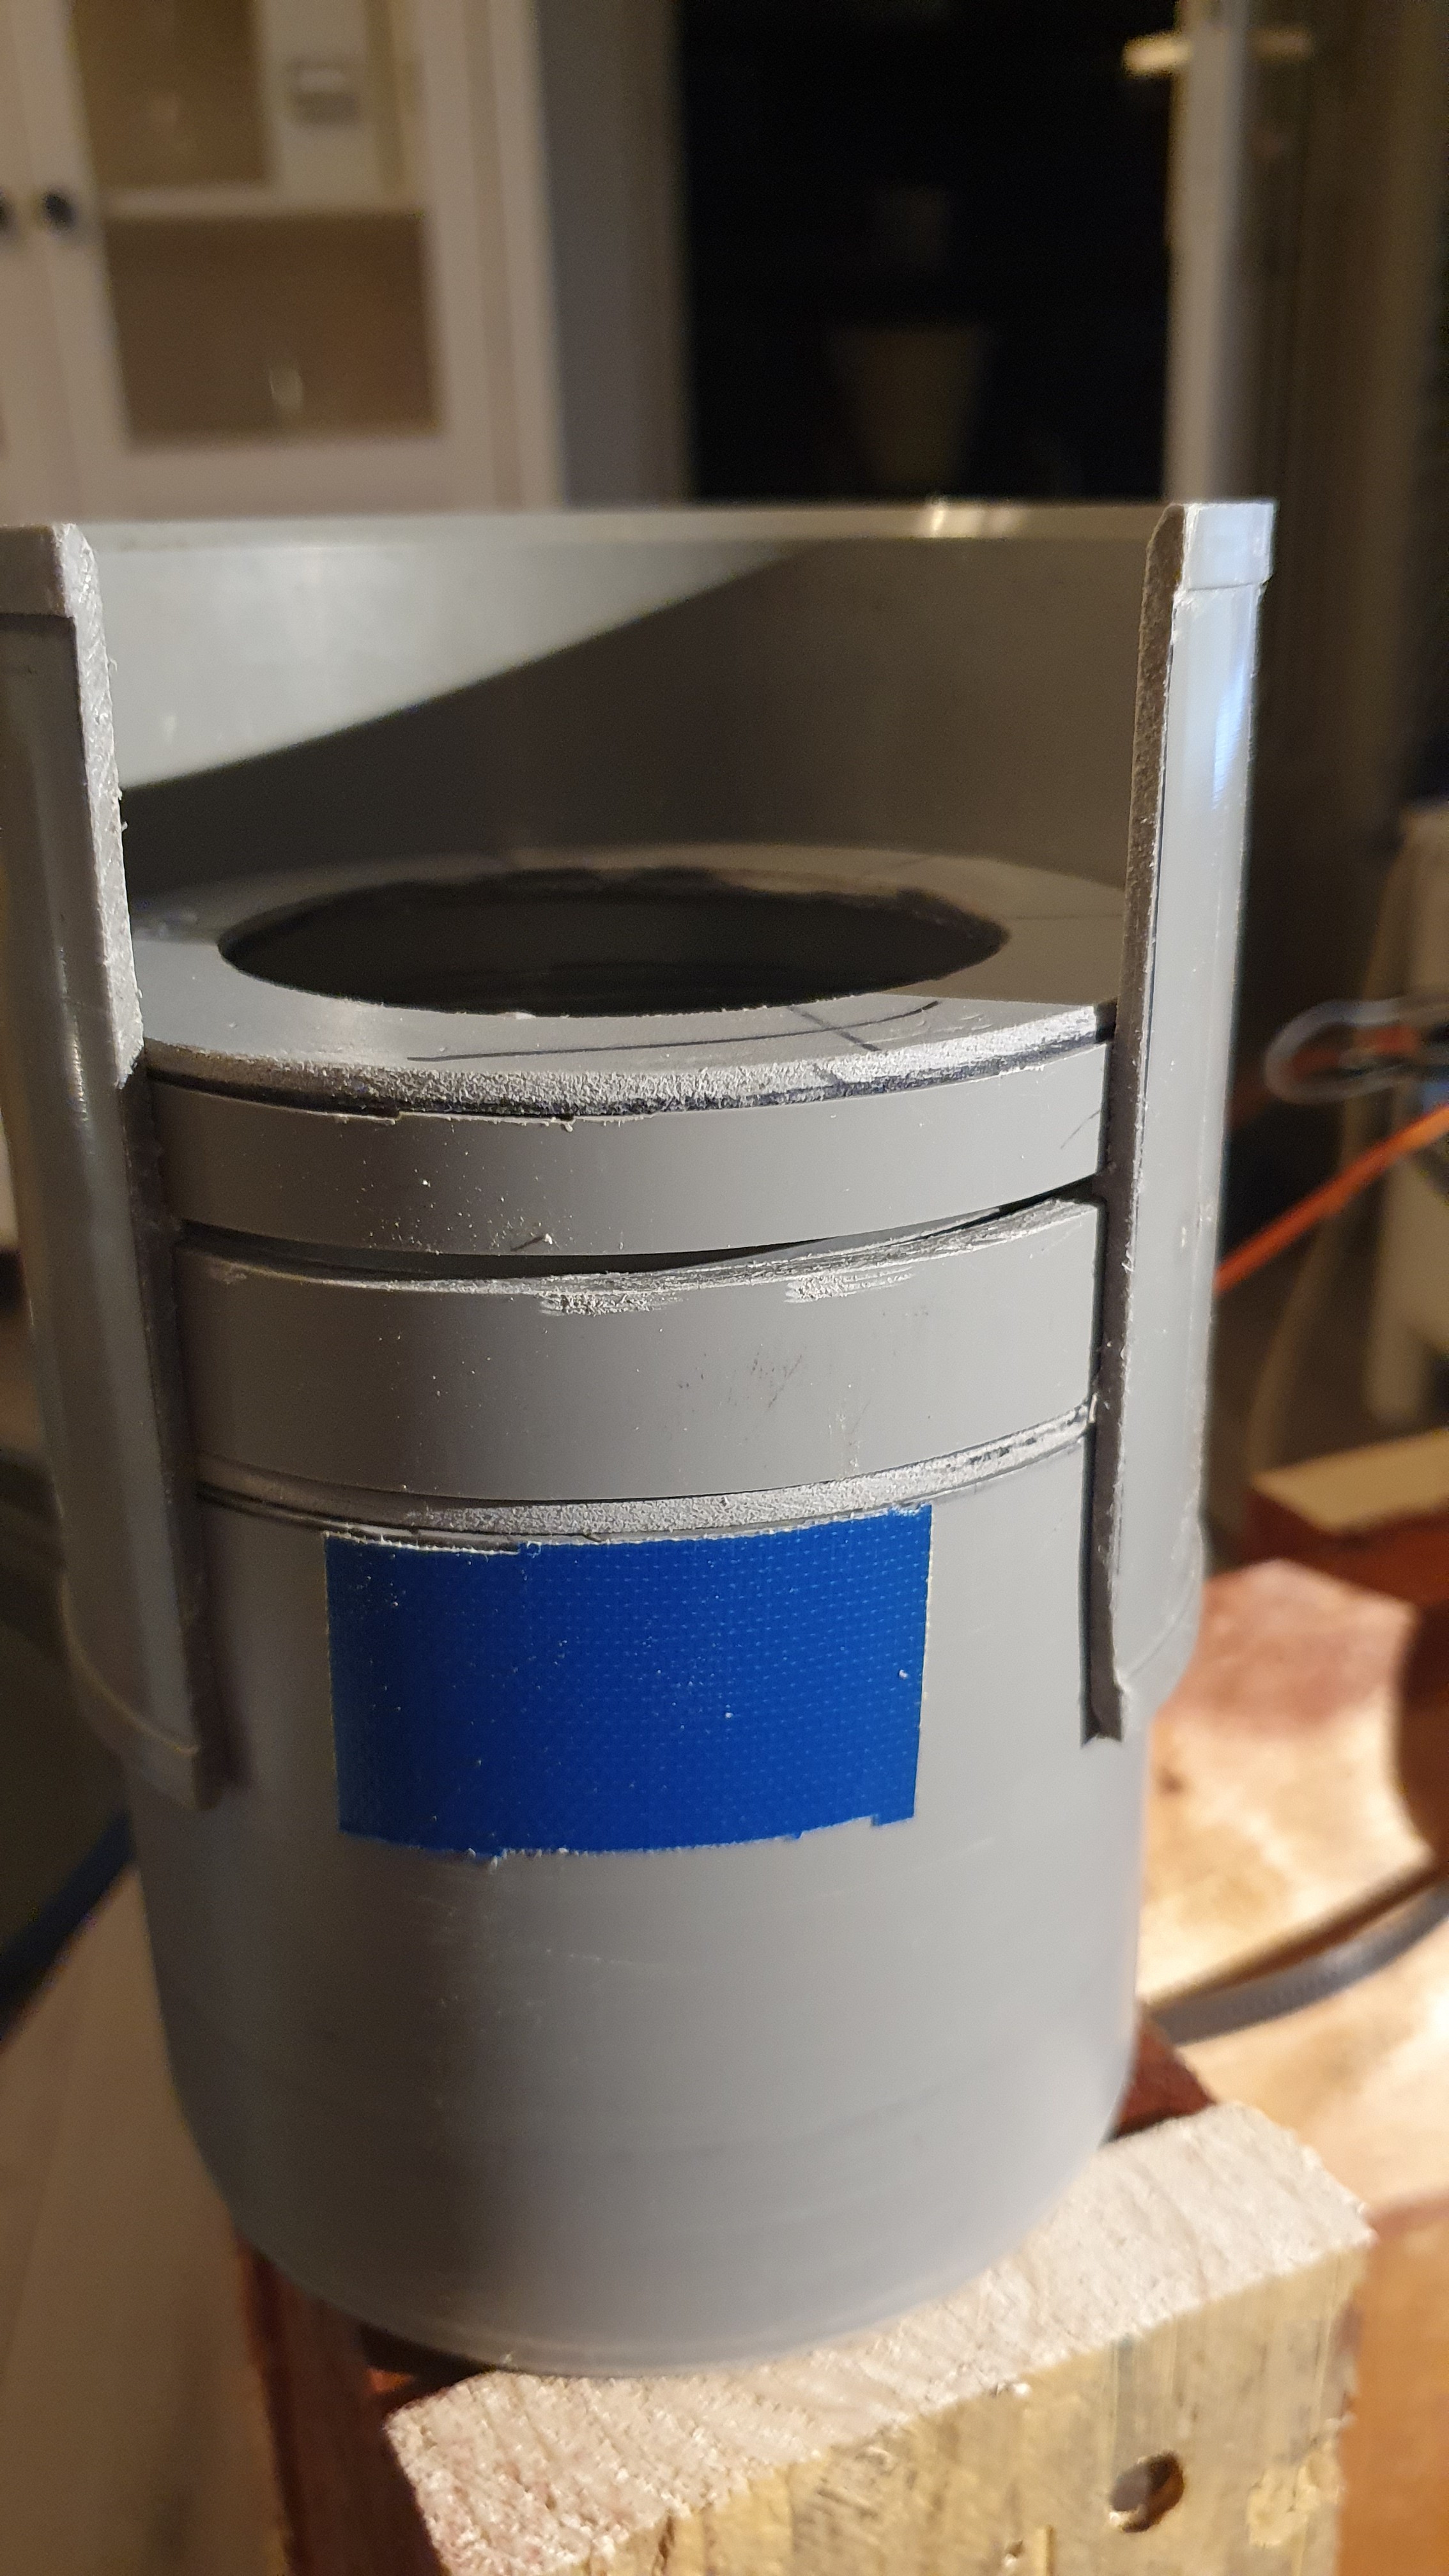
Lower baffle and 10mm pipe slice removed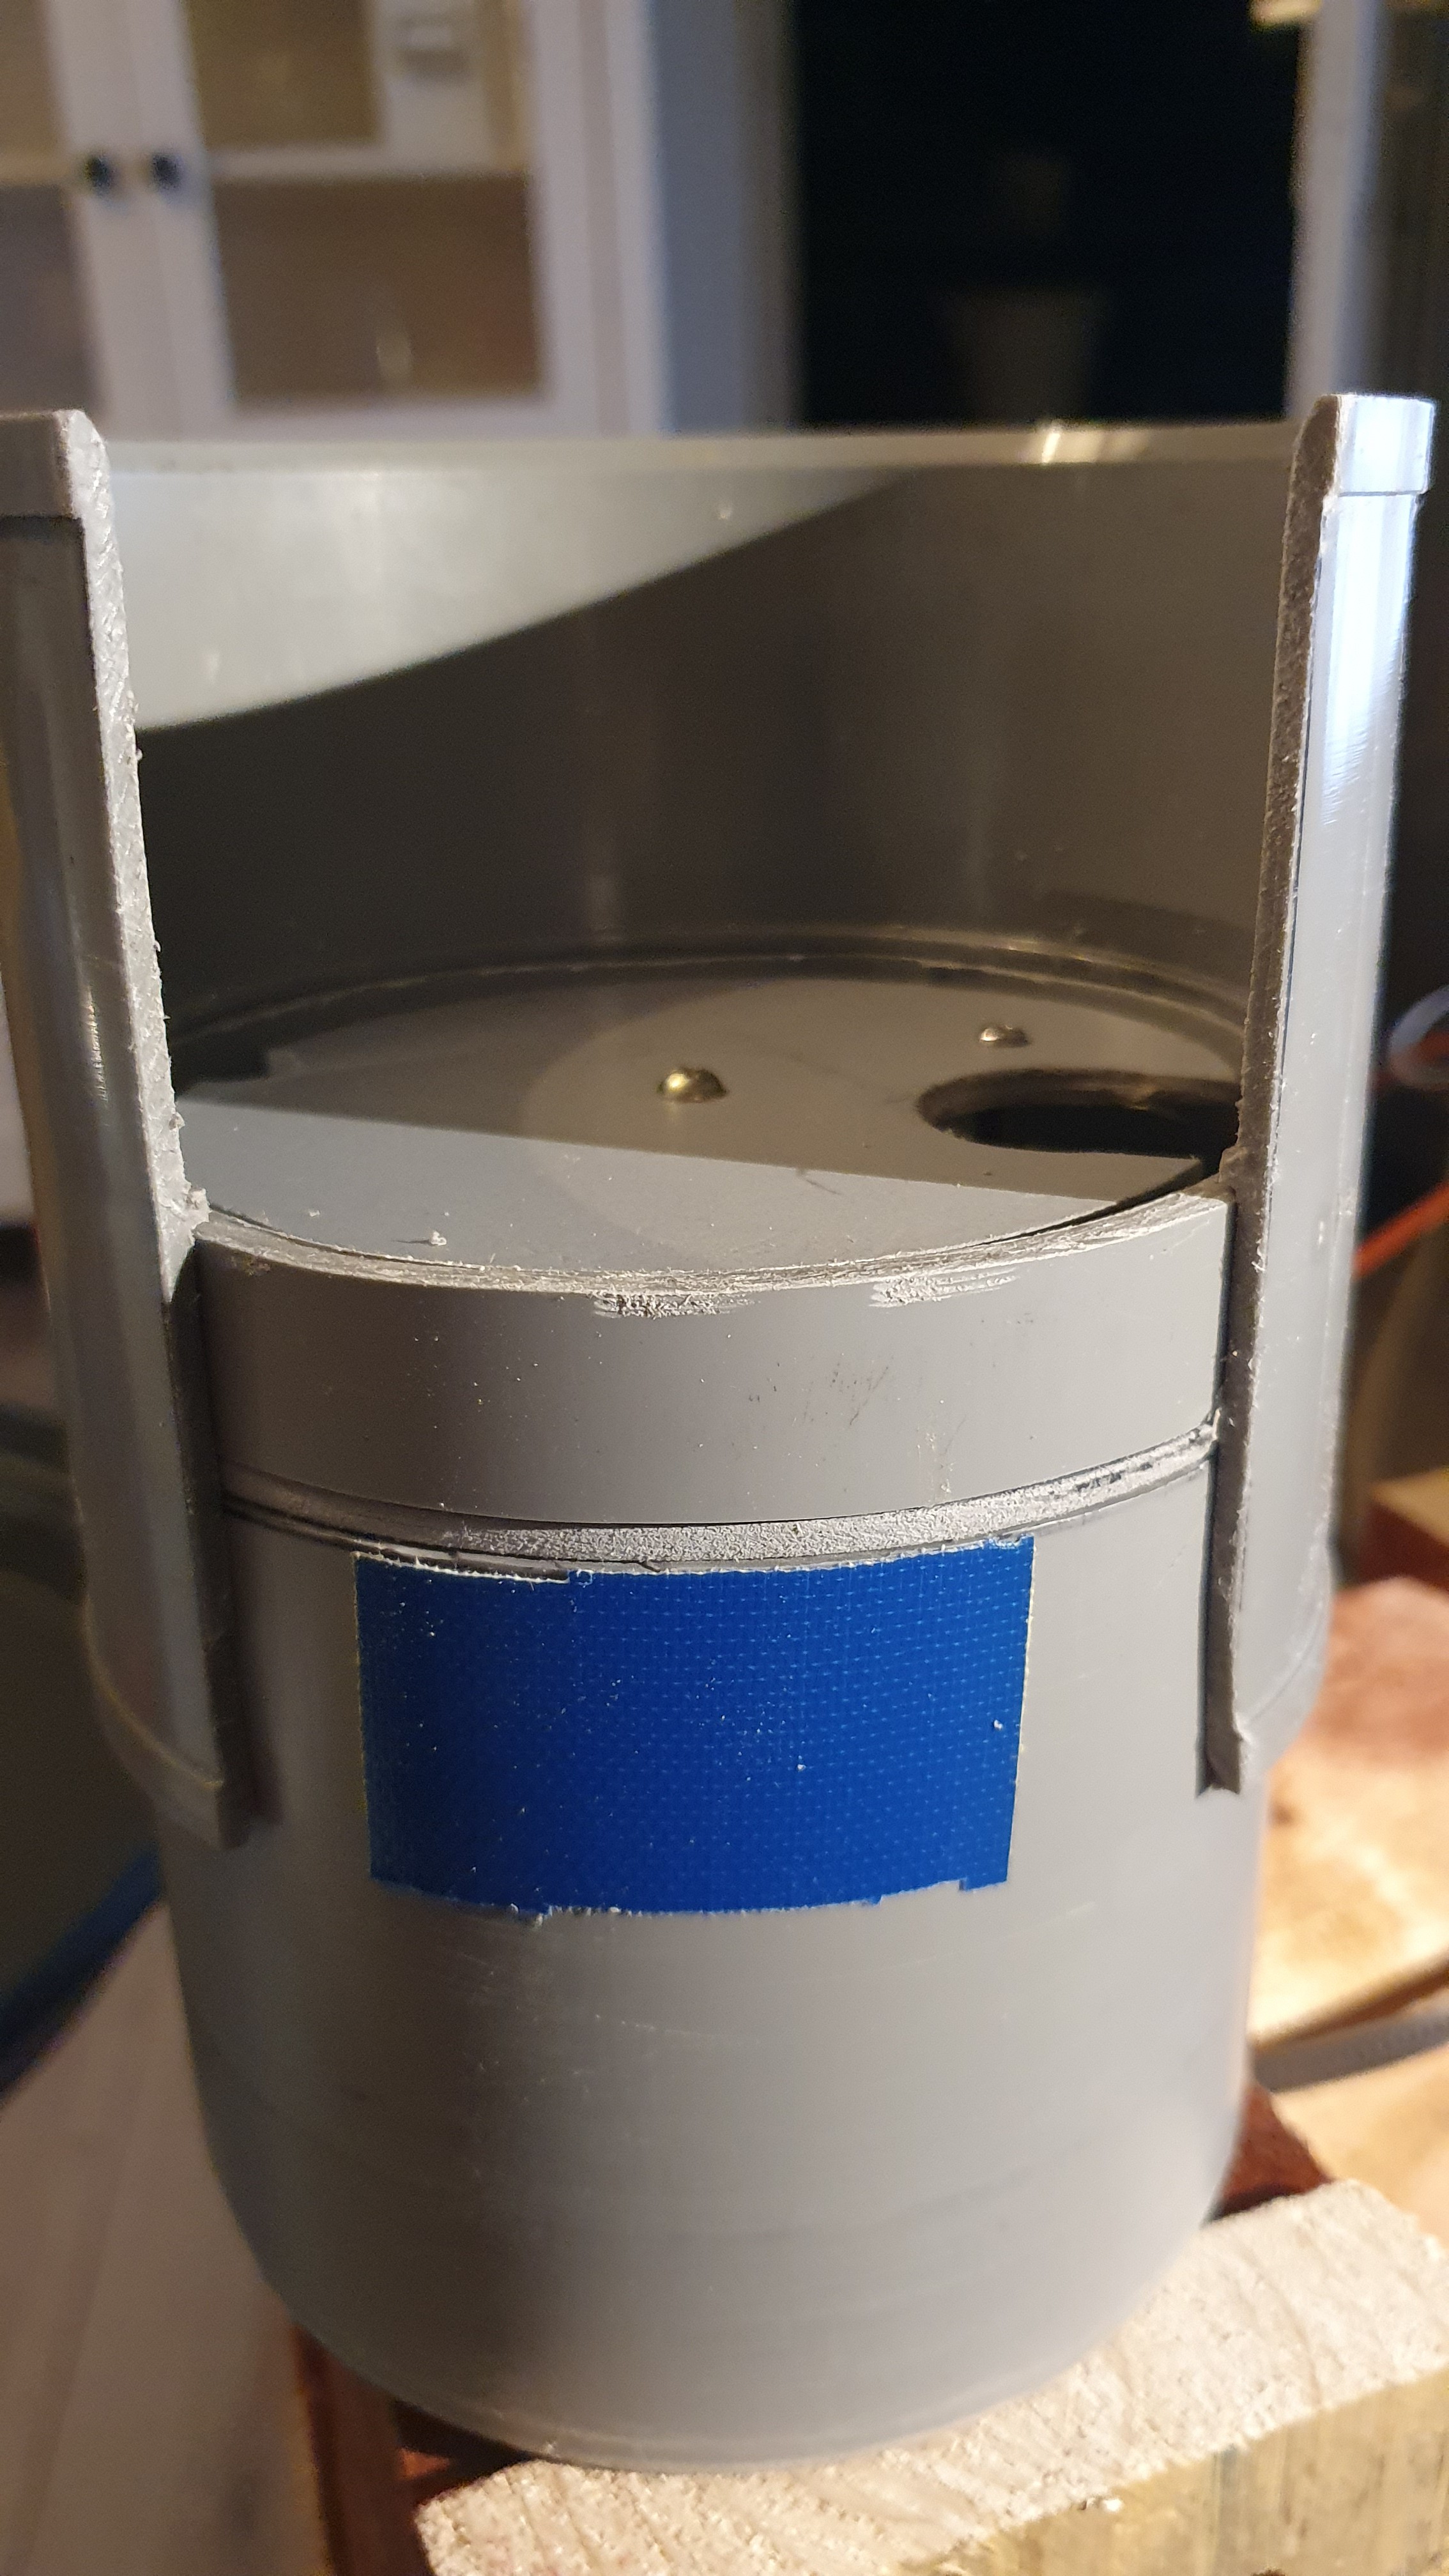
Coupling and 18mm pipe slice removed
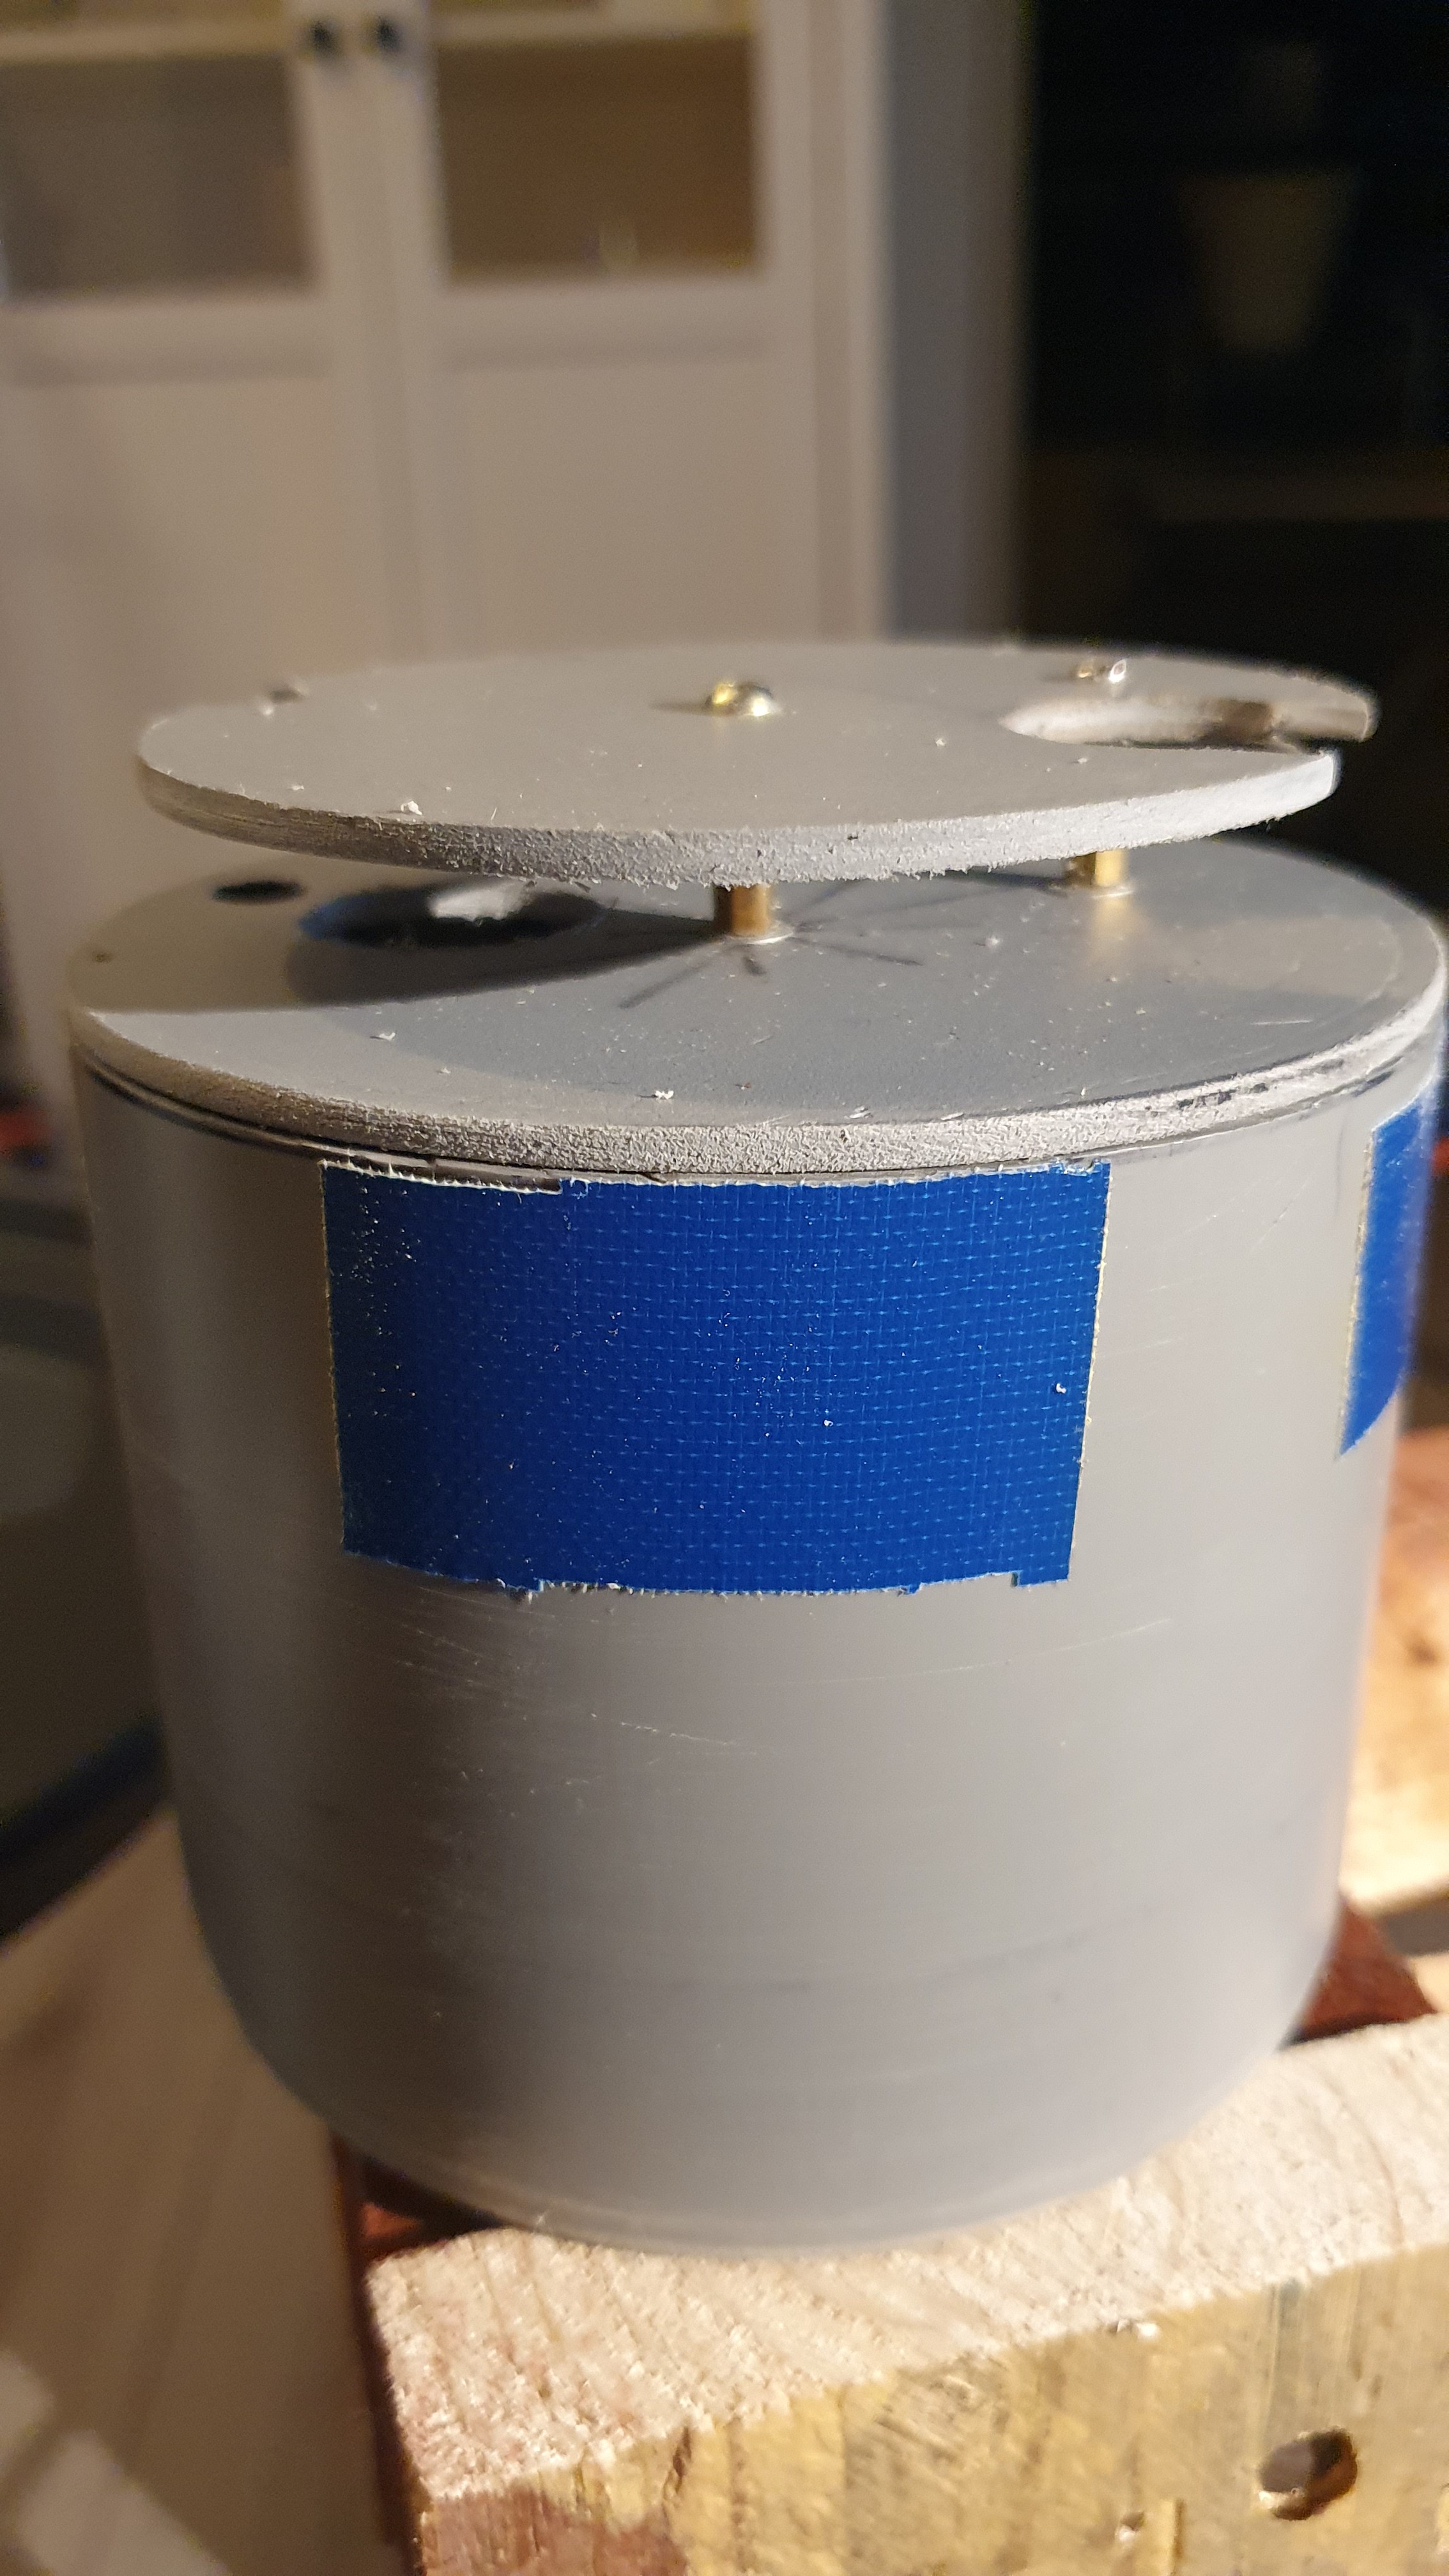
dispenser assembly side view
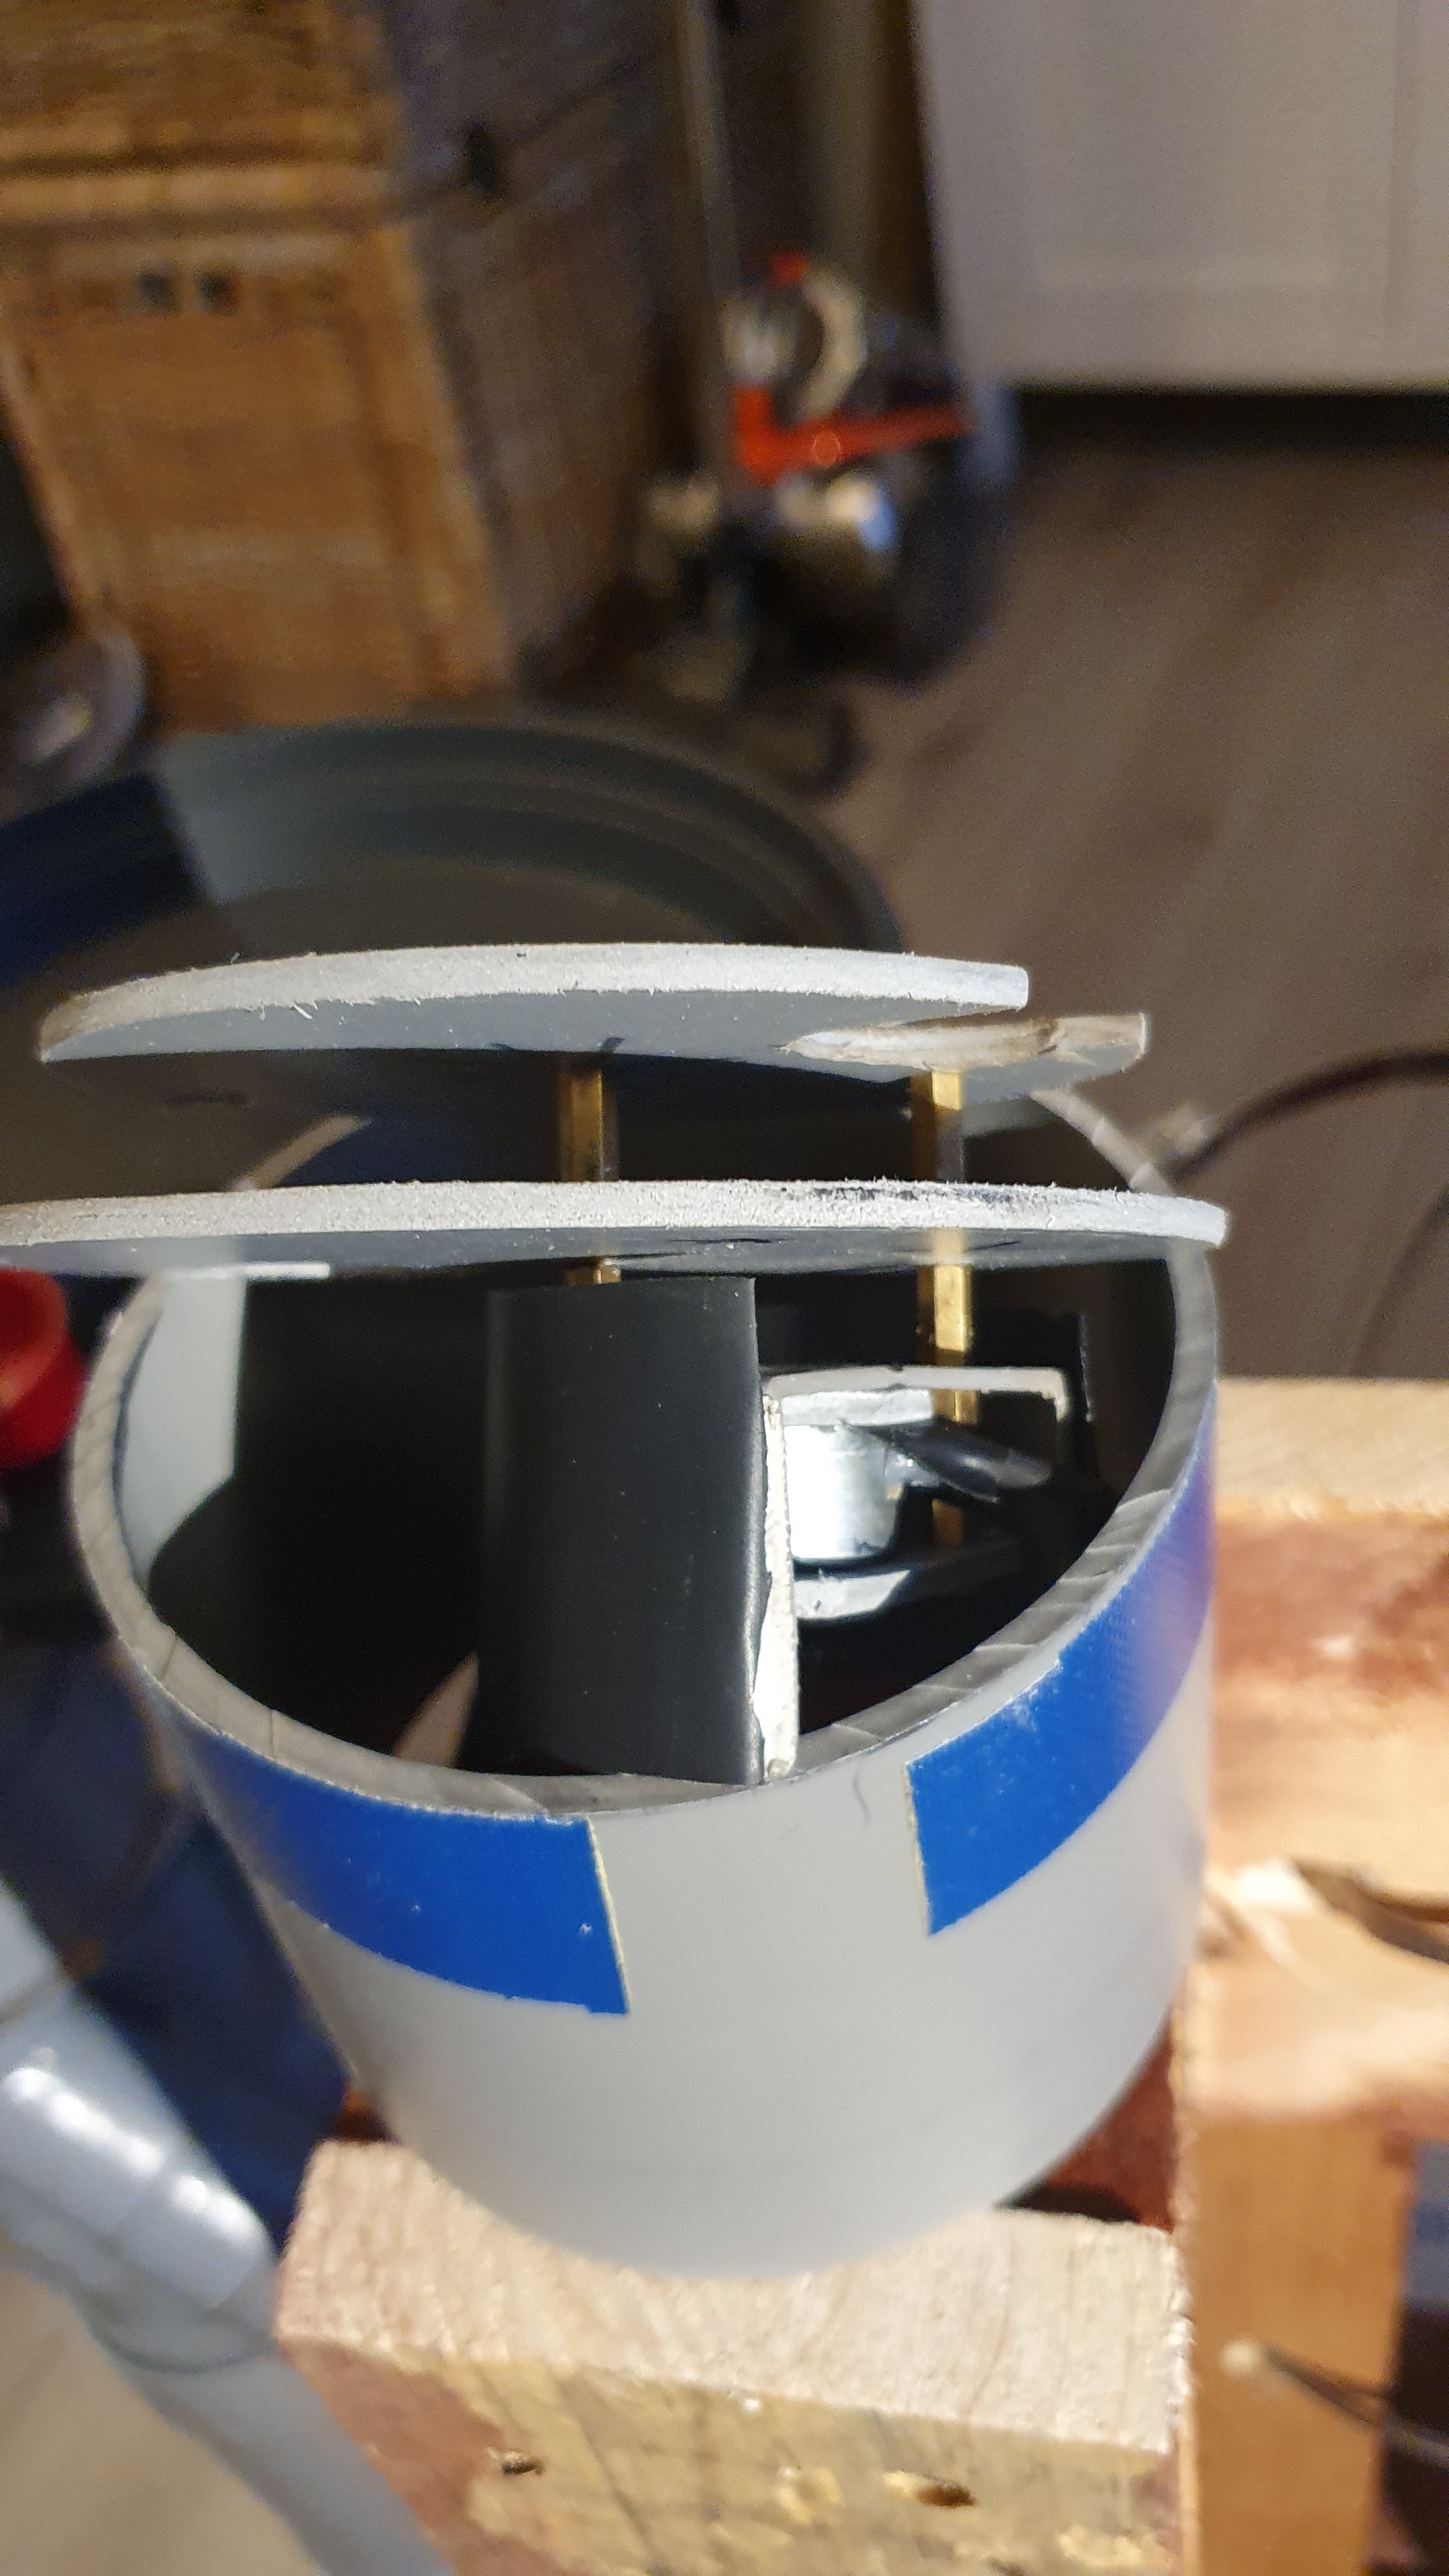
Dispenser motor detail
The dispenser drops peanuts into a funnel made from the top of the PET bottle. There is about 12cm between the two, making it difficult for rodents small enough to get into the machine to get to the food. PVC is tough enough to keep larger rodents from gnawing or breaking thier way in.
PVC ENCLOSURE
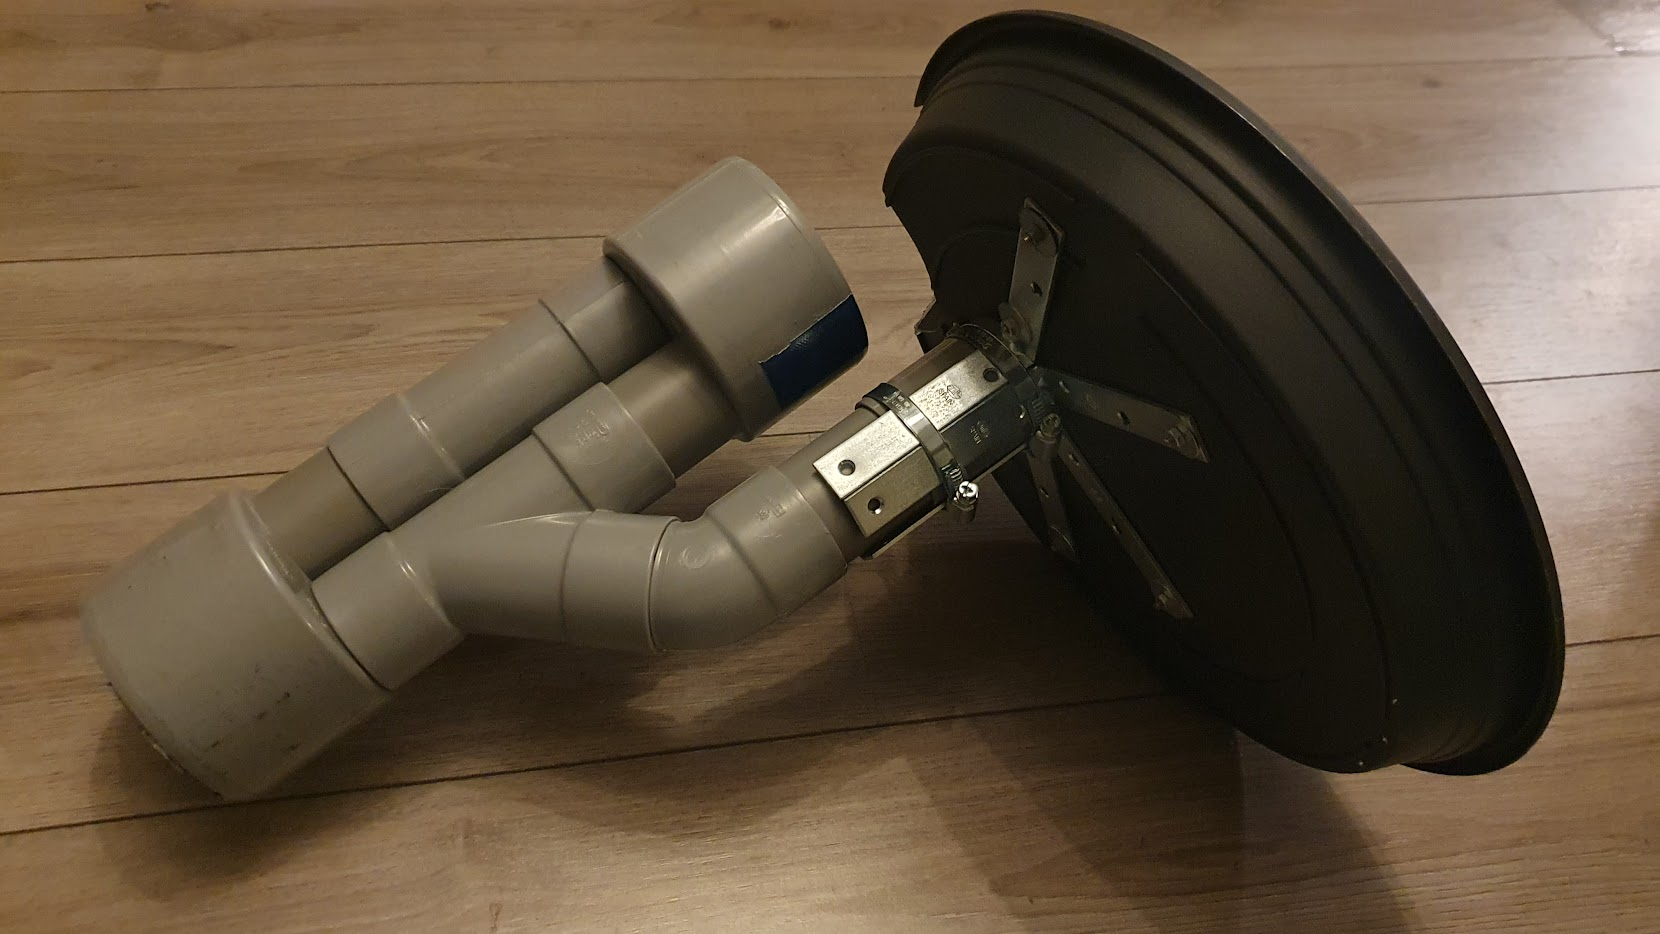
The PVC enclosure contains the battery, electronics and sensors, dispenser, peanuts, and deposited items. The platform is a 35cm plastic tray for a plant pot, attached to the deposit chute with 4 90-degree brackets, four M4 bolts and two hose clamps.
I used bits of electrical or duct tape to make the PVC pipes and joints fit securely tight. This way it is easy to disassemble/modify/repair. It's a good idea to wrap upward-facing joints to prevent water ingress during heavy rains.
You can load peanuts (or whatever) by unscrewing the top cap and pouring them in. I made two baffles from 3mm PVC sheet to reduce the pressure on the vibration dispenser.
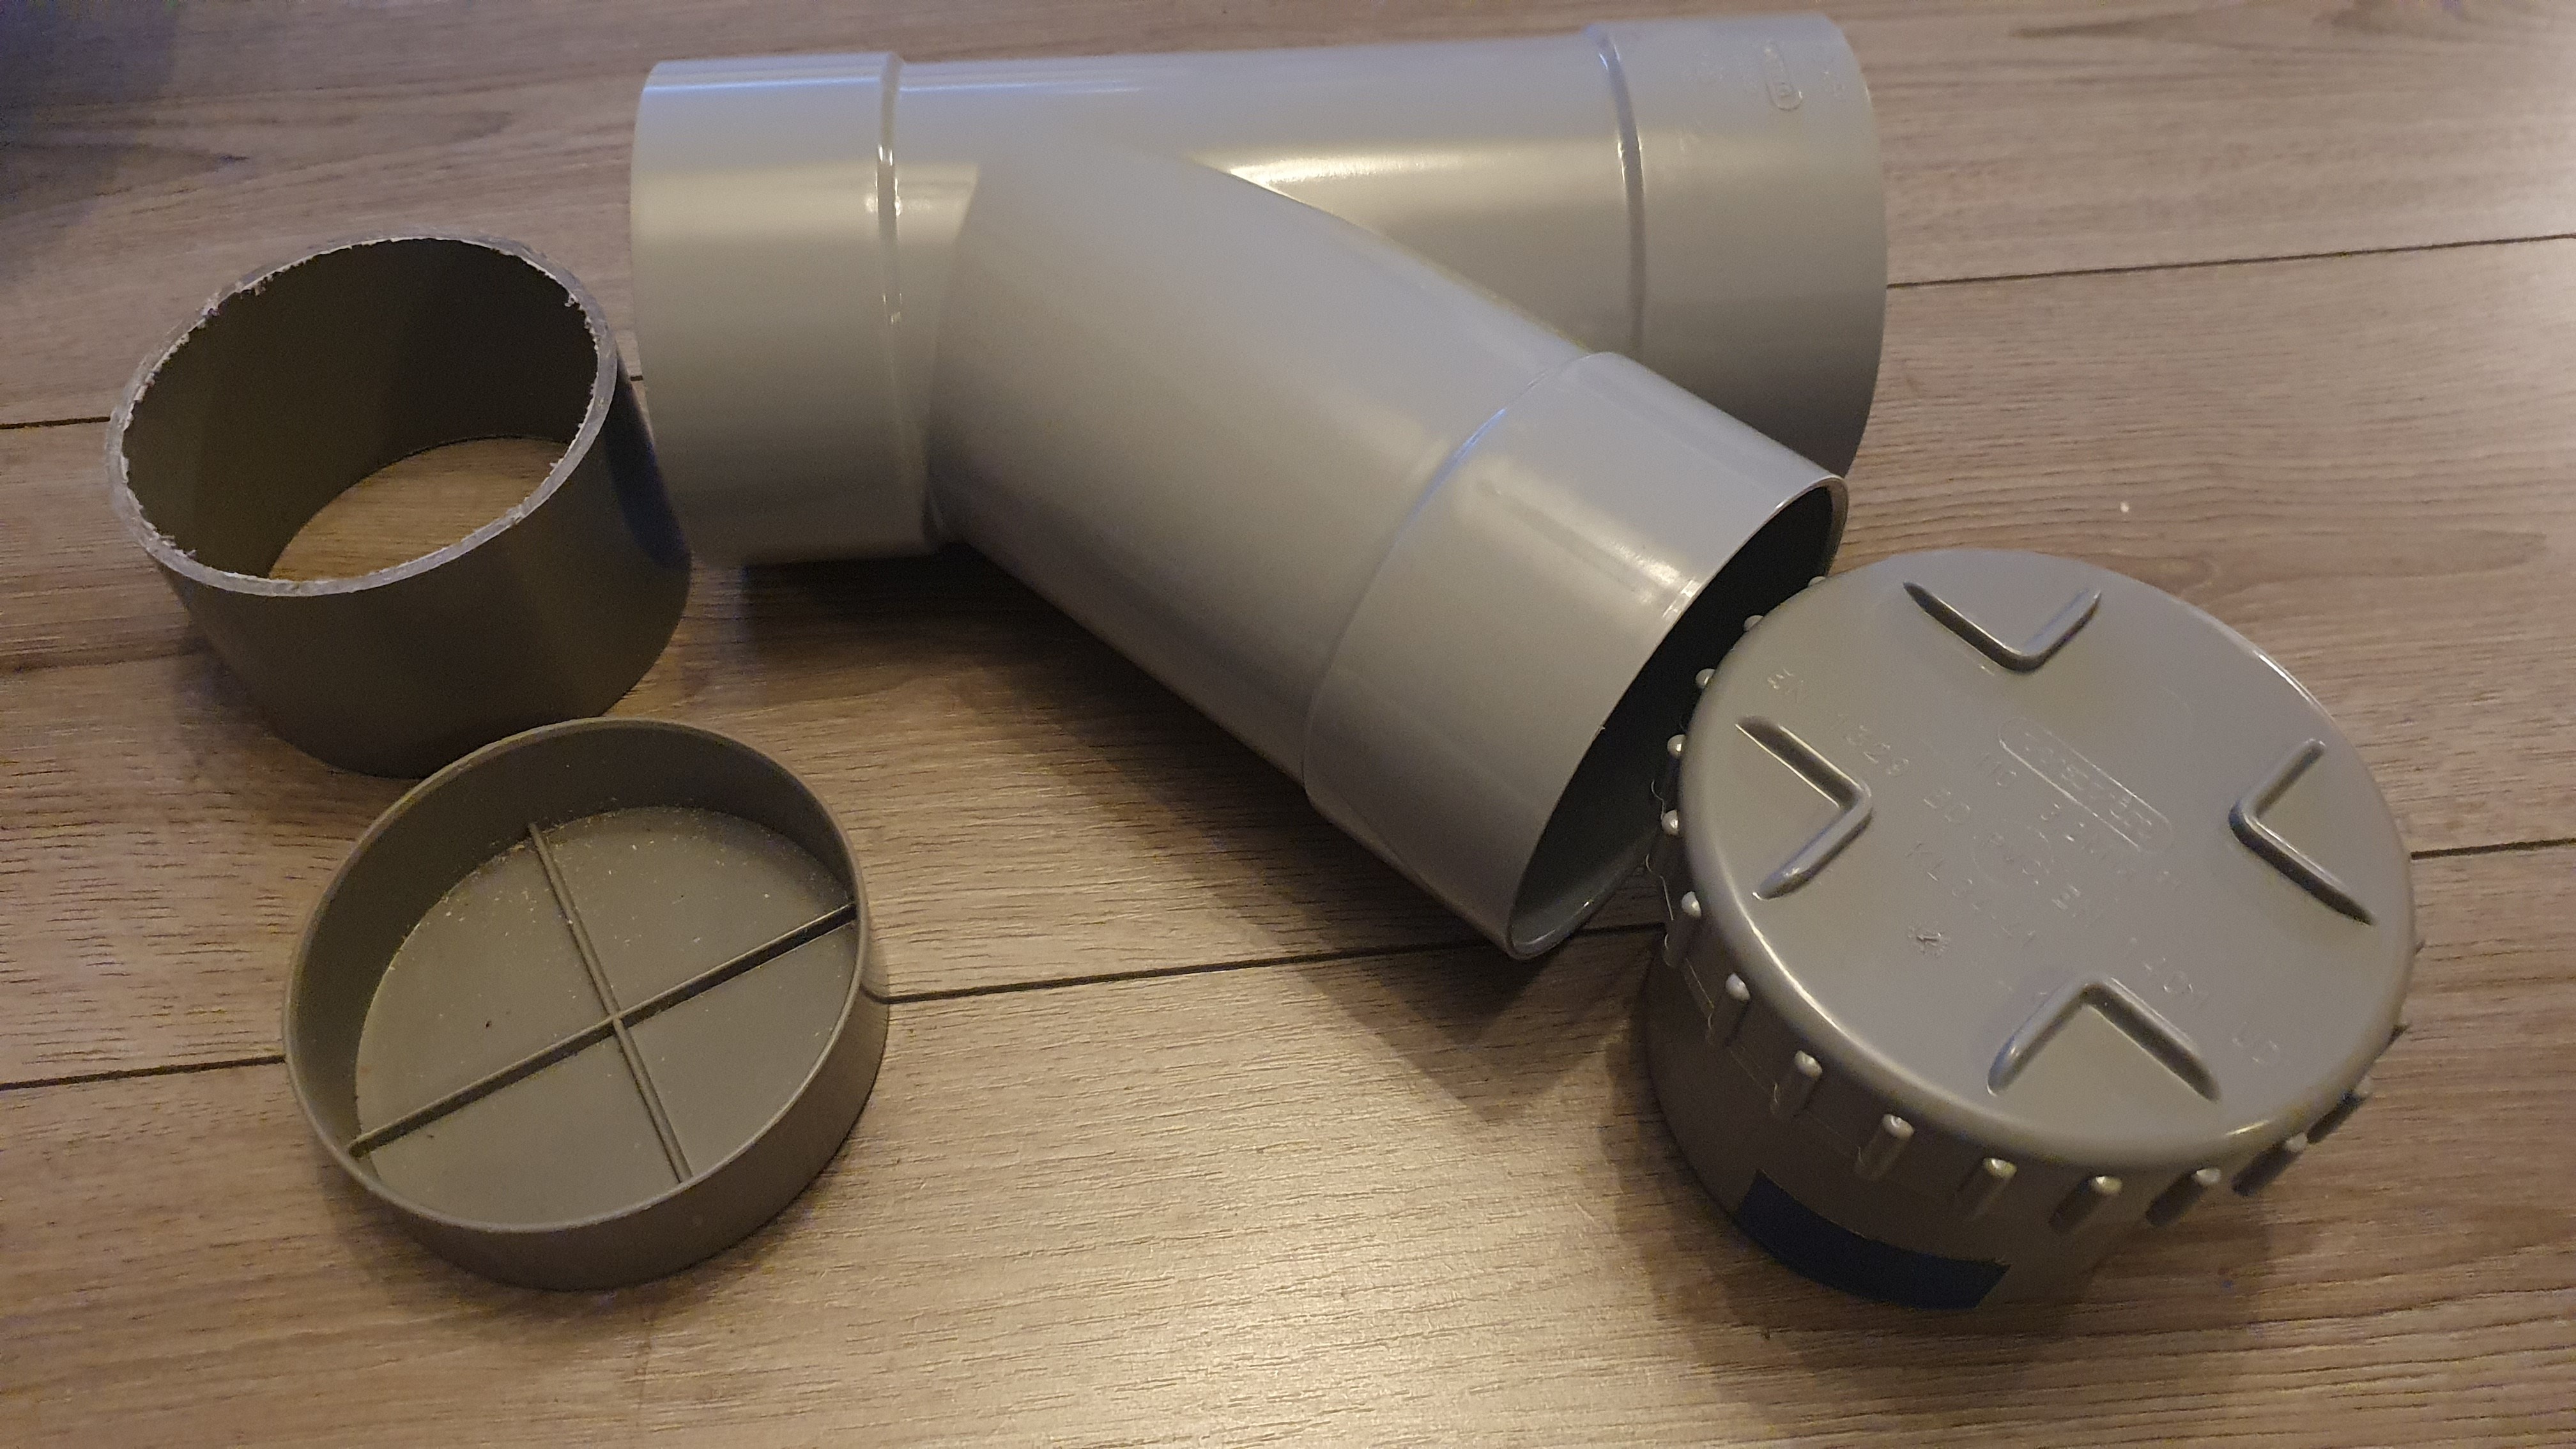
You can unload the deposited items by unscrewing the cap on the lower half of the vending machine.
- The PIR and Daytimer sensors are taped in place inside the enclosure over holes that let them see out.
- The deposit sensor is strapped with rubber bands to a piece of 50mm PVC pipe glued to the inside of the 2x50mm adapter so that it looks across the end of the deposit chute.
- The dispense sensor is double sided taped to the inside of the enclosure just below where the dispensing hole will be. If the motor is mounted in front of it, you can use something carbon black to hide it from the sensor.
- The empty sensor is two boards that can be mounted on or under a baffle inside the hopper. The LED and phototransistor should be facing each other, against opposite sides of the baffle so the phototransistor won't see the led unless the feed level has fallen below where the sensors are
- The vibration motor is secured by two small PVC plates and brass standoffs. I used part of a 50mm end cap and taped a piece of black shrink tubing on it to avoid triggering the dispense sensor. Terminal strips are east to use as an eccentric load. You just need two joined ones. One goes on the motor axle, one gets a bolt and nut to increase the load imbalance.
- For wiring above the funnel, use heat shrink big enough to contain the wires and duct tape or electrical tape to route them down against the inside of the enclosure past the funnel. This way the wires are secure but still have slack.
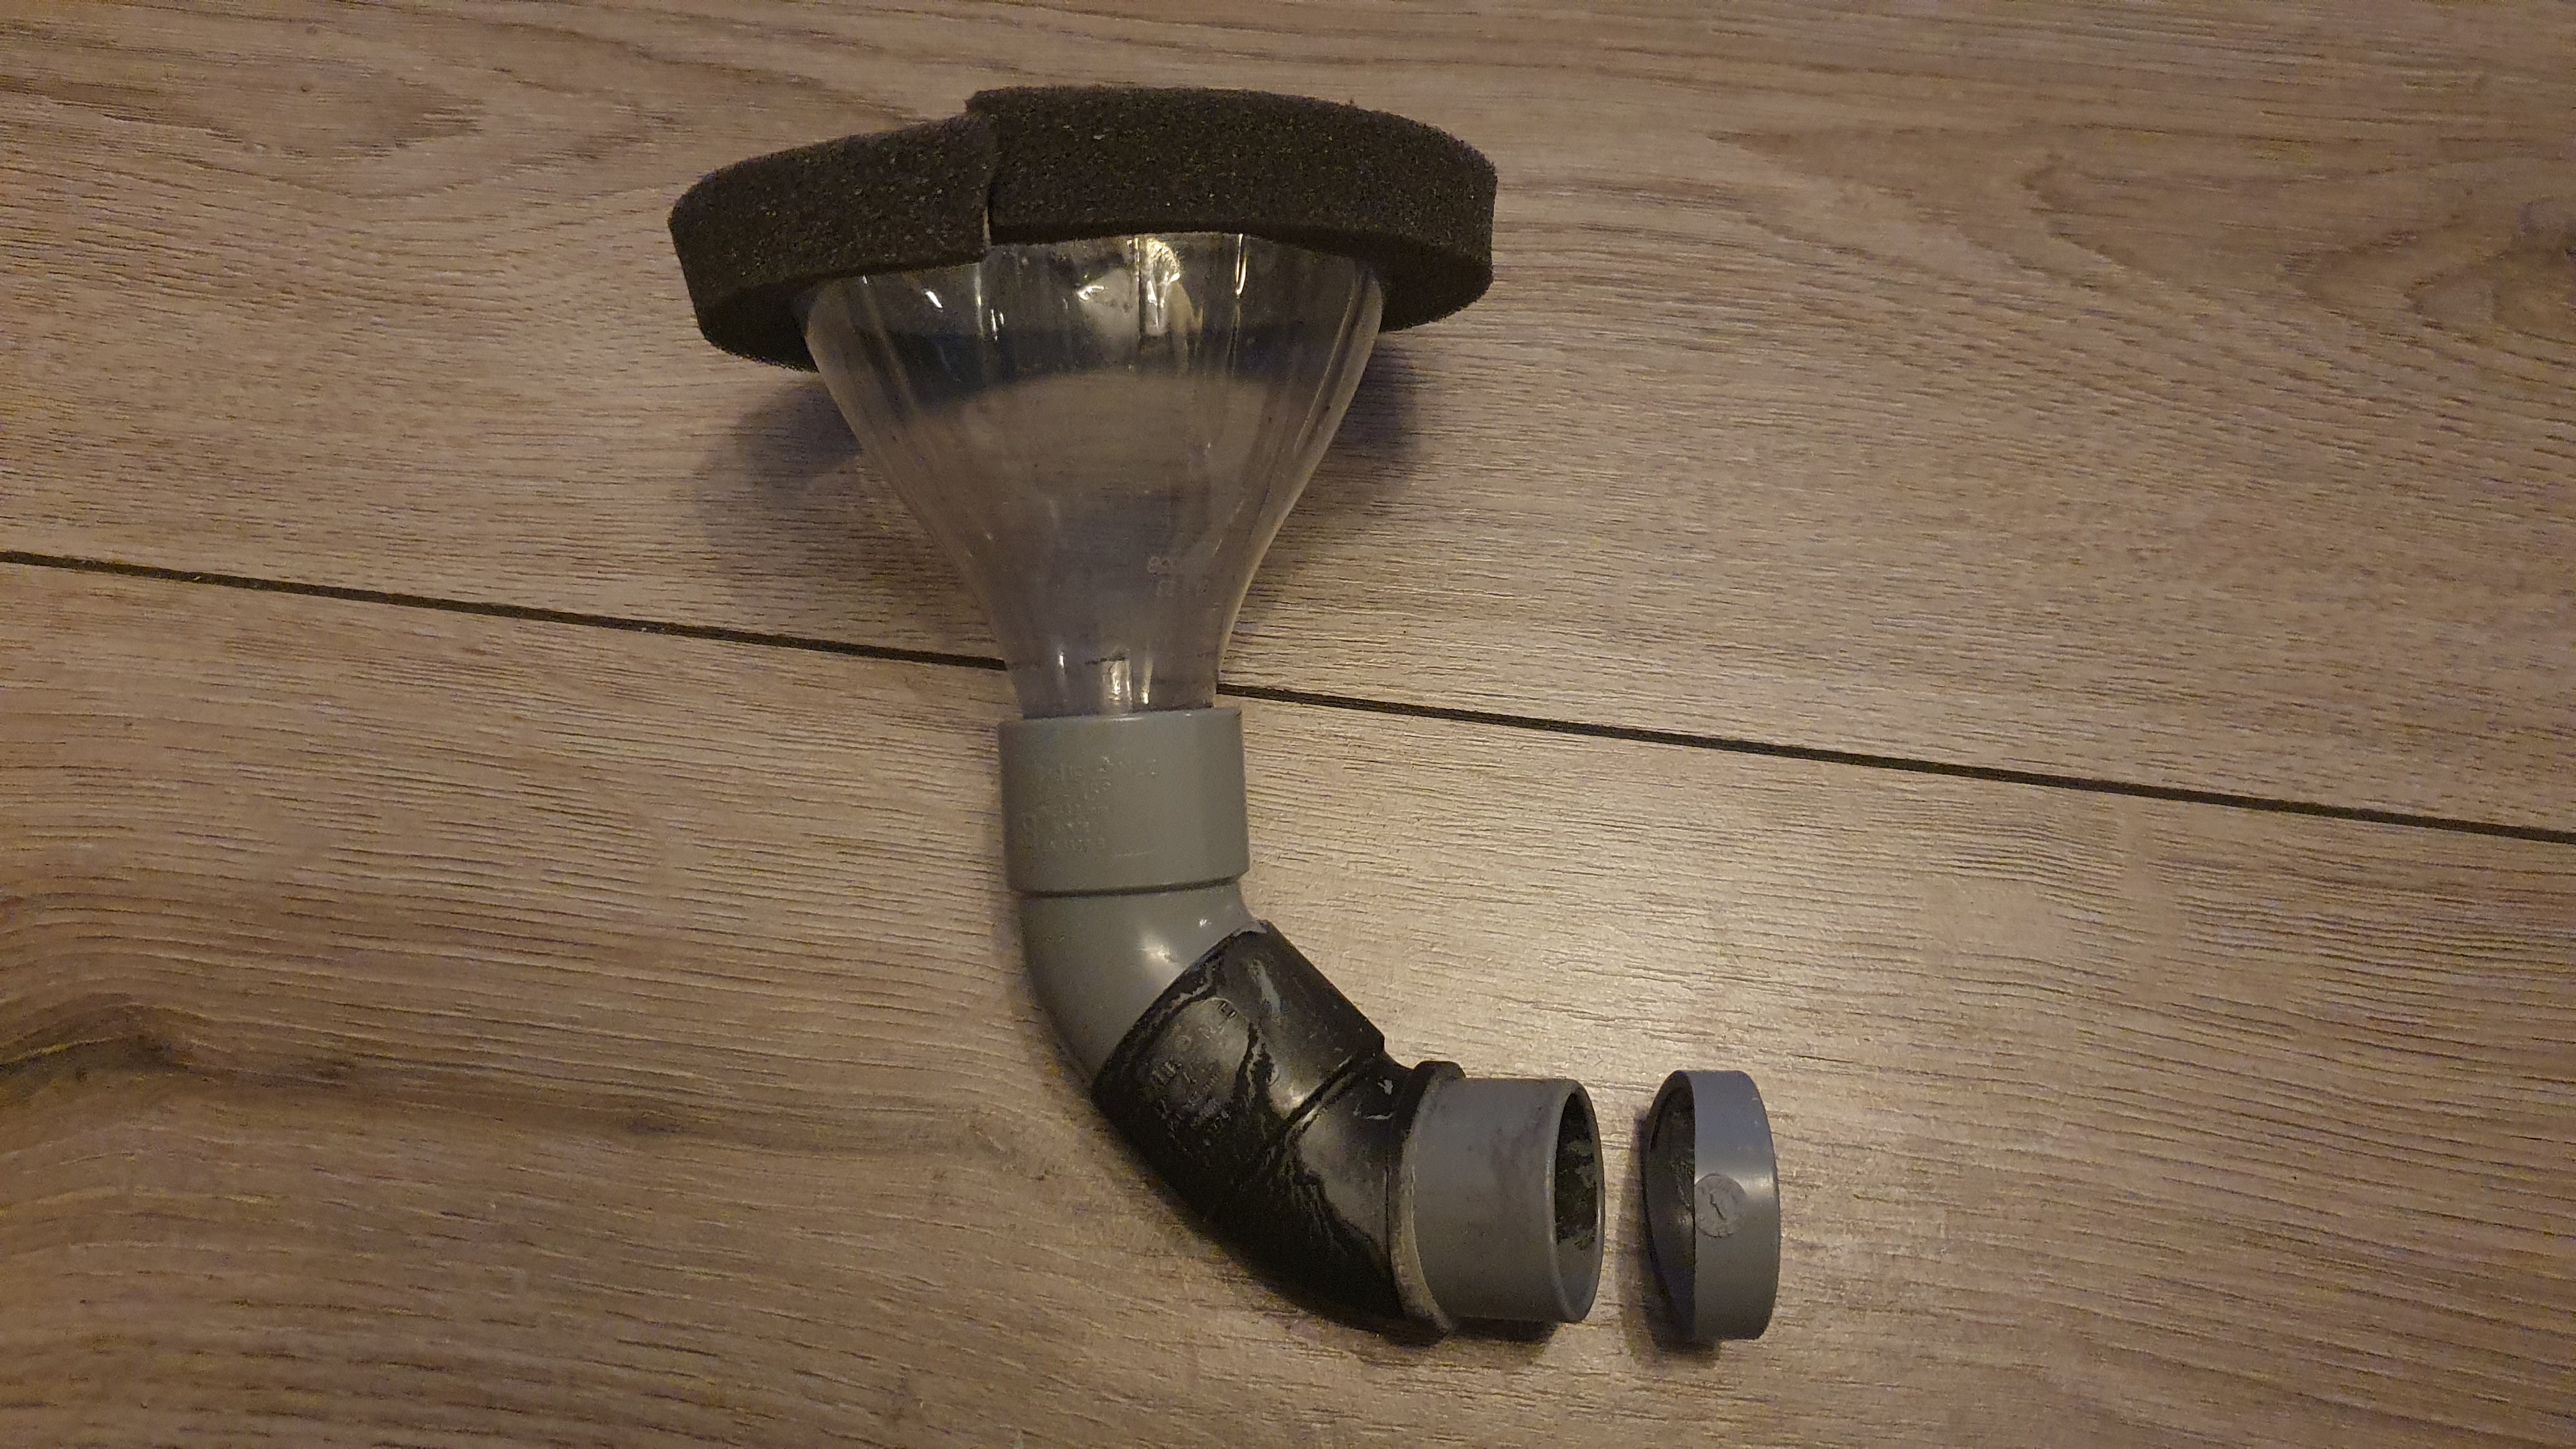
The funnel is the top of a 1.5L PET bottle. I put foam tape around the top to keep debris and food out of the bottom of the vending machine and to hold the routed wires securely. The tip is cut off and glued to a 32mm male end cut from an extra elbow joint I had. This way it can spin freely when in place and put less stress on the wires if you rotate the upper levels to aim the camera or position a solar cell
The dispense chute is 2x32mm 45° F/M elbow joints attached together. The male end goes out a 32mm hole in the enclosure. I used pieces cut from the female end of that extra 32mm joint to make braces to better secure it and position the female end in the center of the enclosure for the funnel to go into.
- No camera? Don't need 50mm PVC arm or hole. You can just use a pieve of PVC pipe
- No 110 to2x50mm adapter? Use a 110x50mm y joint and mount the sensor looking sideways across the 50mm opening with matte black on the other side. Helps to leave a little slack on the IR LED and sensor leads so you can mount it flat against the pvc and bend their leads to aim them. Since this path has just one bend in it, you may need to raise the platform a bit to lengthen the path before the bend, and paint the inside matte black to minimize light getting in
- Would work ok if you substitute 100 or 125mm for 110mm provided you can find the t and y joints.
- You could substitute pvc end caps for the screw caps. Use tape to make sure they fit securely
- Can be mounted on the ground, horizontal or vertical railing, or pole
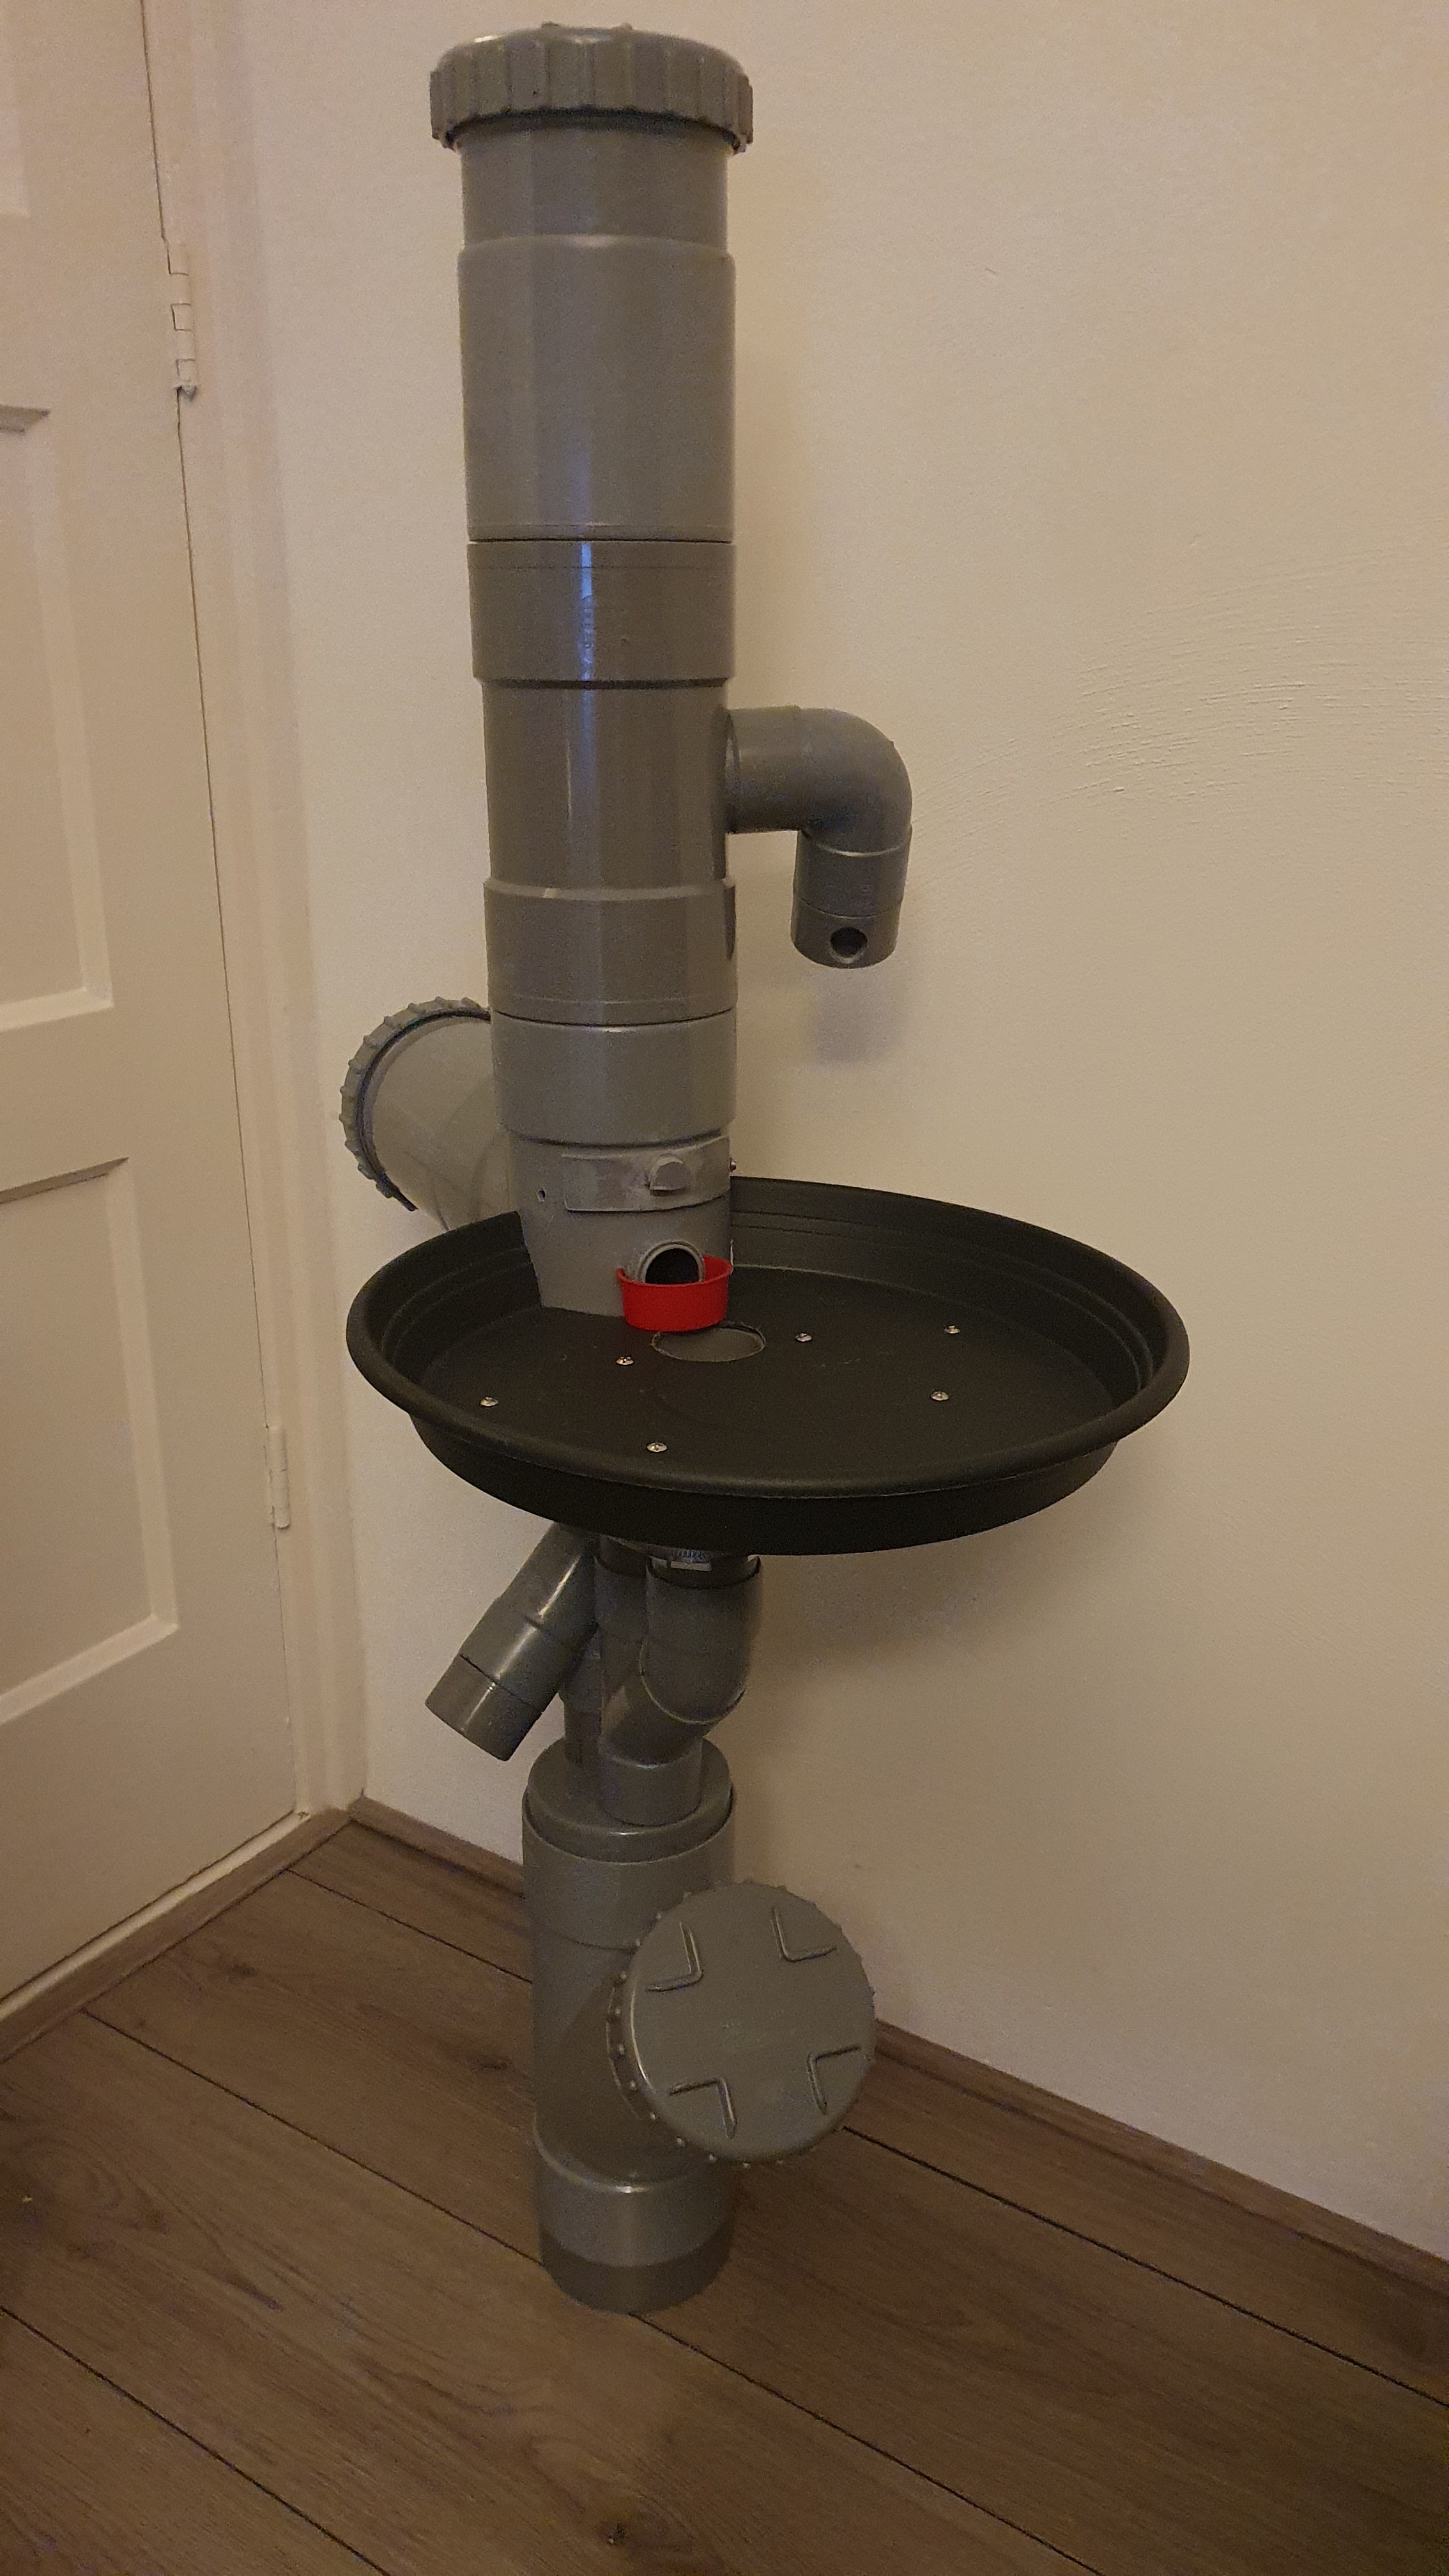
The enclosure shown above is 112.5 cm tall and can be broken down into 5 parts.
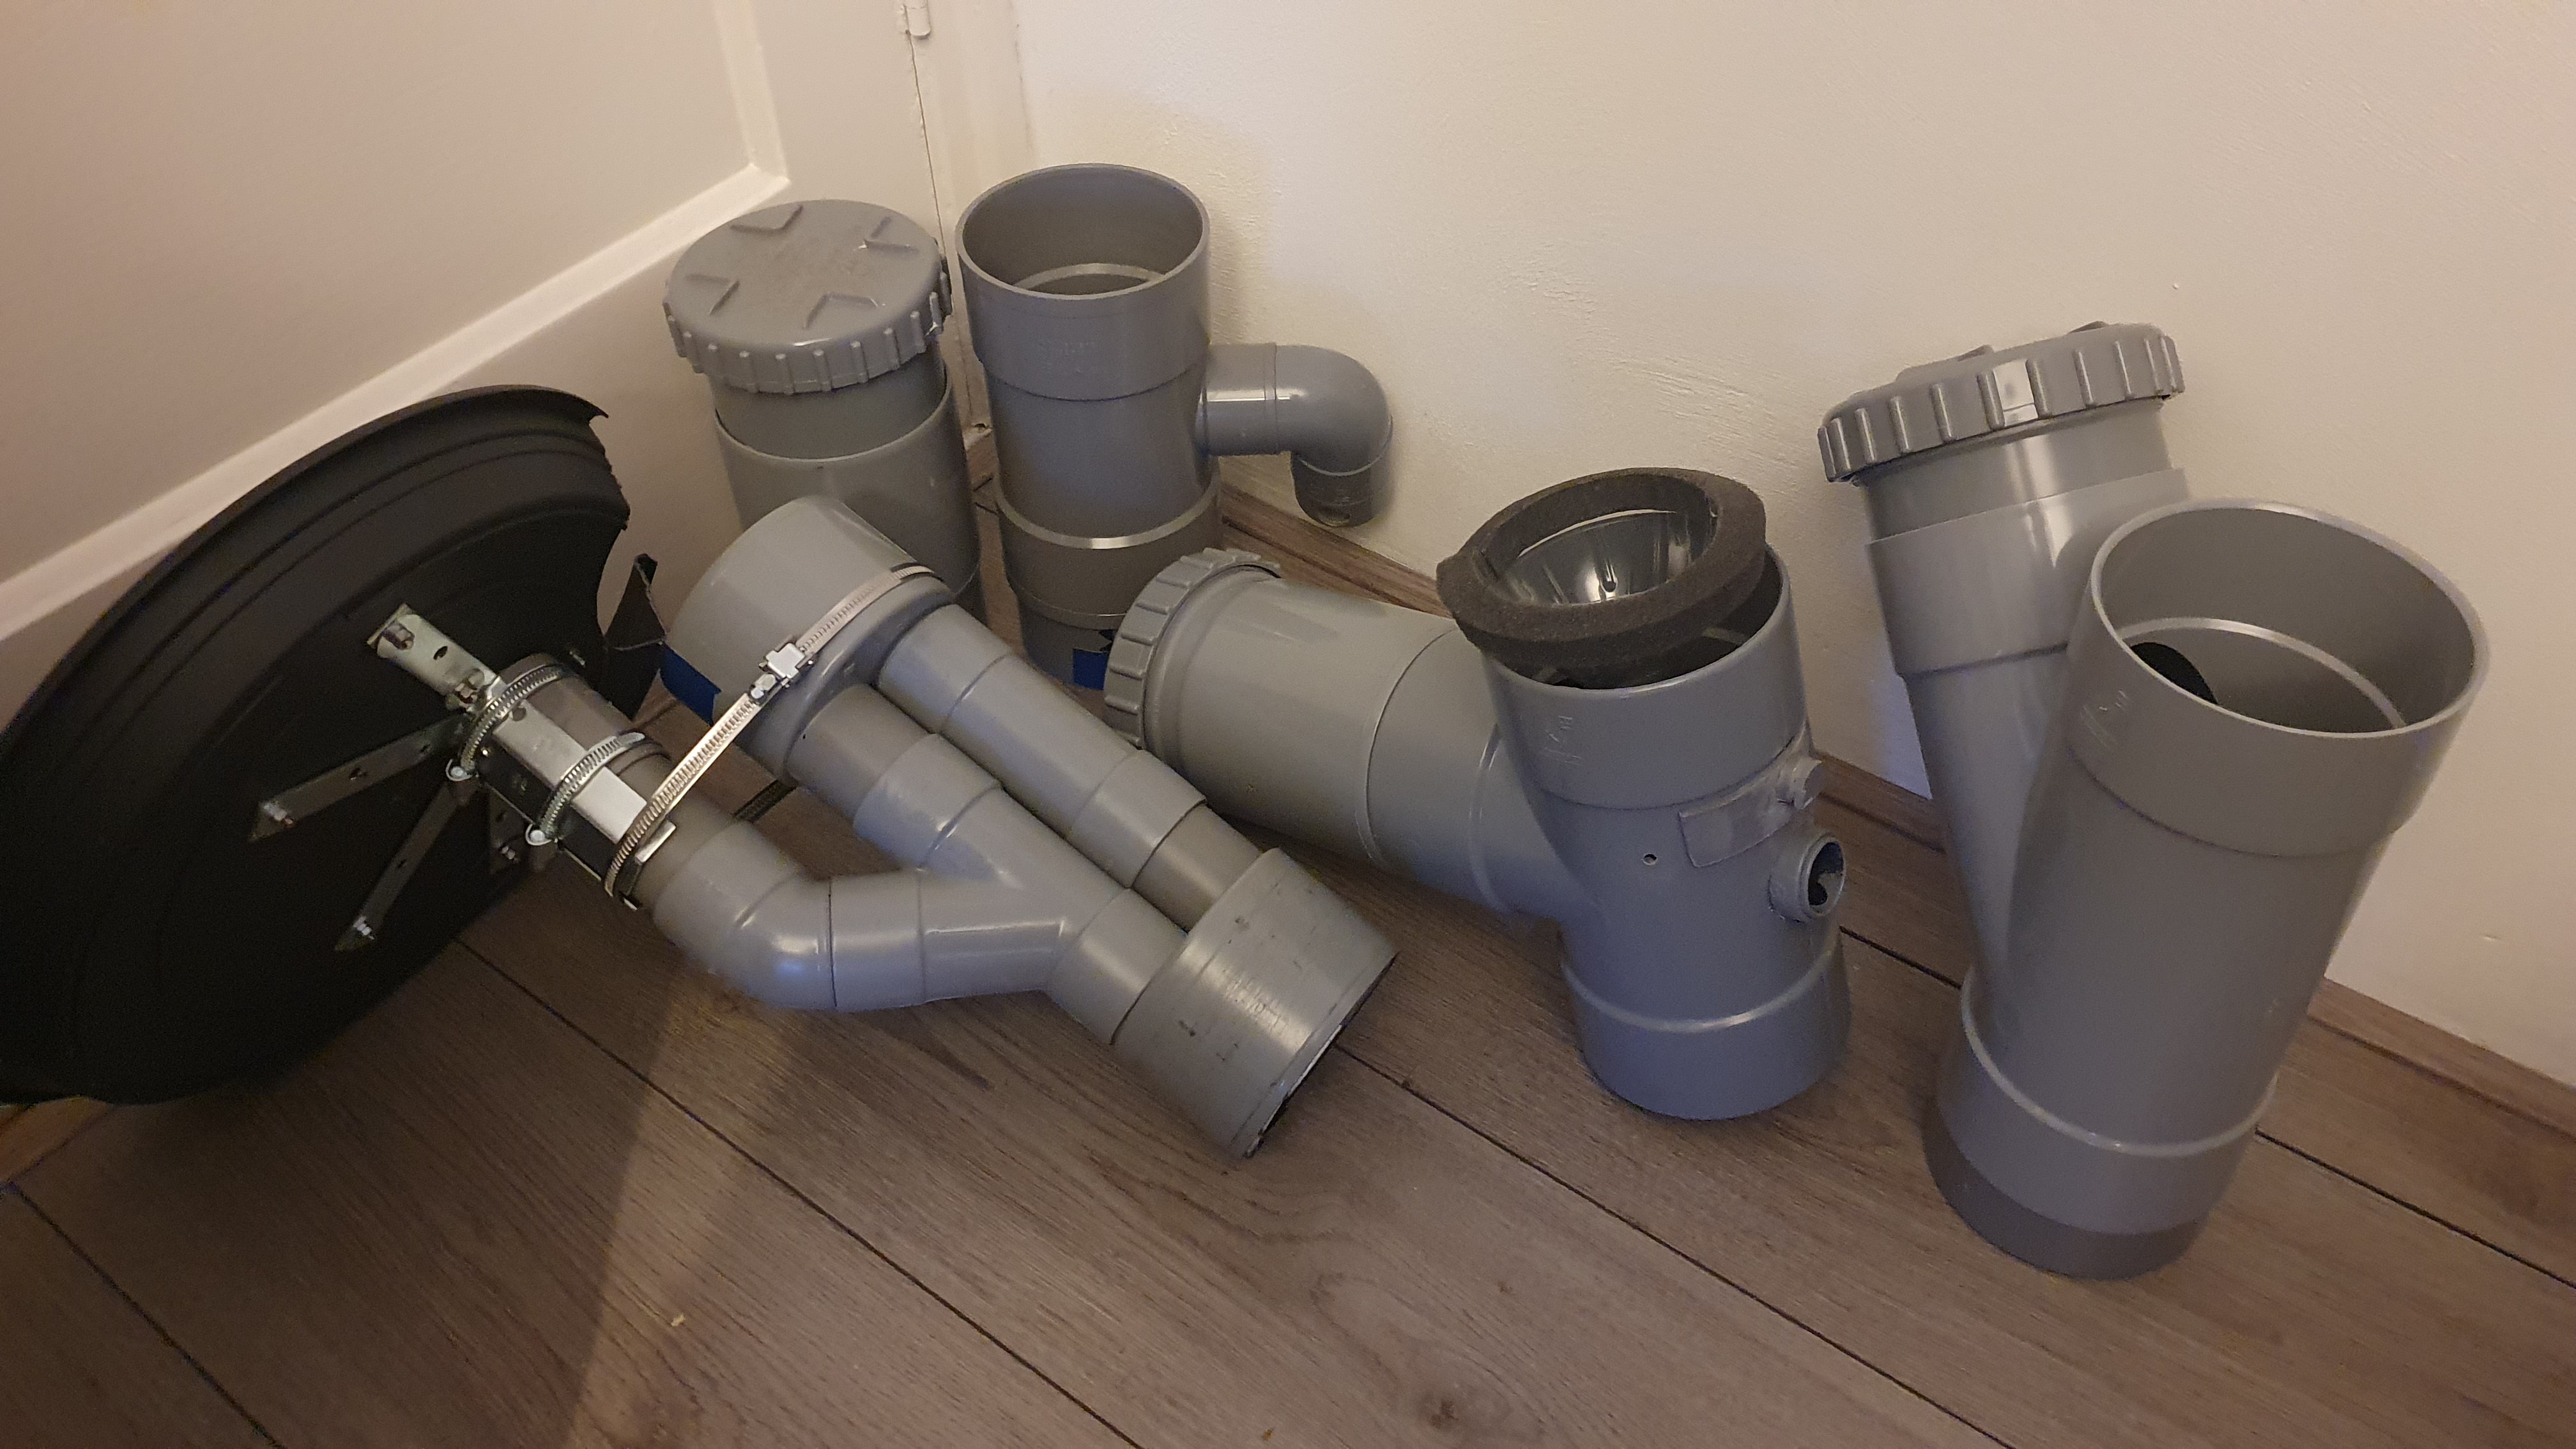
From top to bottom
Hopper and Dispenser
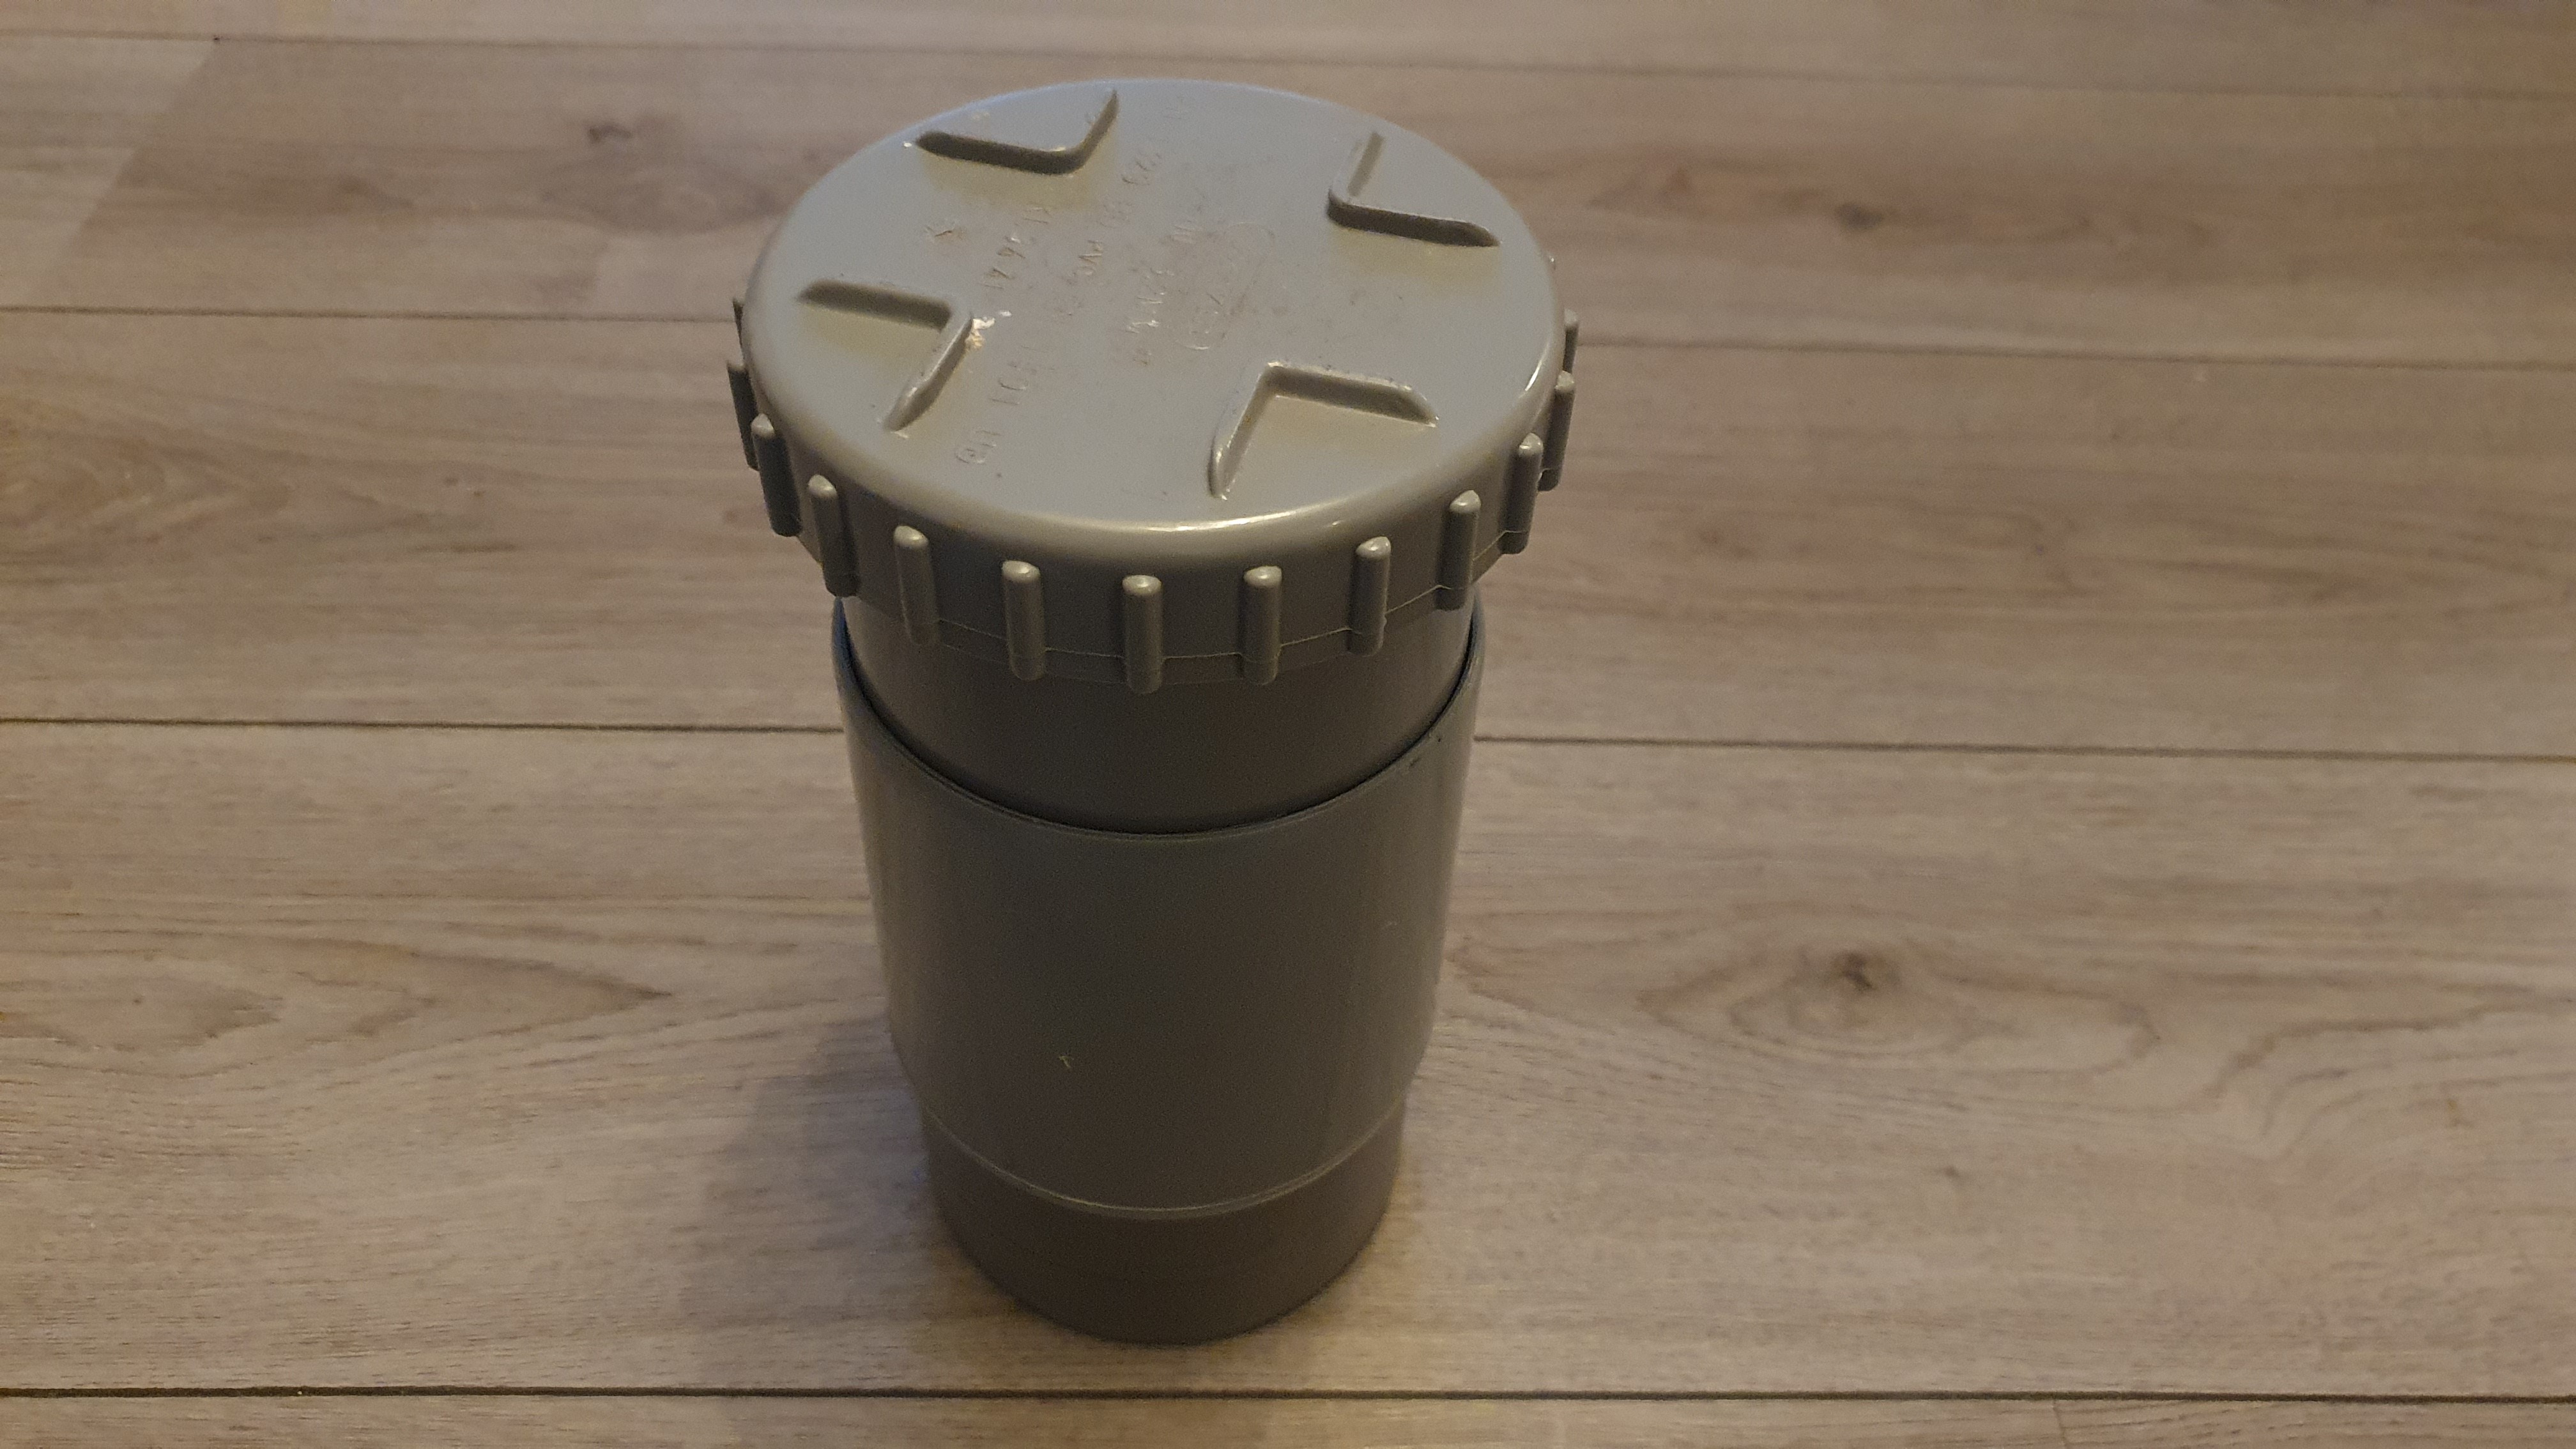
- 110mm screw end cap
- 110mm coupling
- 110mm PVC pipe 88mm long
- 110mm PVC pipe 18mm long
- 110mm PVC pipe 10mm long
- 110mm PVC pipe 5 mm long
- 3x 110mmx3mm PVC disc (lower dispense platform and baffles)
- 96mm disc (upper dispense platform)
- 50mm end cap (for motor shield)
- 2x40mmx3mm PVC discs (to secure motor)
- 4x 15mm M3 standoffs
- 2x 10mm M3 standoffs
- 4x M3 washers
- 2x M3 screws
- 35x120mm matte black material (shrink tubing or similar)
Hopper and dispenser
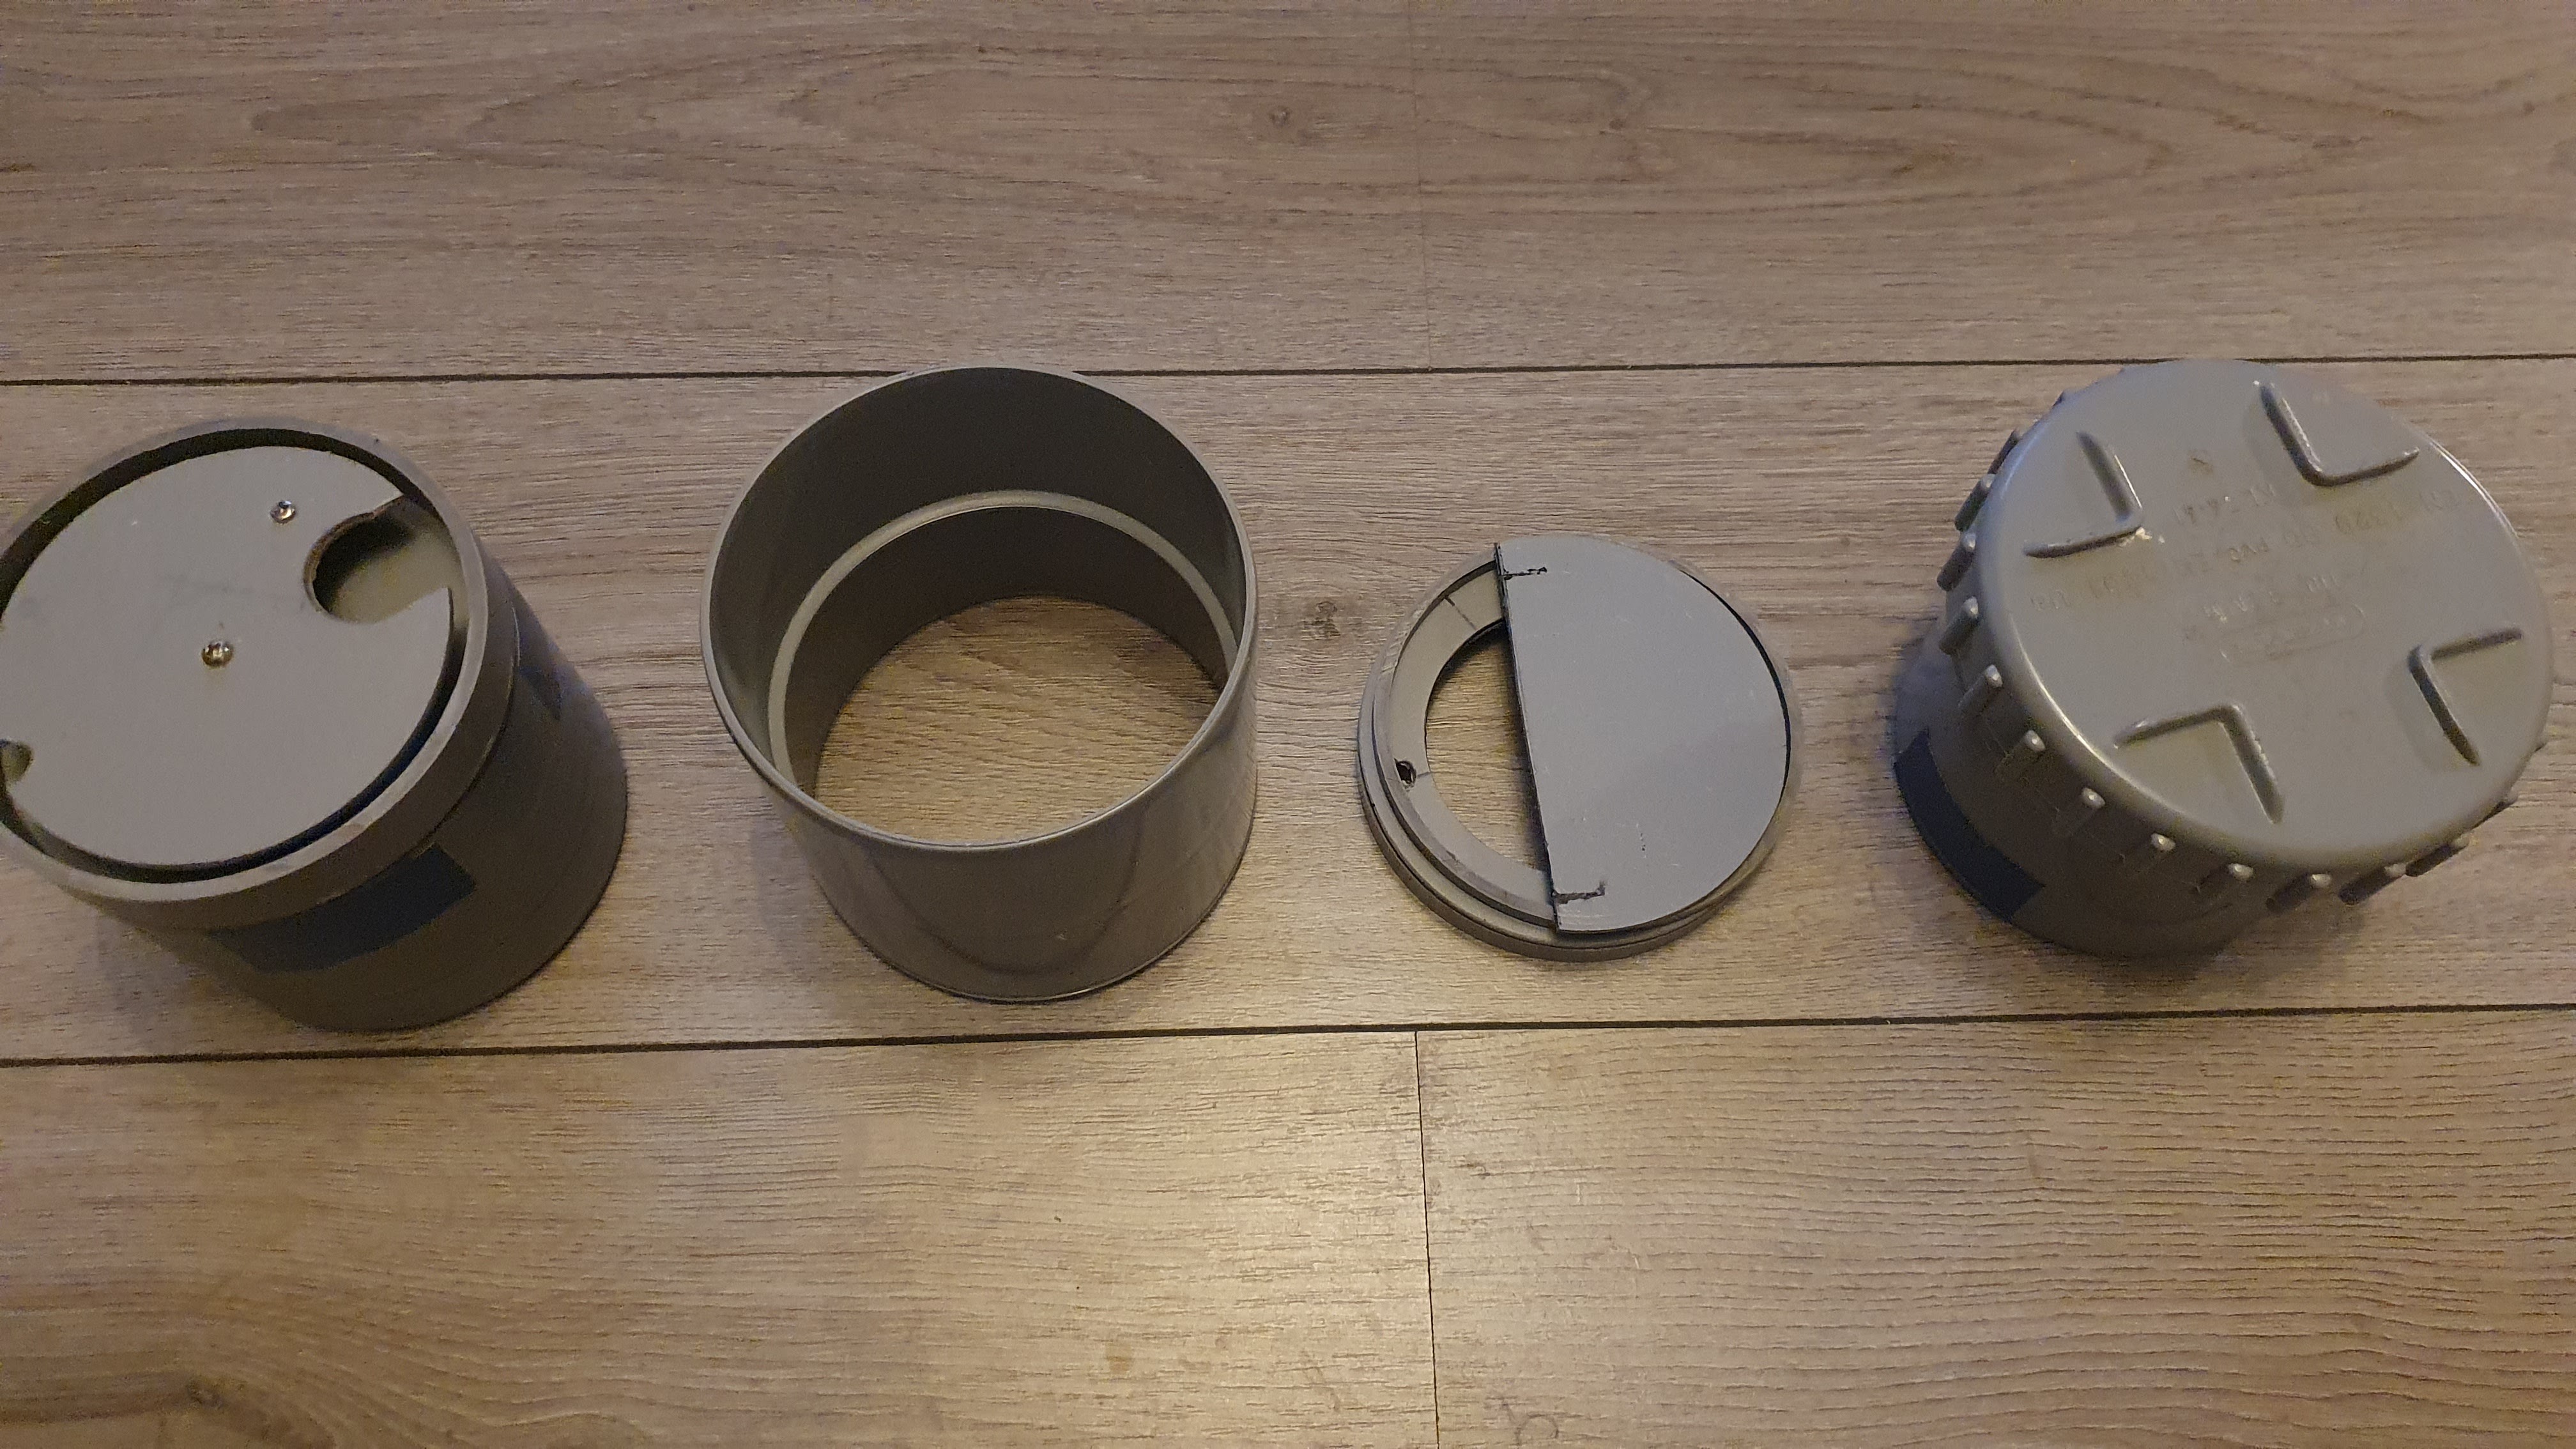
Dispenser assenbly
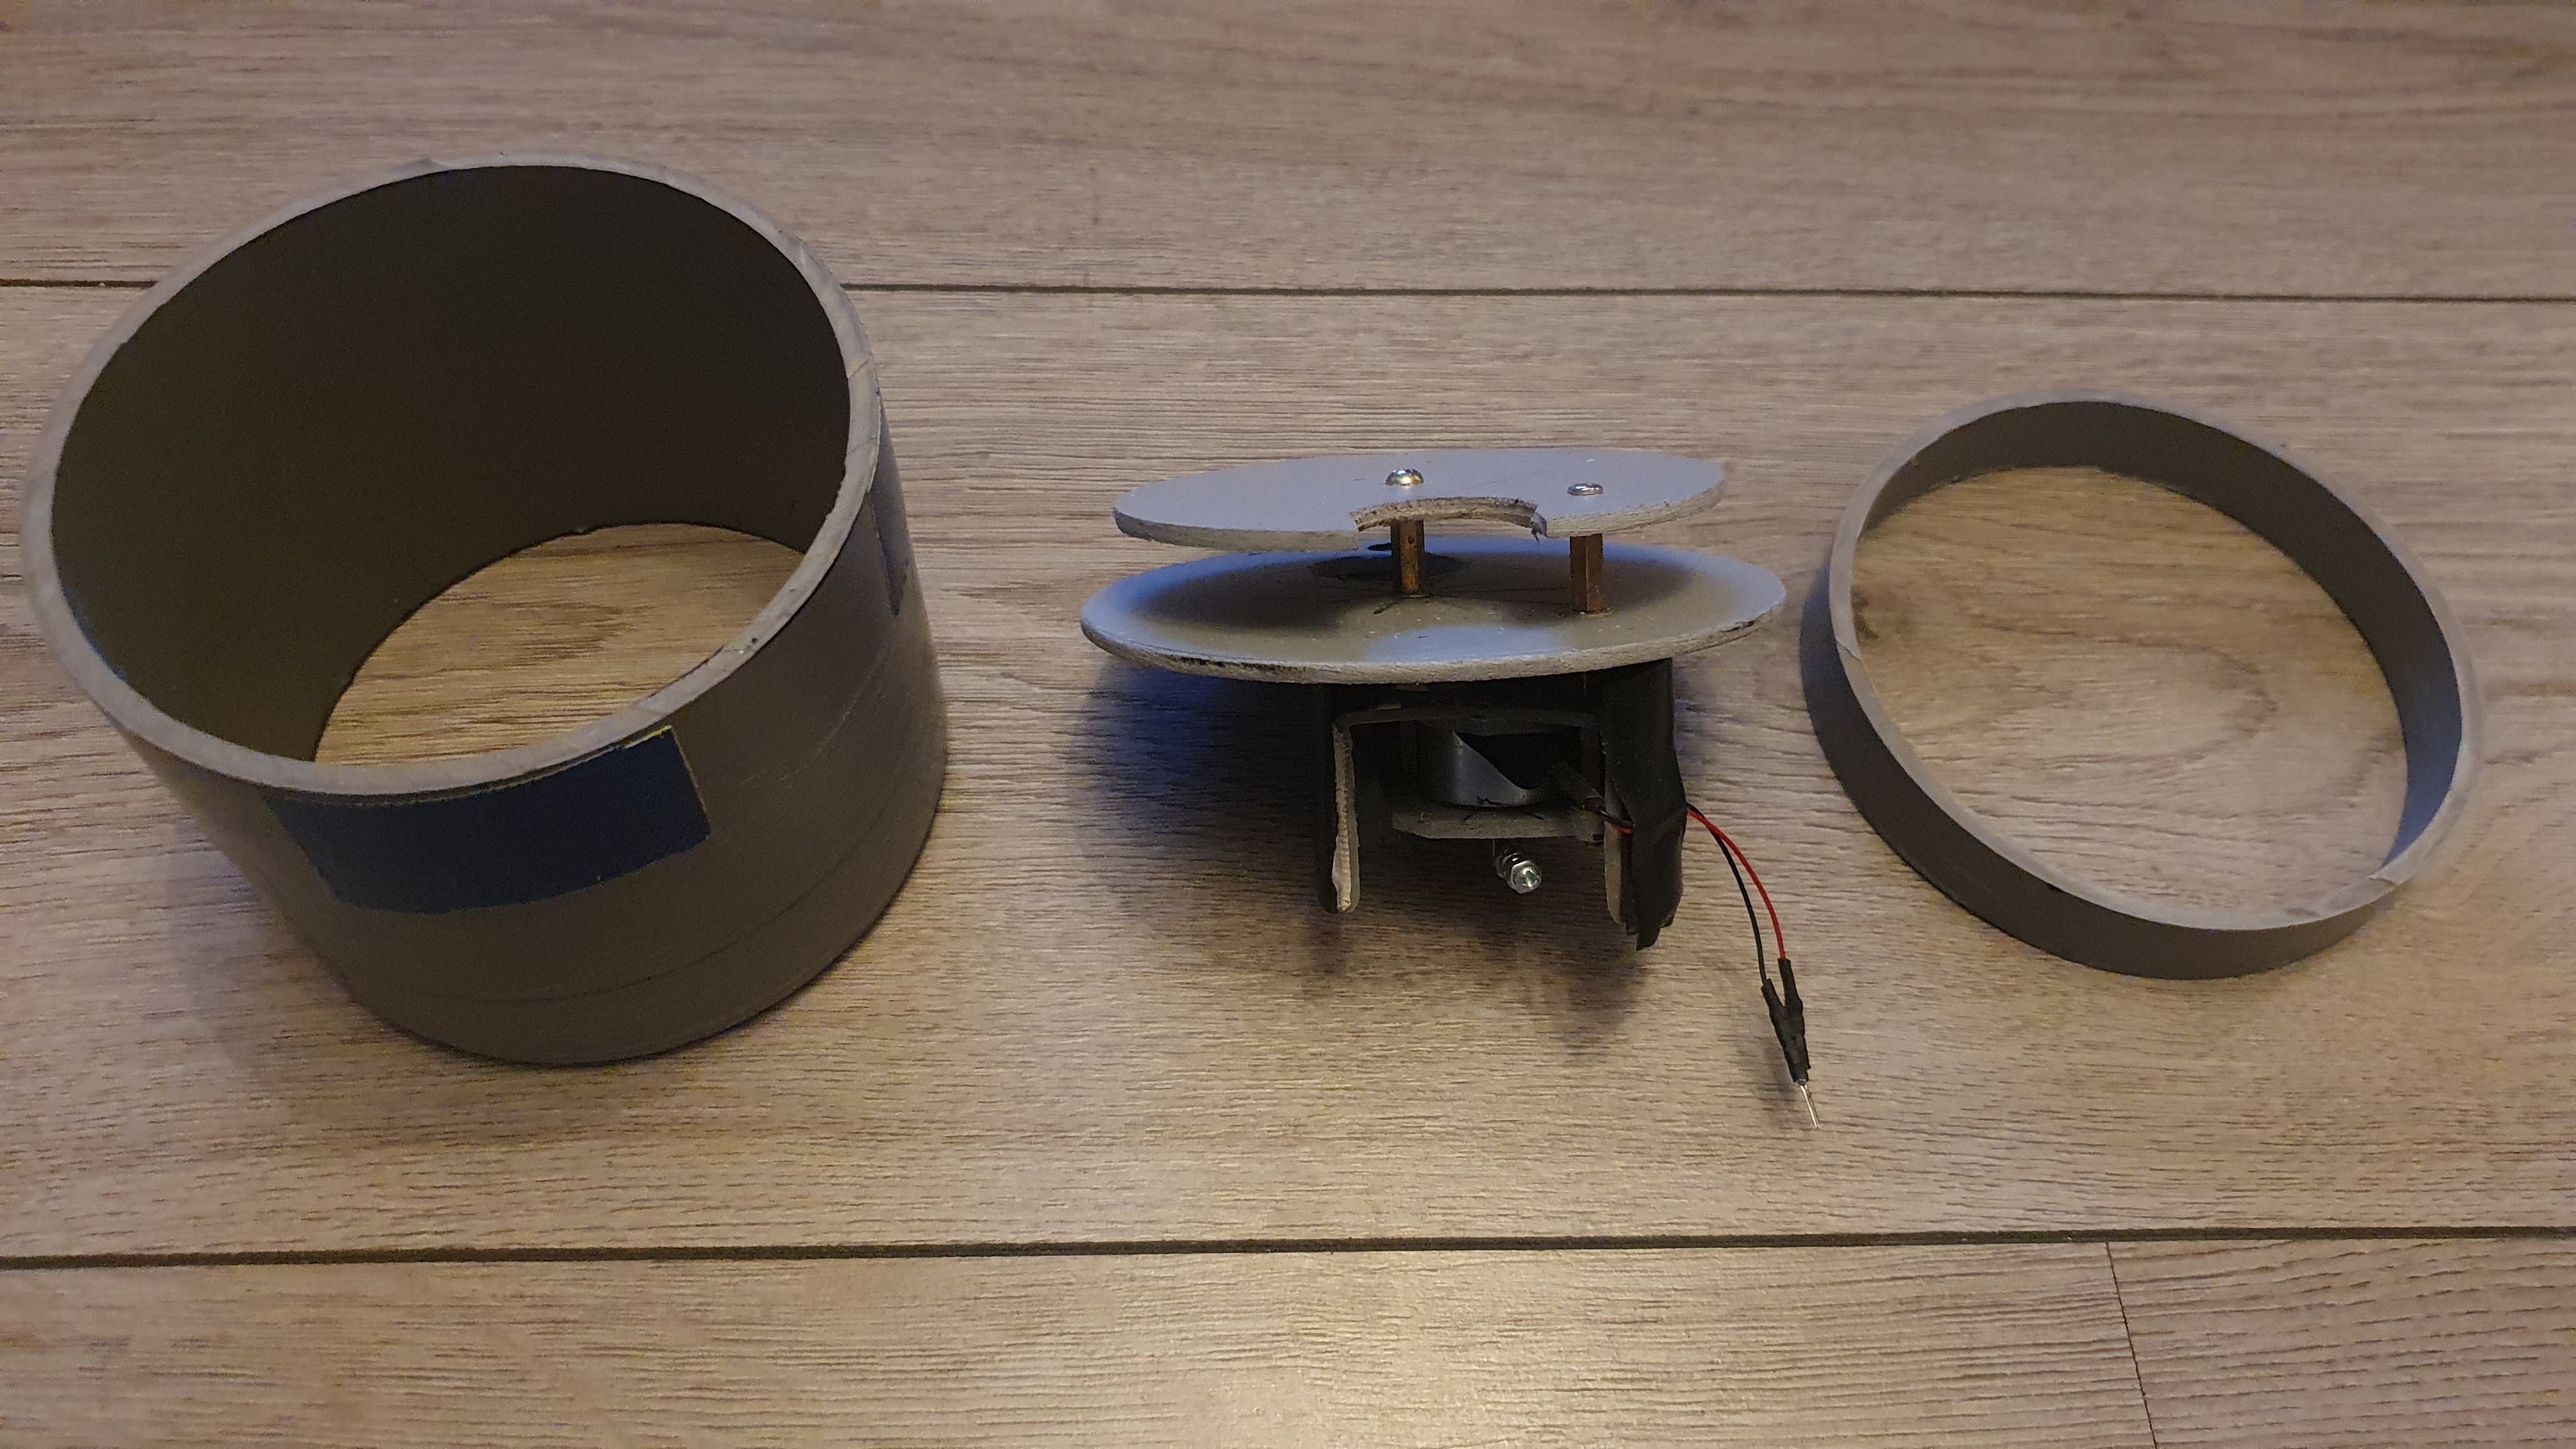
Baffle assenbly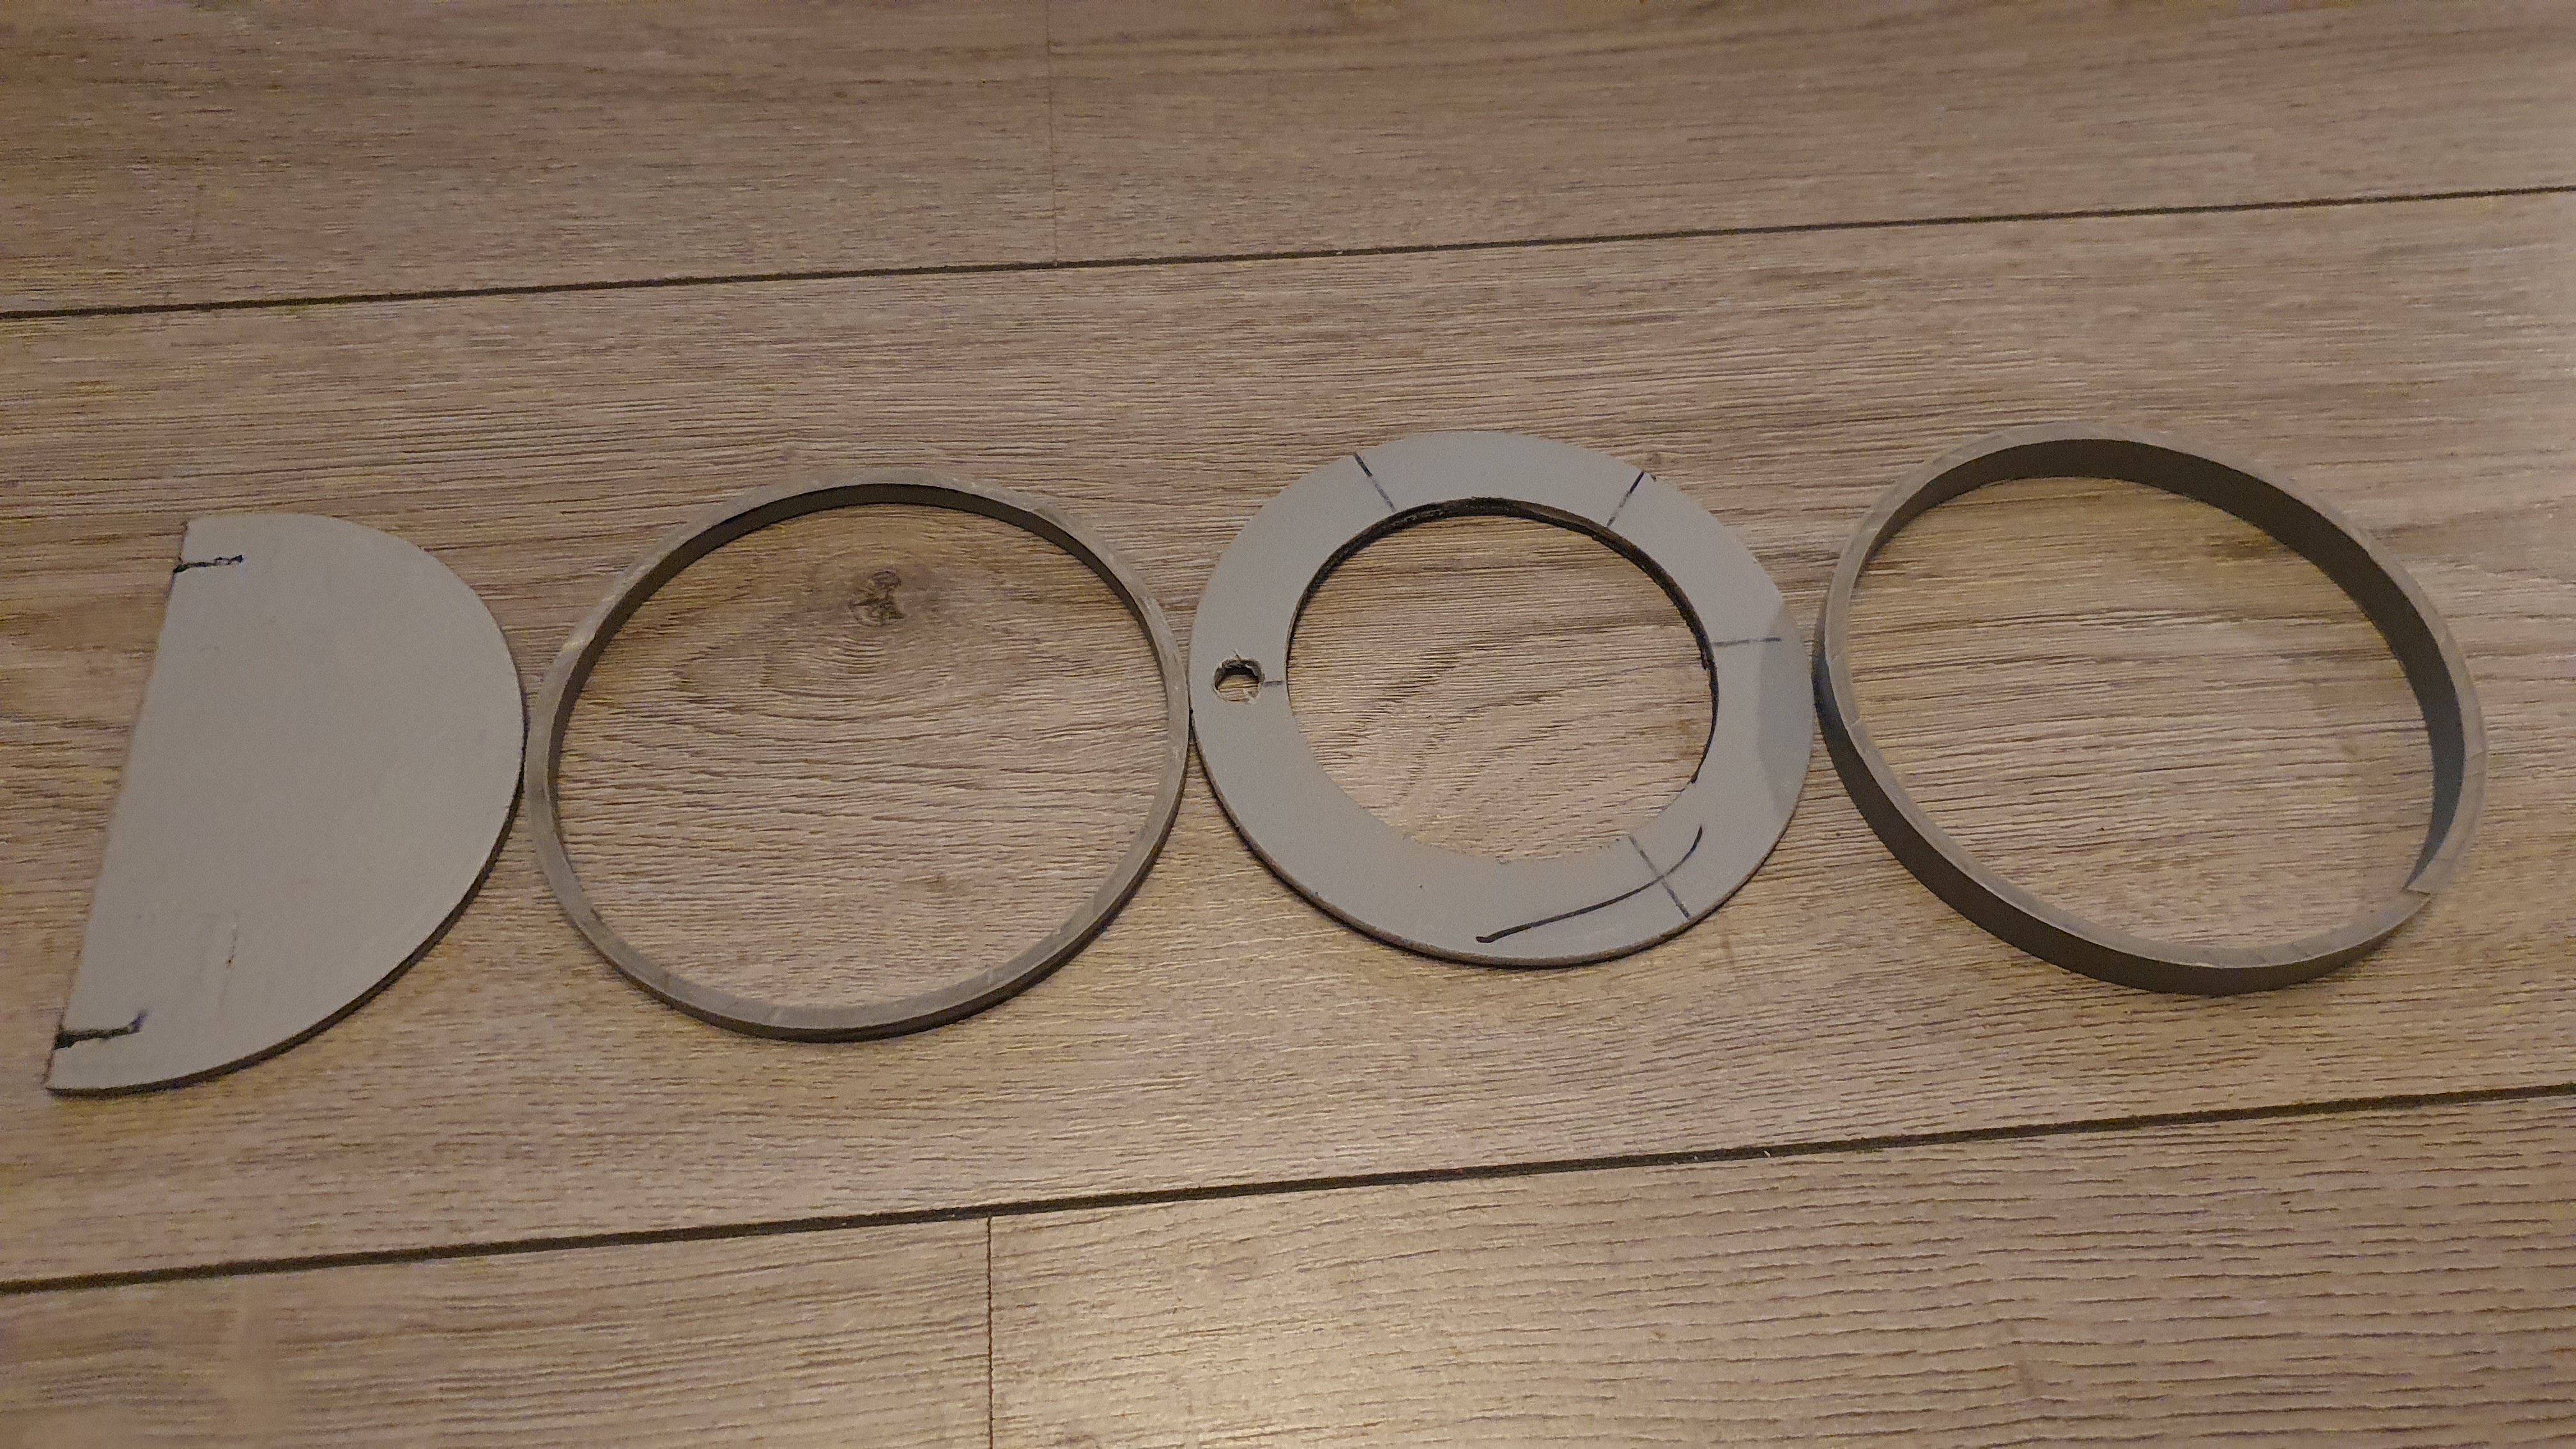
There is more detail about the dispenser assembly above.
Camera Mount
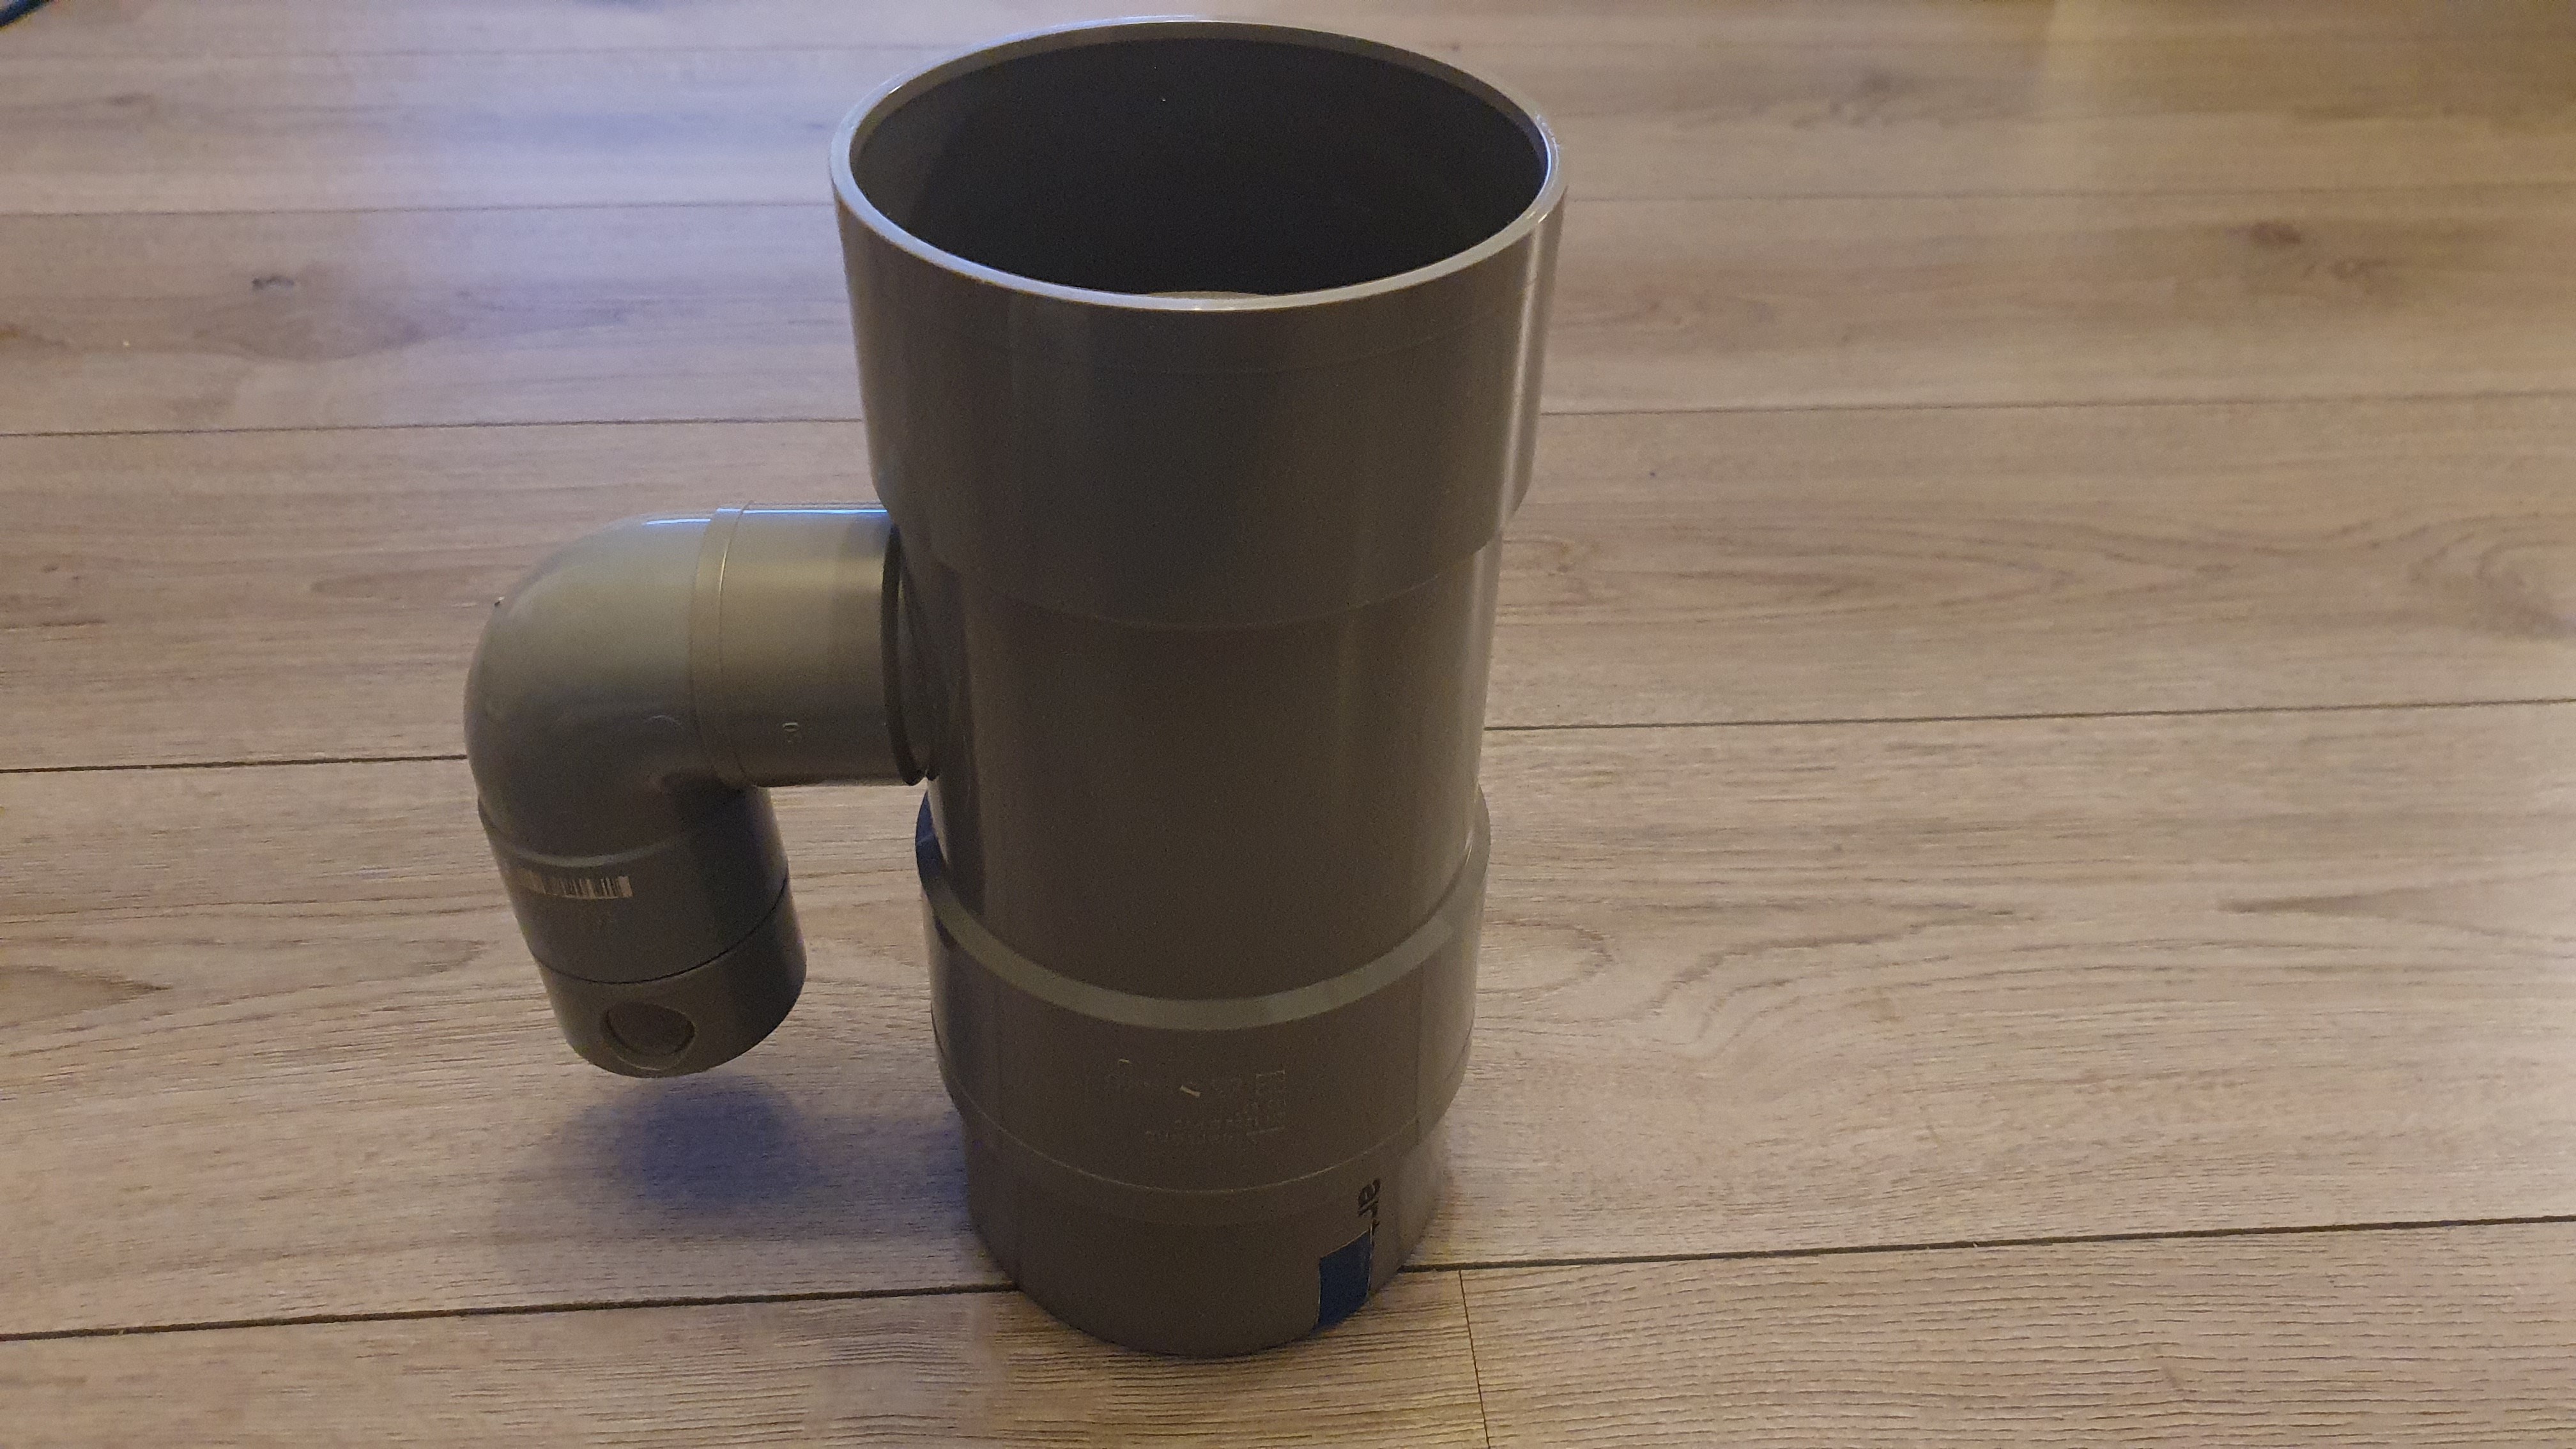
If you don't plan to mount a camera on this vending machine, you can replace this and the 88mm long pipe segment from the Hopper and Dispenser with one 20-25mm piece of 110mm PVC pipe.
- 110mmx50mm 90° T-joint F/F
- 50mm 90° elbow joint M/F
- 50mm PVC 60mm long
- transparency film 25x25mm
- 50mm end cap
- 110mm PVC 115mm long
- 75x35x3mm PVC rectangle
Camera mount assembly
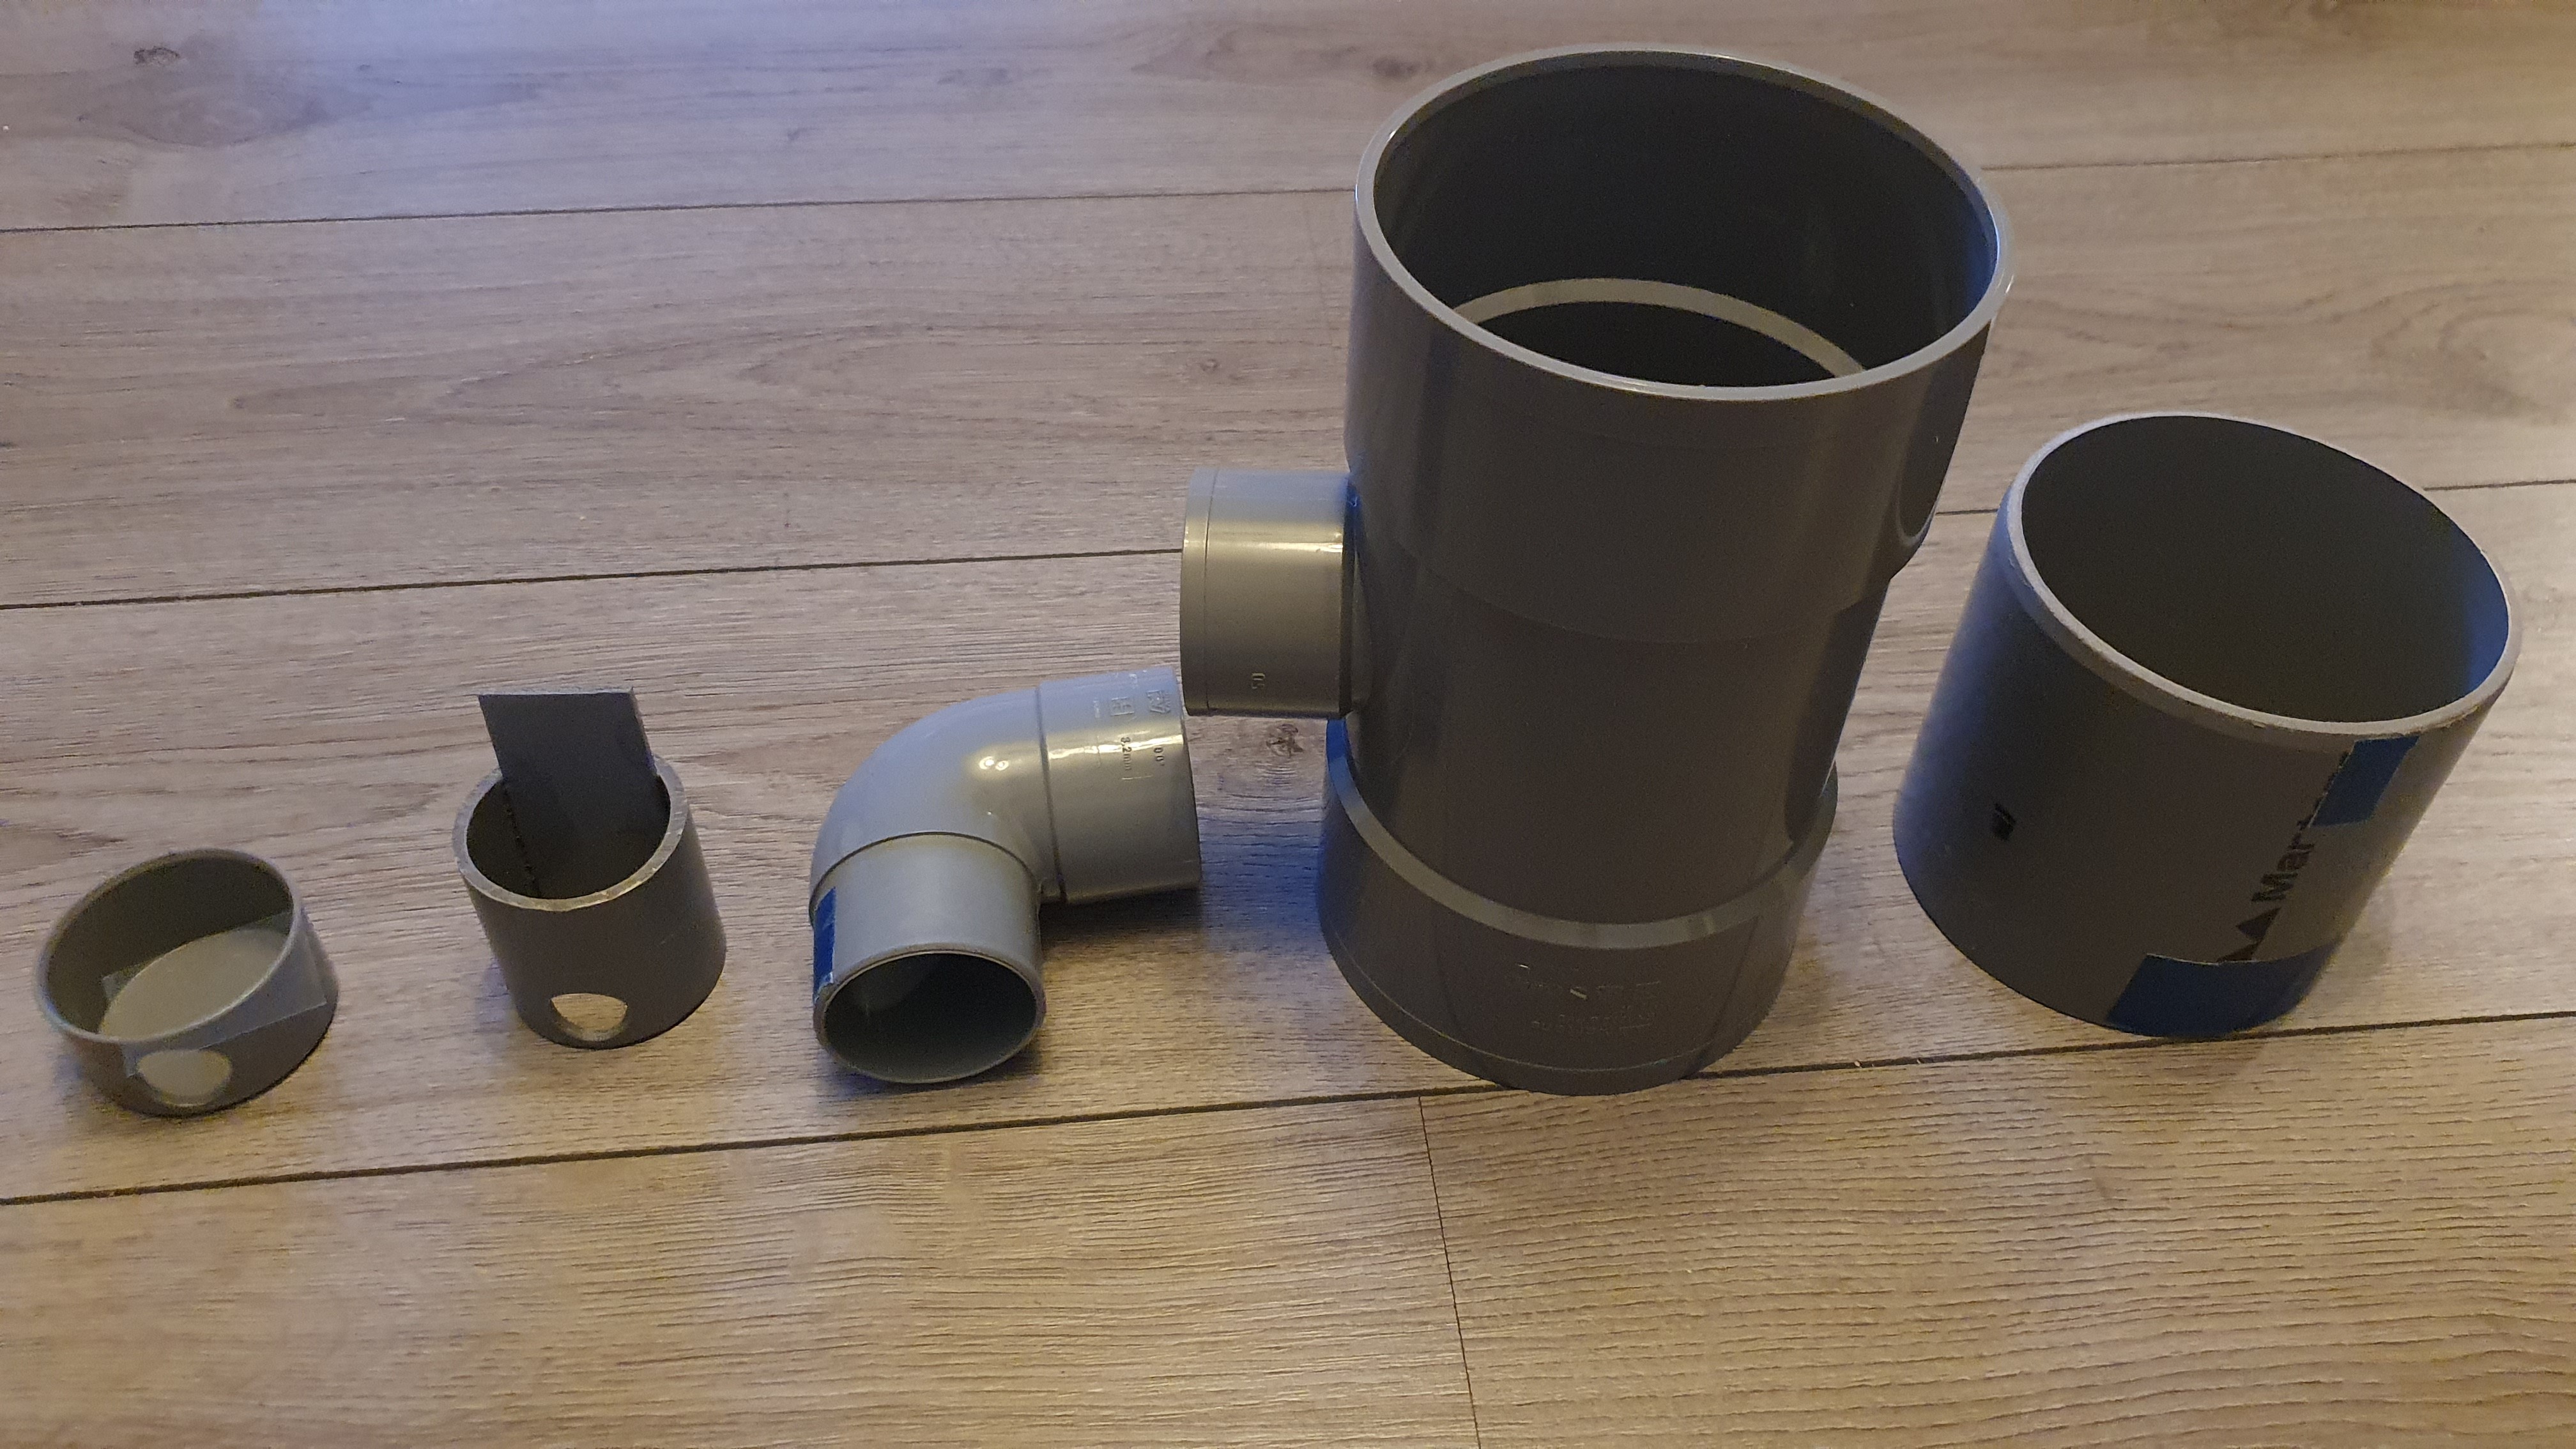
Camera enclosure
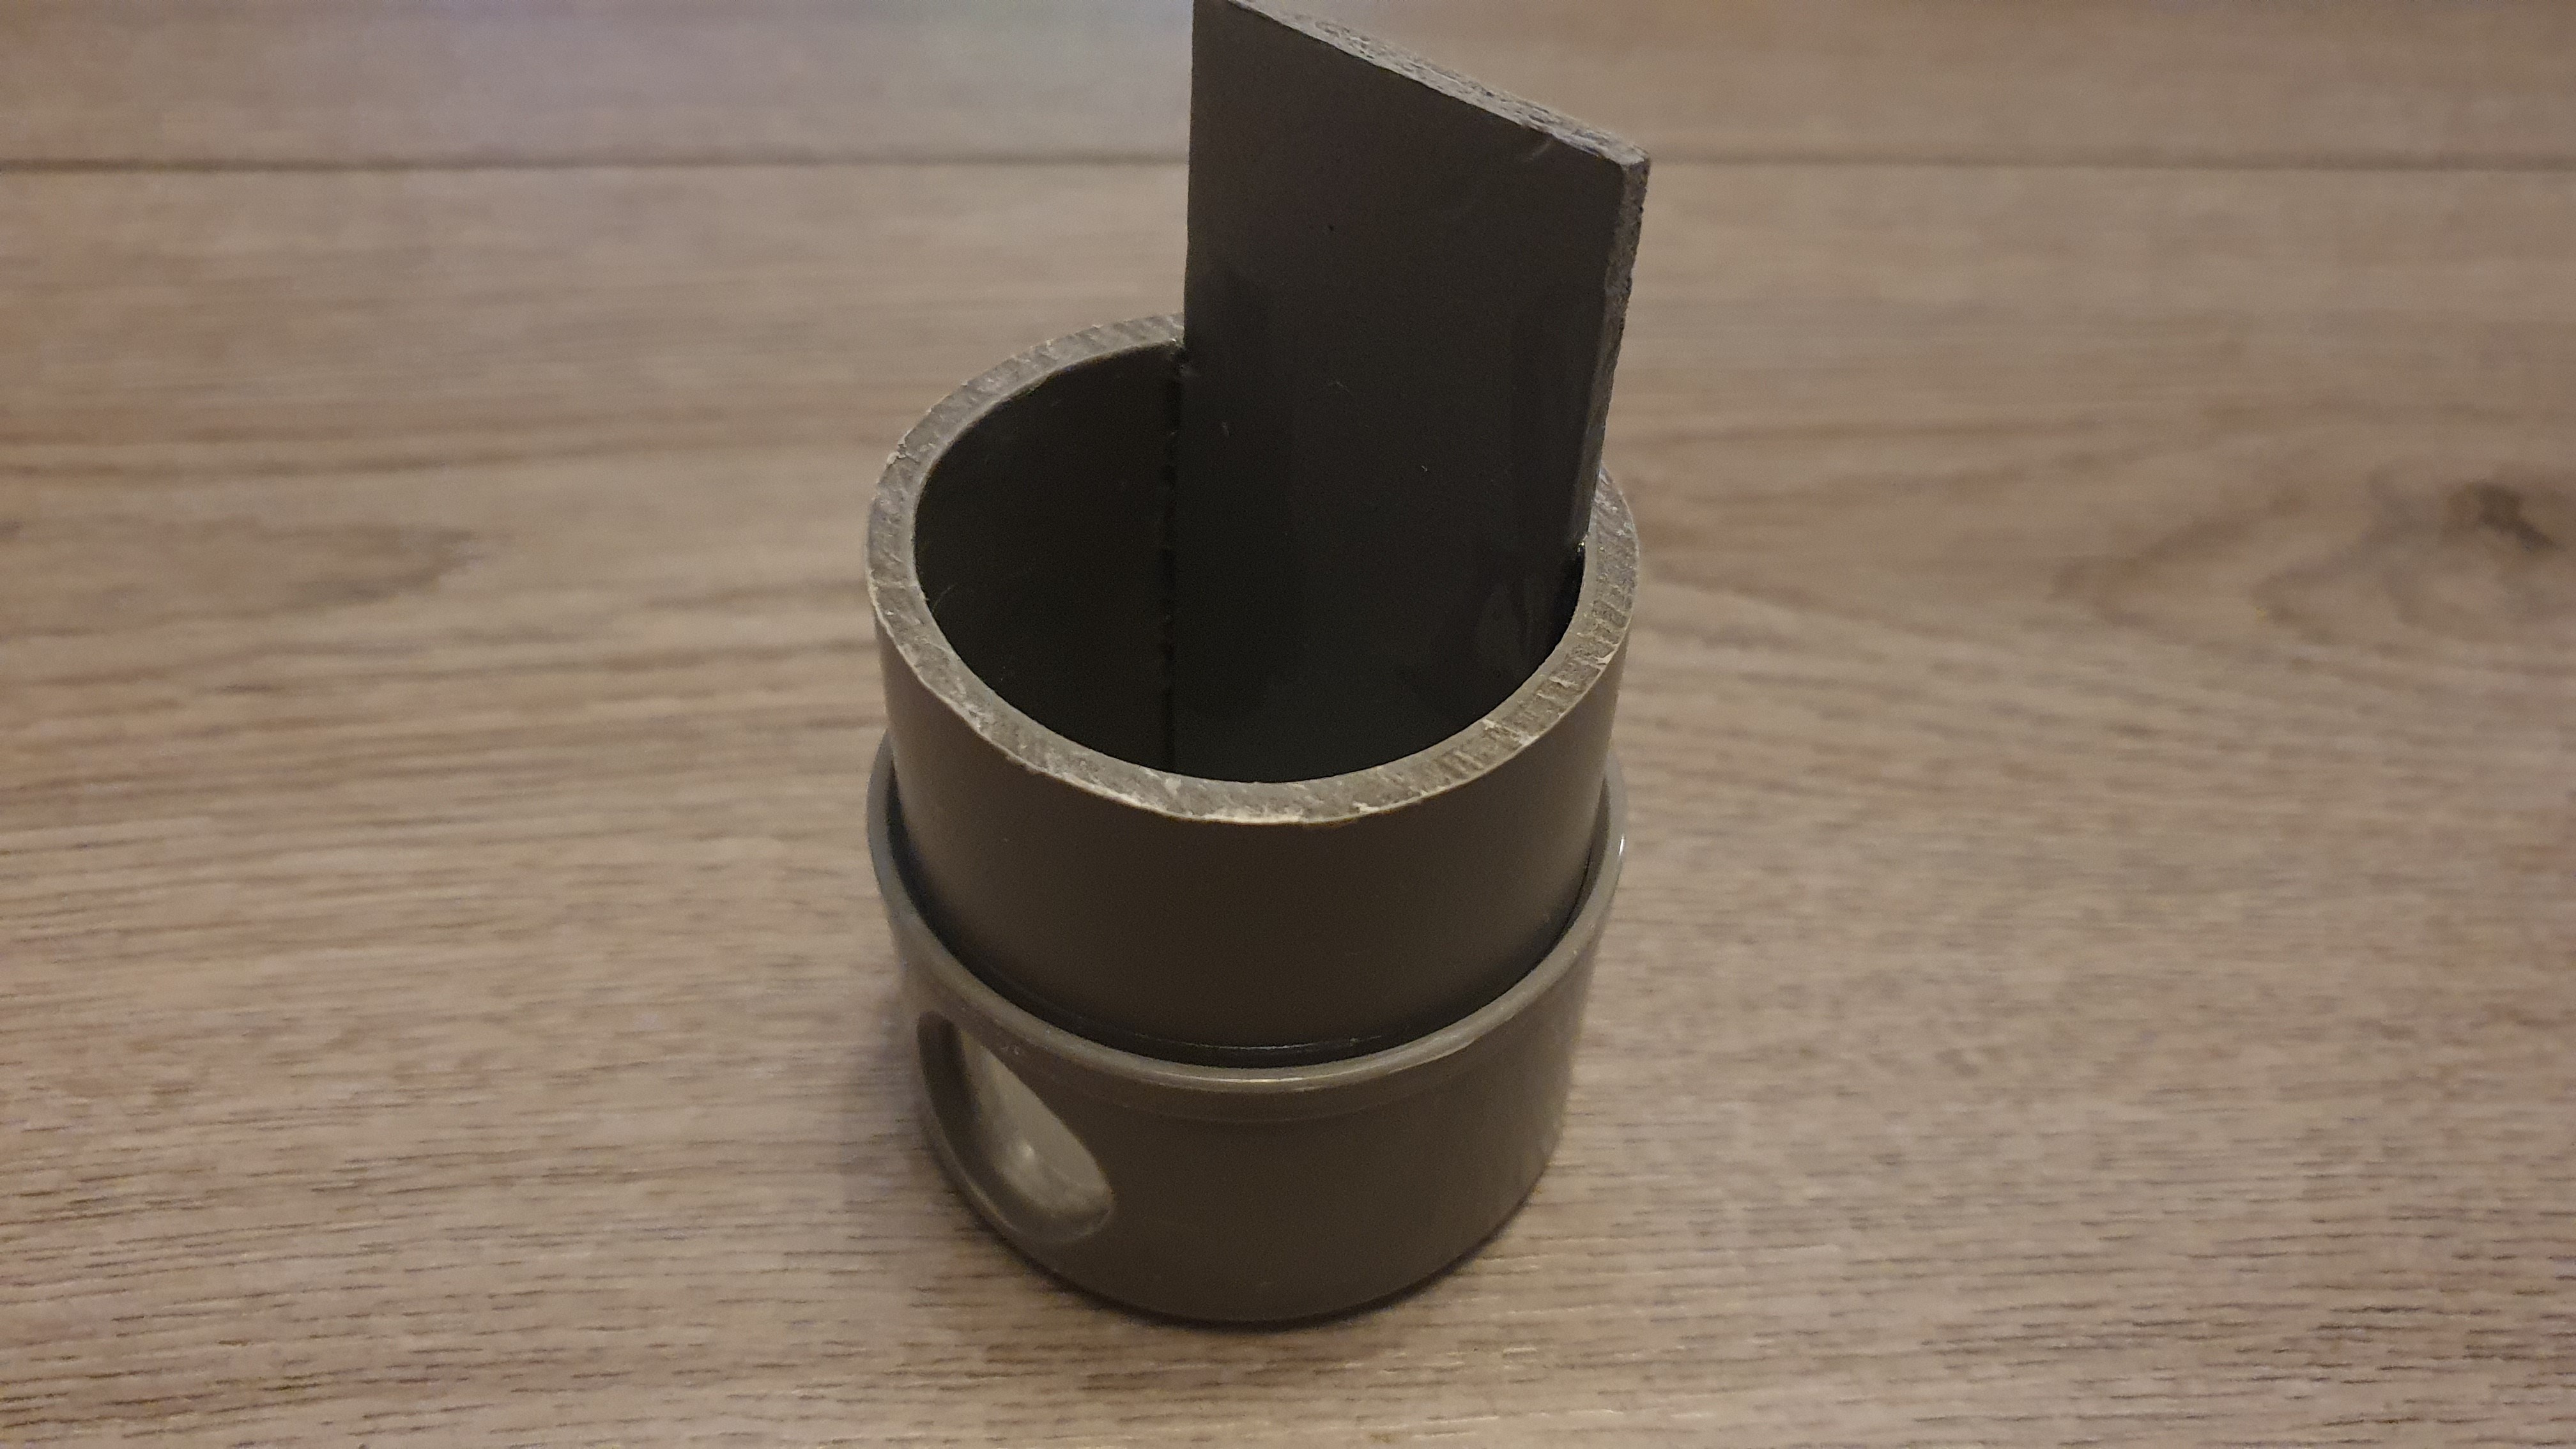
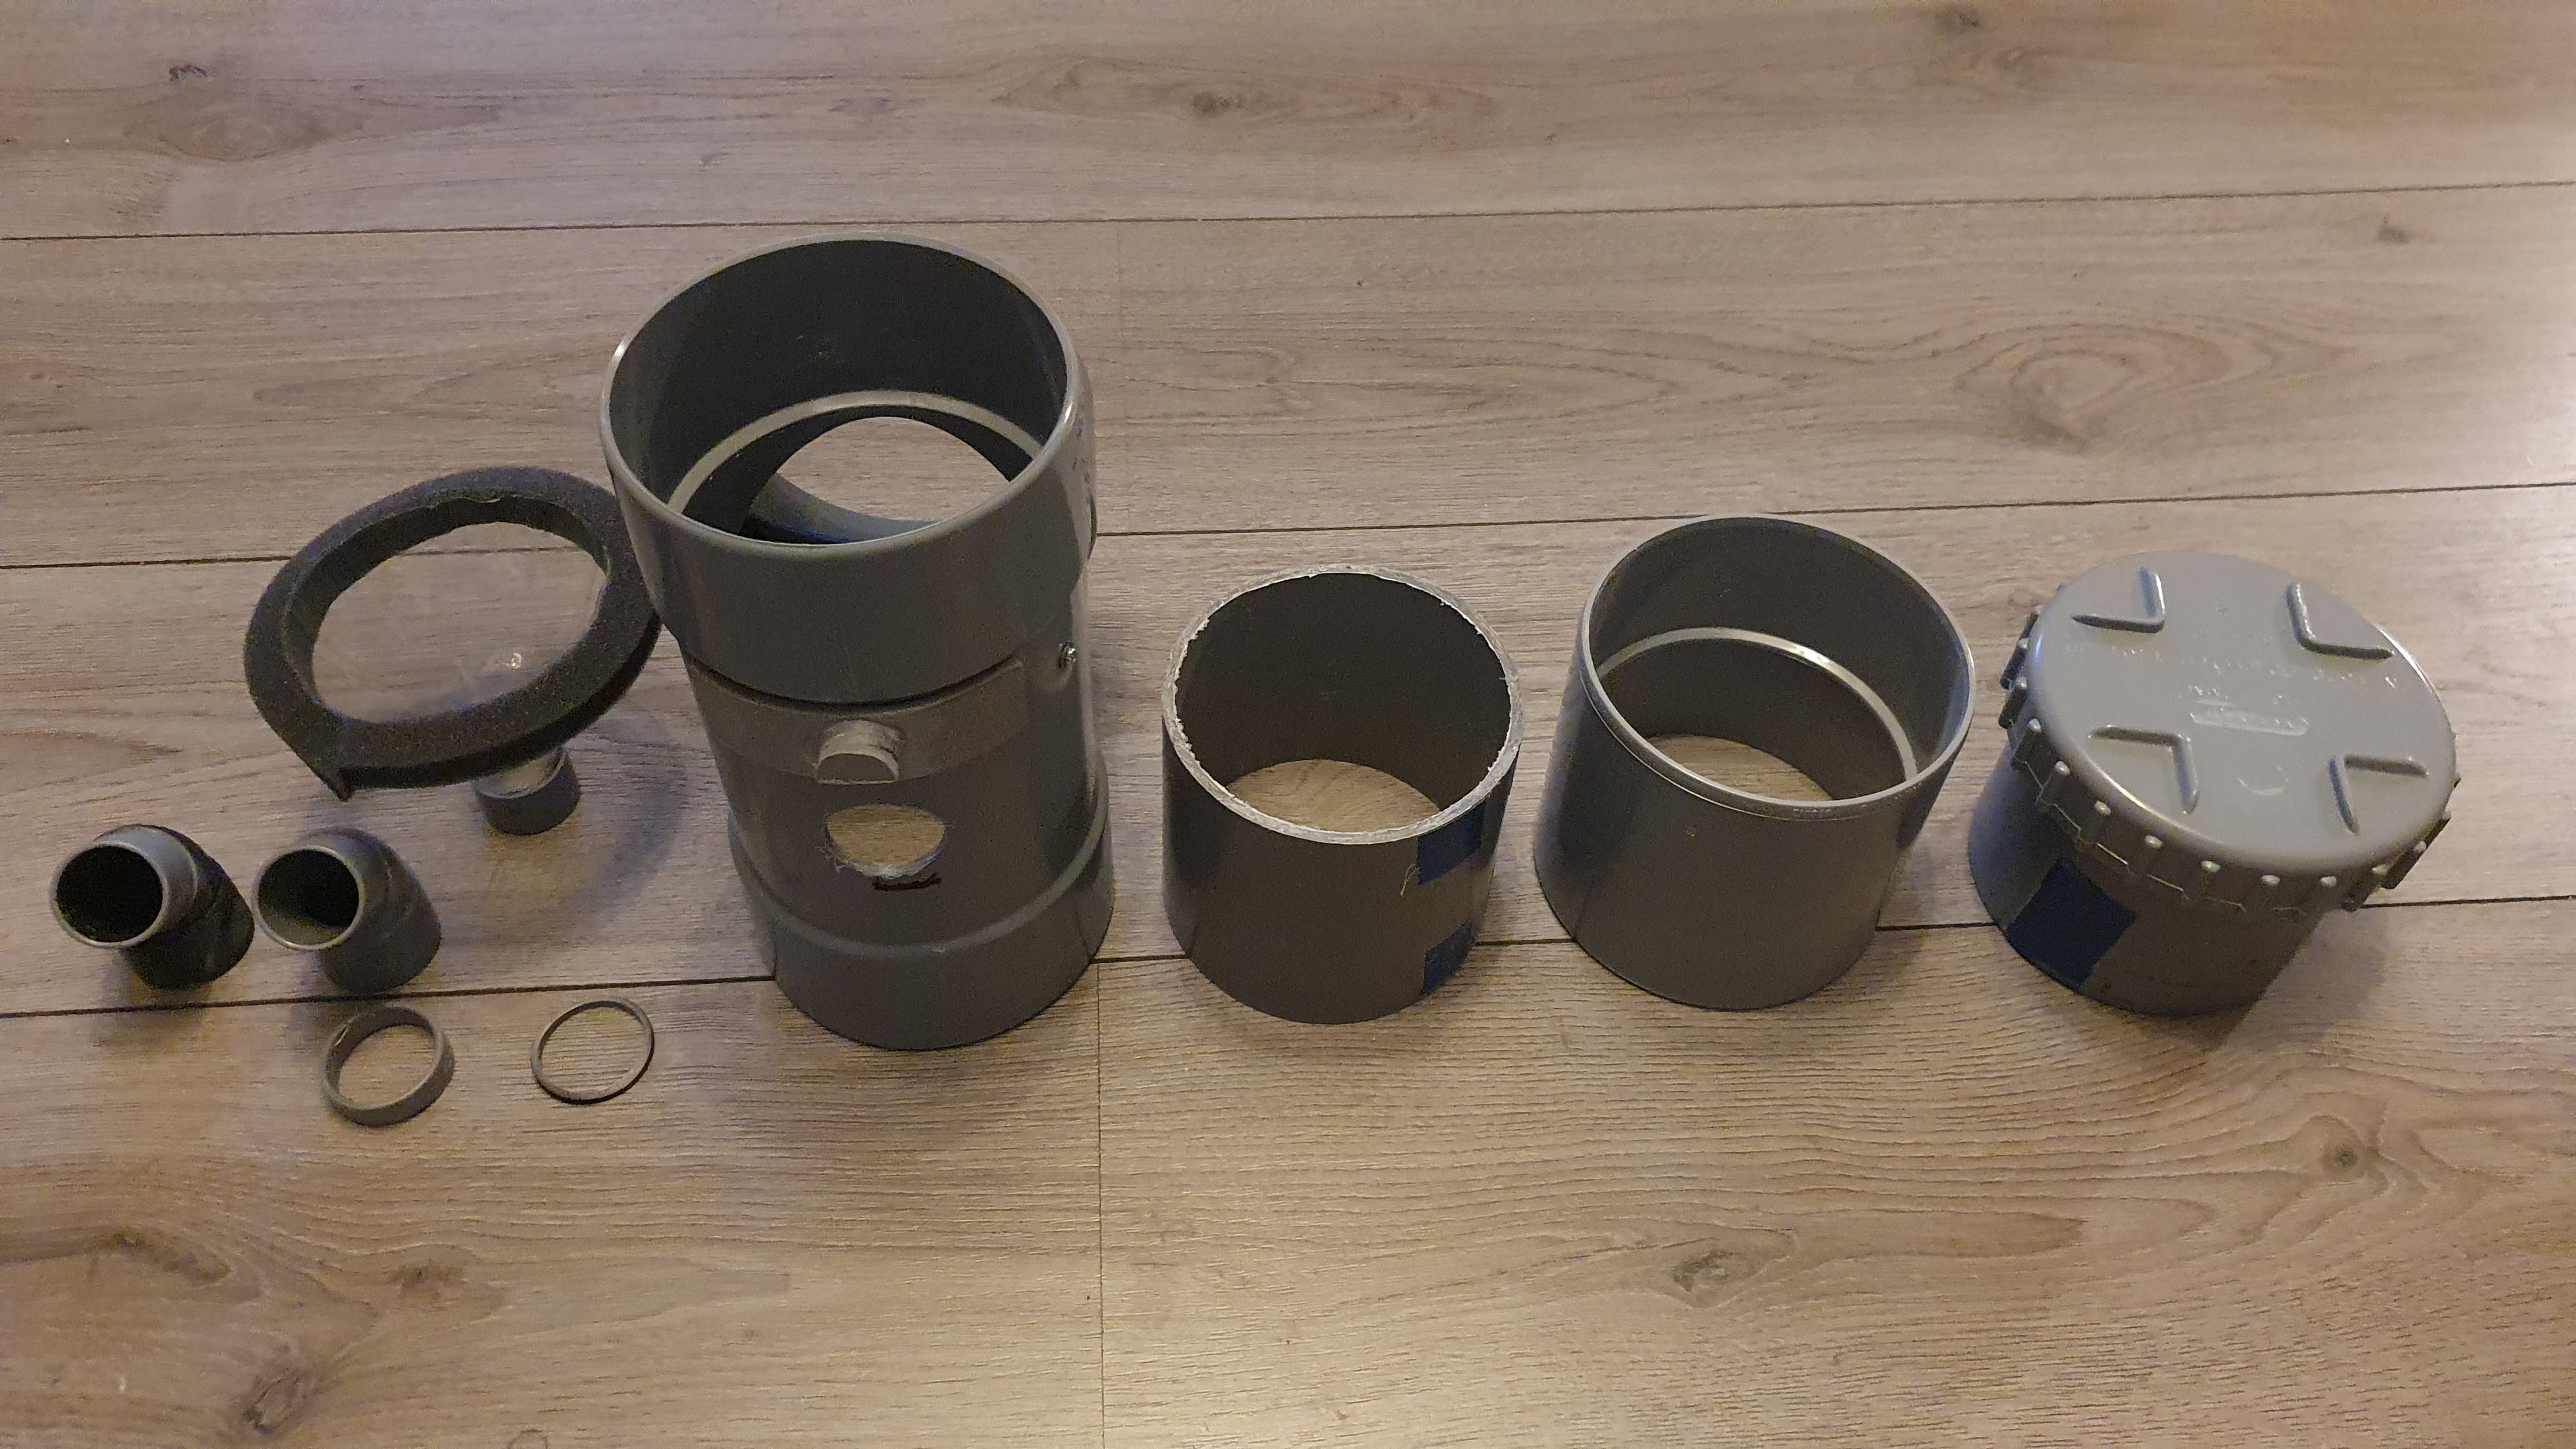
Dispense Chute and PCB/Battery Enclosure
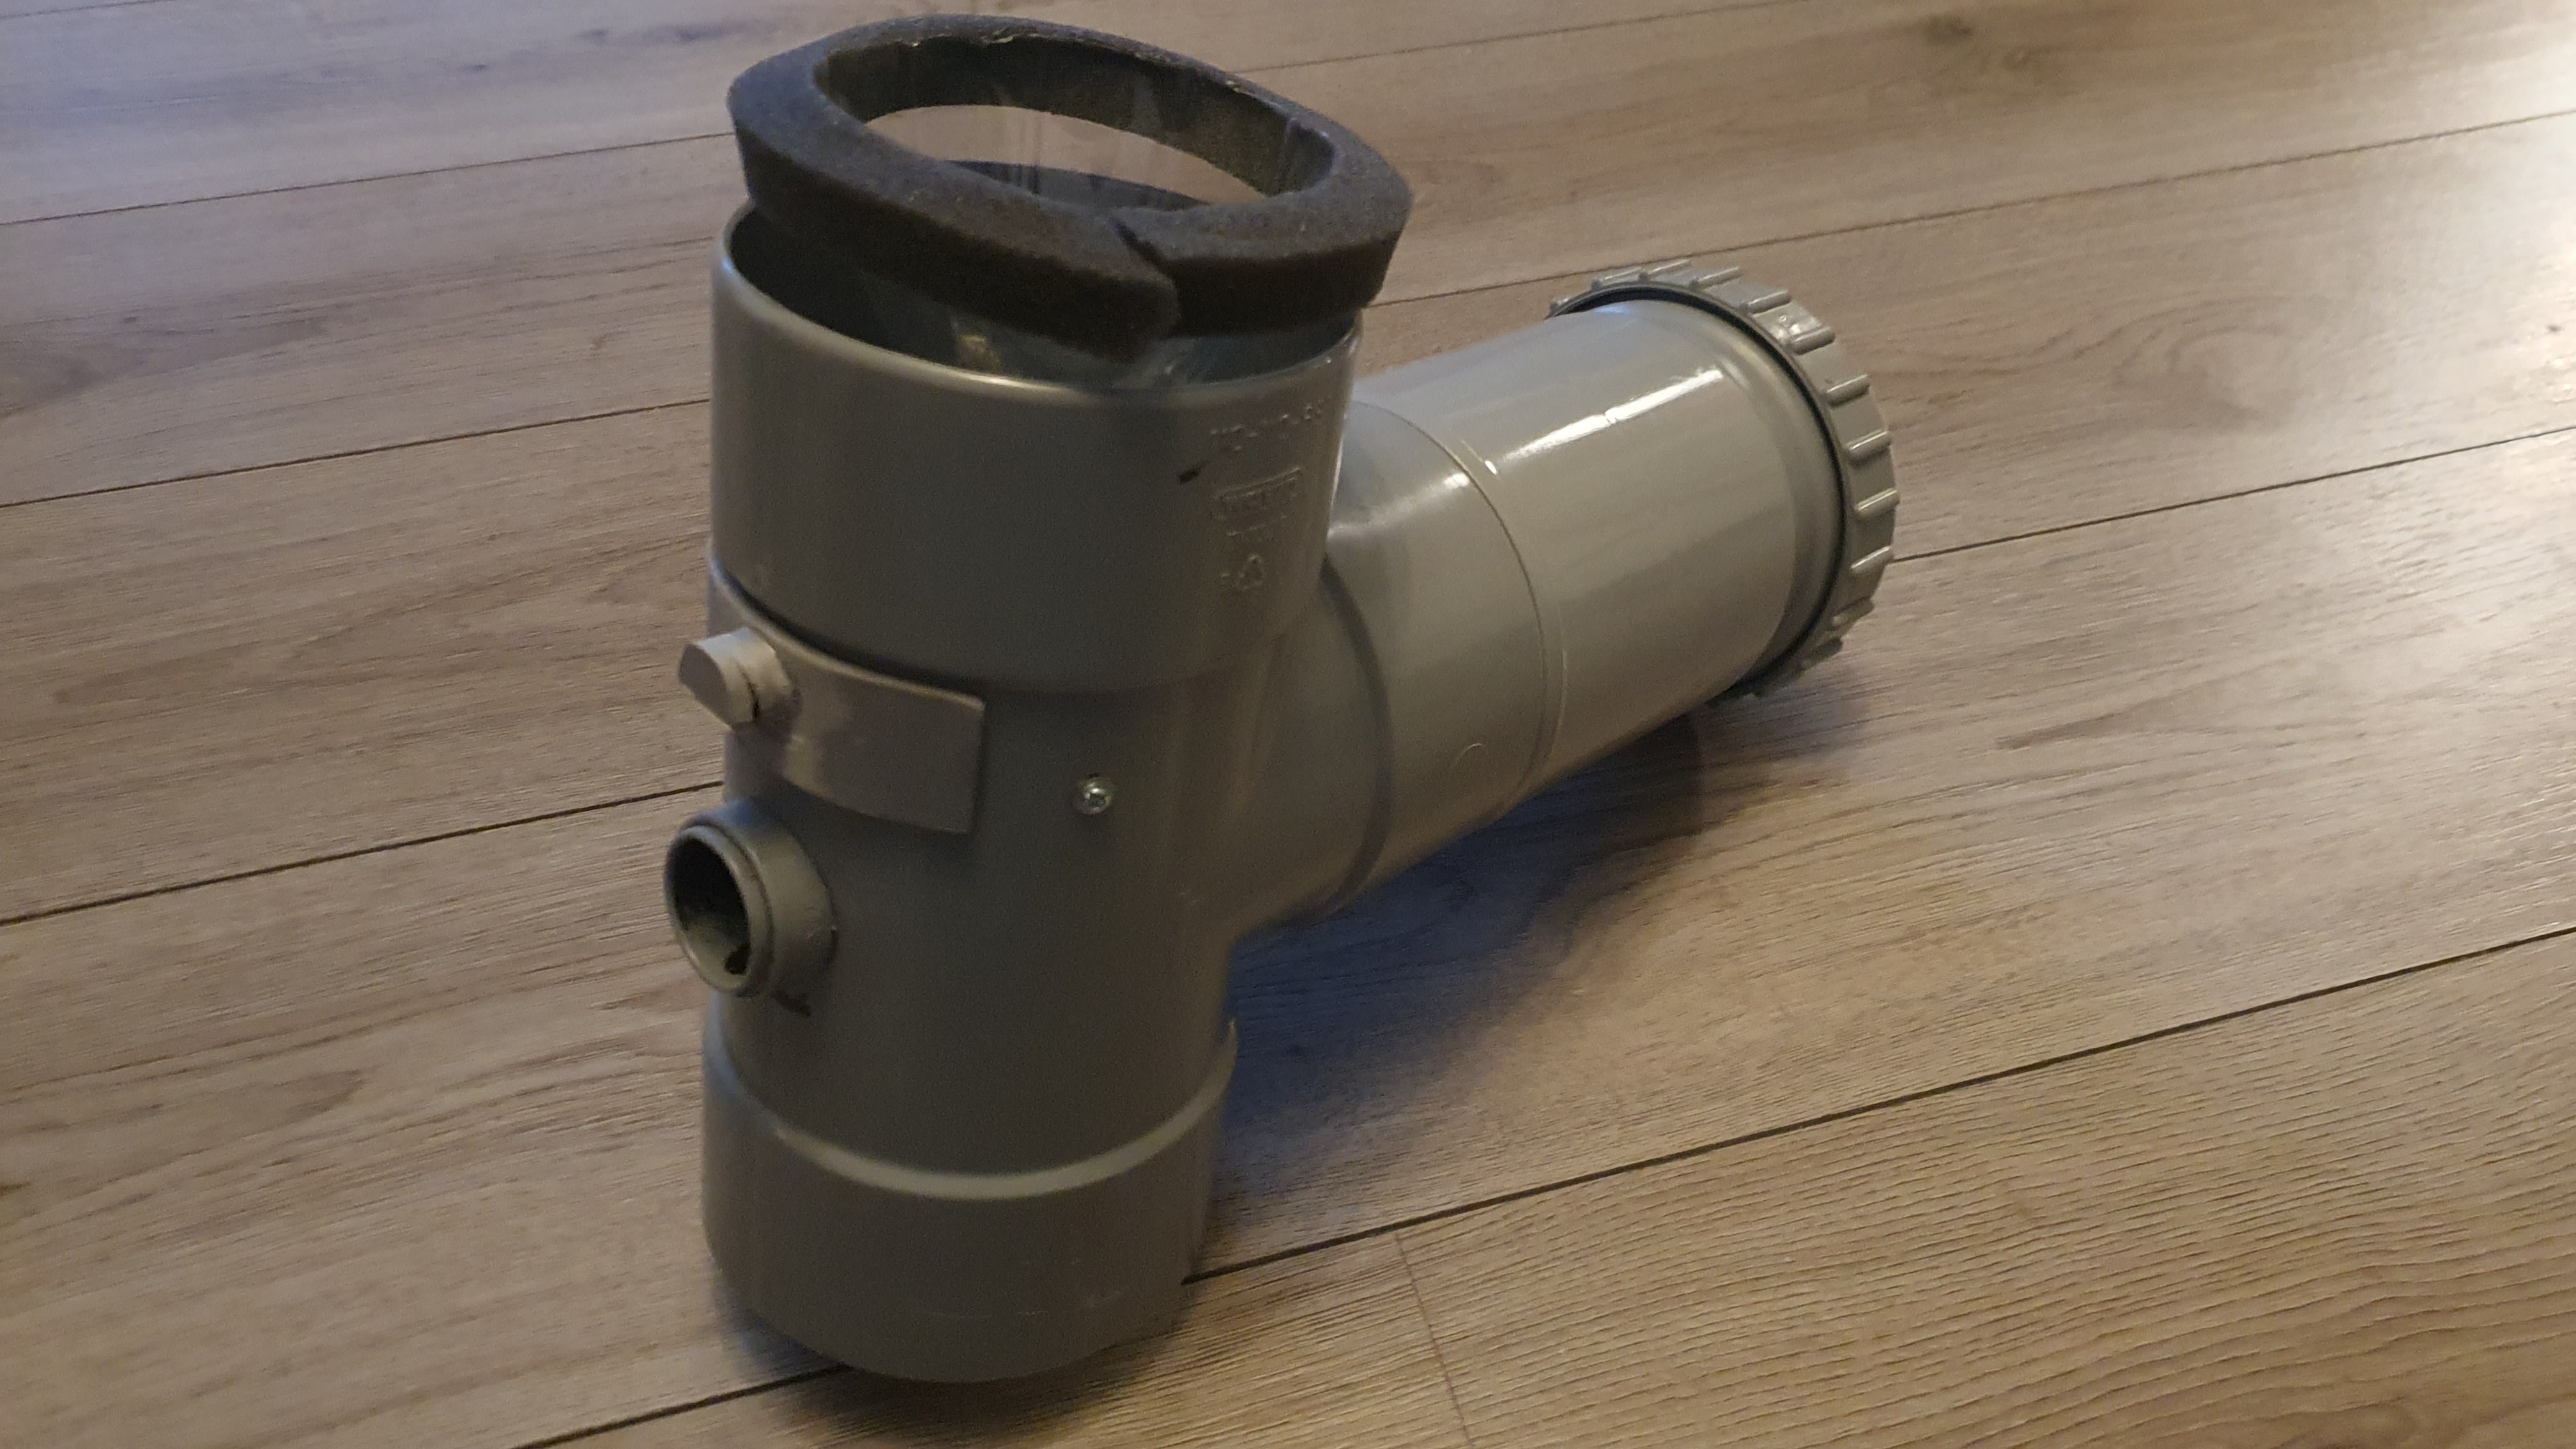
- 110mm 90° T-joint F/F/F
- 110mm coupling
- 110mm PVC 85mm long
- 110mm screw end cap
- 2x 32mm 45° elbow joint M/F
- 32mm elbow joint (to cut 5mm and 10mm slices from the female side to brace the dispense chute, and the entire male side to fit the funnel into the chute)
- 3mm PVC sheet to cut and form a cowl for the PIR
- Top part of a 1.5L PET bottle with the screw top cut off - or something like it
- 10mm foam tape
- 190x95x3mm PVC sheet to mount the PCB on
Dispenser chute and PCB enclosure assembly
Dispenser chute assembly
PCB enclosure assembly
Platform and Deposit Chute
- 2x 110mmx2x50mm adapter
- 2x 50mm 45° Y-joint F/F/F
- 3x 50mm PVC 60mm long
- 2x 50mm PVC 98mm long
- 50mm PVC 115mm long
- 50mm PVC 30mm long (to cut about a third from and glue to the bottom adapter for mounting the deposit sensor)
- 50mm emd cap
- 50mm coupling
- 2x 60mm hose clamps
- 4x 90° braces
- 6x 20mm bolt/shoulder washer/nut to fit braces
- ~35cm plastic plant pot tray
- 50mm plastic end plug (cut to make cup for dispenser)
- 40mm platic end plug (place at top of dispense chute to prevent things from dropping in from the upper enclosure
- 160mm hose clamp to brace depost chute and platform
Platform and deposit chute assembly
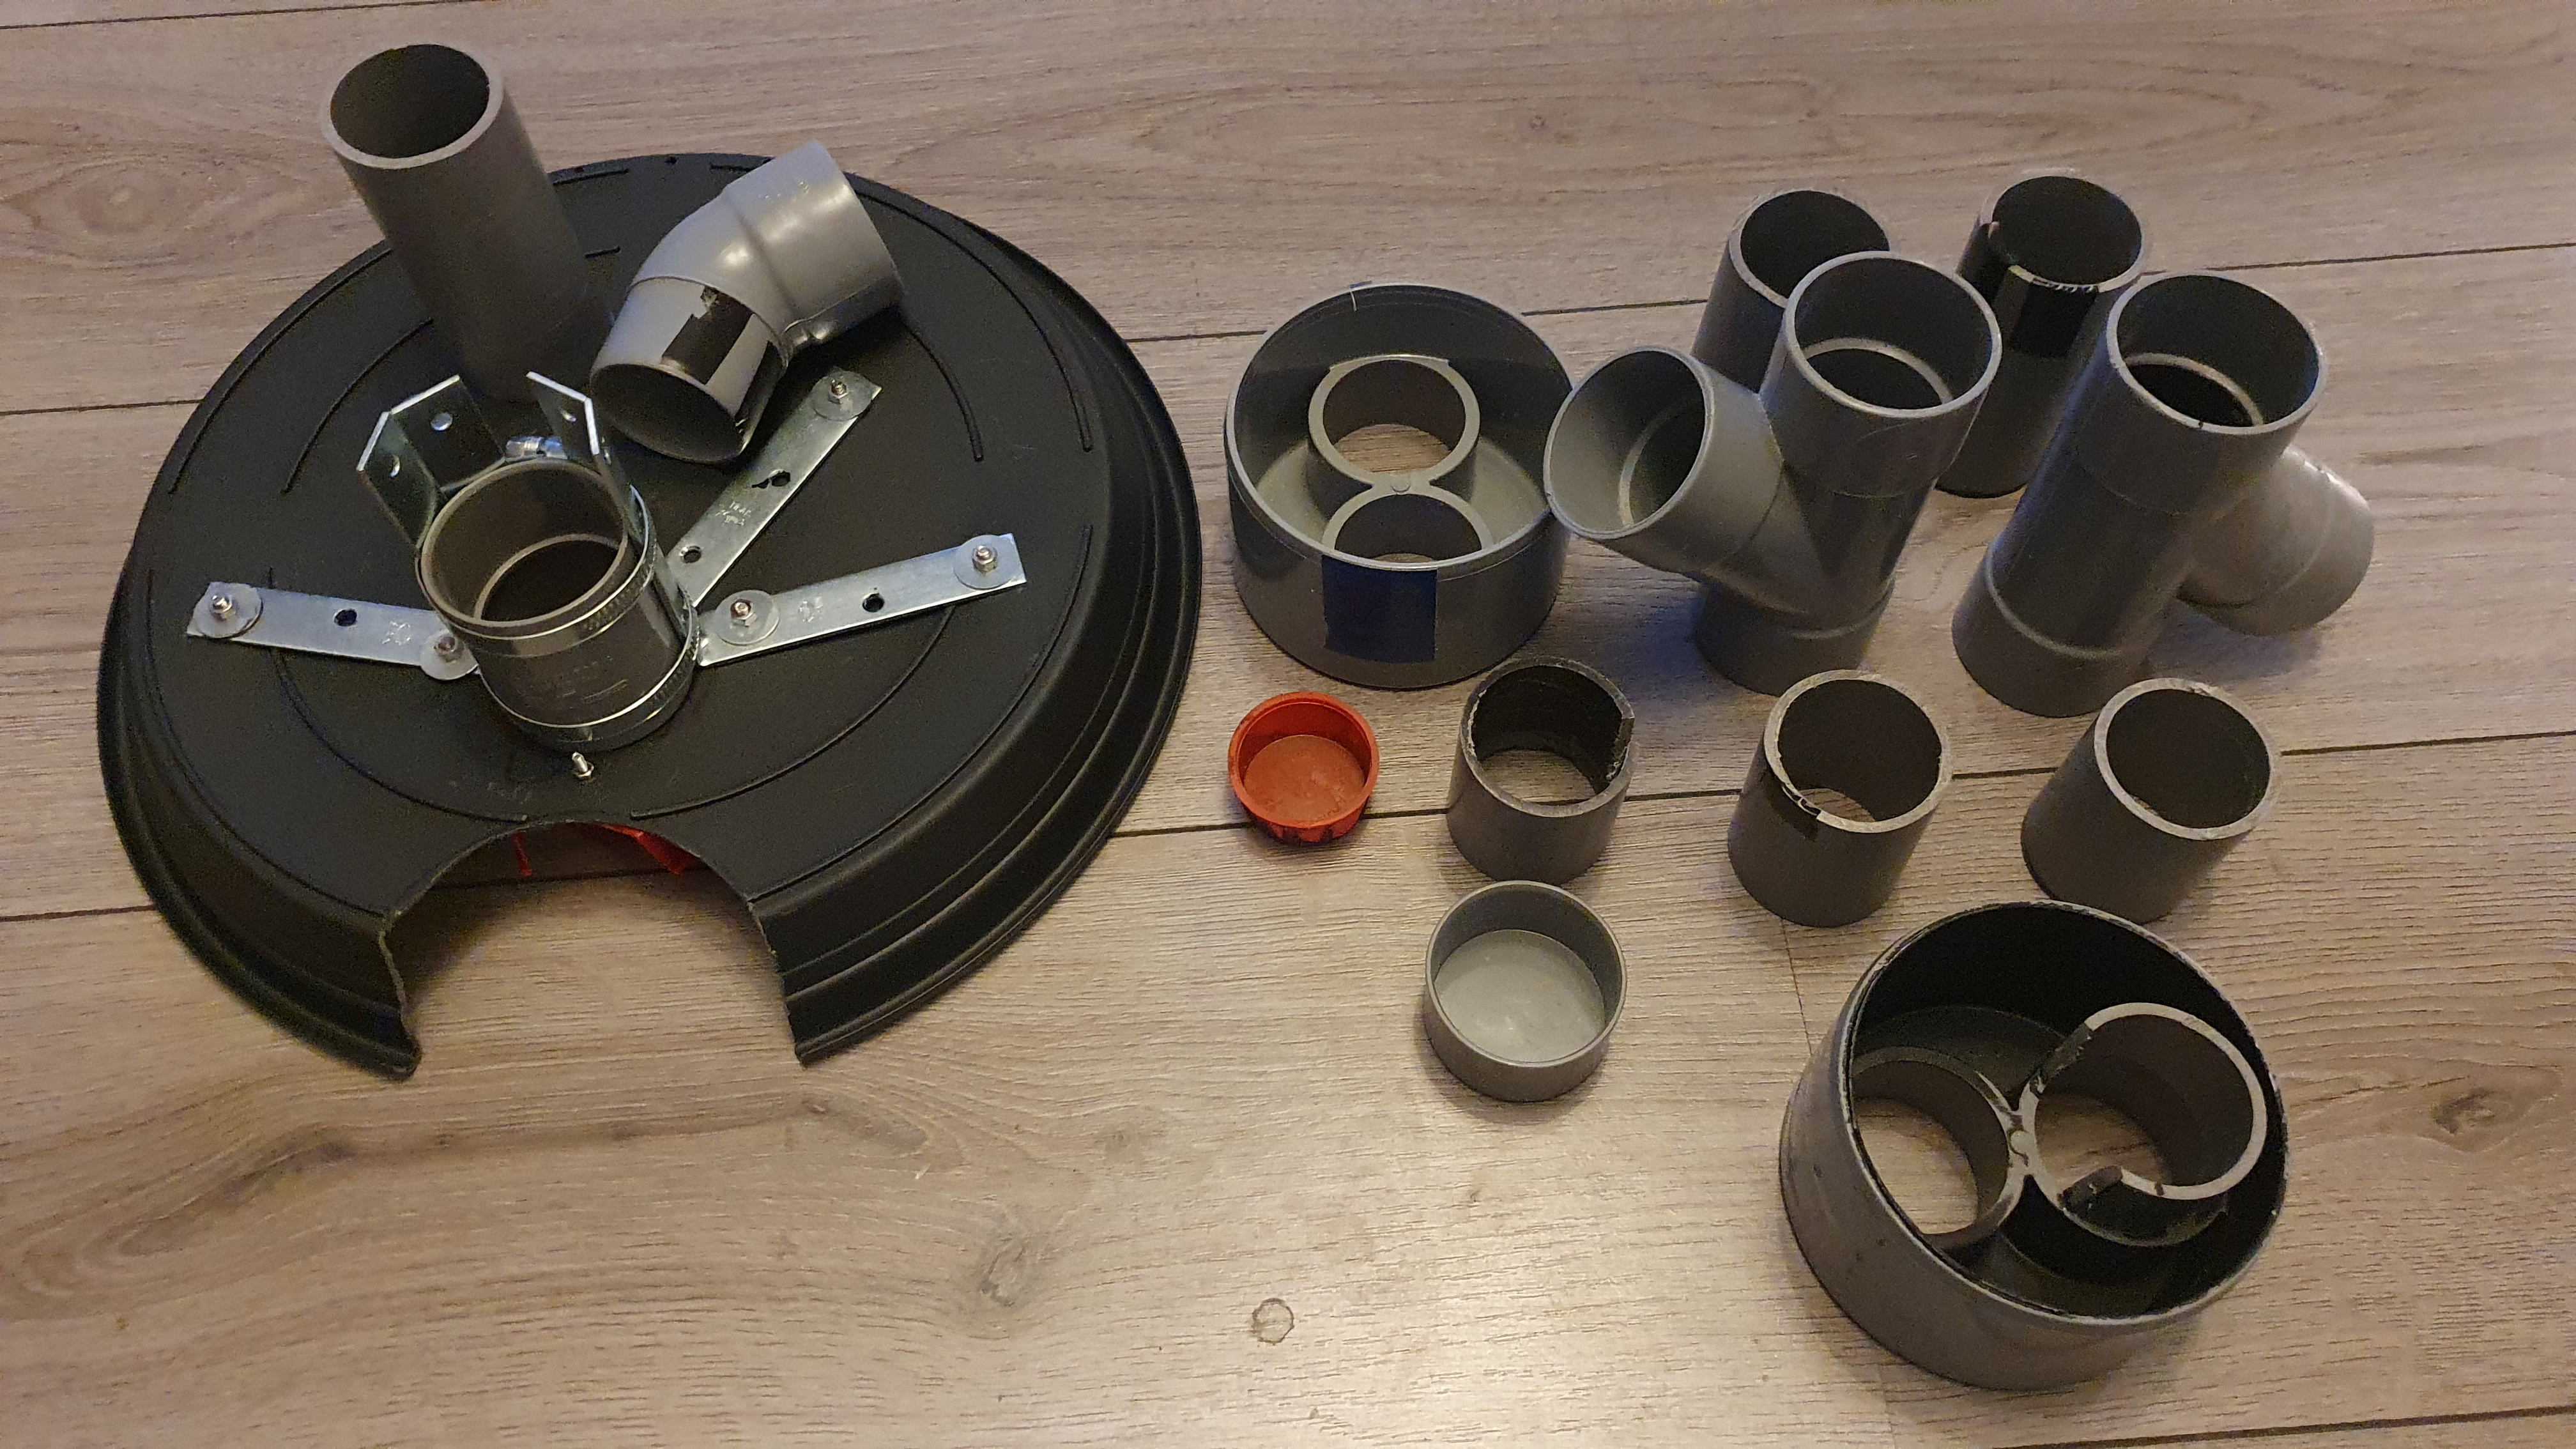
Lower deposit chute assembly
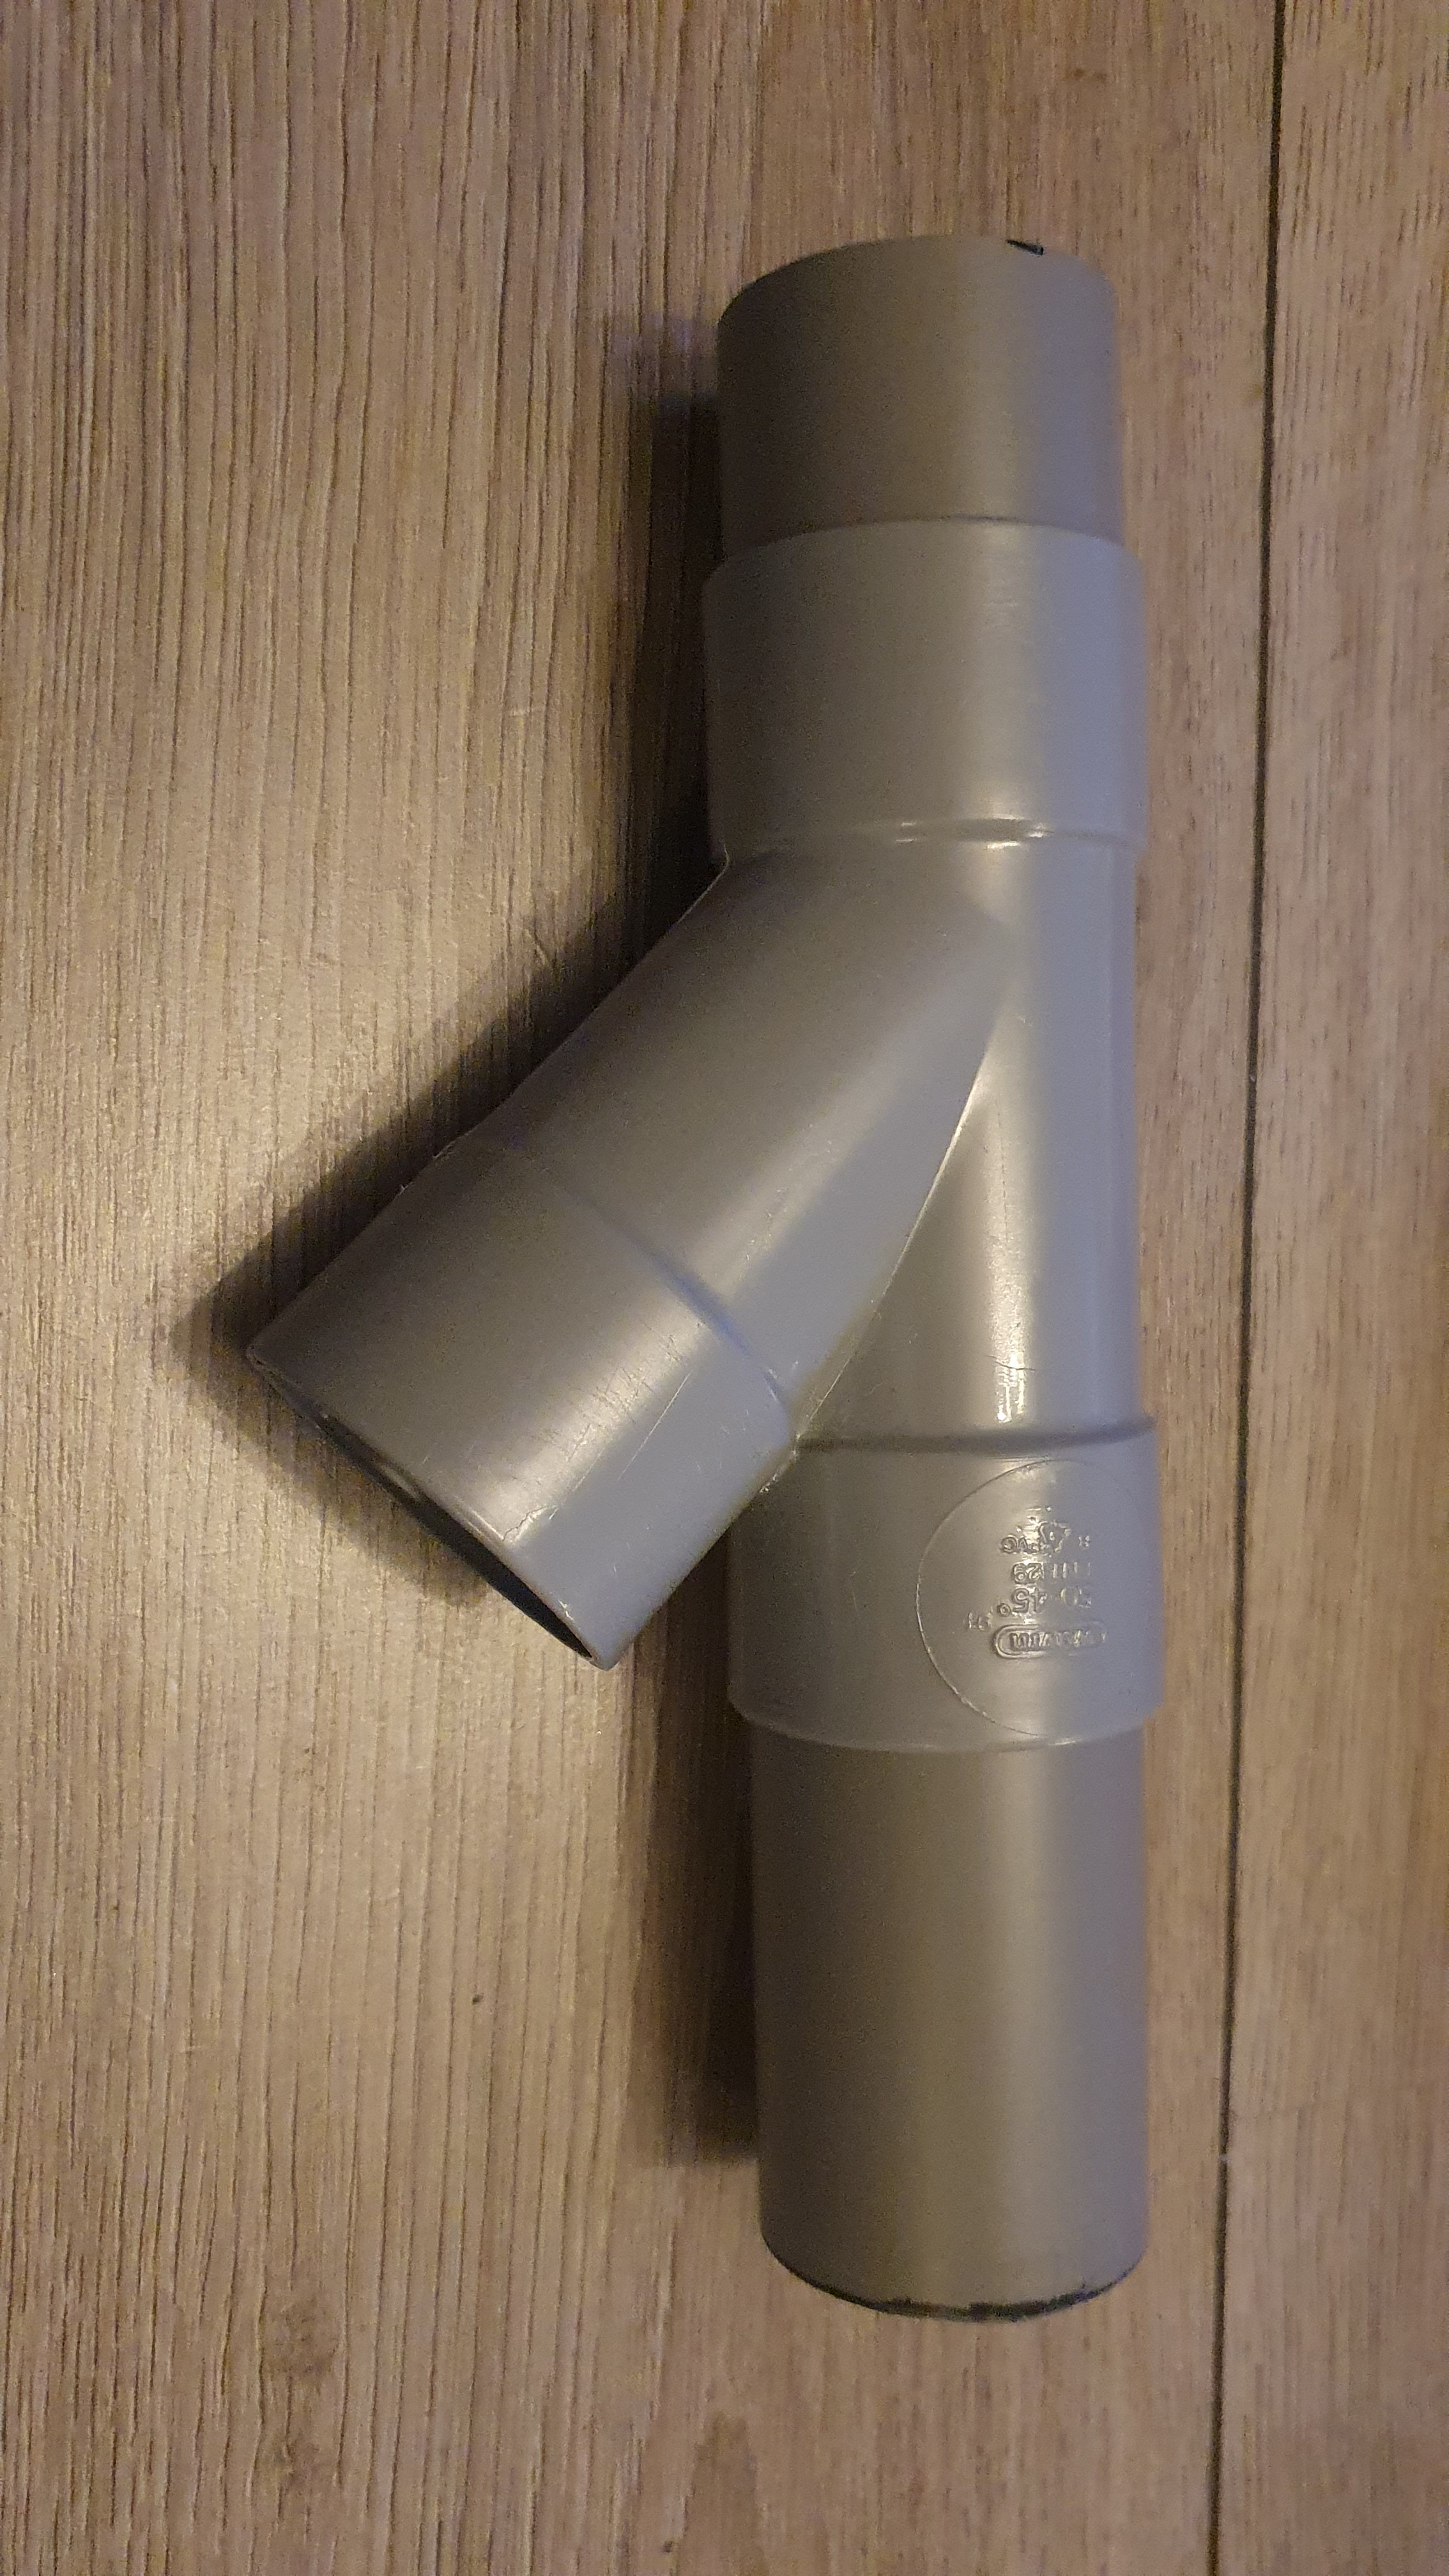
Cord intake assembly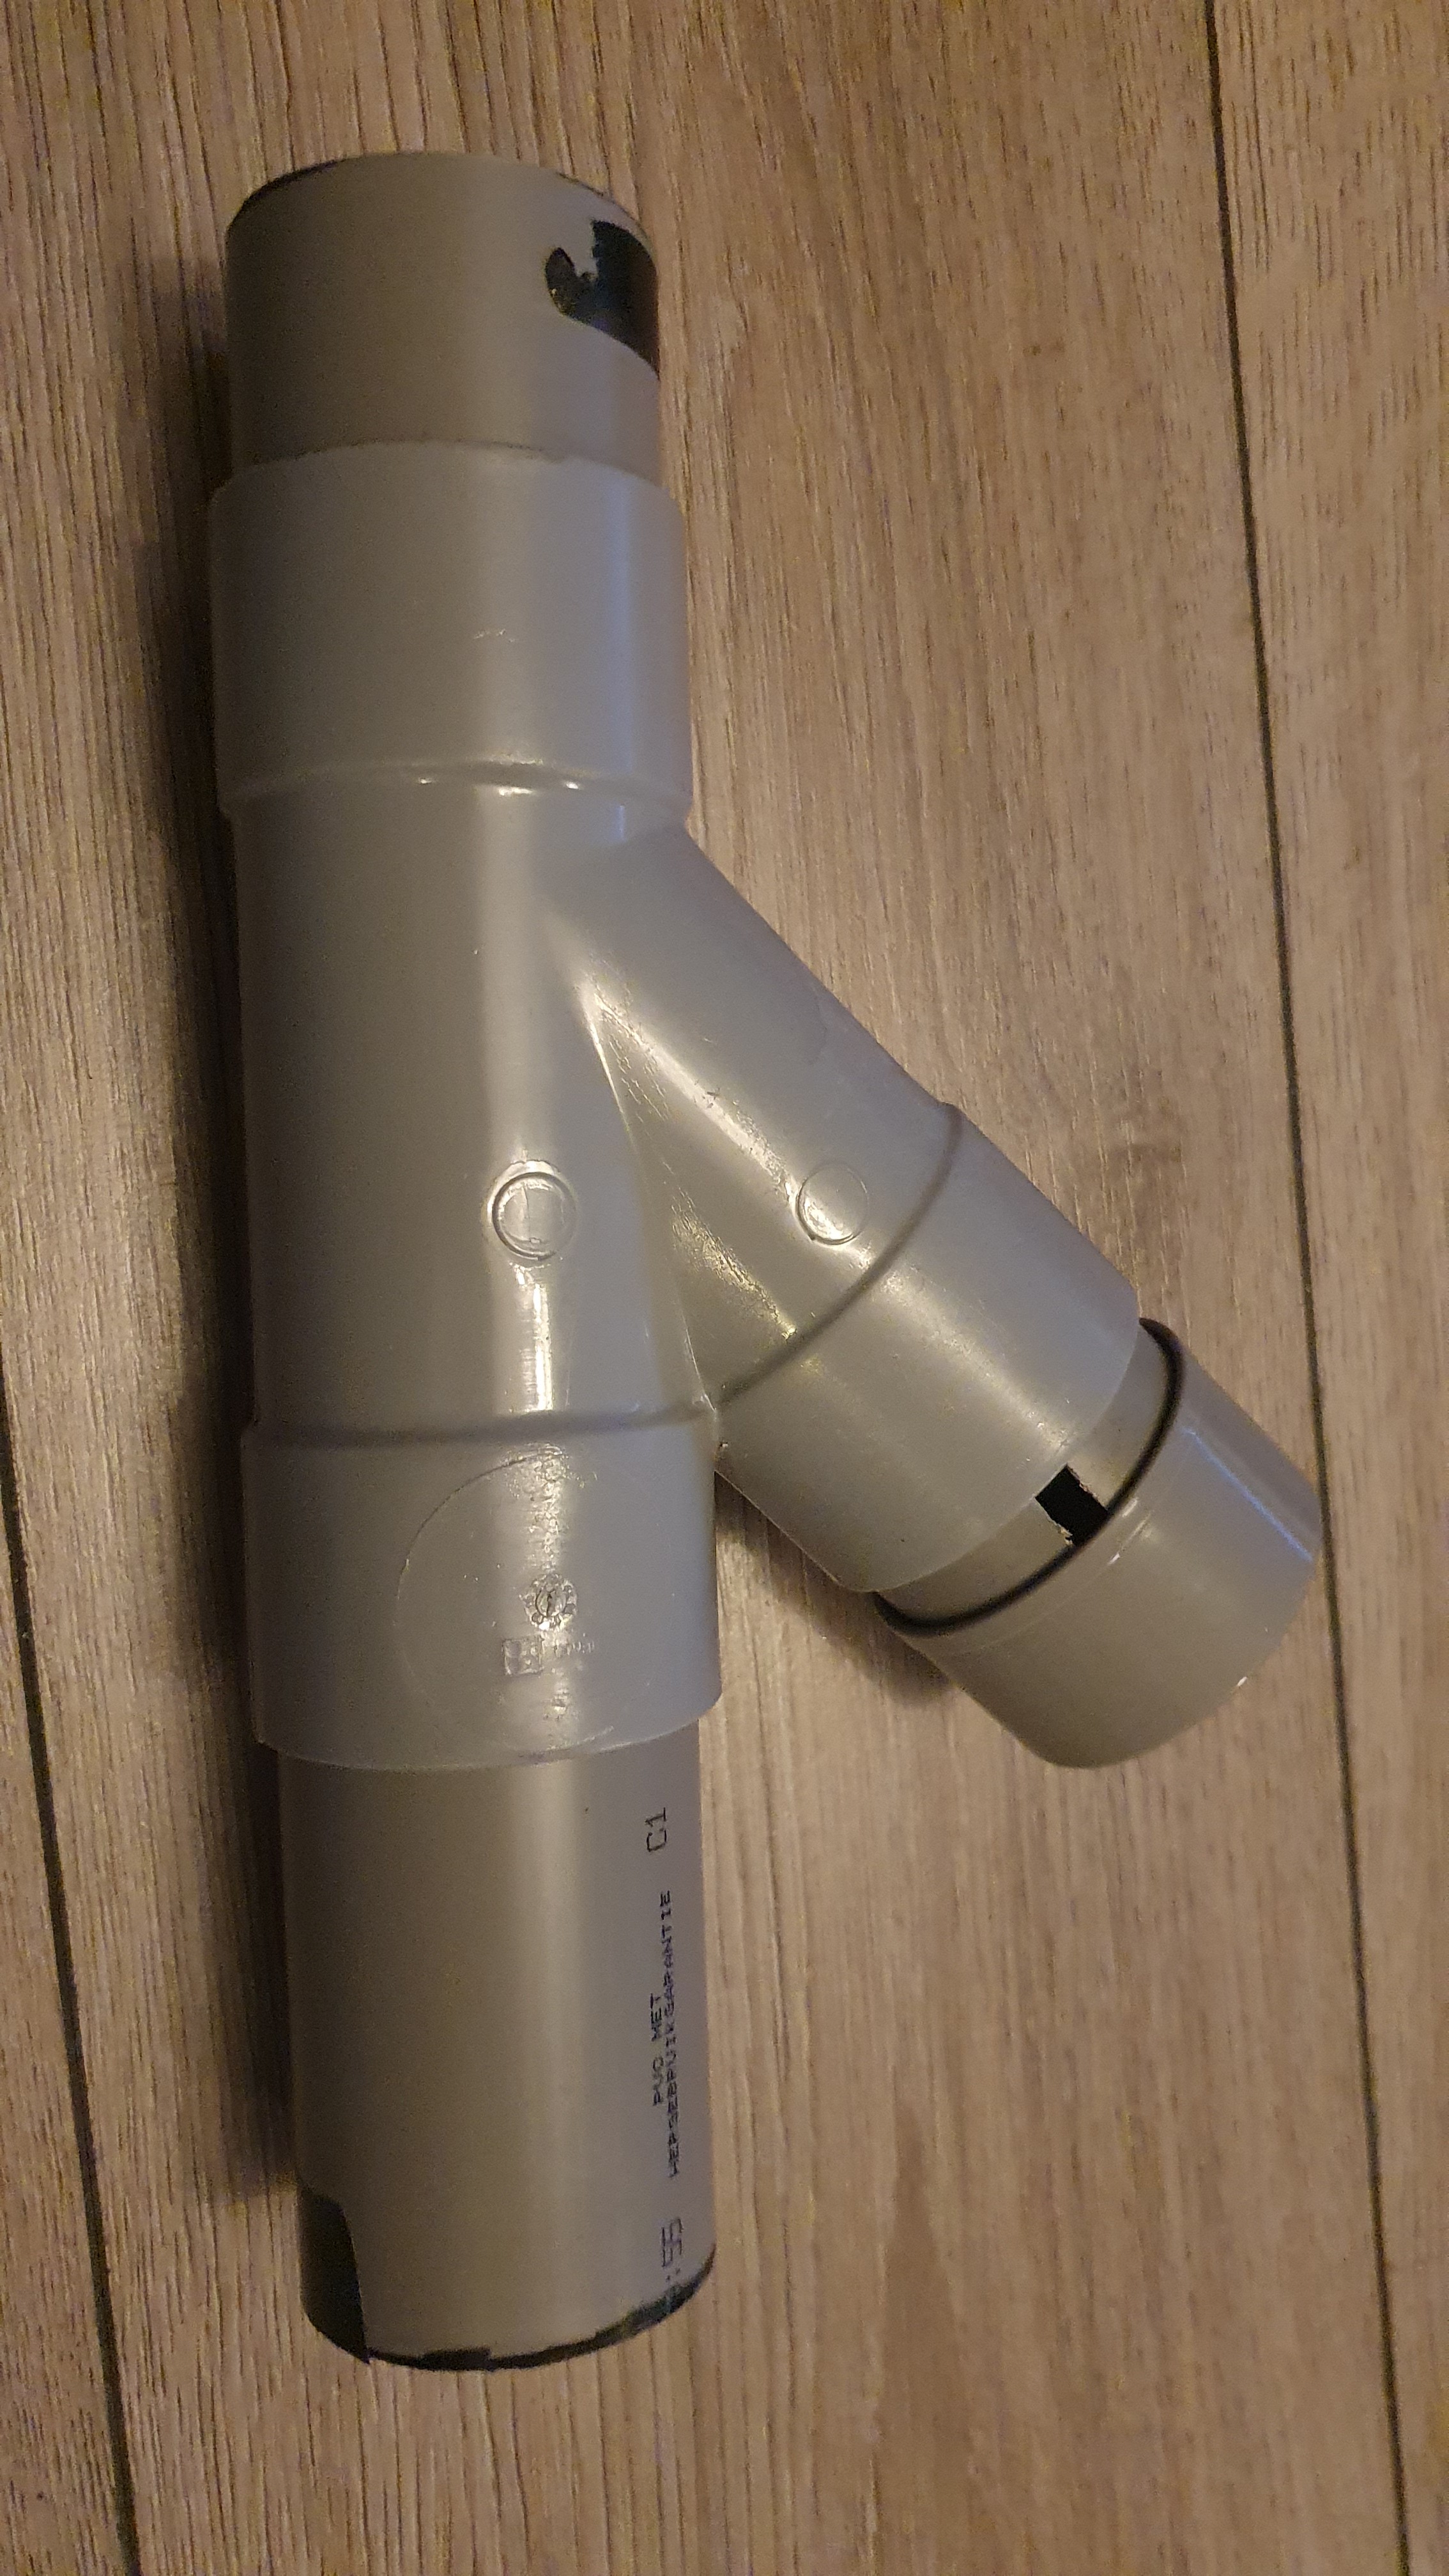
Deposit sensor mount
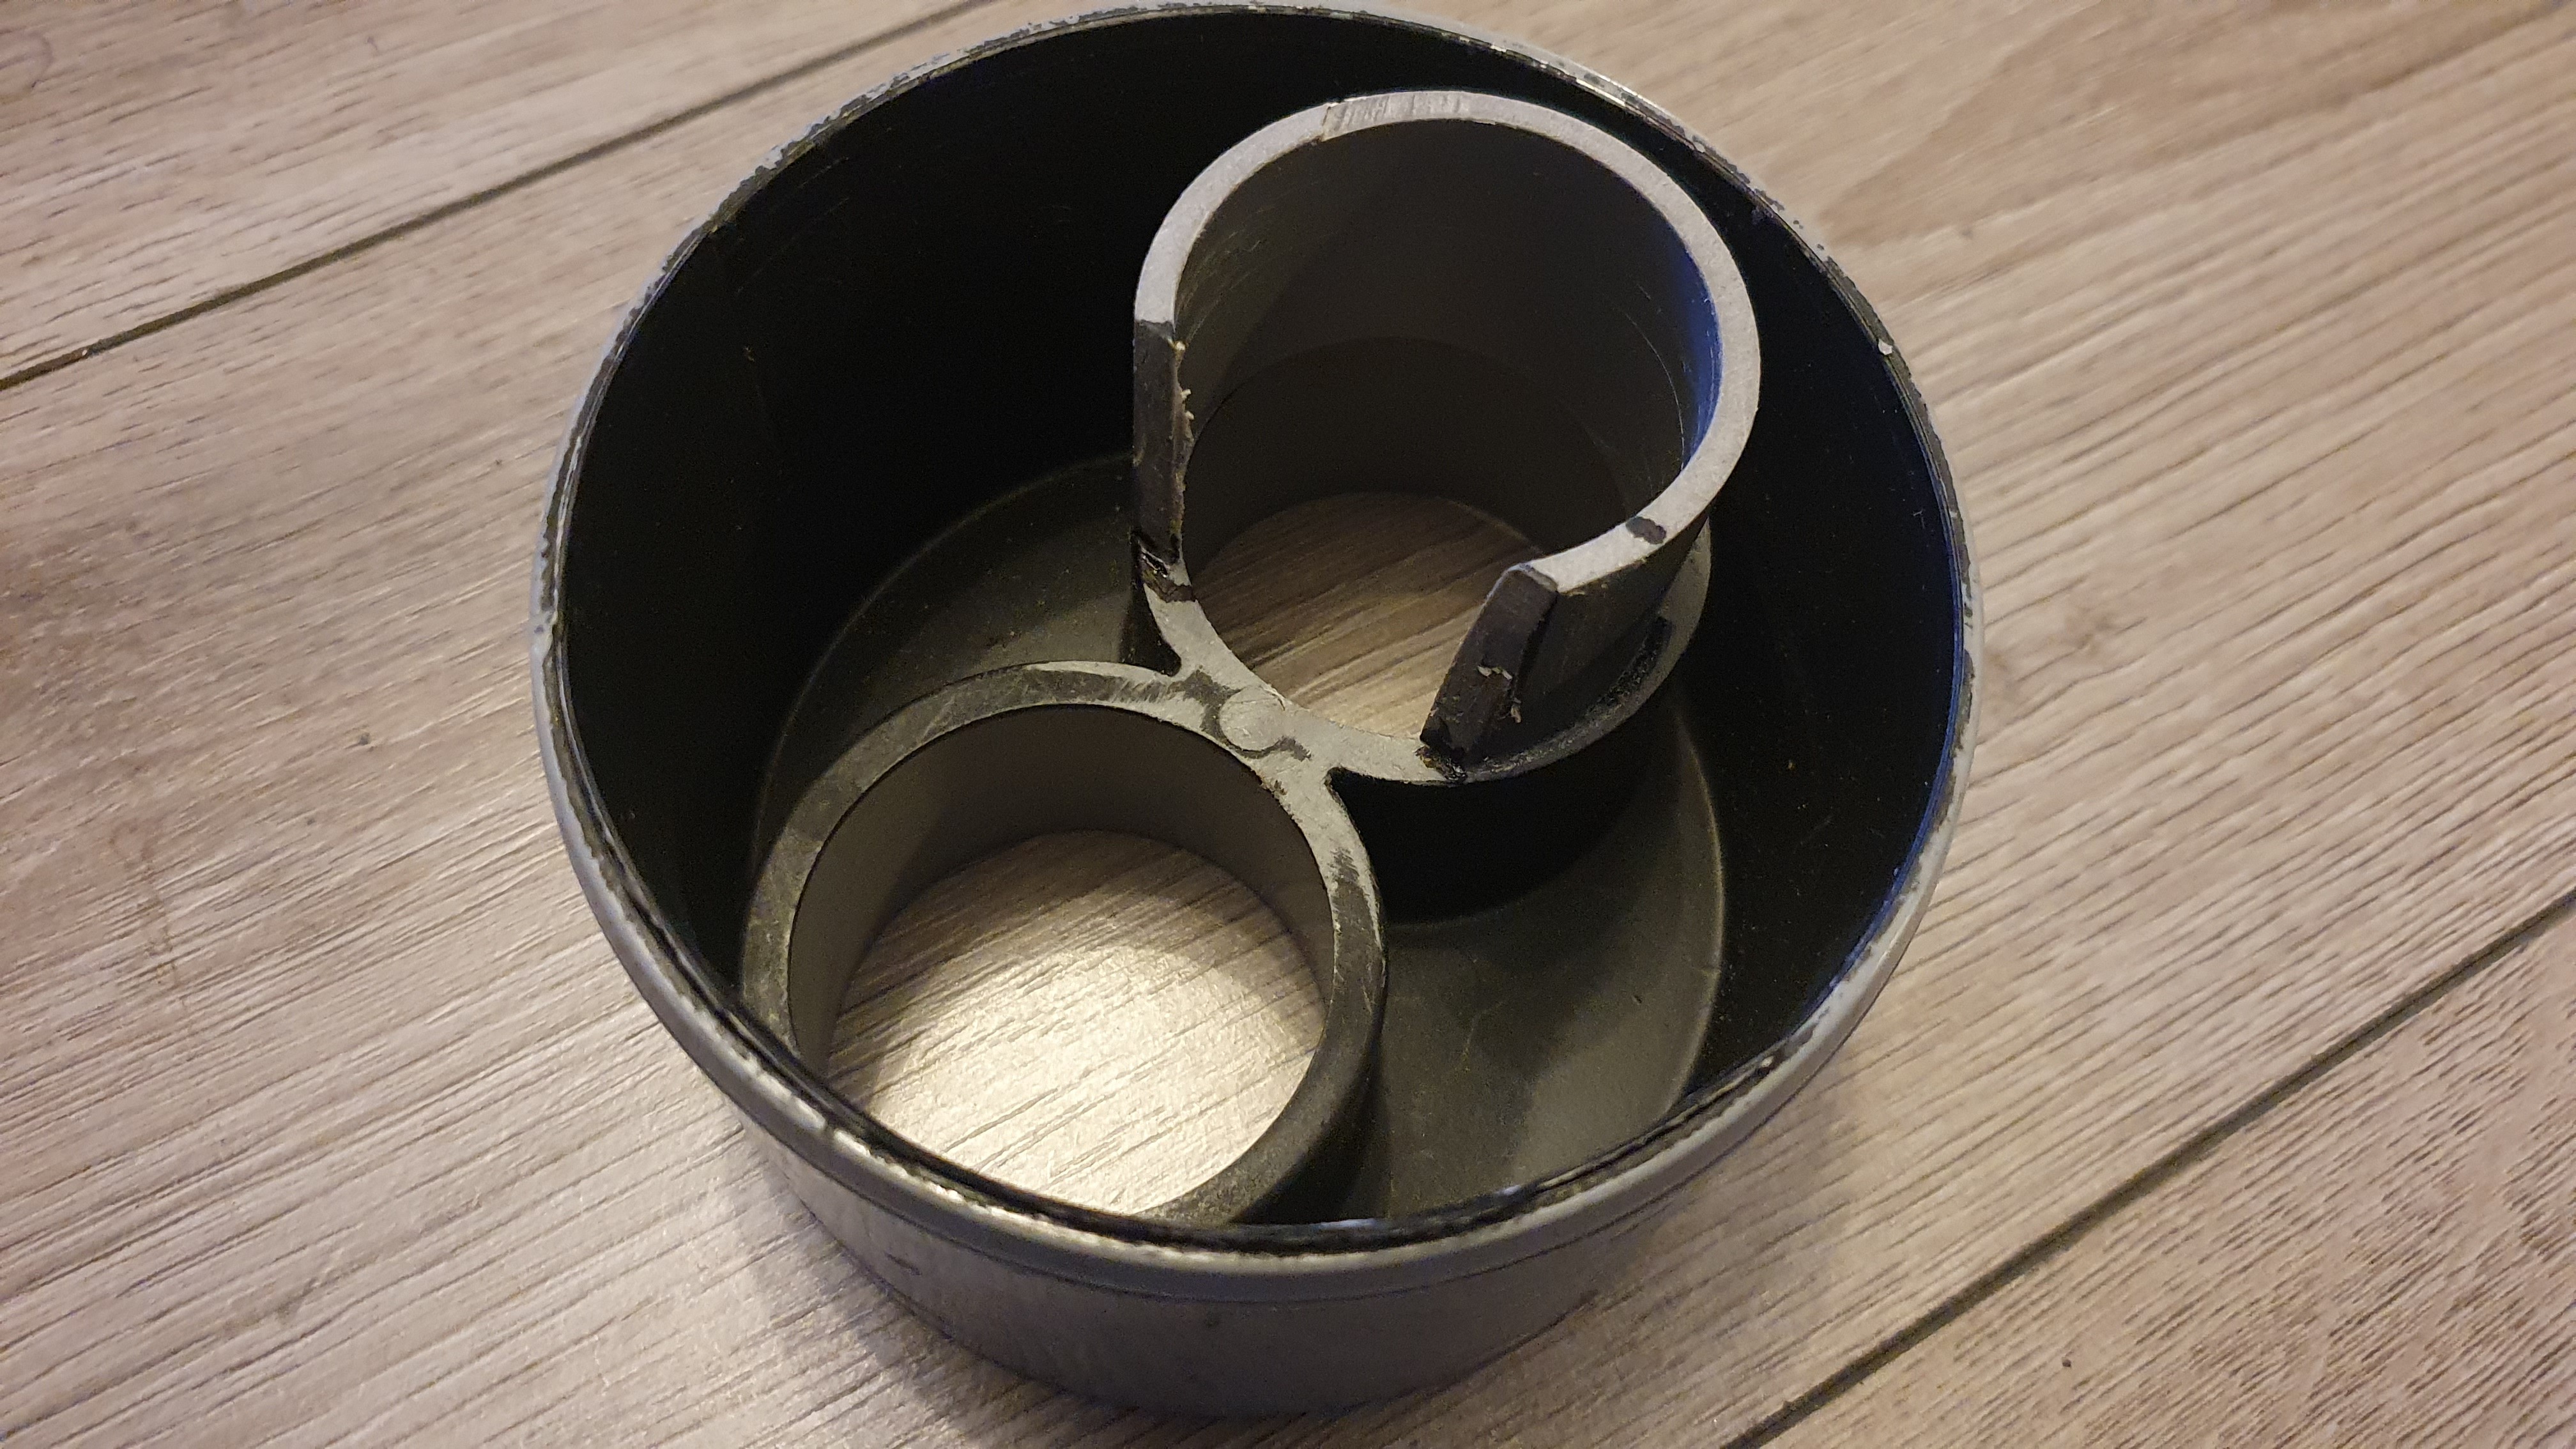
Deposit chute assembly minus platform
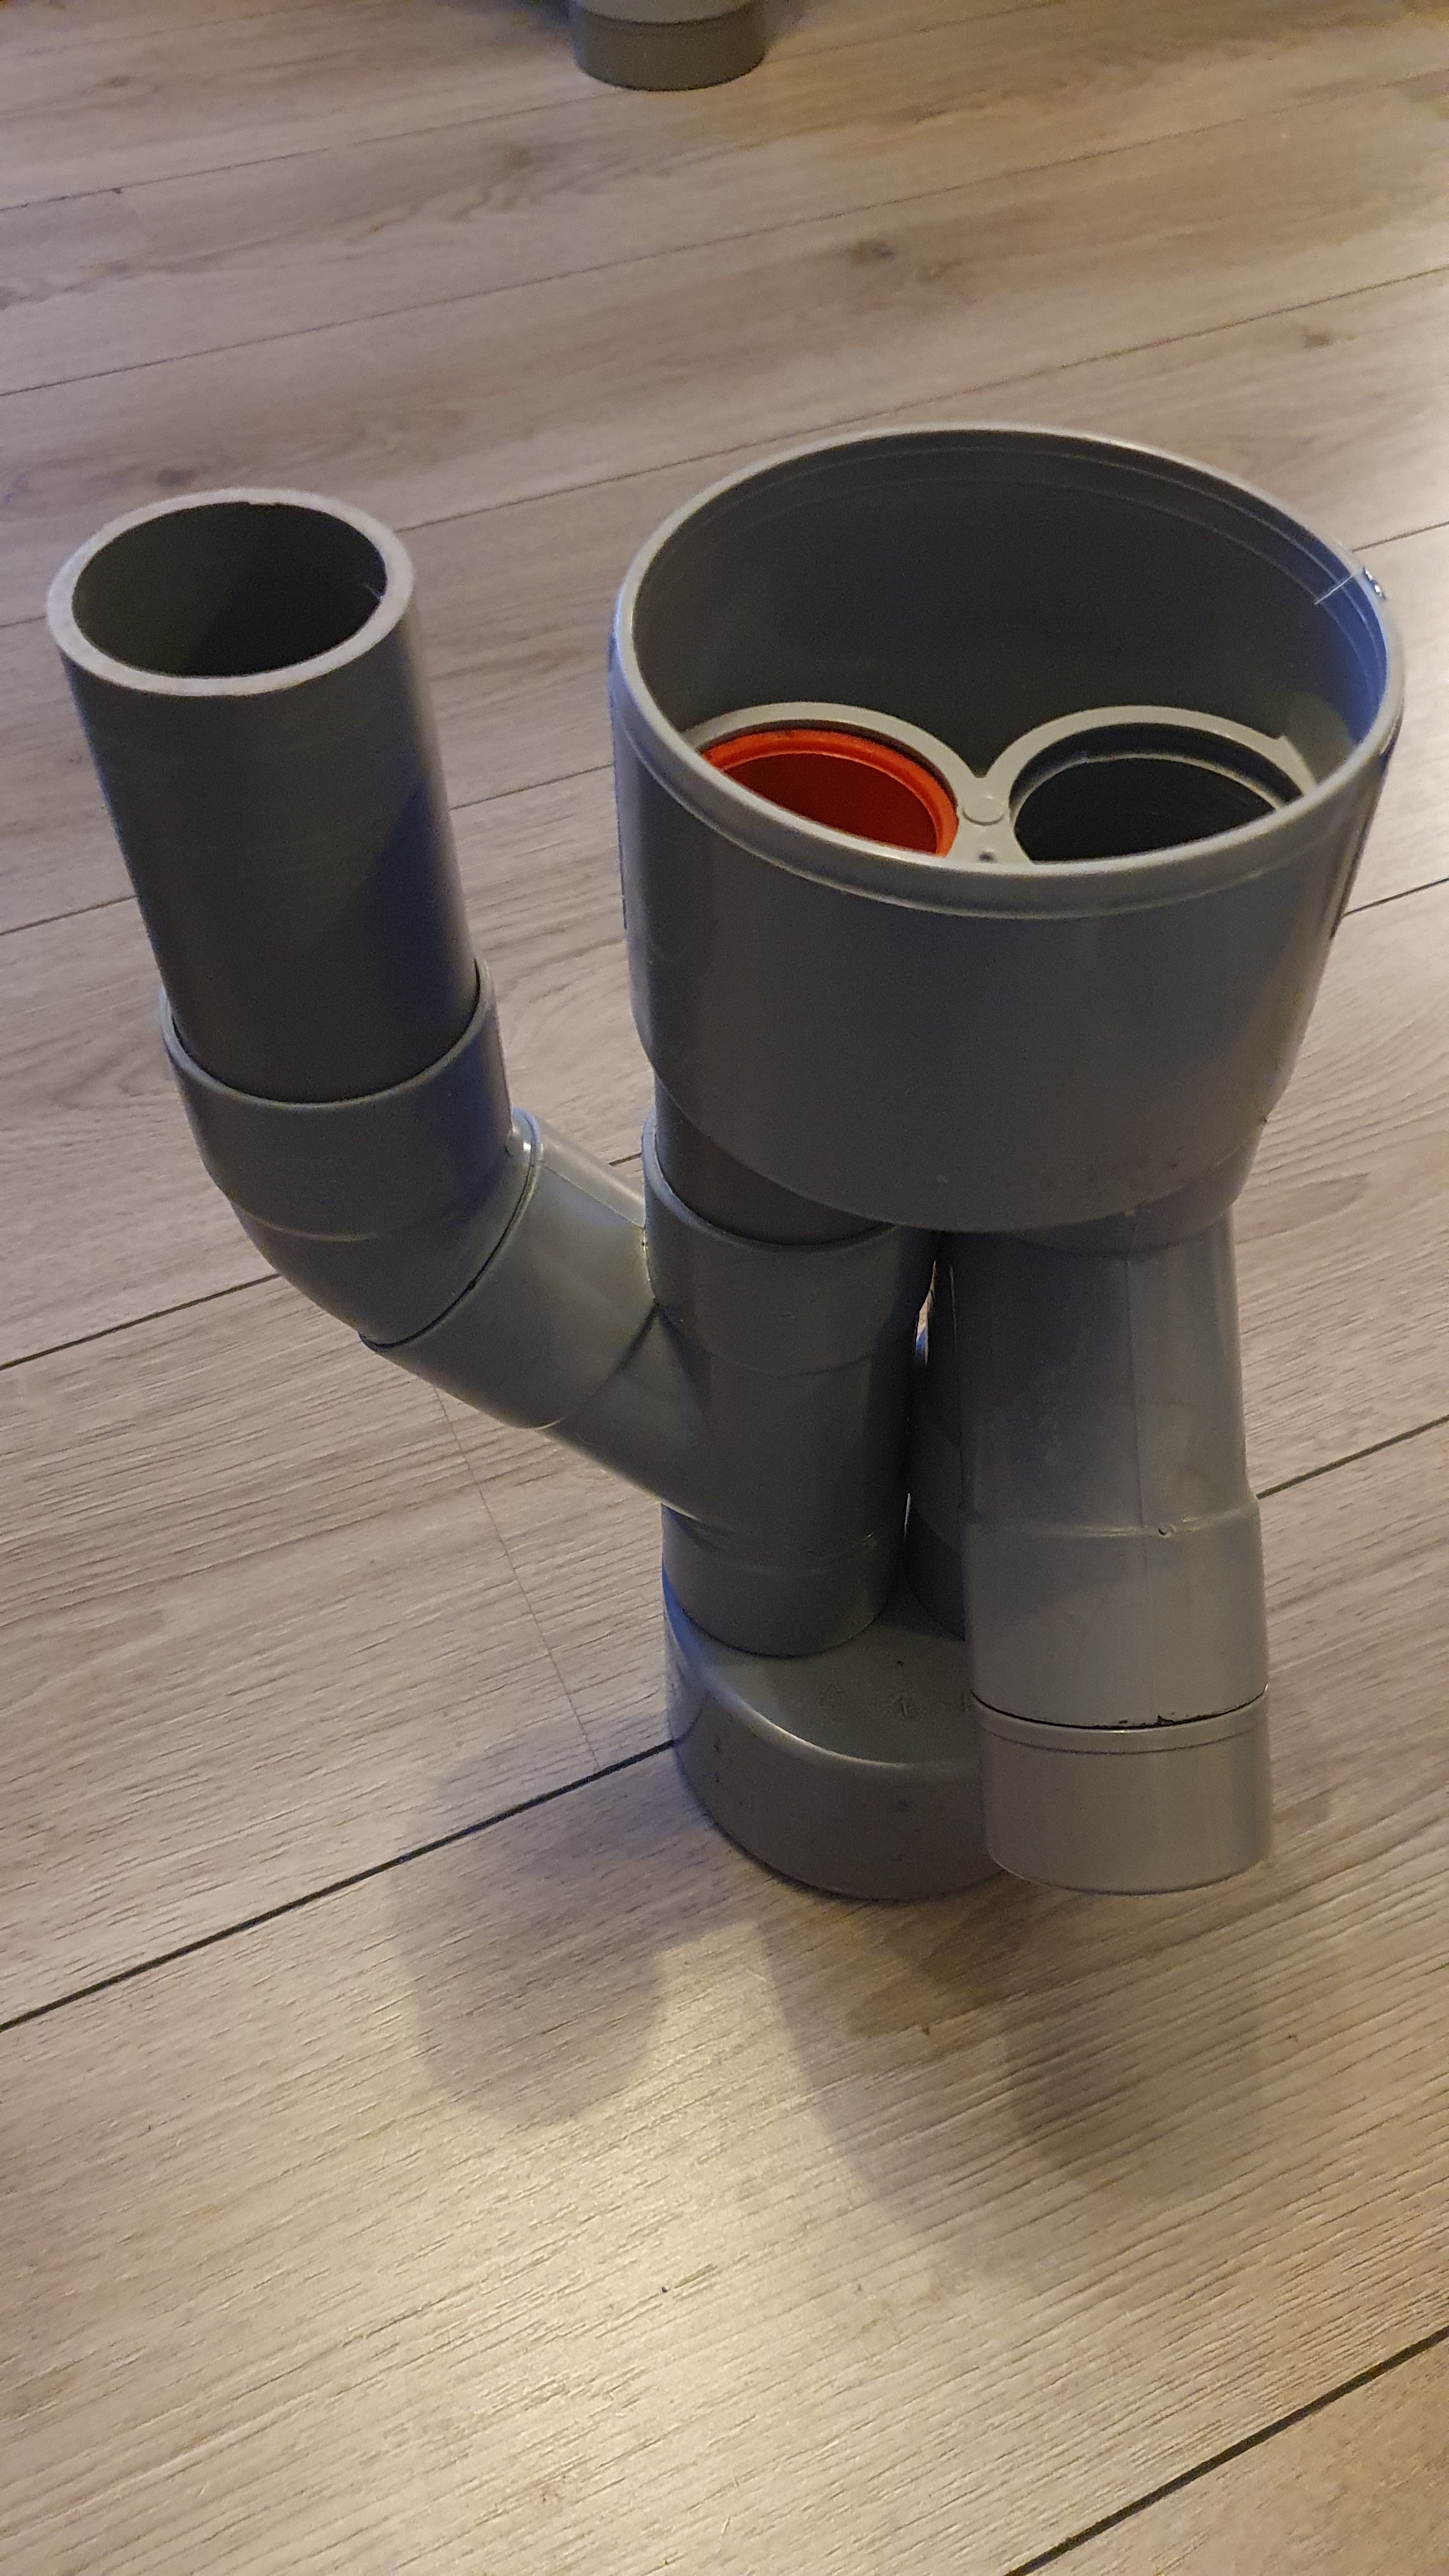
Platform assembly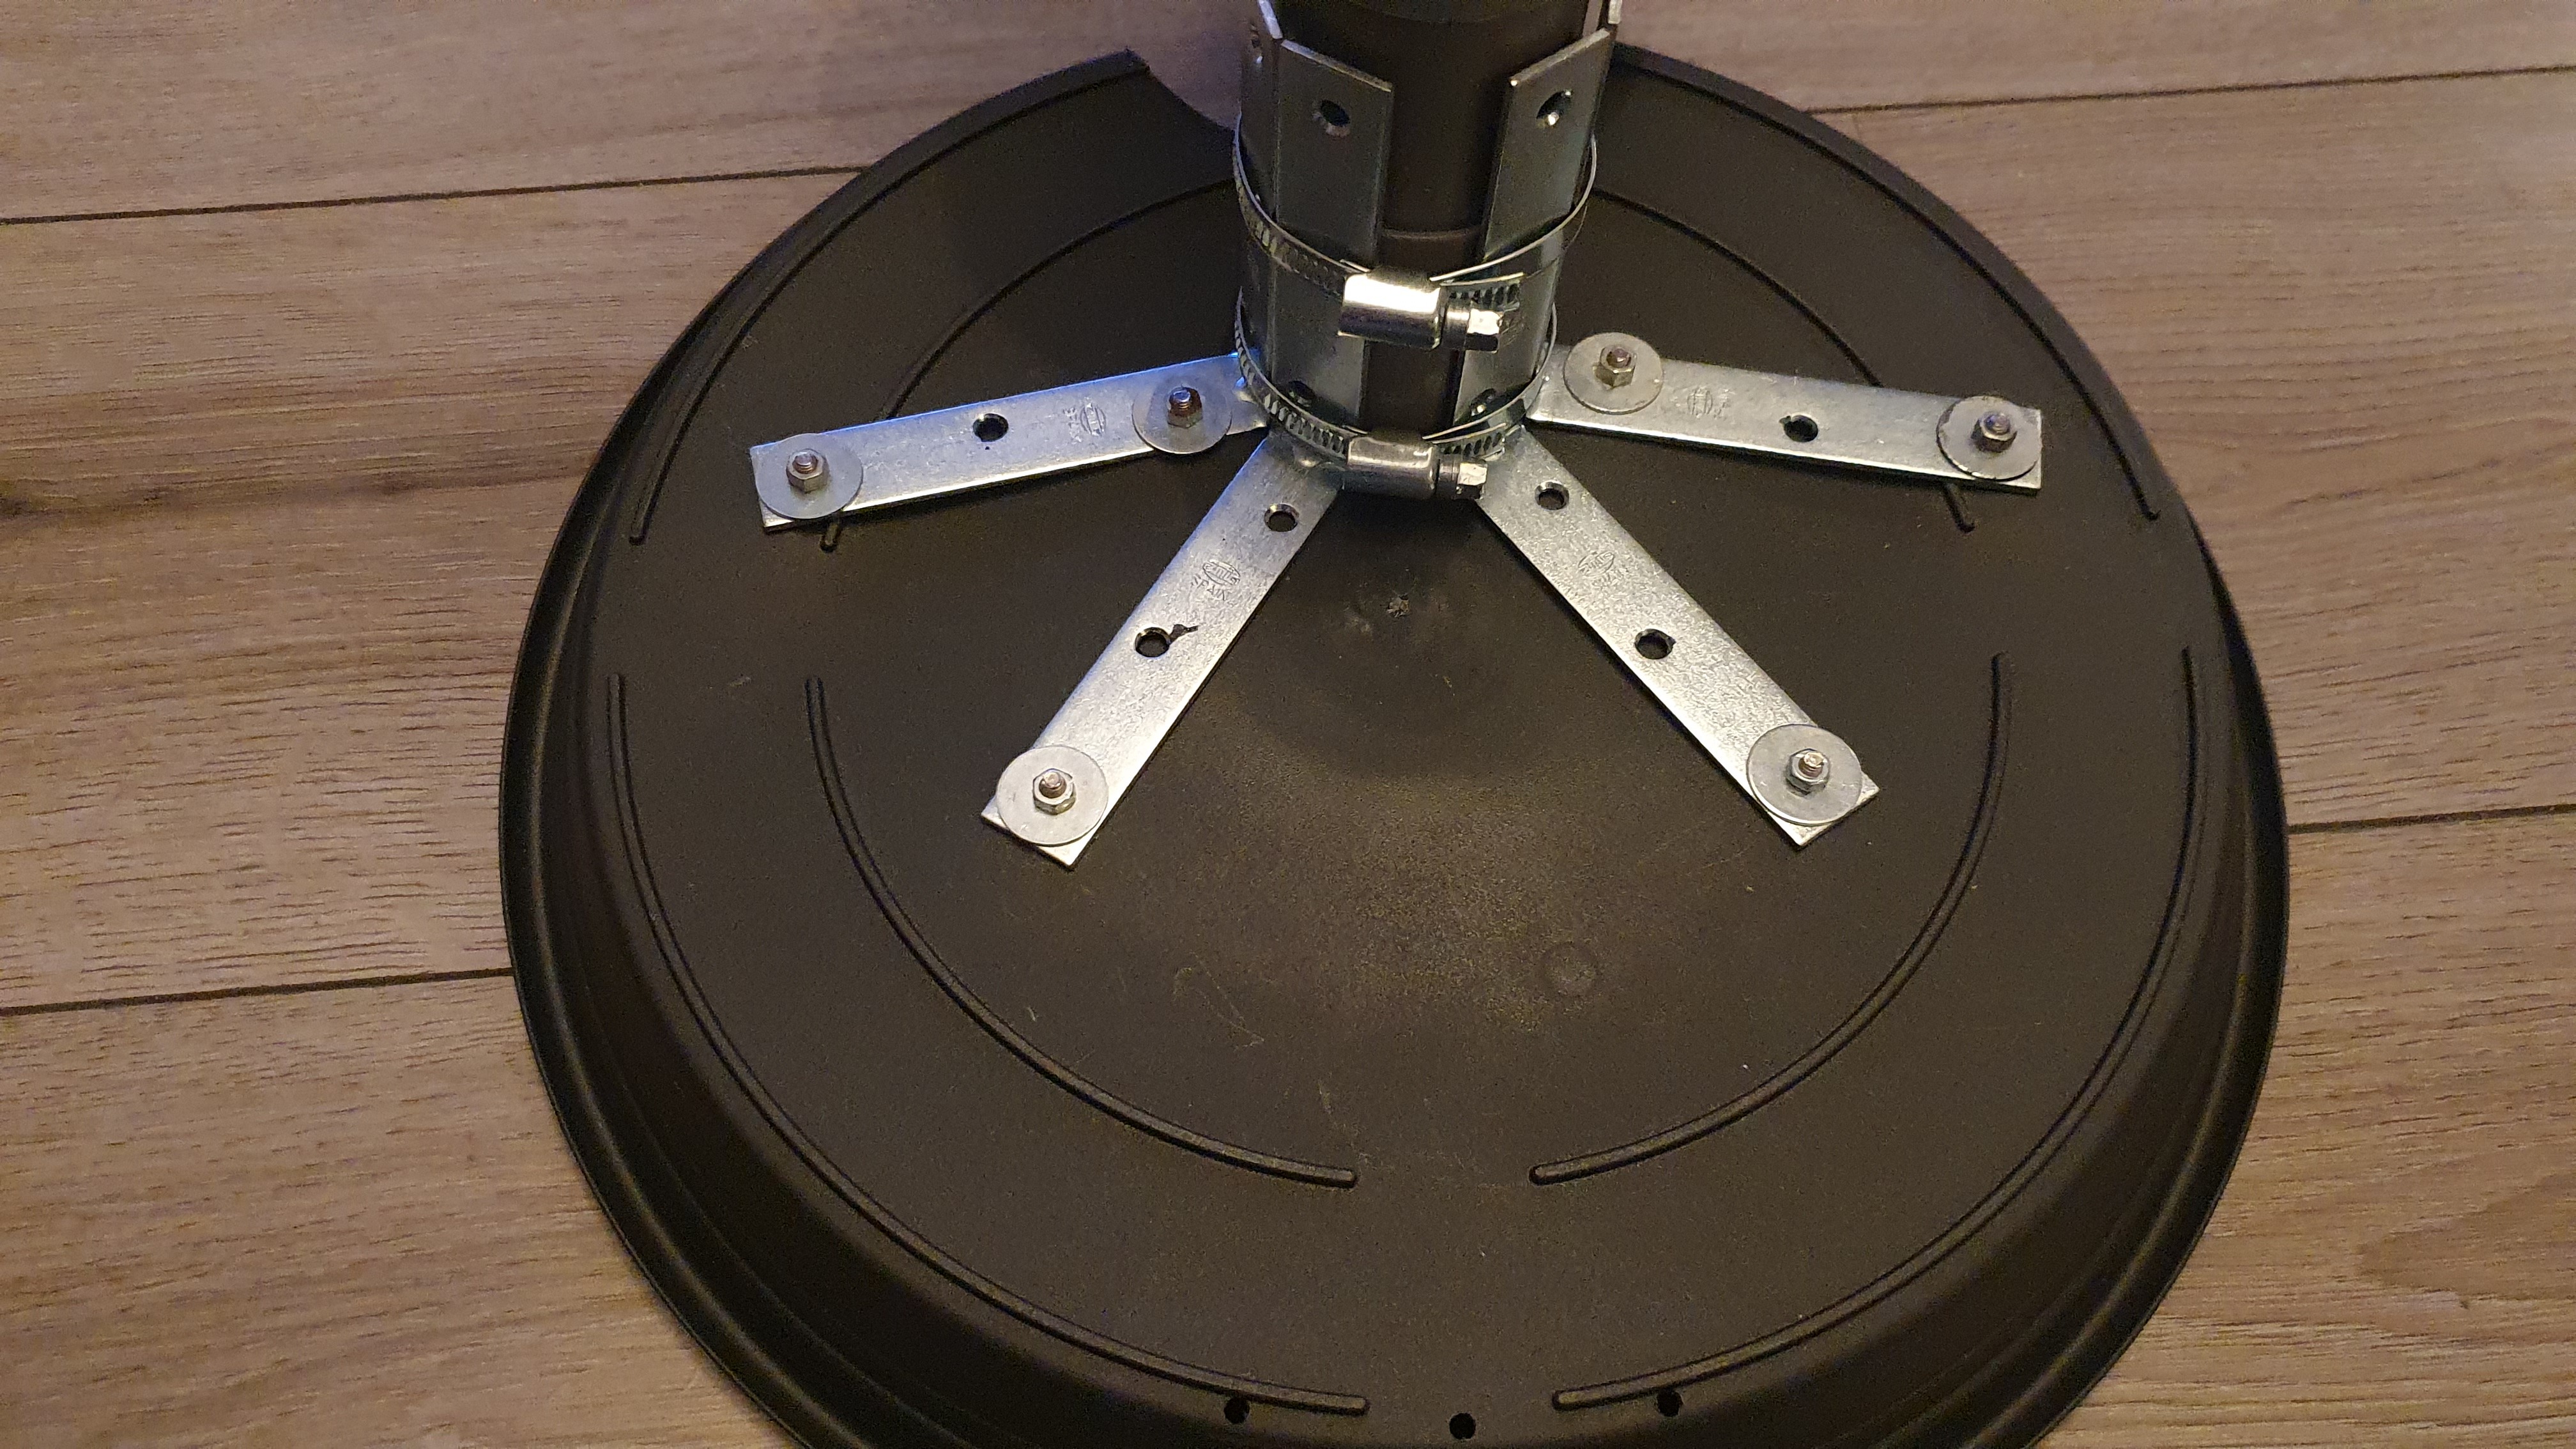
Deposit Collector
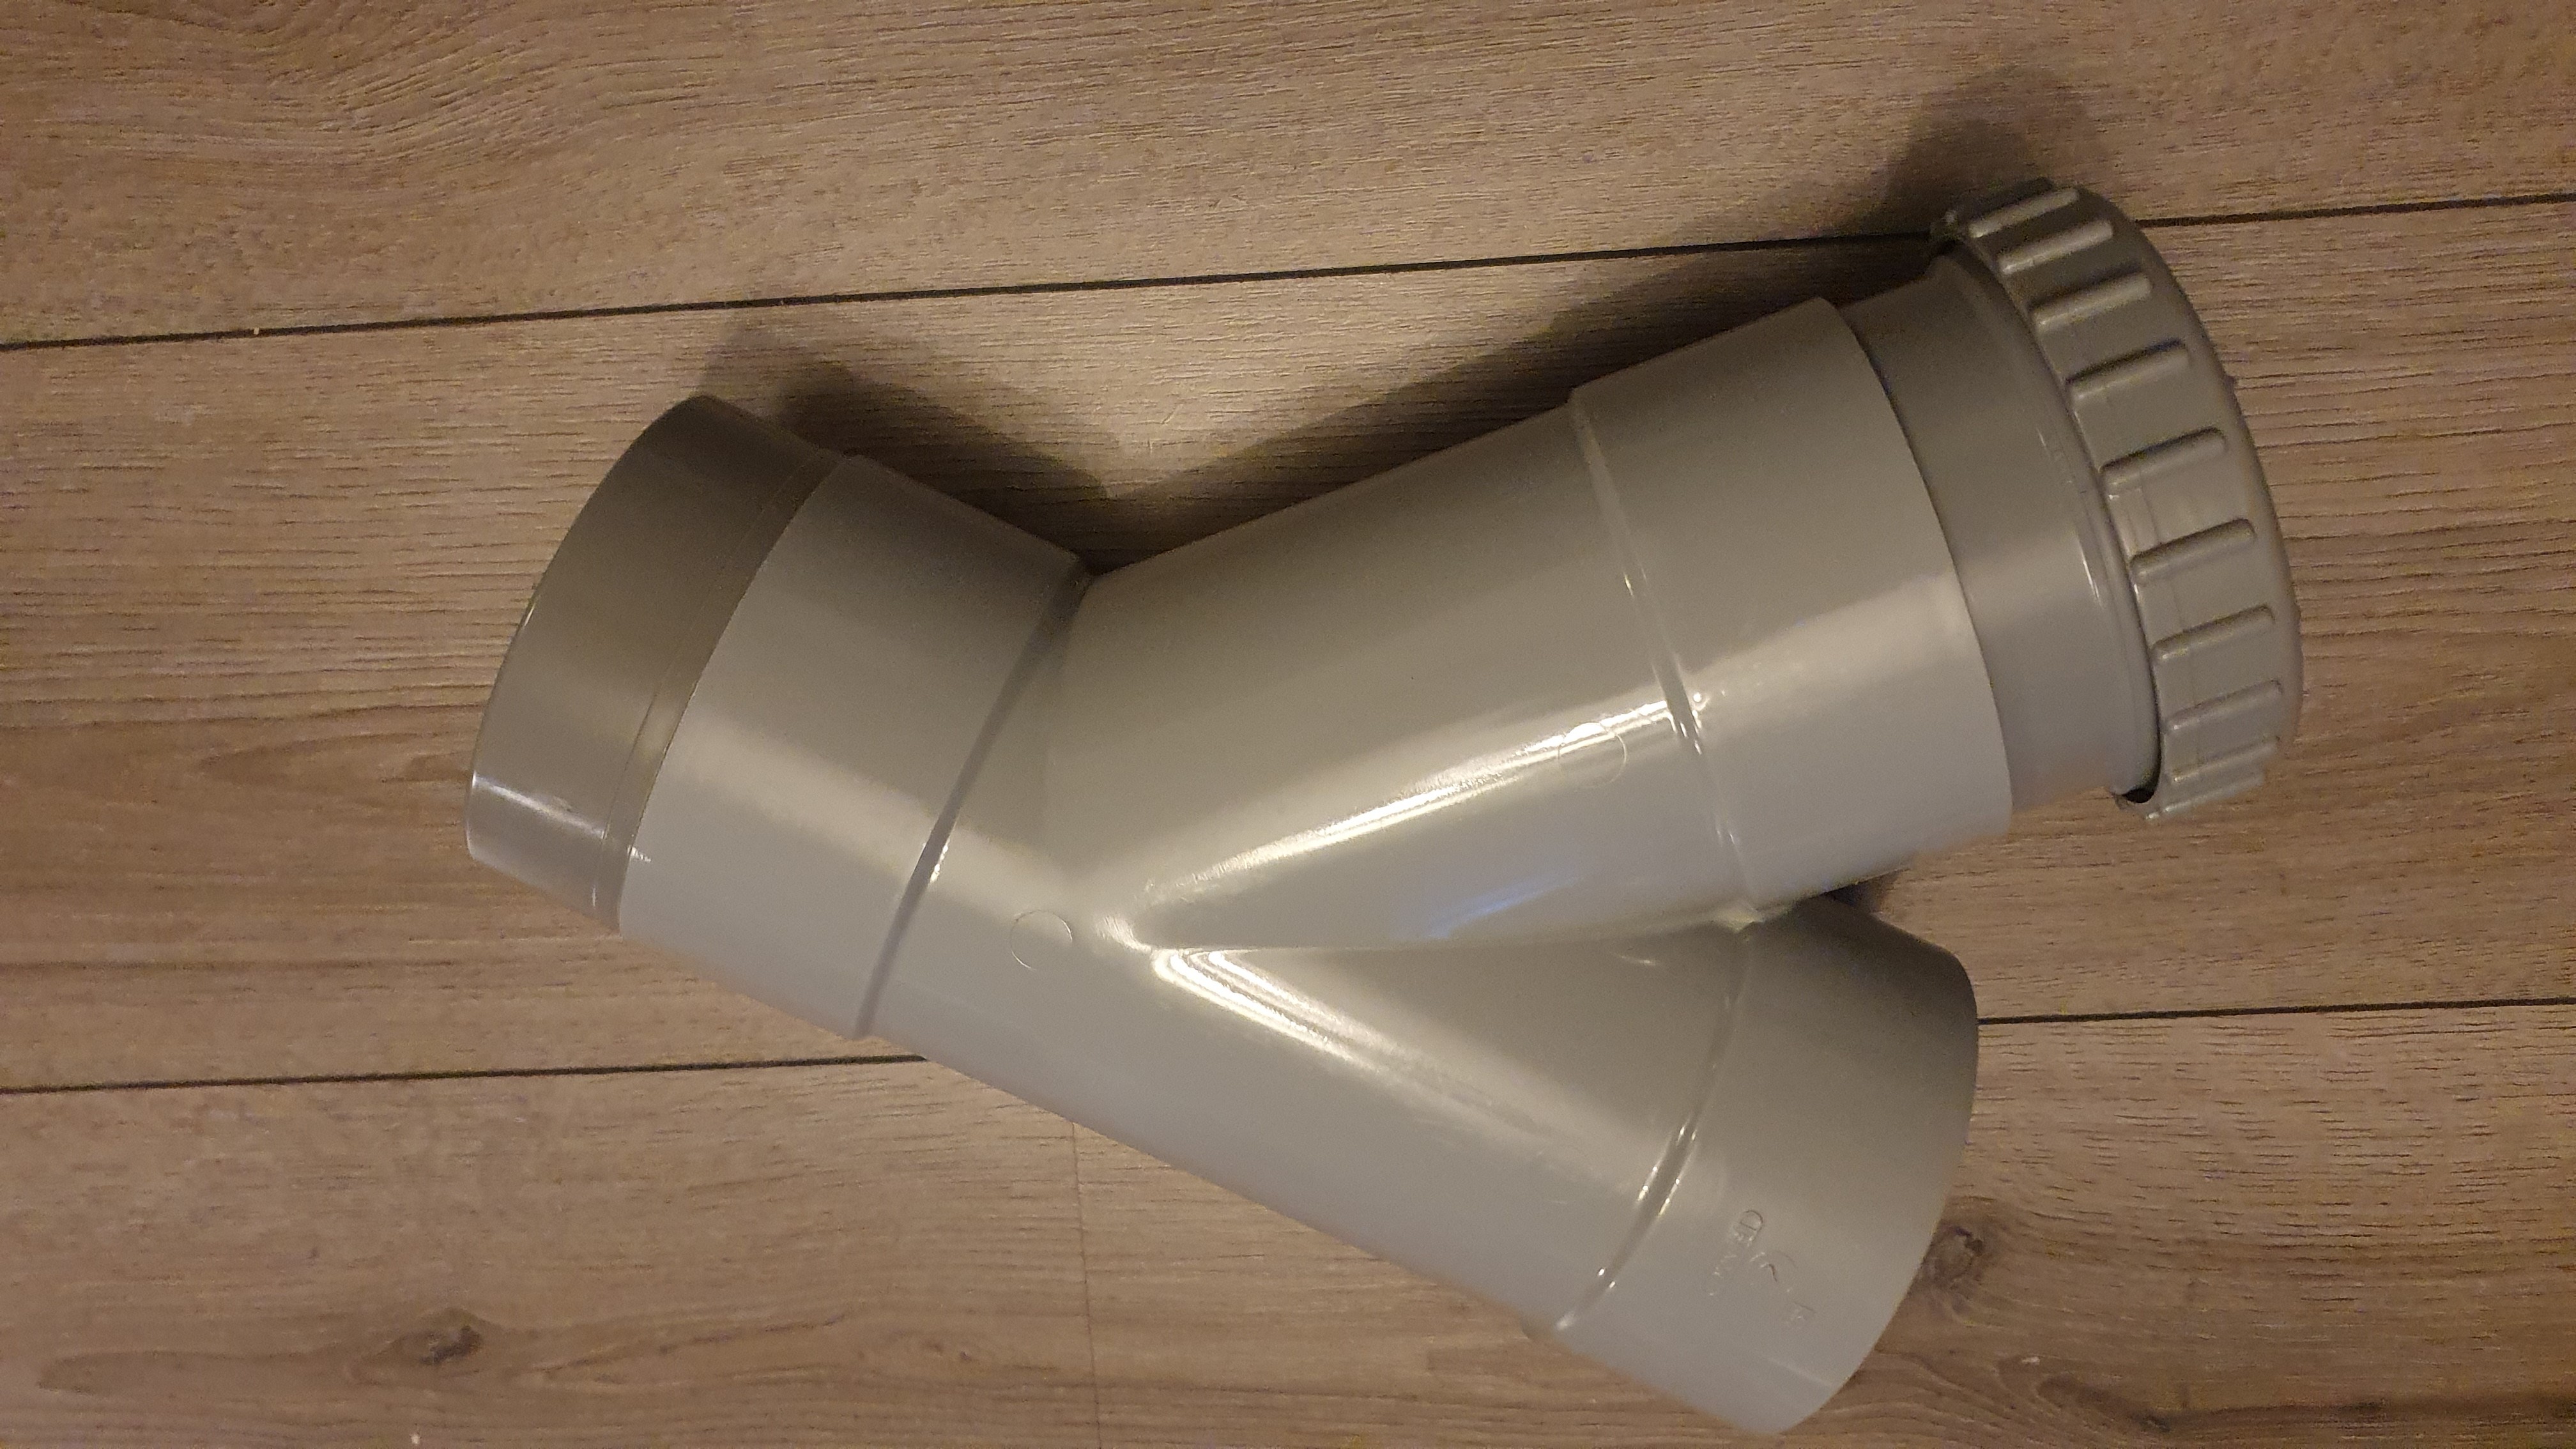
- 110mm end cap
- 110mm PVC 85mm long
- 110mm Y-joint F/F/F
- 110mm screw end cap
Deposit collector assembly
FEED
I used peanuts in the shell to attract birds to the area and shelled peanuts in the vending machine. If you live in an area with lots of pigeons, using peanuts in the shell will not attract them as much since they can't eat them (can't get the shell off) and you have a better chance of attracting corvids. Shelled peanuts are easier to dispense reliably - peanuts in the shell are less dense, more irregular in shape, and jam easily. Dry cat and dog food also works.
BIRD CONDITIONING
Along with learning and having some fun, the goal is to get a birds to bring something, drop it in a hole, and get a reward. Birds need some conditioning for this, so there are a few phases to progress though to help them figure this out.
Conditioning Stages
0 - Put food in the area you plan to mount the vending machine to start attracting birds
(1-2 weeks)
1 - Food Provided, Timed Dispense, Deposit Provided
(2-3 weeks)
2 - No Food Provided, Timed Dispense, Deposit Provided
(1-2 months)
3 - No Food Provided, No Timed Dispense, Deposit Provided
(4-6 months)
4 - No Food Provided, No Timed Dispense, No Deposit Provided
Time estimates are based on my own experience over the past year or so, but Phase 3 duration is a guess. As of July 2023 I have not yet seen a bird deposit an item I didn't provide. Unfortunately I had to take my machine down in May due to some new HOA regulations prohibiting feeding the birds in my neighborhood. I plan to redeploy it when I find another suitable location.
Vending Machine for Birds
*PCBWay community is a sharing platform. We are not responsible for any design issues and parameter issues (board thickness, surface finish, etc.) you choose.

Raspberry Pi 5 7 Inch Touch Screen IPS 1024x600 HD LCD HDMI-compatible Display for RPI 4B 3B+ OPI 5 AIDA64 PC Secondary Screen(Without Speaker)
BUY NOW
ESP32-S3 4.3inch Capacitive Touch Display Development Board, 800×480, 5-point Touch, 32-bit LX7 Dual-core Processor
BUY NOW
Raspberry Pi 5 7 Inch Touch Screen IPS 1024x600 HD LCD HDMI-compatible Display for RPI 4B 3B+ OPI 5 AIDA64 PC Secondary Screen(Without Speaker)
BUY NOW- Comments(3)
- Likes(2)
 Log in to post comments.
 Mitch AltmanMar 10,20240 CommentsReply
 Yorik van HavreFeb 19,20240 CommentsReply
 Kjell MorgensternFeb 16,20240 CommentsReply
- 2 USER VOTES
- YOUR VOTE 0.00 0.00
- 1
- 2
- 3
- 4
- 5
- 6
- 7
- 8
- 9
- 10
- 1
- 2
- 3
- 4
- 5
- 6
- 7
- 8
- 9
- 10
- 1
- 2
- 3
- 4
- 5
- 6
- 7
- 8
- 9
- 10
- 1
- 2
- 3
- 4
- 5
- 6
- 7
- 8
- 9
- 10

-
9design
-
9usability
-
9creativity
-
9content

-
9design
-
9usability
-
8creativity
-
9content
 More by Stephen src1138
-
 Vending Machine For Birds - Microcontroller Version
Simplified version of the VMFB (https://www.pcbway.com/project/shareproject/Vending_Machine_for_Bird...
-
 Vending Machine for Birds
A vending machine for birds that rewards them with food when they drop something in a hole. Electron...
-
 Vending Machine for Birds (OLD)
This project PCB has been updated.The latest version (Rev. B V 1.1) can be fouond here:https://www.p...
-
-
Commodore 64 1541-II 1581 Floppy Disk Drive C64 Power Supply Unit USB-C 5V 12V DIN connector 5.25
201 1 3 -
Easy to print simple stacking organizer with drawers
93 0 0 -
-
-
-
-
-
-
Modifying a Hotplate to a Reflow Solder Station
1170 1 6 -
MPL3115A2 Barometric Pressure, Altitude, and Temperature Sensor
657 0 1 -


