|
EagleAutodesk
|
12V timer relay with delay on release
Delay relay
A simple, solid state delayed off 'relay' for 12V and 24V systems. You could use it to control a Webasto water pump or CB radio, or anything you want to be automatically switched off after a delay.
Circuit operation
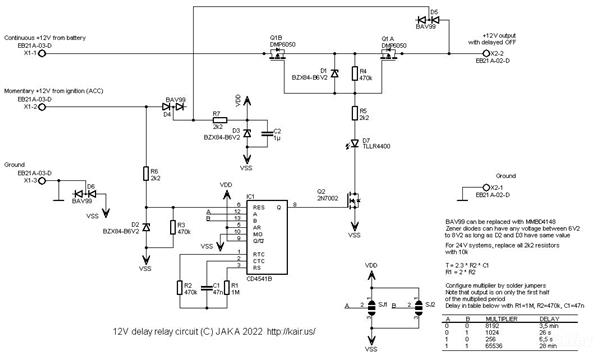
The delay circuit is based on 4541 logic circuit. Despite being an old chip, it is sill available from several manufacturers, e.g. TI, NXP and Onsemi. The 4541 contains an oscillator and divider, so it has everything needed to generate longer delays than a circuit based on NE555. The schematic diagram is shown below.

The circuit has two inputs. The '12V' is connected to a permanent +12V supply, such as car battery. The 'ACC' input is connected to a momentary +12V supply, which acts as control input to delay relay circuit. The load is connected to screw connector X2. The load is powered whenever the 'ACC' input is active. The load stays powered for the delay period and then switches off.
The circuit has many zener and signal diodes. Their purpose is to protect from all the nasty voltage events that could be encountered in a vehicle. For example, reverse battery polarity, jump start from a 24V battery and load dump. They aren't tested to be ISO 7637-2 proof, but the circuit should withstand practical scenarios pretty well.
The power switch is constructed from two PMOS transistors, which are integrated into one package. The benefit is reduced power consumption, size and contact wear elimination. Special attention has been paid to quiescent current. When the delay has elapsed, the power from CD4541B IC is completely cut off. So only the leakage current of the PMOS power switch is draining power, which is negligible.
You can select from four delay settings, spanning from approx. 7 seconds to almost half an hour. If none of the predefined settings suit your need, you could tweak C1,R1 and R2 values according to the equation shown in circuit diagram.
PCB
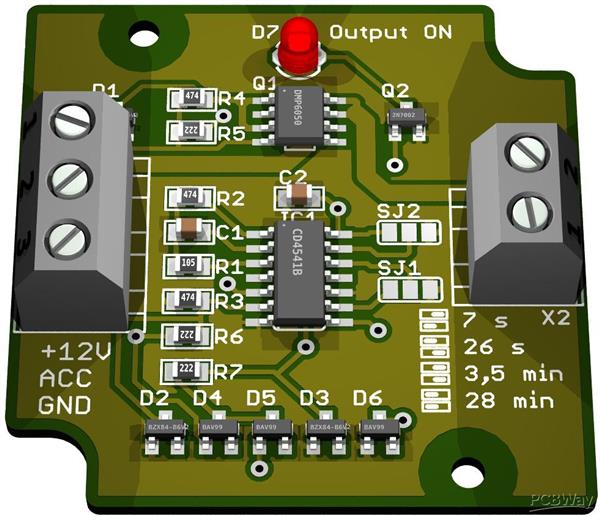
The PCB is designed with Cadsoft Eagle 5.12.0. It fits Hammond 1551RBK enclosure. Below is Eagle 3D rendition of the board. Input connector is shown on left and output connection at right. The LED lights whenever the load is powered. You must solder the SJ1 and SJ2 jumpers according to markings on silkscreen, depending on the delay length you need.

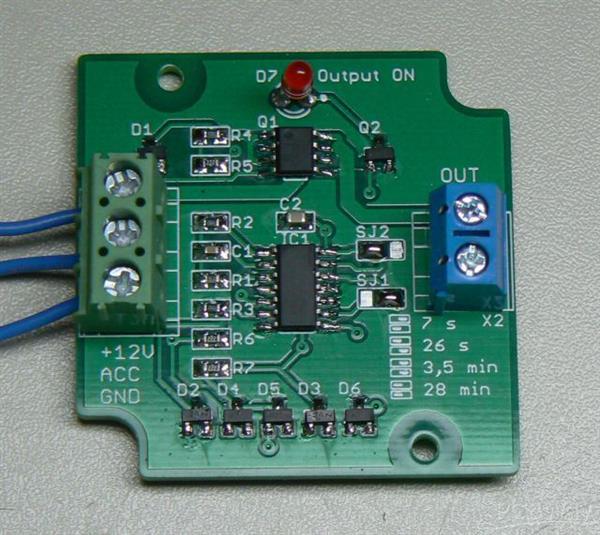
Photo of actual board below. Here I have used mostly 0603 size passives. They work, but the footprints on board are 0805 size.

Downloads for the design files and documentation are below. Gerber files can be downloaded from this page. You can order bare boards from PCBWay from this page. Here is TME shared project which contains all the components for the project, except the PCB.
delay_relay_v11.zip Eagle .sch and .brd
delay_relay_v11.pdf Circuit diagram, assembly drawing and BOM in PDF format
12V timer relay with delay on release
*PCBWay community is a sharing platform. We are not responsible for any design issues and parameter issues (board thickness, surface finish, etc.) you choose.

Raspberry Pi 5 7 Inch Touch Screen IPS 1024x600 HD LCD HDMI-compatible Display for RPI 4B 3B+ OPI 5 AIDA64 PC Secondary Screen(Without Speaker)
BUY NOW
ESP32-S3 4.3inch Capacitive Touch Display Development Board, 800×480, 5-point Touch, 32-bit LX7 Dual-core Processor
BUY NOW
Raspberry Pi 5 7 Inch Touch Screen IPS 1024x600 HD LCD HDMI-compatible Display for RPI 4B 3B+ OPI 5 AIDA64 PC Secondary Screen(Without Speaker)
BUY NOW- Comments(0)
- Likes(2)
 Log in to post comments.
-
 Engineer
Aug 14,2023
-
 Aleksandar Gligorov
Oct 16,2022
- 0 USER VOTES
- YOUR VOTE 0.00 0.00
- 1
- 2
- 3
- 4
- 5
- 6
- 7
- 8
- 9
- 10
- 1
- 2
- 3
- 4
- 5
- 6
- 7
- 8
- 9
- 10
- 1
- 2
- 3
- 4
- 5
- 6
- 7
- 8
- 9
- 10
- 1
- 2
- 3
- 4
- 5
- 6
- 7
- 8
- 9
- 10
 More by jaka
-
 DIY Weller WMRT compatible handle
Here are desoldering tweezers that you can build yourself. They use...
DIY Weller WMRT compatible handle
DIY Weller WMRT compatible handleHere are desoldering tweezers that you can build yourself. They use...
-
 Accurate digital wall clock with GPS and remote control
Kello version 4This is fourth version and maybe final version of my seven segment digital wall clock...
-
 Weller WMRP and WMRT compatible soldering station
This driver can be used with Weller tips which have integrated heater element and temperature sensor...
-
 Temperature difference thermostat v2.1
Temperature difference thermostat which can be used to control heating. When the inside temperature ...
-
 Speed test
A DIY replica of electronic speed test game, manufactured by Coinline in Finland. A similar game is ...
-
 JAKADAPTER - Dual Atari joystick USB adapter
This adapter allows to connect two Atari style joysticks, paddles, or Sega Megadrive / Genesis gamep...
-
 PICkit2- programmer
The PICkit2- programmer, PK2M for short, is yet another clone of the Microchip PICkit2 PIC programme...
-
 Car battery maintenance charger
Maintenance chargerOn this page you find all the information needed to build a maintenance charger f...
-
 12V timer relay with delay on release
Delay relayA simple, solid state delayed off 'relay' for 12V and 24V systems. You could use it to co...
-
 Toyota Hilux Vigo interior light LED upgrade
Toyota Hilux Vigo ceiling light LED modification I replaced my Hilux interior light incandescent bul...
-
 LED board for IL arcade buttons (outside version)
IL arcade buttons LED modificationI am a fan of the IL (Industrias Lorenzo, S.A.) arcade buttons and...
-
 LED board for IL arcade buttons (inside version)
IL arcade buttons LED modification I am a fan of the IL (Industrias Lorenzo, S.A.) arcade buttons an...
-
 Hardsid ISA clone
This is a reincarnation of the Hardsid clone which I made almost 20 years ago. The ...
Hardsid ISA clone
Hardsid ISA cloneThis is a reincarnation of the Hardsid clone which I made almost 20 years ago. The ...
-
 Microchip ICD to PICkit adapter
This simple adapter allows to use Microchip ICD programmers with targ...
Microchip ICD to PICkit adapter
Microchip ICD to PICkit adapterThis simple adapter allows to use Microchip ICD programmers with targ...
-
 BJT water detector
DIY water detector / leak alarmHere is simple water detector you can build yourself. It can be used ...
-
 J-ACE Arcade Controls Encoder
Jaka Arcade Controls Encoder The J-ACE is a DIY USB keyboard encoder. It allows you to make e.g. an ...
-
 DIY Weller WMRT compatible handle
Here are desoldering tweezers that you can build yourself. They use...
DIY Weller WMRT compatible handle
DIY Weller WMRT compatible handleHere are desoldering tweezers that you can build yourself. They use...
-
 Accurate digital wall clock with GPS and remote control
Kello version 4This is fourth version and maybe final version of my seven segment digital wall clock...
-
 Weller WMRP and WMRT compatible soldering station
This driver can be used with Weller tips which have integrated heater element and temperature sensor...
-
 Temperature difference thermostat v2.1
Temperature difference thermostat which can be used to control heating. When the inside temperature ...
-
 Speed test
A DIY replica of electronic speed test game, manufactured by Coinline in Finland. A similar game is ...
-
 JAKADAPTER - Dual Atari joystick USB adapter
This adapter allows to connect two Atari style joysticks, paddles, or Sega Megadrive / Genesis gamep...
-
 PICkit2- programmer
The PICkit2- programmer, PK2M for short, is yet another clone of the Microchip PICkit2 PIC programme...
-
 Car battery maintenance charger
Maintenance chargerOn this page you find all the information needed to build a maintenance charger f...
-
 12V timer relay with delay on release
Delay relayA simple, solid state delayed off 'relay' for 12V and 24V systems. You could use it to co...
-
 Toyota Hilux Vigo interior light LED upgrade
Toyota Hilux Vigo ceiling light LED modification I replaced my Hilux interior light incandescent bul...
-
 LED board for IL arcade buttons (outside version)
IL arcade buttons LED modificationI am a fan of the IL (Industrias Lorenzo, S.A.) arcade buttons and...
-
 LED board for IL arcade buttons (inside version)
IL arcade buttons LED modification I am a fan of the IL (Industrias Lorenzo, S.A.) arcade buttons an...
-
Commodore 64 1541-II 1581 Floppy Disk Drive C64 Power Supply Unit USB-C 5V 12V DIN connector 5.25
161 1 3 -
Easy to print simple stacking organizer with drawers
87 0 0 -
-
-
-
Modifying a Hotplate to a Reflow Solder Station
1134 1 6 -
MPL3115A2 Barometric Pressure, Altitude, and Temperature Sensor
636 0 1 -
-
Nintendo 64DD Replacement Shell
494 0 2 -
V2 Commodore AMIGA USB-C Power Sink Delivery High Efficiency Supply Triple Output 5V ±12V OLED display ATARI compatible shark 100W
1438 4 3


