
tamimabdullah
BANGLADESH • + Follow


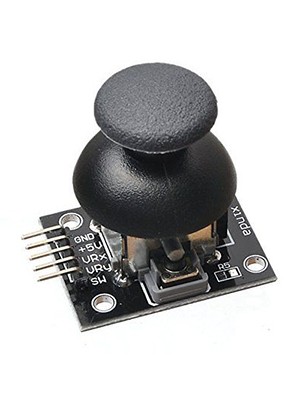
Components


Tools, APP Software Used etc.

|
arduino IDEArduino
|
Description
1km Radio Controller.
MY PROJECT IS ABOUT 1 TO 15 KM , A LONG RANGE REMOTE CONTROLL, THAT CAN CONTROLL DRONES, SPY MODULES, CARS, ROCKET DIY PROJECTS AND A VAST FIELD OF IT'S USING.
Code
Transmitter
C/C++
const uint64_t pipeOut = 0xF9E8F0F0E1LL; //IMPORTANT: The same as in the receiver 0xF9E8F0F0E1LL RF24 radio(8, 9); // select CE,CSN pin struct PacketData { byte lxAxisValue; byte lyAxisValue; byte rxAxisValue; byte ryAxisValue; byte lPotValue; byte rPotValue; byte switch1Value; byte switch2Value; byte switch3Value; byte switch4Value; }; PacketData data; void setup() { radio.begin(); radio.setDataRate(RF24_250KBPS); radio.openWritingPipe(pipeOut); radio.stopListening(); //start the radio Transmitter pinMode(2,INPUT_PULLUP); pinMode(3,INPUT_PULLUP); pinMode(4,INPUT_PULLUP); pinMode(5,INPUT_PULLUP); } //This function is used to map 0-1023 joystick value to 0-254. hence 127 is the center value which we send. //It also adjust the deadband in joystick. //Jotstick values range from 0-1023. But its center value is not always 511. It is little different. //So we need to add some deadband to center value. in our case 500-530. Any value in this deadband range is mapped to center 127. int mapAndAdjustJoystickDeadBandValues(int value, bool reverse) { if (value >= 530) { value = map(value, 530, 1023, 127, 254); } else if (value <= 500) { value = map(value, 500, 0, 127, 0); } else { value = 127; } if (reverse) { value = 254 - value; } return value; } void loop() { data.lxAxisValue = mapAndAdjustJoystickDeadBandValues(analogRead(A0), false); data.lyAxisValue = mapAndAdjustJoystickDeadBandValues(analogRead(A1), false); data.rxAxisValue = mapAndAdjustJoystickDeadBandValues(analogRead(A2), false); data.ryAxisValue = mapAndAdjustJoystickDeadBandValues(analogRead(A3), false); data.lPotValue = map(analogRead(A4), 0, 1023, 0, 254); data.rPotValue = map(analogRead(A5), 0, 1023, 0, 254); data.switch1Value = !digitalRead(2); data.switch2Value = !digitalRead(3); data.switch3Value = !digitalRead(4); data.switch4Value = !digitalRead(5); radio.write(&data, sizeof(PacketData)); }
Reciever
C/C++
const uint64_t pipeIn = 0xF9E8F0F0E1LL; RF24 radio(8, 9); unsigned long lastRecvTime = 0; struct PacketData { byte lxAxisValue; byte lyAxisValue; byte rxAxisValue; byte ryAxisValue; byte lPotValue; byte rPotValue; byte switch1Value; byte switch2Value; byte switch3Value; byte switch4Value; }; PacketData receiverData; Servo servo1; //Pin D2 Servo servo2; //Pin D3 Servo servo3; //Pin D4 Servo servo4; //Pin D5 Servo servo5; //Pin D6 Servo servo6; //Pin D7 int led1 = A0; int led2 = A1; int led3 = A2; int led4 = A3; //Assign default input received values void setInputDefaultValues() { // The middle position for joystick. (254/2=127) receiverData.lxAxisValue = 127; receiverData.lyAxisValue = 127; receiverData.rxAxisValue = 127; receiverData.ryAxisValue = 127; receiverData.lPotValue = 0; receiverData.rPotValue = 0; receiverData.switch1Value = LOW; receiverData.switch2Value = LOW; receiverData.switch3Value = LOW; receiverData.switch4Value = LOW; } void mapAndWriteValues() { servo1.write(map(receiverData.lxAxisValue, 0, 254, 0, 180)); servo2.write(map(receiverData.lyAxisValue, 0, 254, 0, 180)); servo3.write(map(receiverData.rxAxisValue, 0, 254, 0, 180)); servo4.write(map(receiverData.ryAxisValue, 0, 254, 0, 180)); servo5.write(map(receiverData.lPotValue, 0, 254, 0, 180)); servo6.write(map(receiverData.rPotValue, 0, 254, 0, 180)); digitalWrite(led1, receiverData.switch1Value); digitalWrite(led2, receiverData.switch2Value); digitalWrite(led3, receiverData.switch3Value); digitalWrite(led4, receiverData.switch4Value); } void setup() { radio.begin(); radio.setDataRate(RF24_250KBPS); radio.openReadingPipe(1,pipeIn); radio.startListening(); //start the radio receiver servo1.attach(2); servo2.attach(3); servo3.attach(4); servo4.attach(5); servo5.attach(6); servo6.attach(7); pinMode(led1, OUTPUT); pinMode(led2, OUTPUT); pinMode(led3, OUTPUT); pinMode(led4, OUTPUT); setInputDefaultValues(); mapAndWriteValues(); } void loop() { // Check if RF is connected and packet is available if(radio.isChipConnected() && radio.available()) { radio.read(&receiverData, sizeof(PacketData)); lastRecvTime = millis(); } else { //Check Signal lost. unsigned long now = millis(); if ( now - lastRecvTime > SIGNAL_TIMEOUT ) { setInputDefaultValues(); } } mapAndWriteValues(); }
Schematic and Layout
Transmitter
Receiver
RF Reciever.fzz
Nov 28,2022
1,137 views
end-flag
1km Radio Controller.
Powerful 1km 6-10 channel remote controller for drone, car etc DIY projects.
1137
2
0
Published: Nov 28,2022
Download Gerber file 8
PCBWay Donate 10% cost To Author
*PCBWay community is a sharing platform. We are not responsible for any design issues and parameter issues (board thickness, surface finish, etc.) you choose.


Under the
Attribution-ShareAlike (CC BY-SA)
License.


Raspberry Pi 5 7 Inch Touch Screen IPS 1024x600 HD LCD HDMI-compatible Display for RPI 4B 3B+ OPI 5 AIDA64 PC Secondary Screen(Without Speaker)
BUY NOW
ESP32-S3 4.3inch Capacitive Touch Display Development Board, 800×480, 5-point Touch, 32-bit LX7 Dual-core Processor
BUY NOW
Raspberry Pi 5 7 Inch Touch Screen IPS 1024x600 HD LCD HDMI-compatible Display for RPI 4B 3B+ OPI 5 AIDA64 PC Secondary Screen(Without Speaker)
BUY NOW


- Comments(0)
- Likes(2)
 Log in to post comments.
Upload photo
0 / 10000
More by tamimabdullah
You may also like
-
-
-
Modifying a Hotplate to a Reflow Solder Station
864 1 5 -
MPL3115A2 Barometric Pressure, Altitude, and Temperature Sensor
445 0 1 -
-
-
V2 Commodore AMIGA USB-C Power Sink Delivery High Efficiency Supply Triple Output 5V ±12V OLED display ATARI compatible shark 100W
1097 4 2 -
How to measure weight with Load Cell and HX711
693 0 3