|
Visual Studio Code |
|

|
PlatformIOPlatformIO Labs
|
|

|
EagleAutodesk
|
DC Power Meter / Logger Using ESP8266
In this article I will make a DC power meter / logger using the ESP8266. This tool can be used to measure voltage, current, power and electrical capacity of a power supply. The measurement results will be displayed on the OLED display and sent to the Server via MQTT for the Logger. data sent to the server can be displayed in various forms, for example charts, tables, and others.
My main goal in making this device is to measure battery capacity. With this device I can find out the original capacity of the battery, see the voltage/current chart of the charging and discharging process of the battery and know the charging and discharging process time accurately.
for now, the progress of making this device has not been fully completed. even so this tool is enough to meet the needs that I currently need (above paragraph). in future i will upgrade this tool with some features like :
- User-friendly Menu interface
- Error handling for WiFi and MQTT connections
- Automatic 3.5V or 12V battery detection
- Battery charging system
- Battery discharge system
Supplies

This is a list of the components needed to make a DC Power Meter / Logger:
- 1*IC INA219 => current and voltage sensors
- 1*ESP-12E
- 1*Display OLED 128x64 I2C
- 1*Relay 5V
- 1*Rotary Encoder
- 1*micro USB type B
- 1*togle switch SMD
- 1*3mm Red LED
- 1*3mm Green LED
- 2*T-Block 2 PIN
- 1*Transistor BC847 SMD
- 1*Transistor BC857 SMD
- 2*Push Button TS342A4P SMD
- 4*Capacitor 100n SMD
- 2*Elcap 100u SMD
- 12*Resistor 10k SMD
- 1*Resistor 0R1 SMD
- 1*Resistor 1k SMD
- 1*Capacitor 1n SMD
- 1*Diode 4148 SMD
- 1*IC LM1117 SMD
I have also provided a Bill of Materials along with the installation location in the csv file.
PCB Schematic and Layout


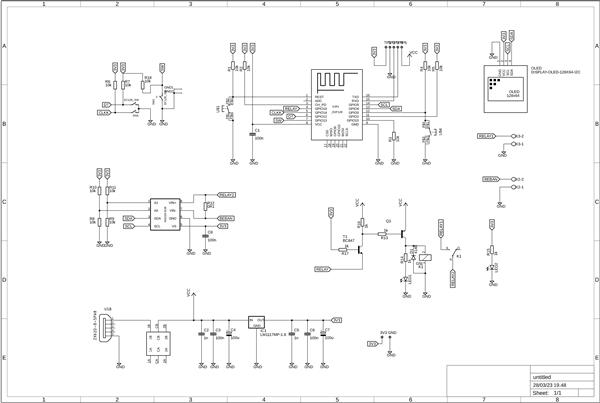
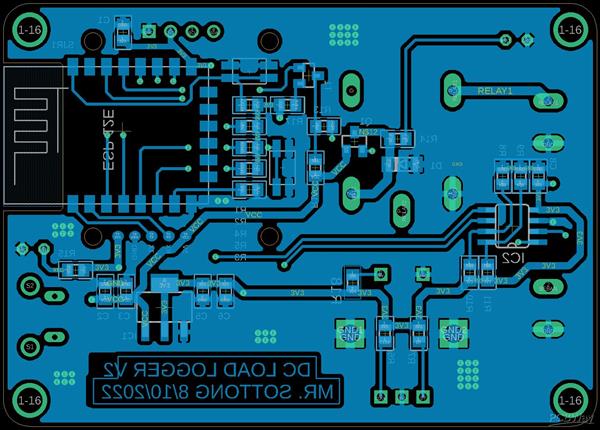
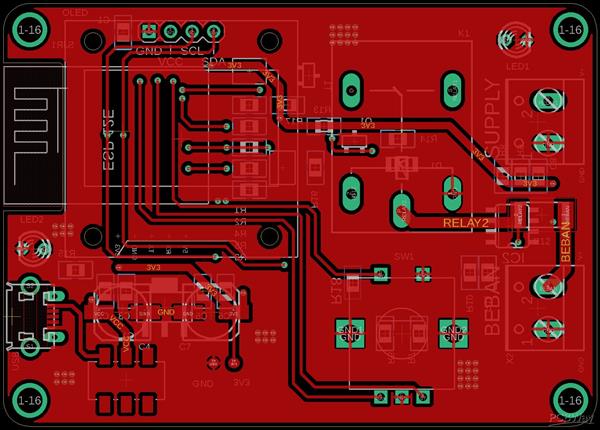
he electronic schematic and PCB design of this DC Power Meter / Logger can be seen in the image above. I used the free version of the Eagle application to make it.
To manufacture electronic modules with industrial quality. I am addicted to PCBWay service to print this PCB DC Power Meter / Logger. Because by making PCB on PCBway you can get High Quality 10 PCs PCBs for only $ 5 & new member First order Free: www.pcbway.com
For those who want to print the PCB, I have provided a gerber file which you can download at the following link: coming soon
If anyone needs a schematic (.sch) and PCB layout (.brd) file, you can download it at the following link: coming soon
Insert Components Into PCB


Insert the components one by one according to the diagram on the PCB. I suggest to install SMD components first. after that install components that have a larger size. for components with large sizes such as OLED, Relay and rotary can be installed last.
Flash Firmware Test
After all the components are installed, it is necessary to do some tests to find out whether the hardware that has been made can function properly. The tests I did included:
- Test flash: to find out that the hardware can be loaded with the program
- [picture 1] Rotary encoder test: to find out whether the rotary encoder is working or not
- [picture 2] OLED test: to find out if OLED can display images / text
- [picture 3] Relay Test: to find out if the Relay can be ON / OFF
- [picture 4] INA219 Sensor Test: to find out if the sensor can measure voltage and current
The program for each test can be seen on the following link: coming soon
Ubidots Configurastion
to store (logger) sensor measurement data, I use a service from Ubidots via MQTT. You can visit the website via the following link: Ubidots
Ubidots is an Internet of Things (IoT) platform and data solution for collecting, analyzing, and visualizing data from various connected IoT devices. For the free version, you can use it for two devices.
To connect to Ubidots, I use the MQTT protocol. to configure MQTT to Ubidots the following are the parameters needed:
- Ubidots Token (MQTT username) : [picture 1]
- Ubidots MQTT Server : "industrial.api.ubidots.com"
- PORT : "1883"
For data formats and MQTT topics, see the reference API provided by Ubidots at the following linkt : LINK
Flash Firmware DC Power Meter
If each piece of hardware is functioning properly. now proceed to the DC Power Meter Flash firmware stage. As I said in the introduction that this tool is not completely finished. With this firmware, DC Power Meter / Logger can only send voltage, current, power and capacity data to the ubidots web service at selectable intervals. for more complete results can be seen later in step 9: Results.
I made the firmware using the Arduino Framework and I wrote the program using the IO platform in VS Code.
The firmware section that needs to be adjusted is the Wifi setup and Ubidots Configuration section, here is an example:
const char* ssid = "your-SSID"; const char* password = "your-Pass-SSID"; const char* mqtt_server = "industrial.api.ubidots.com"; const char* port = "1883"; const char* token = "your-Ubidots-Token";
For the Arduino library used is as follows:
#include <Arduino.h> #include <SPI.h> #include <Wire.h> #include <Adafruit_GFX.h> #include <Adafruit_SSD1306.h> #include <Adafruit_INA219.h> #include "AiEsp32RotaryEncoder.h" #include <ESP8266WiFi.h> #include <PubSubClient.h> #include <ArduinoJson.h> #include <string.h>
Make sure all libraries are added first so the program can work
Firmware can be downloaded on my github page
Configuration


Examples of using this device are:
- Used to measure and logger battery charging process
- Used to measure and logger the battery discharge process
Description of installation configuration diagrams for each application
- [figure 1] : configuration diagram for the battery charger process. The "SUPPLY" connector is connected to the Power supply while the "BEBAN (LOAD)" connector is connected to the Battery
- [figure 2] : configuration diagram for the battery discharge process. The "SUPPLY" connector is connected to the Battery while the "BEBAN (LOAD)" connector is connected to Lights or other loads.
Device Installation

Install according to the configuration you want to use. use a screwdriver (-) to loosen and tighten the connector bolts.
Device Setup

The following is the setup for operating the DC Power Meter:
- Turn on the device by moving the switch
- Certain words will appear, at this stage the device is in the process of connecting to Wifi and MQTT Server
- After the page changes to "INPUT PARAMETERS", it means the device is connected.
- Then press the rotary button once
- Select the duration of the data transmission interval then press the rotary button again
- The relay will turn on and the OLED will display the results of measuring voltage, current, power and capacity.
the interval for sending data to Ubidots adjusts to the selected duration
Logger Results at Ubidots

The measurement results sent to Ubidots can be seen in the image above.
Conclusion
conclusion :
- The device is functioning properly
- Existing features are as needed
constraint :
- In the process of using it, sometimes after the switch is ON, the device can't work. characterized by OLED that displays nothing
Improvements to be made:
- add features
- Overcoming the problem of the device not working


DC Power Meter / Logger Using ESP8266
*PCBWay community is a sharing platform. We are not responsible for any design issues and parameter issues (board thickness, surface finish, etc.) you choose.

Raspberry Pi 5 7 Inch Touch Screen IPS 1024x600 HD LCD HDMI-compatible Display for RPI 4B 3B+ OPI 5 AIDA64 PC Secondary Screen(Without Speaker)
BUY NOW
ESP32-S3 4.3inch Capacitive Touch Display Development Board, 800×480, 5-point Touch, 32-bit LX7 Dual-core Processor
BUY NOW
Raspberry Pi 5 7 Inch Touch Screen IPS 1024x600 HD LCD HDMI-compatible Display for RPI 4B 3B+ OPI 5 AIDA64 PC Secondary Screen(Without Speaker)
BUY NOW- 0 USER VOTES
- YOUR VOTE 0.00 0.00
- 1
- 2
- 3
- 4
- 5
- 6
- 7
- 8
- 9
- 10
- 1
- 2
- 3
- 4
- 5
- 6
- 7
- 8
- 9
- 10
- 1
- 2
- 3
- 4
- 5
- 6
- 7
- 8
- 9
- 10
- 1
- 2
- 3
- 4
- 5
- 6
- 7
- 8
- 9
- 10
 More by Mr. Sottong
-
 Pop Noise Remover For TPA116D2 Amplifier
So on my YouTube channel, I reviewed the TPA3116d2 V1 amplifier. I think the amplifier has a pretty ...
-
 Pocket RGB Light | Arduino & WS2812B
In this article "How to Controls WS2812B Using ESP-01 Arduino (ESP8266)". I made a custom module for...
-
 DC Power Meter / Logger Using ESP8266
In this article I will make a DC power meter / logger using the ESP8266. This tool can be used to me...
-
 Automatic Fish Feeder Using Arduino Nano
In this article I will make an automatic feeding device for fish in an aquarium. This tool uses ardu...
-
 Bluetooth Audio Receiver + Pop Noise Remover for Amplifier TPA3116D2 2.1
In this article I will make a special audio receiver bluetooth module for the TPA3116d2 2.1 Amplifie...
-
 RGB LED Light for Mini Photo Studio
 This project is about RGB LED Light which is used for Mini Photo...
RGB LED Light for Mini Photo Studio
RGB LED Light for Mini Photo Studio This project is about RGB LED Light which is used for Mini Photo...
-
-
-
Modifying a Hotplate to a Reflow Solder Station
934 1 5 -
MPL3115A2 Barometric Pressure, Altitude, and Temperature Sensor
474 0 1 -
-
Nintendo 64DD Replacement Shell
406 0 2 -
V2 Commodore AMIGA USB-C Power Sink Delivery High Efficiency Supply Triple Output 5V ±12V OLED display ATARI compatible shark 100W
1178 4 2 -
How to measure weight with Load Cell and HX711
725 0 3


K1 : https://www.elecbee.com/en-29173-10pcs-1CH-Channel-Relay-Module-5V-For-250VAC-60VDC-10A-Equipment-Device-for-Arduino-products-that-work-with-official-for-Arduino-boards?network=g&campaign=18719854073&adgroup=140153146062&creative=630917925115&keyword=&target=pla-296303633664&matchtype=&devicemodel=&placement=&feeditemid=&adpostition=&gad_source=4&gclid=CjwKCAjwvIWzBhAlEiwAHHWgvX3wB03bD5heaIjoeDQ70g9z7F2sfvYkbjN-PSvNJuhbPtyPFzBiqxoCBHsQAvD_BwE OLED : https://www.elecbee.com/en-29981-3pcs-Blue-0.96-Inch-OLED-I2C-IIC-Communication-Display-128x64-LCD-Module?search=blue%200.96%20inch&descript_ion=true Q1 : same with K1, I removed it from the relay module SW1 : https://www.elecbee.com/en-17993-KY-040-Rotary-Decoder-Encoder-Module-PIC?search=rotary => I took it from this module U$1, U$4 : https://www.monotaro.id/items/s032398175.html?utm_source=google&utm_medium=pla&utm_campaign=1672206402&utm_content=88187085595&gad_source=1&gclid=CjwKCAjwvIWzBhAlEiwAHHWgvezVGP2gi0LINMxaJLx5zHVUVJTUCIHStnVdvYNnwbZjdFn0t6Kz7hoCzygQAvD_BwE U$3 : http://www.jack-zx.com/en/p_xx.asp?id=460 The place to buy that I listed is not where I bought the part, but you can use it as a reference