|
|
ESP32 DEVKIT V1 (DOIT)ESP32
|
x 1 | |
|
|
LED Matrix 16 x 16 pixelleds WS2812 |
x 14 | |
|
|
I2S Audio Baoard |
x 1 | |
|
|
Pin header and sockets 2.54 Pitch |
x 1 | |
|
|
Power Supply 5V/5A |
x 1 |

|
arduino IDEArduino
|
Fast Audio Spectrum Analyzer
This design is nothing if not amazing! Imagine 3500 Colored LEDS dancing around to the music at a very high refresh rate.
All controlled by a single $2 micro controller that is fed music using a Bluetooth connection.
Best of all it's open source so anyone can build it! All production files and firmware are included
- Bluetooth audio connection
- driving 3584 pixelleds using 14 serial connections, simultaniously
- I2S audio output
- 120 FPS
- background animation
- Cartoon characters on display
Did I mention that it is really fast? 120 frames per second...So that means the microcontroller will drive 3584 leds in 8.3 mSeconds. And each frame will show new actual frequency data of the incoming signal.
As a bonus it will also show an animated background while a few cartoon characters make their appearance on screen.
Enough bragging... lets start building!
Supplies
So you need the PCB with components. I did not list all the components on the pcb here but you can check the BOM list above. It has all the components you need.
On top of that you will need:
- ESP32 DOIT DeVKIT 1
- 14x LED MATRIX 16x16 pixel leds WS2812
- Power supply, I used Meanwell S-25-5 5V output 5A
- I2S Audio Board
- Fuse 1AT 14x
The Electronics
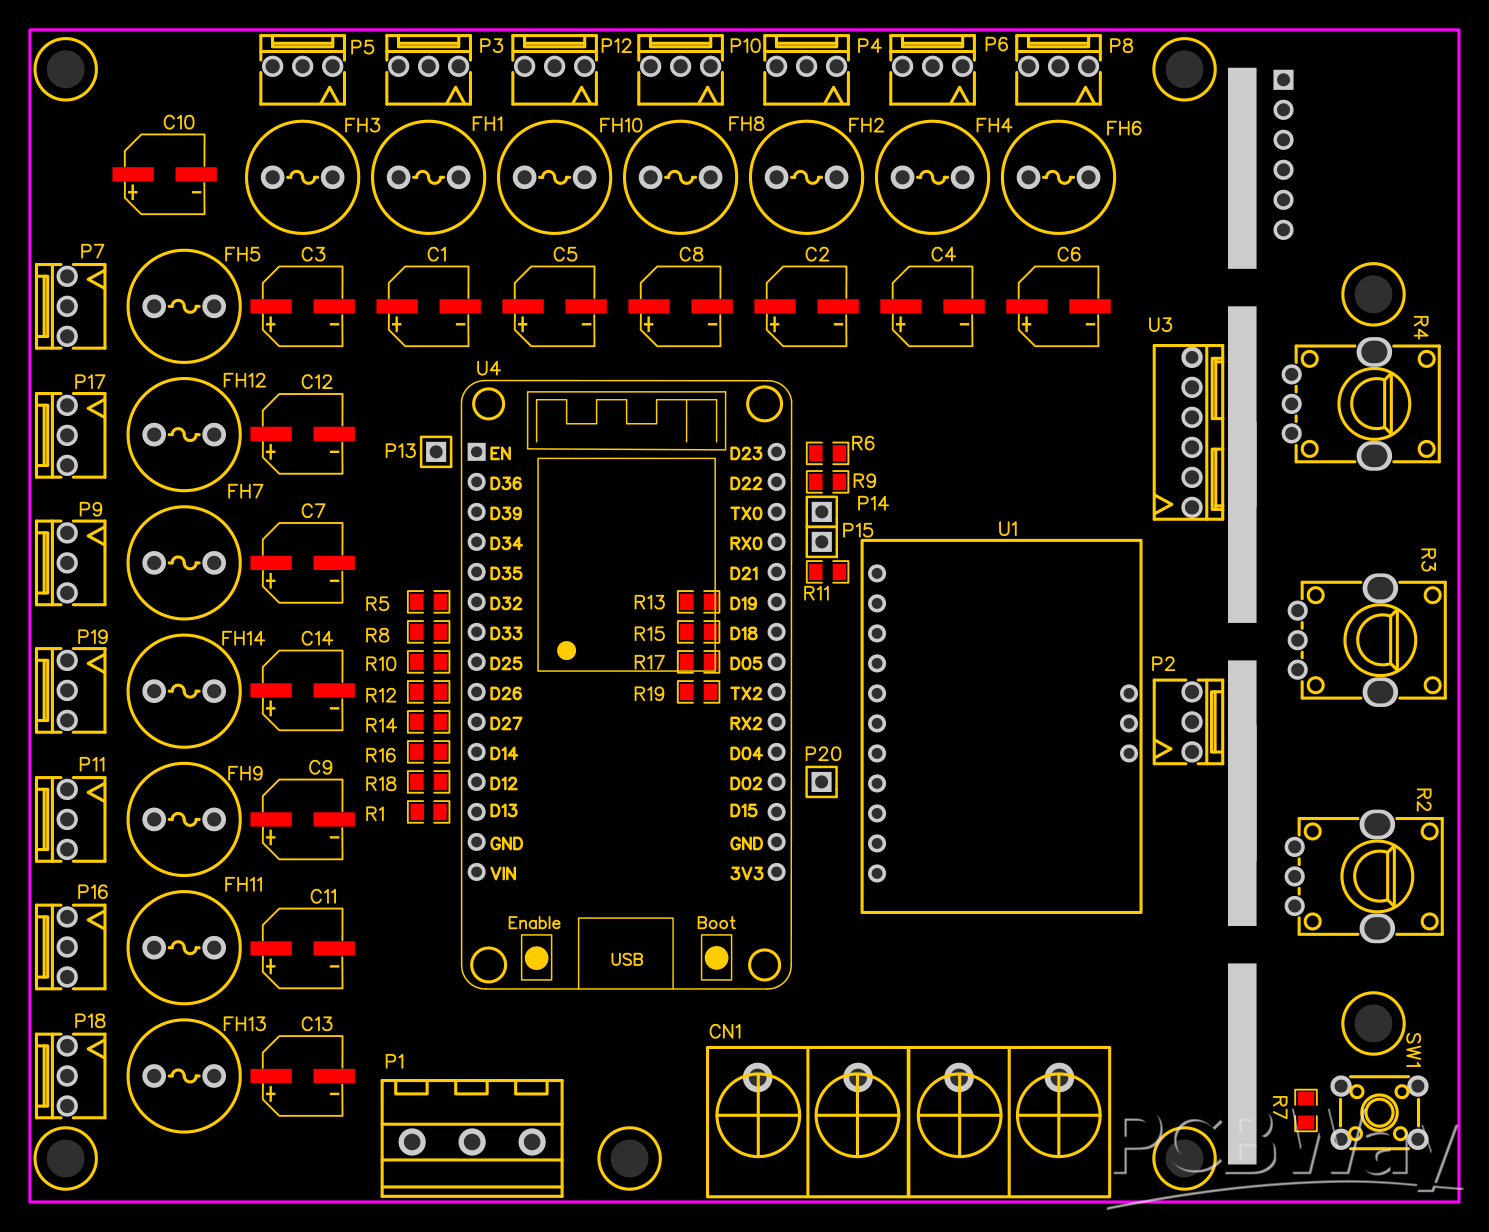
Looking at the PCB , the one thing that will get your attention is the many fuses; 14 in total! Each fuse has a value of 1At. So theoretically, this unit could draw a current of up to 14A. However, this is not the case. First of all, the coding of the EPs32 is designed to limit the maximum current that is send to each led panel. However, in case a short circuit occurs on a output, this fuse will kick in. the maximum current of each led has to stay under 1/256 A = 3.9mA.

The microcontroller connects to 14 led panels and each panel has 256 leds. This brings the total number of leds to 3584. That are a lot of leds to be driven sequentially. To safe time ( and because of a technical limitation of the leds) each panel uses it's own ESP32 Pin and software driver. Essentially, 14 panels are driven simultaniously. This method makes driving these LED panels a fast operation. Fast enough to get a refresh rate of the total led display ( 14 panels) of 120 frames per second! How amazing is that!
The hardware also included some extra options but not all are in use at the moment. Because of the complex FFT algorytm and used buffers, the interval RAM of the ESP32 is almost overflowing....Let's just say, we put it to good use :-). So as soon as I manage to finetune the code to free up more interval RAM, more functions will be added.
At the moment the pushbutton SW1 is in use the change displayed paterns while a potmeter is used to set the brightness of the panel.
Audio is connected using the onboard bluetooth interface that comes with the EPS32. Simply stream your music over bluetooth. Because we also want to listen to the music when we display it, a I2S audio board is added that can be connected to your amplified speakers.
That's the electronics in a nutshell.
Using the designed PCB
You can order the pcb and you can even include assembly service. If you don't, you will have to assemble all the components by hand.
Step 1: separate the user interface pcb from the main pcb.
When you get your hands on a pcb, the first thing you need to do is to seperate the main pcb from the user interface. You can discard any side strips that were part of the production process.
Step 2: assemble all the basic components( skip this step if you puchased the pre-assembled PCB)
The basis components you need to add in case you buy a bare pcb are listed in the attachment.
Step 3: assemble remaining components
At this point you will add the remaining components to complete the PCB.
14x fuse of 1At TR5 I used Farnell 9516131
1x ESP32 DOIT Devkit 1 I buy those at Aliexpress
1x I2s Audio board I buy those at Aliexpress make sure you have the right version as there are several. I bought CJMCU-5102 compare photo's to find the right version.
Take note that you should install the ESP32 and audio board using pin headers and sockets.
Assembling the Led Display
Choose the position of each led panel carefully
What I mean by that is that you should be aware of what wire is comming from wich panel. This is important so it will be easy to identify the positions later. If you mixed up led panel positions, the total led display will be mixed up. If this happens, it is easy to fix by simply swopping led panel connectors. However, it might be a puzzle with 14 panels.


Stitching the panels
I used a sticky spray ( glue in a spray can) to glue all the panels onto a wooden board. I finalized the edges of the board with a small wooden boards to make it look like a framed painting. The idea is to pore some epoxy substance over the displays to make it all look as a finished display. Because the panel is still in a state of development, I did not to so yet.
make sure you attach wires to each panel before you glue those down to the board. I recommend to use 3 wires for each led panel to be connected to the pcb. So that's 42 wires in total. I drilled holes in the board at the exact place that wires are attached to the led panel. That way I can always access those if needed. We will not by daisy chaining any panels so there is no need for you to connected wires to the output pins of the display.
Connecting the wires
Connecting the Led panels to the right output lines
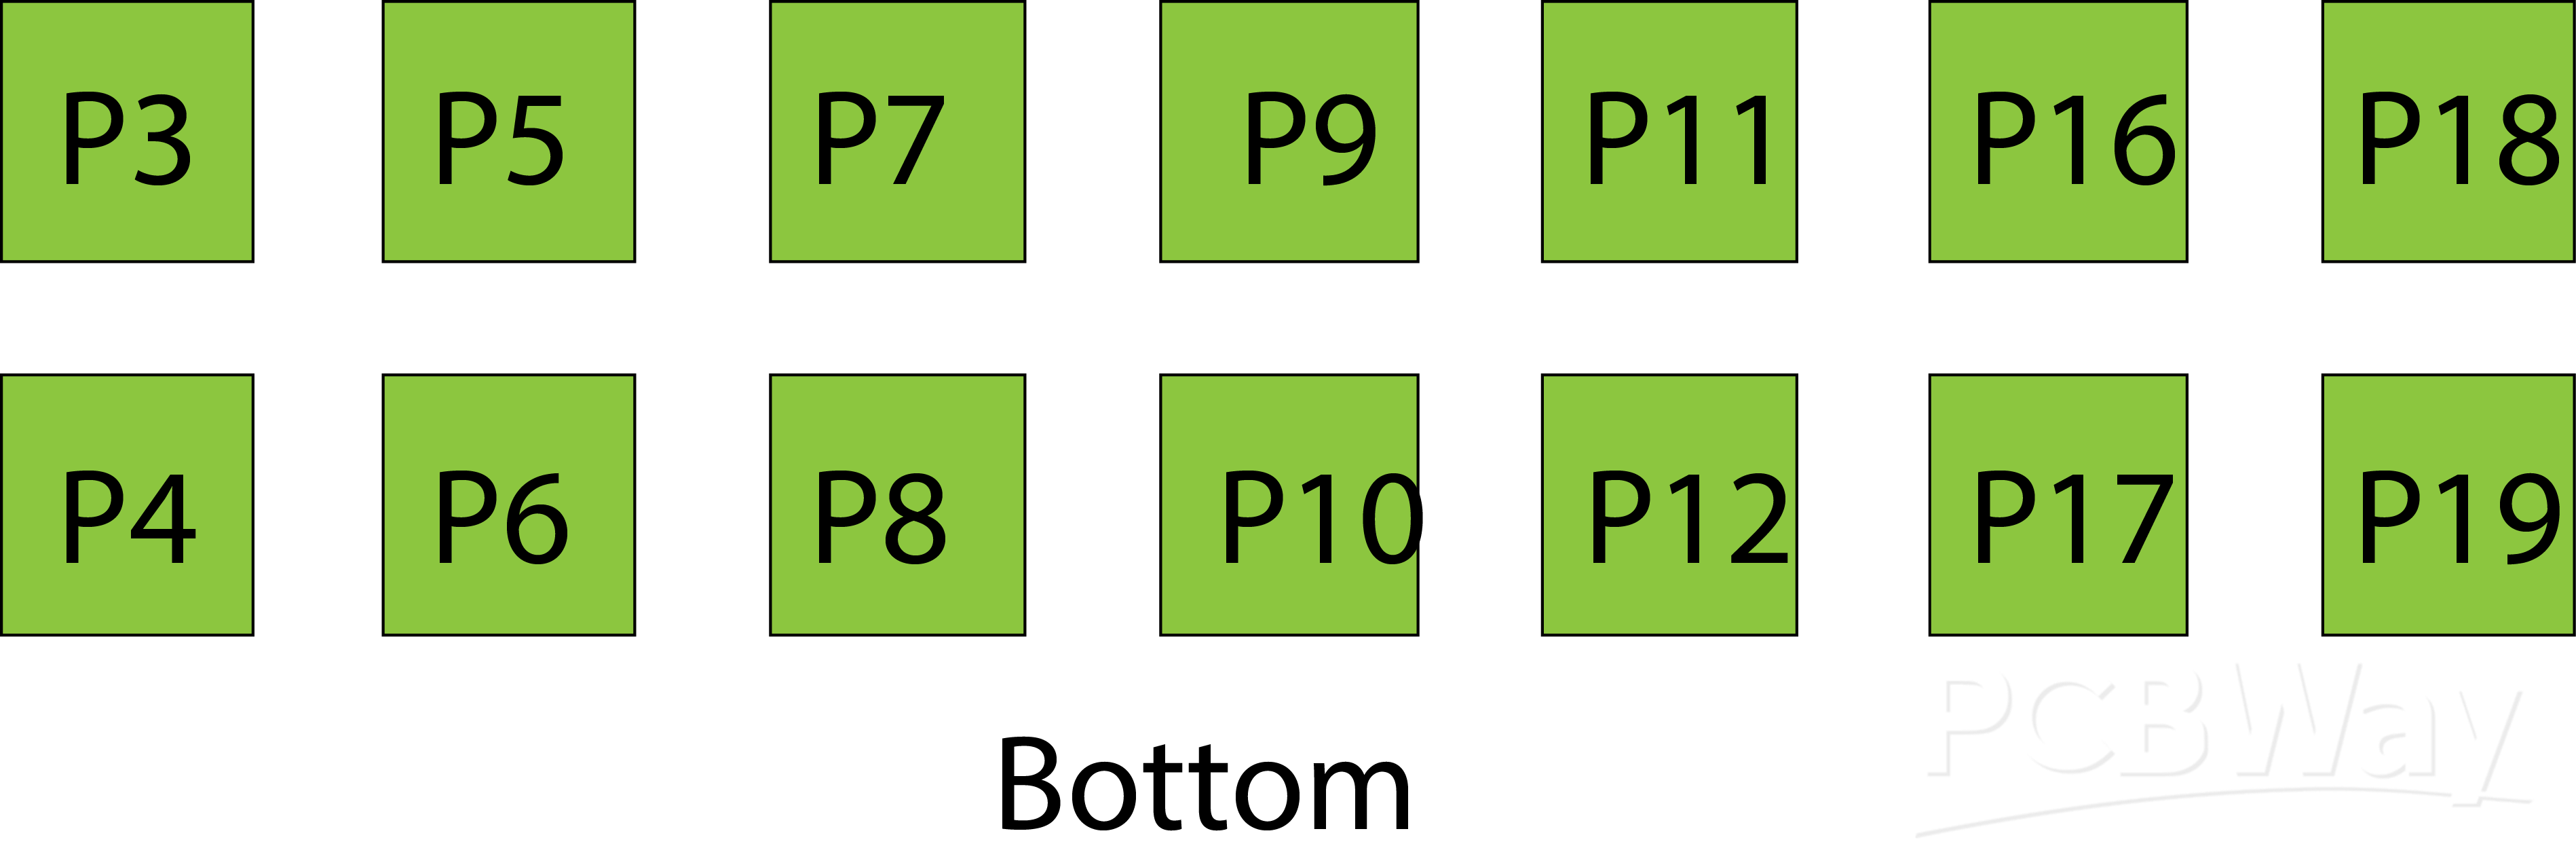
Make sure that you know which panel is where in your layout. The drawing shows a frontal view as if you are looking into the panel. The P numbers are the reference designators on the pcb. All you need to do is wire up each panel to the right connector. pay attention to the pin layout of the connectors.

- Pin 1: +5V
- Pin 2: data line
- Pin 3: Gnd
Need help to identify pin 1? --> check out the silkscreen marking on the pcb for each connector; the arrow < indicates pin 1.( it's not vissible on the assembled pcb but you can check the pcb image that is included.
The picture below shows you the position of each led panel and the connector it is connected to.

Connecting the user interface to the main pcb
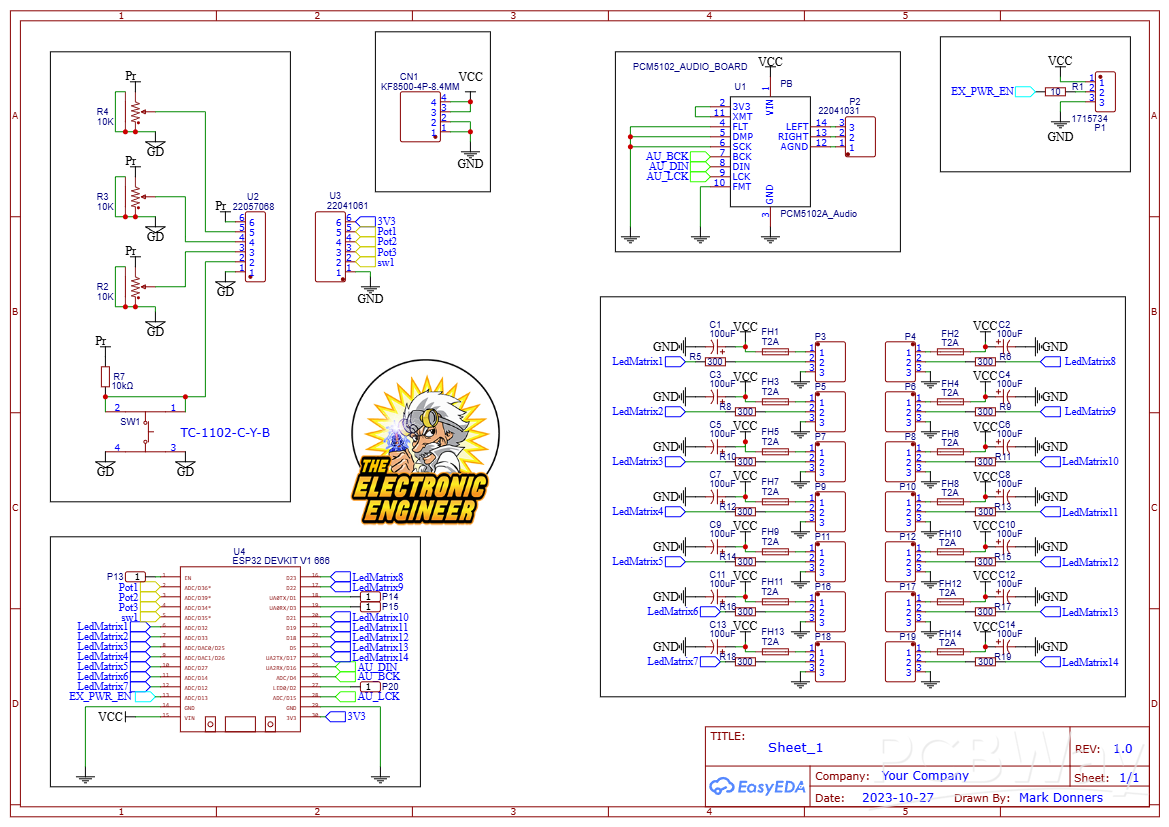
you need to connect U3 on the main PCB to U2 of the user interface. this is a 1:1 connection. Meaning that pin 1 of U2 is connected to pin 1 of U3, pin 2 to pin 2..and so on...
Connecting the power supply
Before you start hooking up your build to an USB port of a computer, you have to make sure the power supply is connected and switch on! NEVER operate this device on usb power only. With this number of leds, even the lowest brightness will quickly fry the diode on your ESP32....trust me...I have a bunch of those in a box labeled: "Fried by impatience"
So you need to hook up a 5V power supply that can handle a few amps, to your pcb before operating the thing. Connect the gnd and +5V wires of your power supply to connector CN1 of the PCB
There is an extra pin configured to act as a power enable pin. It can be found on connector P1 and it can be used if you decide to use a PC power supply that has an enable pin. Check out the schematic for details.
Preparing the Arduino IDE for Your ESP32

Using the ESP32 boards with your Arduino IDE software
Before you can compile your sketch and upload it to your ESP32 board, you need to install the ESP32 library if you haven't already.
You can do so by clicking the board manager in the menu of the software. Look for ESP32 by espressif systems and install version 1.06. Other versions might work but I didn't test!
If the ESP32 by espressif isn't listed when you search using the board manager, you need to add the following line to the Preferences from the File menu:
https://dl.espressif.com/dl/package_esp32_index.json
add it in the files for "Additional Boards Manager URLs"
Board Configuration

Setting up the correct memory mapping for your DEVKIT ESP32 board.
When you first install the ESP32 board libary, when selecting the DOIT ESP32 DEVKIT board, the memory mapping is set to default. In this default mode the onboard memory is devided into chucks. Each chunck has a purpose and a fixed size and we need to change that. If you don't, the code cannot compile because the compiler will tell you it to big because the esp doen't have enough memory.
We need to change the memory map by selecting another configuration in the menu. The way to do this depends on the version of the ESP32 library that you are using. so you have two options:
- simply select it in the menu
- If this option is not available, you need to change the board configuration file.
I will show you both possibilities.
Selecting the right board config from the menu.
In the arduino IDE menu select:
Tools-->Partition Scheme-->No OTA (Large APP)
If you select default, uppon compiling you will get an error that you there isn't enough memory.So make sure to select the No OTA option before you compile.
Changing the board configuration file
If you don't see a Partition Scheme item in the tools menu, you will have to update your boards.txt file.
Find the file in your arduino15 installation directory. Default that something like this:
C:\Users\chord\AppData\Local\Arduino15\packages\esp32\hardware\esp32\1.0.6
so it's in your AppData local directory under ARduino15 etc...
Look for boards.txt, open it and find the section for DOIT ESP32 DEVKIT V1
find the line: esp32doit-devkit-v1.menu.FlashFreq.40.build.flash_freq=40m
add the following lines and save the file:
esp32doit-devkit-v1.menu.PartitionScheme.default=Default
esp32doit-devkit-v1.menu.PartitionScheme.default.build.partitions=default
esp32doit-devkit-v1.menu.PartitionScheme.minimal=Minimal (2MB FLASH)
esp32doit-devkit-v1.menu.PartitionScheme.minimal.build.partitions=minimal
esp32doit-devkit-v1.menu.PartitionScheme.no_ota=No OTA (Large APP)
esp32doit-devkit-v1.menu.PartitionScheme.no_ota.build.partitions=no_ota
esp32doit-devkit-v1.menu.PartitionScheme.no_ota.upload.maximum_size=2097152
esp32doit-devkit-v1.menu.PartitionScheme.min_spiffs=Minimal SPIFFS (Large APPS with OTA)
esp32doit-devkit-v1.menu.PartitionScheme.min_spiffs.build.partitions=min_spiffs
esp32doit-devkit-v1.menu.PartitionScheme.min_spiffs.upload.maximum_size=1966080
esp32doit-devkit-v1.menu.PartitionScheme.fatflash=16M Fat
esp32doit-devkit-v1.menu.PartitionScheme.fatflash.build.partitions=ffat
Close the arduino IDe and reopen it before you do a new compile.
Again, make sure you select No OTA (Large APP) from the menu before you compile
Compiling and Uploading the Sketch
You can download the latest sketch here:
https://github.com/donnersm/BluetoothAnalyzer
Open the sketch if you haven't already. The sketch is ready to be compiled for a working setup simular to the one I build. If you planning to change stuff like used IO lines, you need might have to change some config parameters before you compile.
Compiling the sketch
Make sure you select the right option from the menu before compiling:
Tools-->Partition Scheme-->No OTA (Large APP) ( see previous section for more info)
Connect your ESP32 board using your USB cable and press upload.( compile and upload)
In the first release, only one potmeter has a function. The other two will be implemented at a later time.
Or Just Skip the Arduino IDE Part and Program Over USB

Ok, so you read this much already...High time for a small reward. If you are planning to make a copy of my design we can speed up some things.. No hassle with libraries, version, arduino compiling etc.
I made it easy for you as you can simply program the code into the arduino by hooking it up to your USB and by using the webbrowser.
There is however 1 condition. This only works if you are building the same hardware in regards to ESP32 pinout and usage. If you changed it or if you made modifications to the original code, this will not work for you.
Wanne try? Connect your ESP32 DOIT devkit 1 to your usb port and use Chome or Edge to visit:
donnersm.github.io/BluetoothAnalyzer/flash.html
Simply follow the online instructions and you are good to go.
Again, this will not work with firefox.
Operating the Unit

Operating this most impressive Audio Analyzer.
- Hook up a set of (amplified) speakers or simular to listen to audio.
- I used a set of amplified computer speakers to start with.
- make connection over bluetooth
- Just find and connect to the analyzer named Lightnsound
- Start playing your audio file on your device
- use the pushbutton to switch background on and off and of to change colors
- Use the potmeter to set the brightness of the panel
- If to dimm, some of the characters might disappear.
Demo
It's time for a demo. Here are some photo's and a video of the result


Fast Audio Spectrum Analyzer
*PCBWay community is a sharing platform. We are not responsible for any design issues and parameter issues (board thickness, surface finish, etc.) you choose.

Raspberry Pi 5 7 Inch Touch Screen IPS 1024x600 HD LCD HDMI-compatible Display for RPI 4B 3B+ OPI 5 AIDA64 PC Secondary Screen(Without Speaker)
BUY NOW
ESP32-S3 4.3inch Capacitive Touch Display Development Board, 800×480, 5-point Touch, 32-bit LX7 Dual-core Processor
BUY NOW
Raspberry Pi 5 7 Inch Touch Screen IPS 1024x600 HD LCD HDMI-compatible Display for RPI 4B 3B+ OPI 5 AIDA64 PC Secondary Screen(Without Speaker)
BUY NOW- Comments(0)
- Likes(2)
 Log in to post comments.
-
 Anthony Pedotto
Feb 22,2025
-
 Mark Donners
Oct 11,2024
- 0 USER VOTES
- YOUR VOTE 0.00 0.00
- 1
- 2
- 3
- 4
- 5
- 6
- 7
- 8
- 9
- 10
- 1
- 2
- 3
- 4
- 5
- 6
- 7
- 8
- 9
- 10
- 1
- 2
- 3
- 4
- 5
- 6
- 7
- 8
- 9
- 10
- 1
- 2
- 3
- 4
- 5
- 6
- 7
- 8
- 9
- 10
 More by Mark Donners
-
 Twin display pixelled Audio Analyzer
IntroductionThis Spectrum Analyzer project is nothing other than amazing. It includes a Teensy micro...
-
 SPECTRUM ANALYZER WITH STEAMPUNK NIXIE LOOK
This is my version of a NIXIE tube lookalike Spectrum AnalyzerI created my own tubes using testtubes...
-
 Gerber_PCB_BatDetector
This is the PCB that goes with a video that will be published on the element 14 presents community
-
 Talking CR Timer
The StoryImagine working at the office from nine to five punching numbers in a computer the whole da...
-
 Stereo Flyback Driver
This is my design of a stereo flyback driver. (ZVS) You can drive 2 flyback transformers to create a...
-
 Russian Slayer Exciter PCB
This is my take on the Russian Slayer Exciter. The slayer exciter is an easy to build Tesla coil. A ...
-
 Fast Audio Spectrum Analyzer
This design is nothing if not amazing! Imagine 3500 Colored LEDS dancing around to the music at a ve...
-
 Classic Analog Spectrum Analyzer for Your Desktop
This is a spectrum analyzer that visualizes 10 audio frequency bands. Although it might look like ju...
-
 Pico-Voice_PCB_Pico-Voice_2024-11-14
This is my pcb design for the Pico Voice changer. Software was written by Mike Cook and is open sour...
-
 Gerber_Logo_PCB_Logo_2024-05-15
This is a youtube subscriber counter with audio playback and it has a dot matric spectrum analyzer w...
-
 Twin display pixelled Audio Analyzer
IntroductionThis Spectrum Analyzer project is nothing other than amazing. It includes a Teensy micro...
-
 SPECTRUM ANALYZER WITH STEAMPUNK NIXIE LOOK
This is my version of a NIXIE tube lookalike Spectrum AnalyzerI created my own tubes using testtubes...
-
 Gerber_PCB_BatDetector
This is the PCB that goes with a video that will be published on the element 14 presents community
-
 Talking CR Timer
The StoryImagine working at the office from nine to five punching numbers in a computer the whole da...
-
 Stereo Flyback Driver
This is my design of a stereo flyback driver. (ZVS) You can drive 2 flyback transformers to create a...
-
 Russian Slayer Exciter PCB
This is my take on the Russian Slayer Exciter. The slayer exciter is an easy to build Tesla coil. A ...
-
 Fast Audio Spectrum Analyzer
This design is nothing if not amazing! Imagine 3500 Colored LEDS dancing around to the music at a ve...
-
 Classic Analog Spectrum Analyzer for Your Desktop
This is a spectrum analyzer that visualizes 10 audio frequency bands. Although it might look like ju...
-
 Pico-Voice_PCB_Pico-Voice_2024-11-14
This is my pcb design for the Pico Voice changer. Software was written by Mike Cook and is open sour...
-
 Gerber_Logo_PCB_Logo_2024-05-15
This is a youtube subscriber counter with audio playback and it has a dot matric spectrum analyzer w...
-
 Twin display pixelled Audio Analyzer
IntroductionThis Spectrum Analyzer project is nothing other than amazing. It includes a Teensy micro...
-
 SPECTRUM ANALYZER WITH STEAMPUNK NIXIE LOOK
This is my version of a NIXIE tube lookalike Spectrum AnalyzerI created my own tubes using testtubes...
-
-
Commodore 64 1541-II 1581 Floppy Disk Drive C64 Power Supply Unit USB-C 5V 12V DIN connector 5.25
167 1 3 -
Easy to print simple stacking organizer with drawers
87 0 0 -
-
-
-
Modifying a Hotplate to a Reflow Solder Station
1137 1 6 -
MPL3115A2 Barometric Pressure, Altitude, and Temperature Sensor
639 0 1 -
-
Nintendo 64DD Replacement Shell
495 0 2 -
V2 Commodore AMIGA USB-C Power Sink Delivery High Efficiency Supply Triple Output 5V ±12V OLED display ATARI compatible shark 100W
1442 4 3


