|
EagleAutodesk
|
Raspberry Pi Pico Radio
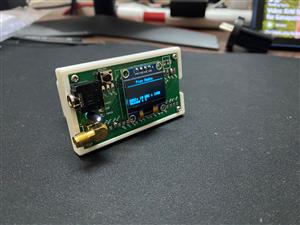
Pico radio is a simple raspberry pi pico based FM receiver that uses rda5807m to tune to FM channels. One can listen to these FM channels by attaching an FM antenna in the SMA connector and a 3.5 mm headphone in the audio jack.
Hardware build:
The hardware is very simple and easy to use. It consists of the following components:
- an OLED display for showing radiofrequency and FM channel info.
- a tack switch or push-button for changing channels.
- a LED for indicating signal strength.
You need to surface mount the Pico onto the PCB.
The project can run on USB power itself if you connect the raspberry pi pico to either a computer or a power bank. But for portability one can attach a 3.3v LiPo battery to the ground and VSYS pin of raspberry pi pico along with the LiPo battery charger and an on/off switch.
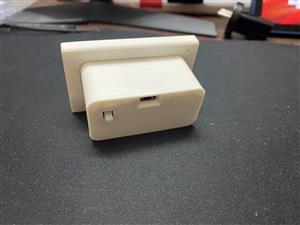
If you own a 3D printer, then you can also 3D print the case for this radio and make it portable and handy. The 3D print files are available here.
Software Code:
If you don't want to get into the hassle of understanding the code for the build, you can directly download the .uf2 file from here.
The project is actually a modified version of the example mentioned on pico_rda5807 library.
Additionally, I have included the support for OLED Display (Using pi-pico-ss-oled library), LED, and Button Input.
Project Controls:
OLED will display basic info such as Tuned Frequency, Station Info, and Signal Strength.
For changing stations, one can press and release the tact button quickly to loop through all the available stations.
For increasing the volume, one can hold the same button and volume will loop from 0-15 and then back to 0.
Additionally one can get access to full features of rda5807 as mentioned in pico_rda5807 library by accessing the serial console.
USB Implementations:
I have also connected the Left Speaker output to GPIO26 (ADC Pin) and Right Speaker output to GPIO27 (ADC Pin) of Raspberry Pi Pico which will allow usera to use Raspberry pi Pico as a microphone input to any PC or a Laptop. So on connecting the Pico radio to a laptop or a desktop, one can listen or record radio broadcasts using recording software such as Audacity or Windows default recorder.
Raspberry Pi Pico Radio
*PCBWay community is a sharing platform. We are not responsible for any design issues and parameter issues (board thickness, surface finish, etc.) you choose.

Raspberry Pi 5 7 Inch Touch Screen IPS 1024x600 HD LCD HDMI-compatible Display for RPI 4B 3B+ OPI 5 AIDA64 PC Secondary Screen(Without Speaker)
BUY NOW
ESP32-S3 4.3inch Capacitive Touch Display Development Board, 800×480, 5-point Touch, 32-bit LX7 Dual-core Processor
BUY NOW
Raspberry Pi 5 7 Inch Touch Screen IPS 1024x600 HD LCD HDMI-compatible Display for RPI 4B 3B+ OPI 5 AIDA64 PC Secondary Screen(Without Speaker)
BUY NOW- Comments(0)
- Likes(9)
 Log in to post comments.
-
 Engineer
Oct 03,2024
-
 Engineer
Oct 01,2024
-
 Rudy Panigas
Jun 23,2024
-
 zoltan.topa
Mar 27,2024
-
 Engineer
Jan 21,2023
-
 myjo12
Sep 17,2022
-
 Engineer
Jul 10,2022
-
 Jo Jonas
Feb 28,2022
-
 Duncan Hames
Nov 24,2021
- 1 USER VOTES
- YOUR VOTE 0.00 0.00
- 1
- 2
- 3
- 4
- 5
- 6
- 7
- 8
- 9
- 10
- 1
- 2
- 3
- 4
- 5
- 6
- 7
- 8
- 9
- 10
- 1
- 2
- 3
- 4
- 5
- 6
- 7
- 8
- 9
- 10
- 1
- 2
- 3
- 4
- 5
- 6
- 7
- 8
- 9
- 10

-
8design
-
9usability
-
7creativity
-
6content
 More by Aviral Verma
-
 Helical Antenna for GOES/GK-2A weather satellite reception.
General Theory:Usually when someone thinks about satellite communication first thing that comes to m...
-
 Raspberry Pi Pico Gamepad
Raspberry Pi Pico-based programmable gamepad.Steps to create:1. PCB Designing a. Download the source...
-
 Project Voyager
This board combines an ESP32 microcontroller with an RA-01 LoRa module. It serves as an alternative ...
-
 Nokia 5110 hat for Raspberry Pi
The Raspberry Pi Clock Hat is a versatile accessory that transforms your Raspberry Pi into a powerfu...
-
 Raspberry Pi Pico Radio
Pico radio is a simple raspberry pi pico based FM receiver that uses rda5807m to tune to FM channels...
-
 IoT Connect
 is an open-source IoT platform built on top of esp8266, which allow users to connect an...
IoT Connect
IoT Connect is an open-source IoT platform built on top of esp8266, which allow users to connect an...
-
-
-
Modifying a Hotplate to a Reflow Solder Station
934 1 5 -
MPL3115A2 Barometric Pressure, Altitude, and Temperature Sensor
474 0 1 -
-
Nintendo 64DD Replacement Shell
406 0 2 -
V2 Commodore AMIGA USB-C Power Sink Delivery High Efficiency Supply Triple Output 5V ±12V OLED display ATARI compatible shark 100W
1178 4 2 -
How to measure weight with Load Cell and HX711
725 0 3


