|
Raspberry Pi 3 B+ |
x 1 | |
|
|
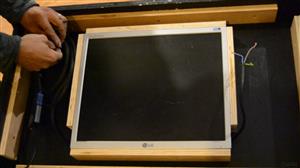
LG Flatron Lcd17 Pol. L1752s-sfLG
|
x 1 | |
|
|
Rotary Switch - 1 Pole, n Positions |
x 1 | |
|
|
Huge Fresnel Len from Retroprojector |
x 1 |

|
Inkscape |
|
|
|
Vegas Movie Studio 17 - Steam VersionVegas Creative Software
|
|

|
GIMP |
|
|
|
HandbrakeThe Handbrake Team
|
|

|
Python |
|
|
|
Shell ScriptLinux Team
|
|

|
Raspbian OSRaspberry Pi
|
|
|
|
Youtube-dl |
Recreating an 80s TV with Raspberry Pi
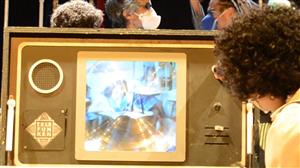
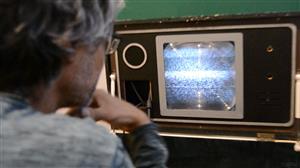
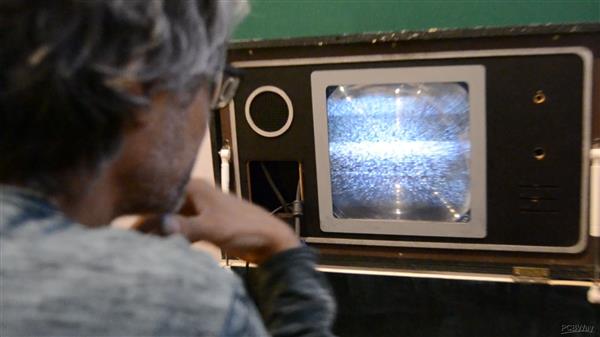
Recently I built a series of special effects for the scenography of the play "Strange House" by Leonardo Cortez. The set design was composed of several white boxes, all identical, as if the family were moving to a new house. On the lid of one of these boxes, built like a chest, was a TV from the 80's, with manual channel selector, made with rotary selector switch. Here I share how I solved this challenge.
For this tutorial, I'm guessing you already know how to install Raspberry Pi OS and how to program it in Python. But if you don't know, I recommend the step by step on the Raspberry Pi OS website itself - https://www.raspberrypi.org/software/
I'll divide this tutorial into steps to make it easier to understand. First, I eliminated the rainbow screen, the default splash screen, all system startup messages, redirecting them to another console (tty3). For this, I followed the instructions of this link: https://scribles.net/customizing-boot-up-screen-on-raspberry-pi/
Which are basically these:
Remove any sign that you are in a computer system
Remove Rainbow Screen:
Open “/boot/config.txt” as root.
sudo nano /boot/config.txt
Then add below line at the end of the file.
disable_splash=1
Remove text message under splash image:
Open “/usr/share/plymouth/themes/pix/pix.script” as root.
sudo nano /usr/share/plymouth/themes/pix/pix.script
Then, remove (or comment out) four lines below:
message_sprite = Sprite();
message_sprite.SetPosition(screen_width * 0.1, screen_height * 0.9, 10000);
       my_image = Image.Text(text, 1, 1, 1);
       message_sprite.SetImage(my_image);
Note : This is a quick and dirty method I found. It works, but there might be better way.
Remove Boot Messages
Open “/boot/cmdline.txt” as root.
sudo nano /boot/cmdline.txt
Then, replace “console=tty1” with “console=tty3”. This redirects boot messages to tty3.
Remove other things
Still in “/boot/cmdline.txt”, add below at the end of the line
splash quiet plymouth.ignore-serial-consoles logo.nologo vt.global_cursor_default=0
Here are brief explanations.
‘splash’ : enables splash image
‘quiet’ : disable boot message texts
‘plymouth.ignore-serial-consoles’ : not sure about this but seems it’s required when use Plymouth.
‘logo.nologo’ : removes Raspberry Pi logo in top left corner.
‘vt.global_cursor_default=0’ : removes blinking cursor.
Note : The first three should be there by default, but make sure if those exist.
Creating the illusion that you're really in front of an old television
I searched on Youtube and found some videos with the boot sequence of an old TV with CRT tube. The example I used was this one: https://www.youtube.com/watch?v=V-nbvAnq65I
I downloaded the video using the excellent Youtube-dl tool
youtube-dl https://www.youtube.com/watch?v=V-nbvAnq65I
So I cut the end of the video, in the part where the TV is turned off, using Vegas Movie Studio edit tool in my Windows Computer.
I rendered the new video and saved as boot.mp4 in folder /home/pi in my Raspberry Pi SD Card.
So I created a new file as root:
sudo nano /etc/systemd/system/splash.service
I've used the following service file definition to kick off a slide show display early in the boot process with debian:
[Unit]
Description=Splash screen
DefaultDependencies=no
After=local-fs.target

[Service]
ExecStart=/usr/bin/omxplayer -b /home/pi/boot.mp4
StandardInput=tty
StandardOutput=tty

[Install]
WantedBy=sysinit.target
Following this instructions: https://raspberrypi.stackexchange.com/questions/48084/custom-splash-screen-video
Using the rotary selector switch to choose channels
The trick of this project is precisely this: use a rotary selector key to make the selection of different videos. The switch I used in the design had two poles and four positions. Any rotary key of #poles and # positions should serve. We will use only 1 pole and connect this pole to any GND pin on the Raspberry Pi.
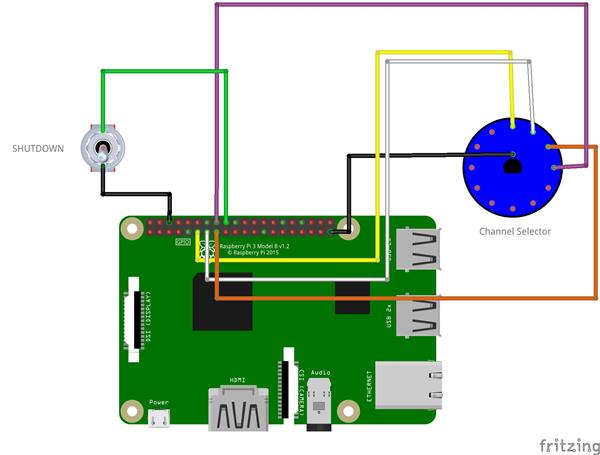
Then, I use this Python Script:
#!/usr/bin/env python
import RPi.GPIO as GPIO
import sys
import os

from subprocess import Popen
GPIO.setmode (GPIO.BCM)

GPIO.setup(17, GPIO.IN, pull_up_down=GPIO.PUD_UP)
GPIO.setup(27, GPIO.IN, pull_up_down=GPIO.PUD_UP)
GPIO.setup(22, GPIO.IN, pull_up_down=GPIO.PUD_UP)
GPIO.setup(23, GPIO.IN, pull_up_down=GPIO.PUD_UP)
GPIO.setup(24, GPIO.IN, pull_up_down=GPIO.PUD_UP)

movie1 = ("/home/pi/Videos/Movie1.mp4")
movie2 = ("/home/pi/Videos/Movie2.mp4")
movie3 = ("/home/pi/Videos/Movie3.mp4")
movie4 = ("/home/pi/Videos/Movie4.mp4")

last_state1 = True
last_state2 = True
last_state3 = True
last_state4 = True

input_state1 = True
input_state2 = True
input_state3 = True
input_state4 = True

args = '-b --aspect-mode fill --win "0,0,1279,1023"'

quit_video = True
player = False

while True:
    #Read states of inputs
    input_state1 = GPIO.input(17)
    input_state2 = GPIO.input(27)
    input_state3 = GPIO.input(22)
    input_state4 = GPIO.input(23)

    quite_video = GPIO.input(24) # shutdown system

    #If GPIO(17) is shorted to ground
    if input_state1 != last_state1:
        if (player and not input_state1):
            os.system('killall omxplayer.bin')
            omxc = Popen(['omxplayer', args, movie1])
            player = True
        elif not input_state1:
            omxc = Popen(['omxplayer', args, movie1])
            player = True

    #If GPIO(27) is shorted to ground
    elif input_state2 != last_state2:
        if (player and not input_state2):
            os.system('killall omxplayer.bin')
            omxc = Popen(['omxplayer', args, movie2])
            player = True
        elif not input_state2:
            omxc = Popen(['omxplayer', args, movie2])
            player = True

    #If GPIO(22) is shorted to ground
    elif input_state3 != last_state3:
        if (player and not input_state3):
            os.system('killall omxplayer.bin')
            omxc = Popen(['omxplayer', args, movie3])
            player = True
        elif not input_state3:
            omxc = Popen(['omxplayer', args, movie3])
            player = True

    #If GPIO(23) is shorted to ground
    elif input_state4 != last_state4:
        if (player and not input_state4):
            os.system('killall omxplayer.bin')
            omxc = Popen(['omxplayer', args, movie4])
            player = True
        elif not input_state4:
            omxc = Popen(['omxplayer', args, movie4])
            player = True


    #If omxplayer is running and GPIO(17) and GPIO(18) are NOT shorted to ground
    elif (player and input_state1 and input_state2 and input_state3 and input_state4):
        os.system('killall omxplayer.bin')
        player = False

    #GPIO(24) to close omxplayer manually - used during debug
    if quit_video == False:
        os.system('killall omxplayer.bin')
        os.system('poweroff')
        player = False

    #Set last_input states
    last_state1 = input_state1
    last_state2 = input_state2
    last_state3 = input_state3
    last_state4 = input_state4
Saving the file as televisao.py in /home/pi/
Saving and converting videos
All videos have been resized to 1280 x 1024 resolution because the monitor used is at 5:4 aspect ratio (it's an old 17-inch monitor from LG). This was the most efficient solution because, for some reason, I couldn't get omxplayer to resize the videos correctly and the display was left with undesirable black bars.
All videos must be saved in the same folder as they were specified in the file televisao.py (in my case /home/pi/Videos). If you want, you can save the file boot.mp4 in same folder. Just remember to change the file location in /etc/systemd/system/splash.service.
Executing televisao.py at boot
Just as we created the service to display the video on boot, we'll create a service to run the python script.
I just follow this: https://learn.sparkfun.com/tutorials/how-to-run-a-raspberry-pi-program-on-startup#method-3-systemd
sudo systemctl --force --full edit televisao.service
And then, we write this:
[Unit]
Description=Show Retro Television
After=multi-user.target

[Service]
ExecStart=/usr/bin/python3 /home/pi/televisao.py

[Install]
WantedBy=multi-user.target
Enable and monitor the service with:
sudo systemctl enable --now televisao.service
systemctl status televisao.service
Reboot and see the magic happens!!!
Aesthetics
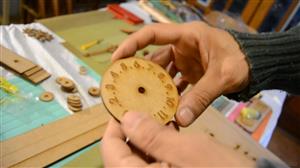
To give the illusion of an old TV, I created several layers in MDF and laser cutting, using Inkscape, with the exact measurements of the fresnel lens that I found in my scraps. The selector switch received a dial with VHF channels recorded in low relief. In the rehearsal video of the play we do not see this dial, because it was under maintenance. But in the final version, he was there. The system shutdown button went disguised as the brightness adjustment of the TV. All elements were painted with variations of black, silver and brown, to match the televisions of the 80s.
As soon as the video of the play is available I will share the link here. My wife and I produced several videos with making-off of the various objects of the piece and probably the ones in English to facilitate the understanding of non-Brazilians.
Recreating an 80s TV with Raspberry Pi

Raspberry Pi 5 7 Inch Touch Screen IPS 1024x600 HD LCD HDMI-compatible Display for RPI 4B 3B+ OPI 5 AIDA64 PC Secondary Screen(Without Speaker)
BUY NOW
ESP32-S3 4.3inch Capacitive Touch Display Development Board, 800×480, 5-point Touch, 32-bit LX7 Dual-core Processor
BUY NOW
Raspberry Pi 5 7 Inch Touch Screen IPS 1024x600 HD LCD HDMI-compatible Display for RPI 4B 3B+ OPI 5 AIDA64 PC Secondary Screen(Without Speaker)
BUY NOW- Comments(0)
- Likes(3)
 Log in to post comments.
-
 Rudy Panigas
Jun 23,2024
-
 papernov
Aug 02,2021
-
 (DIY) C64iSTANBUL
Jul 22,2021
- 0 USER VOTES
- YOUR VOTE 0.00 0.00
- 1
- 2
- 3
- 4
- 5
- 6
- 7
- 8
- 9
- 10
- 1
- 2
- 3
- 4
- 5
- 6
- 7
- 8
- 9
- 10
- 1
- 2
- 3
- 4
- 5
- 6
- 7
- 8
- 9
- 10
- 1
- 2
- 3
- 4
- 5
- 6
- 7
- 8
- 9
- 10
 More by nicolaudosbrinquedos
-
 Alastor Moody Eye using Raspberry Pi Pico, CircuitPython and Round Display GC9A01
I am developing a series of objects for a children's play about fear and terror. And then I got insp...
-
 The Crazy Pots Game
At some point on the internet I came across someone who had made a game like that, but unfortunately...
-
 Arduino Mastermind Game
I created this little game as a hobby for my children during the Covid-19 quarantine. I had already ...
-
 Raspberry Pi Pico With I2C Oled Display and CircuitPython
This is my first experience using this little board from Raspberry Pi Foundation.I preferred to inst...
-
 Raspberry Pi Pico and TFT ILI9341 with Circuit Python
I decided to write another tutorial on the Raspberry Pi Pico, mainly because the card is very recent...
-
 Arduino Minesweeeper
It was then that I found the works of Rachit Belwariar, on the page https://www.geeksforgeeks.org/cp...
-
 Homeassistant in Beaglebone Black With Debian 11
Intro: The primary objective of my project was to give some use to the Beaglebone Black that has bee...
-
 The Adventures of Porting Circuitpython to Wio RP2040
I have been developing some electronic props solutions for Escape Rooms. And periodically I usually ...
-
 Simple Electronics to Escape Room Owners - Using a bunch of voltmeters with PCA9685
This is a preliminary study for an Escape Room game. My main goal was to add as many analog displays...
-
 Simple Electronics to Escape Room Owners - First Chapter
I've been developing puzzles and artifacts for Escape Room since 2018 and most of the time, I've bee...
-
 Finally! Animated Eyes using Seed Xiao RP2040
This is another advance in my studies to enable a more economically viable version for the Monster M...
-
 Circuitpython on Seeed XIAO RP2040
Step 1: Unboxing... I2C Not Working?As soon as the card arrived, I installed the firmware version fo...
-
 Raspberry Pi Pico with GC9A01 Round Display using Arduino IDE and TFT-eSPI Library
This is a work in progress for another one of the artifacts I used in Leonardo Cortez's "Strange Hou...
-
 Recreating an 80s TV with Raspberry Pi
Recently I built a series of special effects for the scenography of the play "Strange House" by Leon...
-
 Talk to Me
This project is part of an extensive research on the use of animatronics and interactive objects tha...
-
 Back in time! Make a Zoetrope using Arduino
I'm working on a series of animated objects for a children's play and decided to build a Zoetrope, t...
-
 Alastor Moody Eye using Raspberry Pi Pico, CircuitPython and Round Display GC9A01
I am developing a series of objects for a children's play about fear and terror. And then I got insp...
-
 The Crazy Pots Game
At some point on the internet I came across someone who had made a game like that, but unfortunately...
-
 Arduino Mastermind Game
I created this little game as a hobby for my children during the Covid-19 quarantine. I had already ...
-
 Raspberry Pi Pico With I2C Oled Display and CircuitPython
This is my first experience using this little board from Raspberry Pi Foundation.I preferred to inst...
-
 Raspberry Pi Pico and TFT ILI9341 with Circuit Python
I decided to write another tutorial on the Raspberry Pi Pico, mainly because the card is very recent...
-
 Arduino Minesweeeper
It was then that I found the works of Rachit Belwariar, on the page https://www.geeksforgeeks.org/cp...
-
 Homeassistant in Beaglebone Black With Debian 11
Intro: The primary objective of my project was to give some use to the Beaglebone Black that has bee...
-
 The Adventures of Porting Circuitpython to Wio RP2040
I have been developing some electronic props solutions for Escape Rooms. And periodically I usually ...
-
 Simple Electronics to Escape Room Owners - Using a bunch of voltmeters with PCA9685
This is a preliminary study for an Escape Room game. My main goal was to add as many analog displays...
-
 Simple Electronics to Escape Room Owners - First Chapter
I've been developing puzzles and artifacts for Escape Room since 2018 and most of the time, I've bee...
-
 Finally! Animated Eyes using Seed Xiao RP2040
This is another advance in my studies to enable a more economically viable version for the Monster M...
-
 Circuitpython on Seeed XIAO RP2040
Step 1: Unboxing... I2C Not Working?As soon as the card arrived, I installed the firmware version fo...
-
Commodore 64 1541-II Floppy Disk Drive C64 Power Supply Unit USB-C 5V 12V DIN connector 5.25
152 1 2 -
Easy to print simple stacking organizer with drawers
83 0 0 -
-
-
-
Modifying a Hotplate to a Reflow Solder Station
1127 1 6 -
MPL3115A2 Barometric Pressure, Altitude, and Temperature Sensor
634 0 1 -
-
Nintendo 64DD Replacement Shell
489 0 2 -
V2 Commodore AMIGA USB-C Power Sink Delivery High Efficiency Supply Triple Output 5V ±12V OLED display ATARI compatible shark 100W
1428 4 3


