
|
J105D1AS5VDC.45CIT Relay and Switch
|
x 1 | |

|
Arduino Nano IoT 33Arduino
|
x 1 | |

|
GW PLLRA1.CM-M7N2-XX53-1-700-R18OSRAM Opto Semiconductors Inc.
|
x 1 | |

|
EP3WS1K0JTE Connectivity Passive Product
|
x 1 |

|
arduino IDEArduino
|
Voice Controlled Door Lock using Alexa and Arduino
Voice Controlled Door Lock: An Overview
Hey, everyone! Welcome back. In this video, we'll make an Alexa-controlled door locking system that lets us lock and unlock a door with our voices. This lock is easy to design, make, install, and use. Not only do they make your home safer and more convenient, but they also make it easier to install and use locks in general.
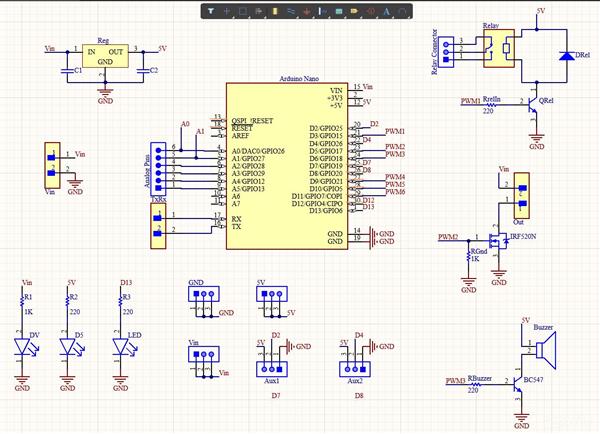
Let's get started! So let's begin with the circuit! I drew the circuit and made the PCB with the help of the Altium designer. Here we are in Altium designer. Here, I'll be using a Solenoid door lock that works on 12 V, so I'll connect a 12 V DC adapter. A 7805 regulator is linked to the power source. The 7805 is a 5V regulator that can turn a 7-32V input voltage into a steady 5V DC supply. There are LEDs at different places to help you figure out what's wrong.
Alexa Door Lock Circuit
There are two switches here. One is a Relay that is turned on by a transistor BC547, whose base is connected to Digital Pin 3, and then there is a MOSFET that is connected to digital pin 5 of the Arduino. Here, you should also see a buzzer that this transistor turns on and off. The digital pin 6 of the Arduino is linked to this transistor.
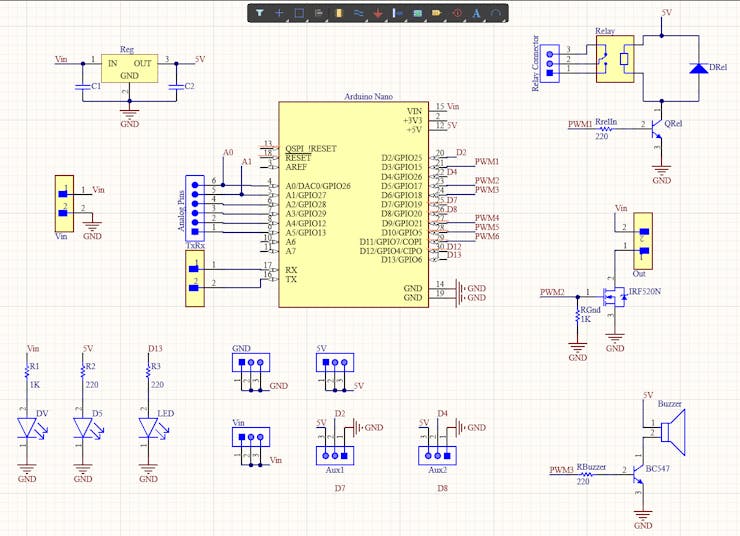
You can connect the lock to either the MOSFET or the Relay, both of which can be programmed to turn on and off. I decide to connect the Lock to the MOSFET so that I can use the relay to connect something else, like a light bulb. You can connect extra things, like a lamp or a motor, to the other switch to open the door, like a motor or a lamp.
This is just my idea. As I said before, I'll put the plans in the description so you can redesign the whole thing, change it, and then make your own version. Or you can make it like my version. Before you do anything else, you should try it out on a breadboard. Once you have the output, you can either use it as is or use it to make your PCB.
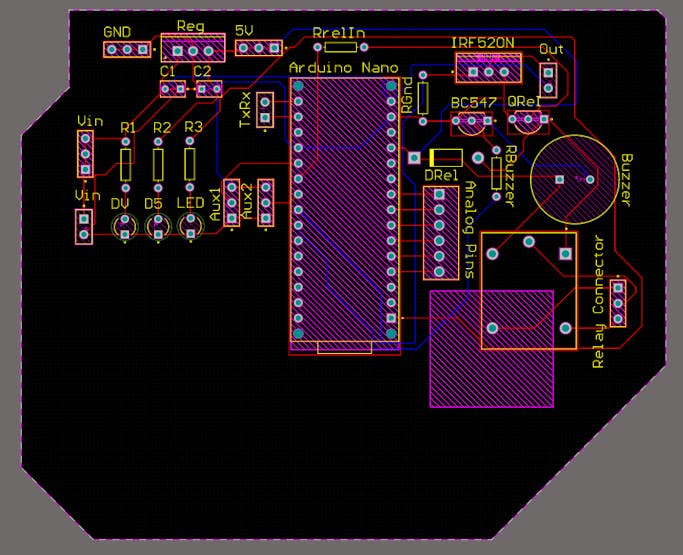
I made the decision to go with the PCB. I made a PCB layout where you can easily mount your Arduino Nano RP 2040, relays, MOSFETs, and other components. This way, you don't have to use wires and cables that are all over the place. And making your own PCBs for your project is cool, right? The board is small and easy to carry. Depending on the Solenoid Lock voltage, it can be powered by a 9V battery or a 9–12 V power adapter.
Getting the PCBs Done
I ordered PCB from PCBWay. PCBWay is a PCB manufacturer specializing in PCB prototyping, low-volume production, and neat and tidy PCB assembly. If you are interested in making your own PCBs for your project, check out the link below. You can get a 5-dollar discount when you sign up using the link below and get an additional 5-dollar discount at the checkout by providing the coupon code PCBWayLab.

To order your PCB from PCBWay, go to the PCBWay website and fill in the basic board details in the instant order form. From there you will be directed to a form where you can provide more elaborate board details. Update your board information in the PCB specification screen. On the next screen, you should be able to upload your Gerber file and submit it for review. Once the review is completed, all that is left is to add to the cart, make payment, and wait for your PCBs to arrive.
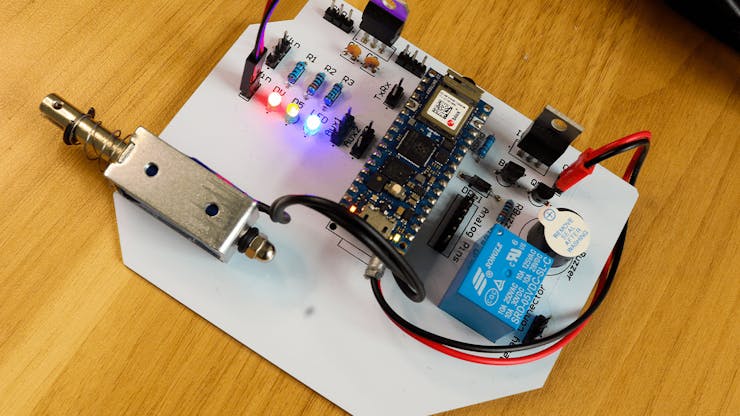
Once you get all the components and the PCB, it’s time for you to solder them together. Solder all the components onto the board and make sure to check the polarity of the components. After soldering the PCB looks like this.
Using the Arduino Cloud to program a door lock
Let's talk about the software now. Here, I'll use Arduino IoT Cloud to write code for the board. Here, we've made a new project or "thing" for our voice door lock and made a switching variable that works with Alexa devices. Then, an Arduino Nano RP2040 Board was added.
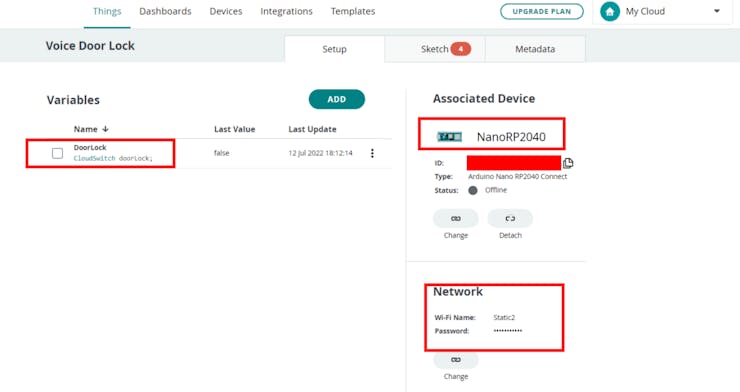
This page will show you everything you need to know about your project. Here, you'll find all the information about your project, such as the attached board, variables, network, sketch, etc.
Coding our door lock so that Alexa can use it
When you use the Arduino IoT cloud, once you set up your thing and all the variables, it will automatically create a skeleton code that includes all the variables and critical functions that are needed to run the code. All we need to do is add more variables and functions.
#include "thingProperties.h" void setup() { Serial.begin(9600); delay(1500); pinMode(LED_BUILTIN, OUTPUT); pinMode(5, OUTPUT); pinMode(6, OUTPUT); initProperties(); ArduinoCloud.begin(ArduinoIoTPreferredConnection); setDebugMessageLevel(2); ArduinoCloud.printDebugInfo(); } void loop() { ArduinoCloud.update(); } void onDoorLockChange() { if (doorLock == 1) { beeper(); beeper(); beeper(); beeper(); digitalWrite(LED_BUILTIN, HIGH); digitalWrite(5, HIGH); } else if (doorLock == 0) { beeper(); beeper(); digitalWrite(LED_BUILTIN, LOW); digitalWrite(5, LOW); } } void beeper() { digitalWrite(LED_BUILTIN, HIGH); digitalWrite(6, HIGH); delay(100); digitalWrite(LED_BUILTIN, LOW); digitalWrite(6, LOW); delay(100); }
Now, I'll get rid of all the comments that don't add anything, so they'll look neet. And here's our last code, guys. Let's look at it in more detail.
In the setup function, we will set up serial communication and communication with the Arduino cloud. We will also set the pin mode and get the carrier ready to run the rest of the code.
This function will run whenever the variables change. The function will be run when the value changes. So, when Alexa tells us to lock the door, all we do is flip the pin that is connected to the lock. I've also put in some beeping functions here. That wasn't hard at all, right?
Add your Alexa Lock
Now, get your phone out and open the Alexa app. Go ahead and link your account and the Arduino Skill for Alexa.
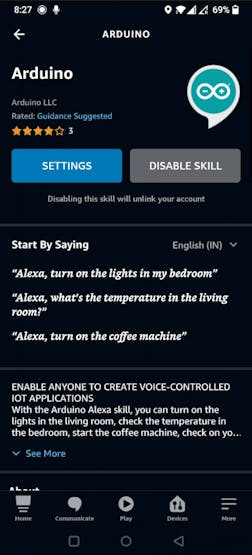
Now, click on find devices. It will start looking for any IoT devices that work with Alexa. Once the scan is done, the variable we made earlier will be shown as an Alexa device. Just add the thing. Guys, that's it.
Testing
Now, you should be able to use your voice to control the lock through Alexa. You can talk to Alexa and control these devices through the Amazon app on your phone and Amazon devices like Echo Dot. If you like this project and really want to build cool DIY projects, make sure you subscribe to our channel by clicking the "Subscribe" button here.
Voice Controlled Door Lock using Alexa and Arduino
*PCBWay community is a sharing platform. We are not responsible for any design issues and parameter issues (board thickness, surface finish, etc.) you choose.
- Comments(0)
- Likes(0)
- 0 USER VOTES
- YOUR VOTE 0.00 0.00
- 1
- 2
- 3
- 4
- 5
- 6
- 7
- 8
- 9
- 10
- 1
- 2
- 3
- 4
- 5
- 6
- 7
- 8
- 9
- 10
- 1
- 2
- 3
- 4
- 5
- 6
- 7
- 8
- 9
- 10
- 1
- 2
- 3
- 4
- 5
- 6
- 7
- 8
- 9
- 10
 More by Krishna S
-
 DIY Home Automation using Arduino UNO R4
Welcome to this beginner's guide to making your own home automation system, leveraging the prowess o...
-
 Getting Plants Watered Automatically: A Guide to Scheduling
In this guide, we'll explore how using a scheduler in your DIY electronic projects can automate your...
-
 DIY Motion Triggered Halloween Prop using Arduino/Digispark
Having Halloween decorations that come to life is absolutely fun. Unfortunately, there are significa...
-
 Control your Home Devices using Arduino and Personal Assistant
IntroductionIn the previous video, we build an Alexa-controlled Door Locking System. So many people ...
-
 Making A Gesture Controller Glove using Hall Effect Sensor
StoryHey guys, in this video, we will be making a compact circuit that can be fitted in a glove to c...
-
 Voice Controlled Door Lock using Alexa and Arduino
Voice Controlled Door Lock: An OverviewHey, everyone! Welcome back. In this video, we'll make an Ale...
-
 Making a DIY Soldering Fume Extractor with Lighting
IntroductionSoldering is awesome, right? It's fun to make our own PCB for our project, but there are...
-
 Driving 4 High Current Motors in your Robot using a Simple L293D Piggy Backed Arduino Nano Shield
StoryHey, guys welcome back, In this post, I will show you how you can make your own high current mo...
-
 USB Joystick using Arduino for Robotics and Computer Game
Hey guys, in this video, we are going to make an amazing compact joystick using Arduino. We can use ...
-
 How to make an Arduino UNO at Home? DIY Arduino
In this project, we are going to be making our own customized Arduino Uno board and I will be showin...
-
 Beating Heart PCB for Valentines Day | Love is in the Circuit
Hey guys it’s valentine’s day! So let me ask you a question. what gift are you going to give to your...
-
 5V – 3.3V Logic Level Shifter IC for Arduino and Raspberry Pi
Hey, Guys welcome back to RootSaid. In ...
5V – 3.3V Logic Level Shifter IC for Arduino and Raspberry Pi
5V – 3.3V Logic Level Shifter IC for Arduino and Raspberry PiHey, Guys welcome back to RootSaid. In ...
-
 Lets make an IOT based plant watering system using Arduino Nano 33 IoT, some pumps and an Android Smart Phone.
IntroductionHome automation is a popular subject these days and with excellent cause. Our smart devi...
-
 DIY Photoshop Editing Console using Arduino Nano RP 2040
Making a DIY Photoshop Editing ConsoleWhat if there was something that we could use to quickly chang...
-
 DIY Halloween Pumpkin using Arduino
It’s time to get ready for Halloween! We’re going to be doing a lot of DIY stuff this month, so stay...
-
 Drink Like James Bond! DIY Cocktail Mixer Using Arduino
Robotic BartenderThis weekend you can make your next cocktail party an even bigger success by buildi...
-
-
AEL-2011 Power Supply Module
512 0 2 -
AEL-2011 50W Power Amplifier
472 0 2 -
-
-
Custom Mechanical Keyboard
688 0 0 -
Tester for Touch Screen Digitizer without using microcontroller
321 2 2 -
Audio reactive glow LED wristband/bracelet with NFC / RFID-Tags
304 0 1 -
-
-


