Atmega328P without Arduino PCB Design
Atmega328P microcontroller:
The ATmega328P is a high-performance picoPower 8-bit AVR RISC-based microcontroller having 32KB ISP flash memory with read-while-write capabilities created by Atmel from the megaAVR family.
Atmega indicates the family name
32 indicates the 32 KB Flash Memory
8 indicates an 8-bit processor
P indicates picoPower (Consumes very low power)Atmega328P Pinout
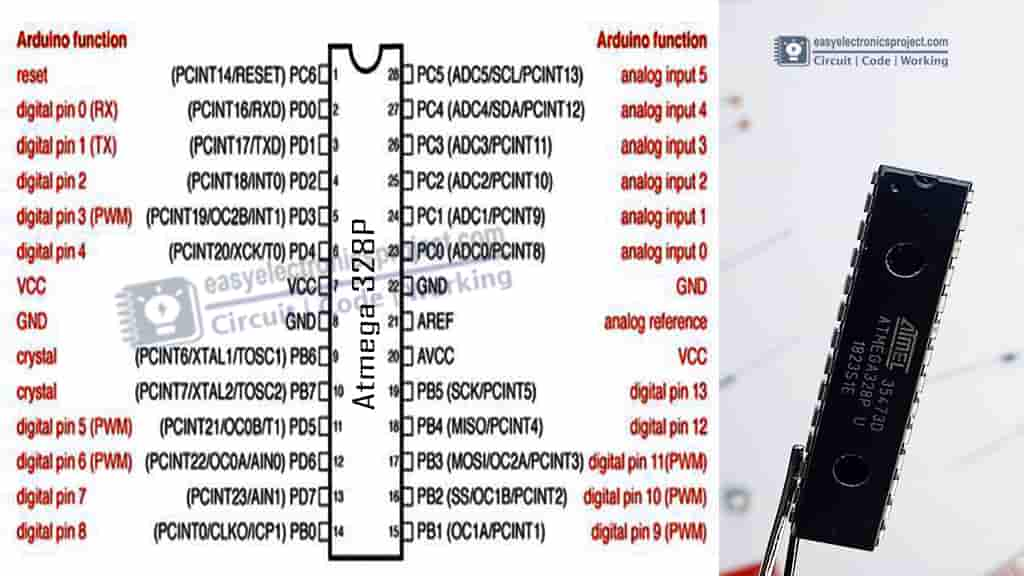
 Atmega328P Pinout
I have mentioned all the Atmega328 pinout details with related Arduino functions. So this pinout diagram will be very helpful as you can easily identify the digital and analog I/O pins of the Atmega328P microcontroller.
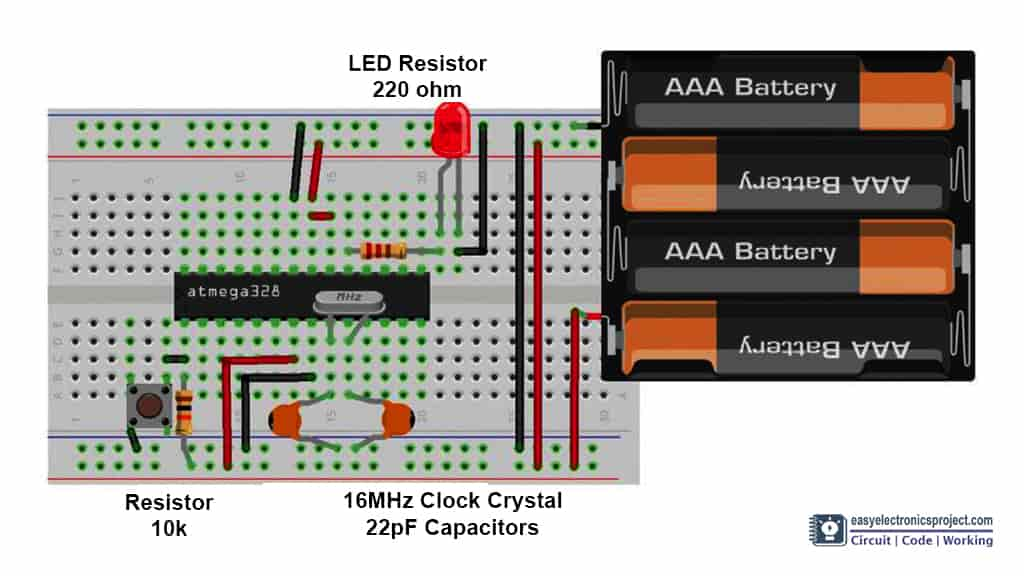
Atmega328P without Arduino circuit

Before designing the DIY Arduino PCB, I have made the complete circuit on the breadboard for testing. You can also use a 5V mobile charger to supply the circuit.
In this tutorial video, I have explained how make Arduino circuit on breadboard using Atmega328P microcontroller.
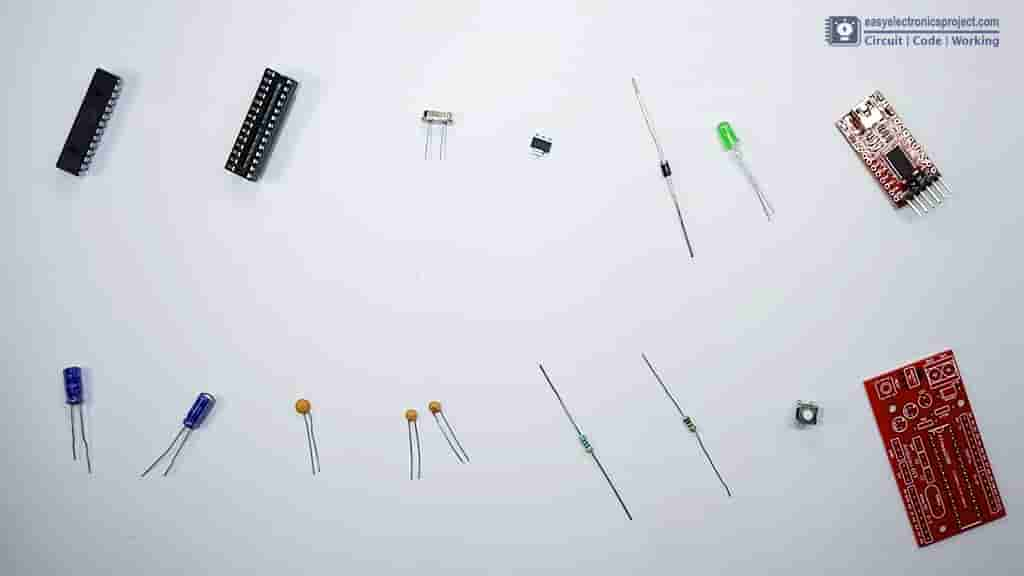
Required Components

ATmega328P with bootloader
16MHz Crystal
LED 5-mm
10k & 470-ohm Resistors
22pF Capacitors 2no
100nF (104) Capacitor
10uF Capacitors 2no
AMS1117 5v Regulator
Push switch
IN4001 Diode
2mm Pitch Female BERG Strip
FTDI232 USB to Serial
Arduino PCB
Designing the PCB

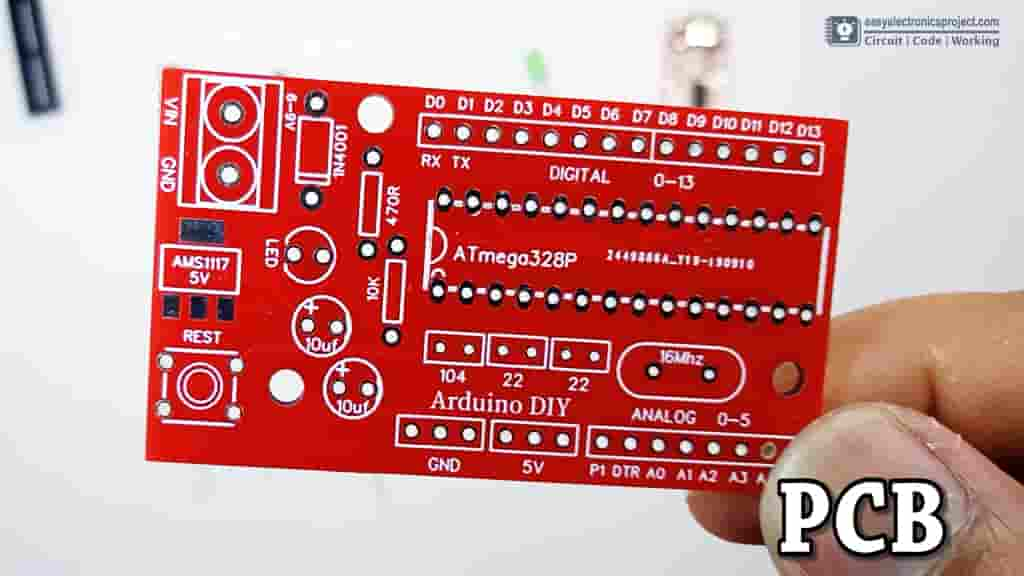
After testing the circuit on the breadboard, I have designed the PCB for this Atmega328P project.
This circuit has all the features of Arduino UNO, but the size is smaller and the cost is also low.
I have ordered the PCB from PCBWay.com. The PCB quality is very good in this affordable price range. You can also try PCBWay.com to order any custom design PCB.
Atmega328P without Arduino PCB Design
*PCBWay community is a sharing platform. We are not responsible for any design issues and parameter issues (board thickness, surface finish, etc.) you choose.

Raspberry Pi 5 7 Inch Touch Screen IPS 1024x600 HD LCD HDMI-compatible Display for RPI 4B 3B+ OPI 5 AIDA64 PC Secondary Screen(Without Speaker)
BUY NOW
ESP32-S3 4.3inch Capacitive Touch Display Development Board, 800×480, 5-point Touch, 32-bit LX7 Dual-core Processor
BUY NOW
Raspberry Pi 5 7 Inch Touch Screen IPS 1024x600 HD LCD HDMI-compatible Display for RPI 4B 3B+ OPI 5 AIDA64 PC Secondary Screen(Without Speaker)
BUY NOW- 0 USER VOTES
- YOUR VOTE 0.00 0.00
- 1
- 2
- 3
- 4
- 5
- 6
- 7
- 8
- 9
- 10
- 1
- 2
- 3
- 4
- 5
- 6
- 7
- 8
- 9
- 10
- 1
- 2
- 3
- 4
- 5
- 6
- 7
- 8
- 9
- 10
- 1
- 2
- 3
- 4
- 5
- 6
- 7
- 8
- 9
- 10
 More by Sayanik Mandal
-
 300W RMS Power Amplifier - 2SC3858 and 2SA1494 Transistors
This amplifier has an excellent audio quality, and use four output power transistors, it reaches a s...
-
 70W Stereo HI-FI Power Amplifier - High Fidelity using two TDA2050 IC's + PCB
The TDA2050 Integrated CircuitsThe TDA2050 is a monolithic integrated circuit in a Pentawatt? packag...
-
 Adjustable Switching Power Supply 5.1 to 40V, 2.5 Amp using L4960
In this article, we present an adjustable power supply with a stabilized output that varies from 5.1...
-
 Christmas tree with arduino uno
Christmas tree with Arduino UNOStep 1: Circuit DiagramThe project is super easy for everyone to make...
-
 Christmas tree with arduino uno
Step 1: Circuit DiagramThe project is super easy for everyone to make, and no specific knowledge is ...
-
 rgb LED Controller
Hi guys in this project I shall show you that how you can make a RGB Light cntoller. Here is the PCB...
-
 Time Delay Relay circuit using 555 timer IC
In this 555 timer project, I have shown how to make a time delay relay circuit using 555 timer IC to...
-
 Speed control of DC motor using PWM with 555 IC
In this 555 timer project, I have shown how to make speed control of DC motor using PWM with a 555 t...
-
 Speed control of DC motor using PWM with 555 IC
In this 555 timer project, I have shown how to make speed control of DC motor using PWM with a 555 t...
-
 Atmega328P without Arduino PCB Design
Atmega328P microcontroller:The ATmega328P is a high-performance picoPower 8-bit AVR RISC-based micro...
-
 Time Delay Relay circuit using 555 timer IC
In this electronics project, I have explained how to make a simple Water Level Indicator using the B...
-
 Time Delay Relay circuit using 555 timer IC
In this 555 timer project, I have shown how to make a time delay relay circuit using 555 timer IC to...
-
 LED chaser lights with 555 timer
n this electronics project, I have explained how to make simple LED chaser lights with CD4017 & ...
-
 300 watt amplifier
Introduction to the AmplifierAn amplifier is an electronic device or circuit which is used to increa...
-
 amplification process
All Category amplifiers50W Power Amplifier With LM3886This is my second encounter with LM3886. I was...
-
 All Category amplifiers
50W Power Amplifier With LM3886This is my second encounter with LM3886. I was...
All Category amplifiers
All Category amplifiers50W Power Amplifier With LM3886This is my second encounter with LM3886. I was...
-
 Rotary switches controller
Rotary switches move in a circle and can stop in several positions. They are used to control many di...
-
 All Category amplifiers
50W Power Amplifier With LM3886This is my second encounter with LM3886. I was pleased with the sound...
-
 300W RMS Power Amplifier - 2SC3858 and 2SA1494 Transistors
This amplifier has an excellent audio quality, and use four output power transistors, it reaches a s...
-
 70W Stereo HI-FI Power Amplifier - High Fidelity using two TDA2050 IC's + PCB
The TDA2050 Integrated CircuitsThe TDA2050 is a monolithic integrated circuit in a Pentawatt? packag...
-
 Adjustable Switching Power Supply 5.1 to 40V, 2.5 Amp using L4960
In this article, we present an adjustable power supply with a stabilized output that varies from 5.1...
-
 Christmas tree with arduino uno
Christmas tree with Arduino UNOStep 1: Circuit DiagramThe project is super easy for everyone to make...
-
 Christmas tree with arduino uno
Step 1: Circuit DiagramThe project is super easy for everyone to make, and no specific knowledge is ...
-
 rgb LED Controller
Hi guys in this project I shall show you that how you can make a RGB Light cntoller. Here is the PCB...
-
 Time Delay Relay circuit using 555 timer IC
In this 555 timer project, I have shown how to make a time delay relay circuit using 555 timer IC to...
-
 Speed control of DC motor using PWM with 555 IC
In this 555 timer project, I have shown how to make speed control of DC motor using PWM with a 555 t...
-
 Speed control of DC motor using PWM with 555 IC
In this 555 timer project, I have shown how to make speed control of DC motor using PWM with a 555 t...
-
 Atmega328P without Arduino PCB Design
Atmega328P microcontroller:The ATmega328P is a high-performance picoPower 8-bit AVR RISC-based micro...
-
 Time Delay Relay circuit using 555 timer IC
In this electronics project, I have explained how to make a simple Water Level Indicator using the B...
-
 Time Delay Relay circuit using 555 timer IC
In this 555 timer project, I have shown how to make a time delay relay circuit using 555 timer IC to...
-
-
-
Modifying a Hotplate to a Reflow Solder Station
934 1 5 -
MPL3115A2 Barometric Pressure, Altitude, and Temperature Sensor
474 0 1 -
-
Nintendo 64DD Replacement Shell
406 0 2 -
V2 Commodore AMIGA USB-C Power Sink Delivery High Efficiency Supply Triple Output 5V ±12V OLED display ATARI compatible shark 100W
1178 4 2 -
How to measure weight with Load Cell and HX711
725 0 3


for which purpose
you just add to cart my project then you can order it