


AC Power Monitoring Using BL0937 IC
AC power monitoring is an amazing feature nowadays in IoT related applications, such as smart fans, switches and boards. Some good company boards implement this tech in their products and continuously monitor the supplied output power. Monitoring power at local device level has its own advantages, like now we have data, if current increases and something goes wrong it can turn off the whole system and can save equipment from burning. Moreover power monitoring in IoT uses ASIC based designs, I got myself one let’s explore the working. This article is sponsored by PCBWAY, they provide a full proof prototyping solution from manufacturing PCBs to CNC. PCBWAY is popular because of its reliable services over the time in the electronics industry. Sign-up now using the link and get free coupons for your first PCB order.
BL0937 and Power Monitoring:
The IC from Shanghai Belling, BL0937B is a wide range of single-phase multi-function energy meter IC for single-phase socket, Smart Appliance, with a low cost and high accuracy. BL0937B integrates two high-accuracy Sigma-Delta ADC, voltage reference, power management and other analog circuit modules, and digital signal processing circuit to calculate active power, IRMS, VRMS etc.
Features:
- High accuracy, less than ±0.5% error over a dynamic range of 2500: 1
- High stability of large signal, in the condition of signal 300mA, less than ± 0.2% error in the output frequency fluctuation (CF).
- High stability of small signal, in the condition of signal 50mA, less than ± 0.3% error in the output frequency fluctuation (CF).
- Current and voltage RMS, current measurement range (8mA ~ 30A) @ 1mohm
- On-Chip anti-creep protection
- On-Chip power supply detector
- On-Chip voltage reference of 1.1V(typical)
- On-chip oscillator as clock source
- Single 3.3V supply, low power (8 mW typical)
Measurements of Voltage, Current and Power:
The IC has one input control pin, named as SEL(select), Two output pins (CF and CF1).
High frequency CF1 is provided for indicating IRMS/VRMS and high frequency CF for energy metering. BL0937B can measure the single-phase active energy, active power, current and voltage RMS and other parameters to fully meet the needs of the socket, power strip, smart appliances and others. Interrelated patents are pending.
IP and IN: These inputs are fully differential voltage inputs with a maximum signal range of ±50 mV. Because of the internal ESD protection circuit, If the voltage exceeds ± 1.5V the IC will not be damaged badly.
VP: Positive Input for Voltage Channel. The Voltage Inputs are differential voltage inputs with a maximum signal range of ±200 mV. Because of the internal ESD protection circuit, If the voltage exceeds ± 1.5V the IC will not be damaged badly.
CF: High frequency pulse output for active power, the pulse width is fixed to 38uS; the frequency is proportional to the active power value. Over-current indication pin; If overcurrent occurs, the pin outputs a 6.78KHz pulse.
CF1: When SEL=0, the output is current RMS, pulse width is fixed to 38uS, The frequency is proportional to the current RMS value. When SEL=1, the output is voltage RMS, pulse width is fixed to 38uS, The frequency is proportional to the voltage RMS value.
BL0937B measures two voltage signals on current channel and voltage channel and then calculates the real power information. This real power information is then converted to a frequency. The frequency information is output on CF in the form of active high pulses. At the same time current RMS and voltage RMS are calculated and converted to a frequency, and output on CF1 in the form of active high pulses.
Circuit Diagram:
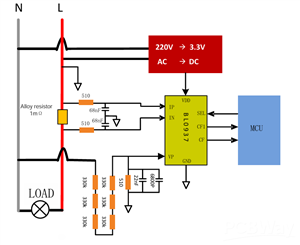
Typical Application BL0937B Typical application block diagram is shown below. Single 3.3V supply. The current signal is sampled through the alloy resistor connected to the IP and IN pins of BL0937B. The voltage signal is sampled through the resistor divider network connected to the VP pin of BL0937B. CF, CF1, SEL directly access to the MCU pin. CF/CF1 pulse cycle is measured to calculate the power, current RMS and voltage RMS. SEL pins should be pulled high or low using a 10K resistor. If left open the output will be indeterminate.
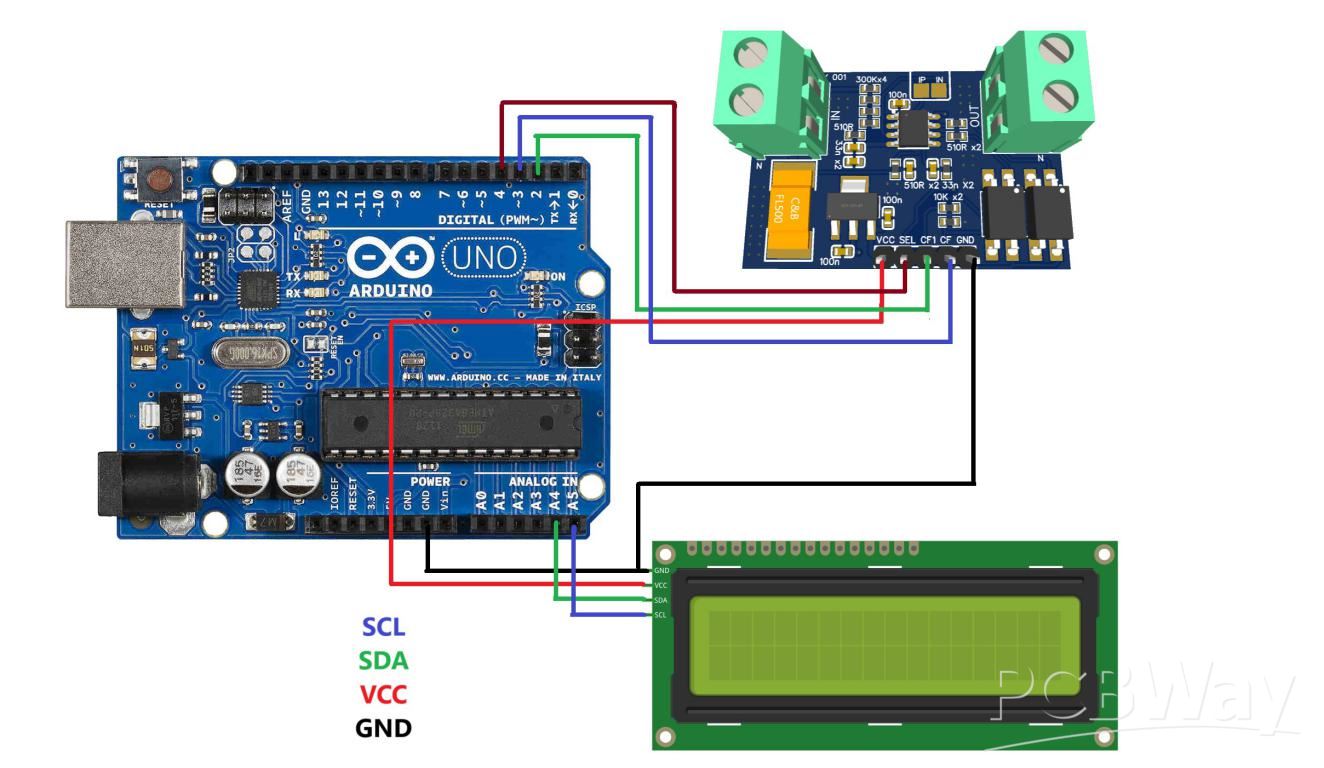
I have modified the circuit with some onboard protection features to make a breakout board which can be used with any microcontroller. Here is modified schematics given, it is fully tested and working. Chinese energy monitoring ICs do not work without a proper circuit, if anything messes up it will stop working permanently. And to keep the AC section away from the microcontroller on board isolation is provided.
Arduino Code:
#include <Wire.h>
#include <LiquidCrystal_I2C.h>
volatile unsigned long pulseCountCF = 0;
volatile unsigned long pulseCountCF1 = 0;
unsigned long startTime;
const unsigned long interval = 1000; // Measurement interval in milliseconds
#define CF1_PIN 2    // Pin for CF1 signal (must be INT0)
#define CF_PIN 3   // Pin for CF signal (must be INT1)
#define SEL_PIN 4   // Pin for SEL control
LiquidCrystal_I2C lcd(0x27, 16, 2); // I2C address 0x27 for HW061 16x2 LCD
// Calibration factors (adjust manually based on measurements)
float voltageFactor = 0.083;  // Scaling factor for voltage conversion
float currentFactor = 0.00002; // Scaling factor for current conversion
float powerFactor = 0.65;    // Scaling factor for power conversion
void pulseISR_CF1() {
pulseCountCF1++; // Increment CF pulse count
}
void pulseISR_CF() {
pulseCountCF++; // Increment CF1 pulse count
}
void setup() {
Serial.begin(9600);
lcd.init();
lcd.backlight();
lcd.setCursor(0, 0);
lcd.print("Initializing...");
delay(2000);
lcd.clear();
pinMode(CF1_PIN, INPUT);
pinMode(CF_PIN, INPUT);
pinMode(SEL_PIN, OUTPUT);
attachInterrupt(digitalPinToInterrupt(CF1_PIN), pulseISR_CF1, RISING);
attachInterrupt(digitalPinToInterrupt(CF_PIN), pulseISR_CF, RISING);
startTime = millis();
}
void loop() {
if (millis() - startTime >= interval) {
digitalWrite(SEL_PIN, LOW);
delayMicroseconds(10); // Allow signal stabilization
float currentFrequency = (pulseCountCF1 * 1000.0) / interval;
float currentRMS = currentFrequency * currentFactor;
digitalWrite(SEL_PIN, HIGH);
delayMicroseconds(10); // Allow signal stabilization
float voltageFrequency = (pulseCountCF1 * 1000.0) / interval;
float voltageRMS = voltageFrequency * voltageFactor;
Serial.print("Voltage: ");
Serial.print(voltageRMS);
Serial.println(" V");
float powerFrequency = (pulseCountCF * 1000.0) / interval;
float powerRMS = powerFrequency * powerFactor;
Serial.print("Power: ");
Serial.print(powerRMS);
Serial.println(" W");
float currentNEW = (powerRMS / voltageRMS);
lcd.clear();
lcd.setCursor(0, 0);
lcd.print("V:");
lcd.print(voltageRMS);
lcd.print("V");
lcd.setCursor(0, 1);
lcd.print("I:");
lcd.print(currentNEW);
lcd.print("A");
delay(4000);
lcd.clear();
lcd.setCursor(0, 0);
lcd.print("P:");
lcd.print(powerRMS);
lcd.print("W");
delay(2000);
pulseCountCF = 0;
pulseCountCF1 = 0;
startTime = millis();
}
}
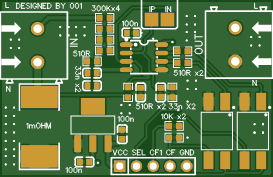
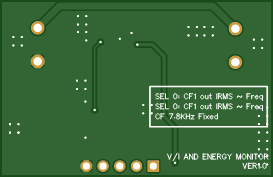
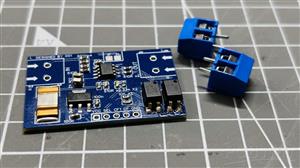
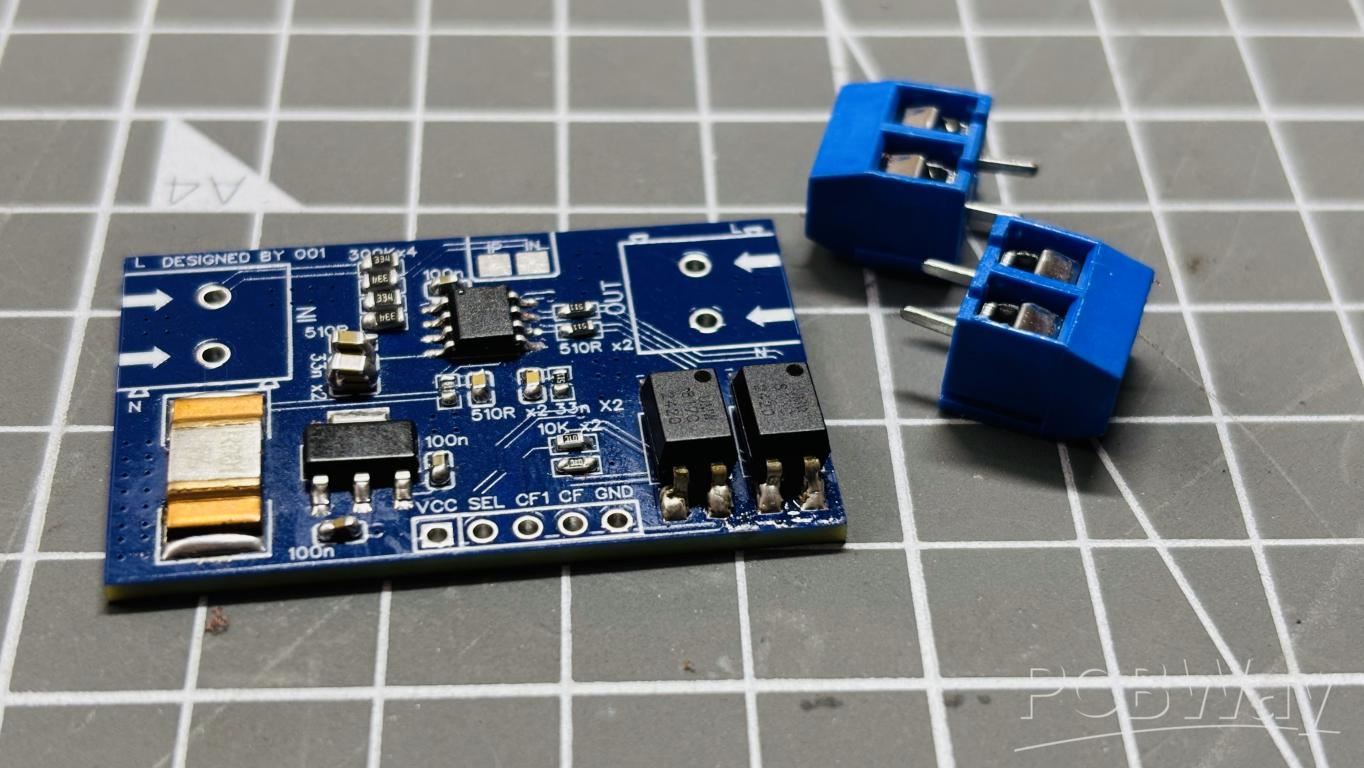
PCB design:

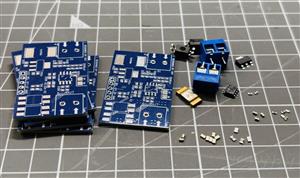
The PCB is designed keeping the power consideration of a device in mind, it is a type of plug board which can be used anywhere to monitor power like a breakout board. The PCB consists of two screw terminals for input and output, A shunt resistor which is responsible for voltage and current calculation. Some capacitors and resistor combinations are placed near the IC as per the layout design rules. To isolate the AC section from the microcontroller unit, optocouplers are used. Some onboard testing points to check the working of IC. The PCB is designed in EasyEDA and fabricated by PCBWAY. You can download all the required files, datasheet and code from the attached files below.

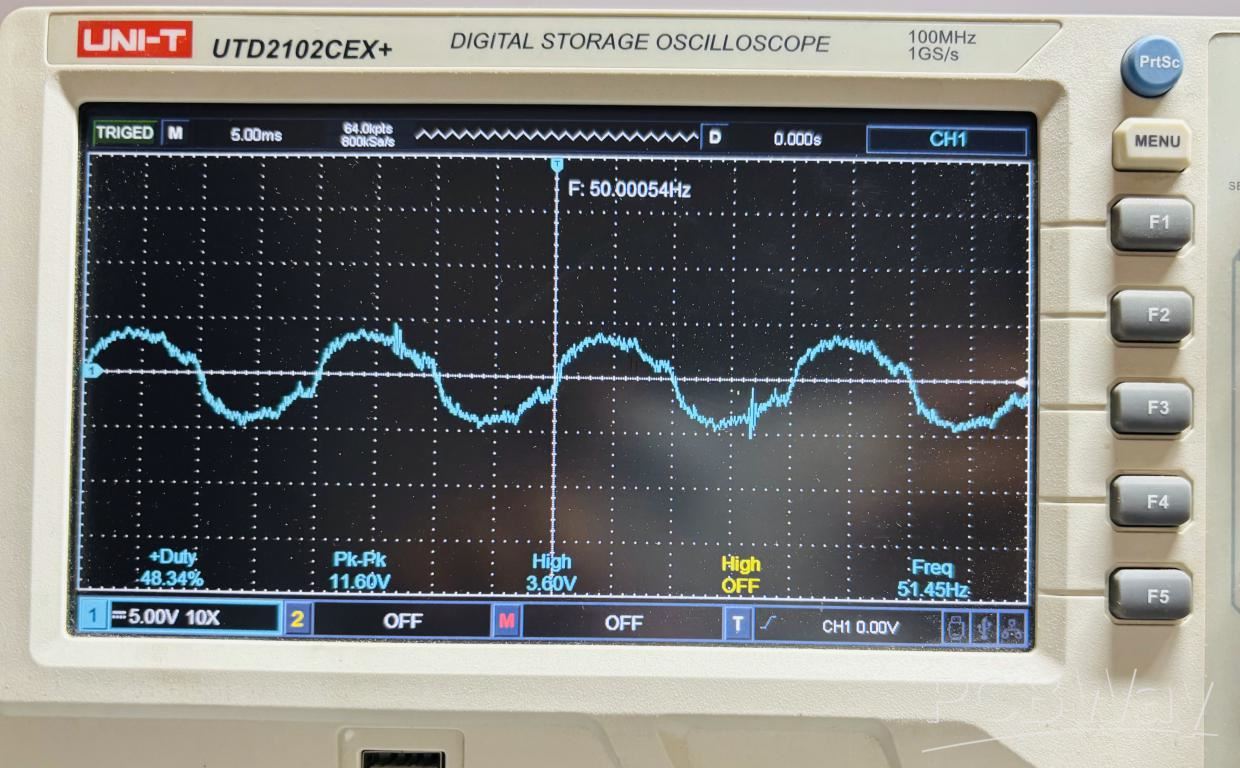
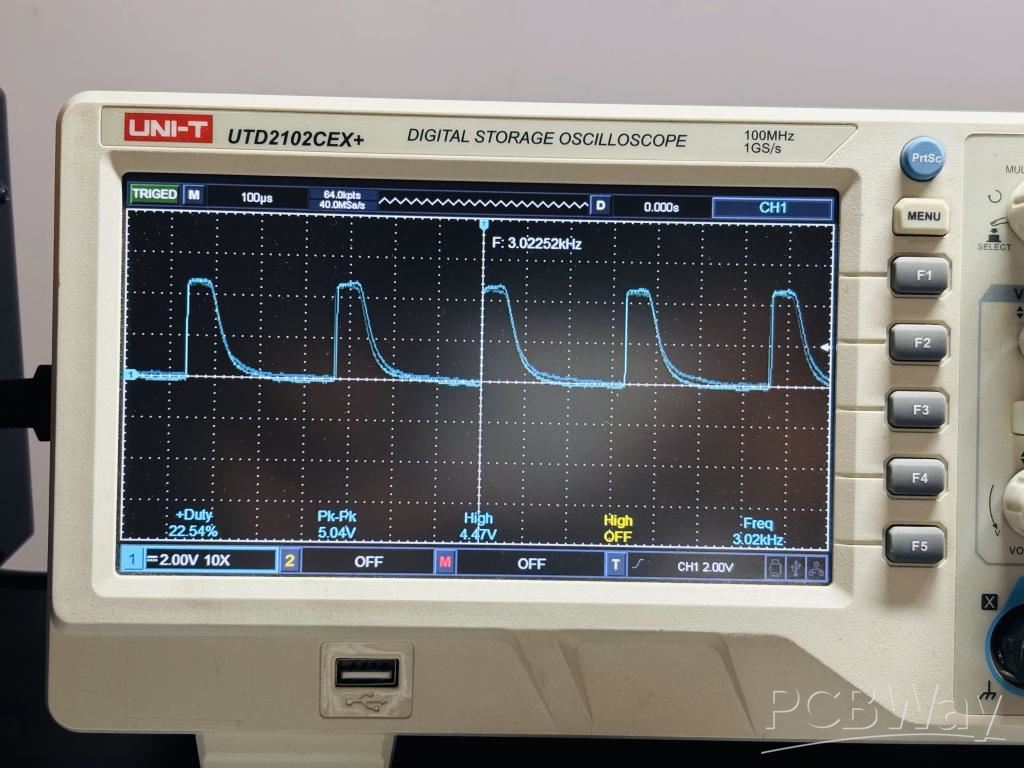
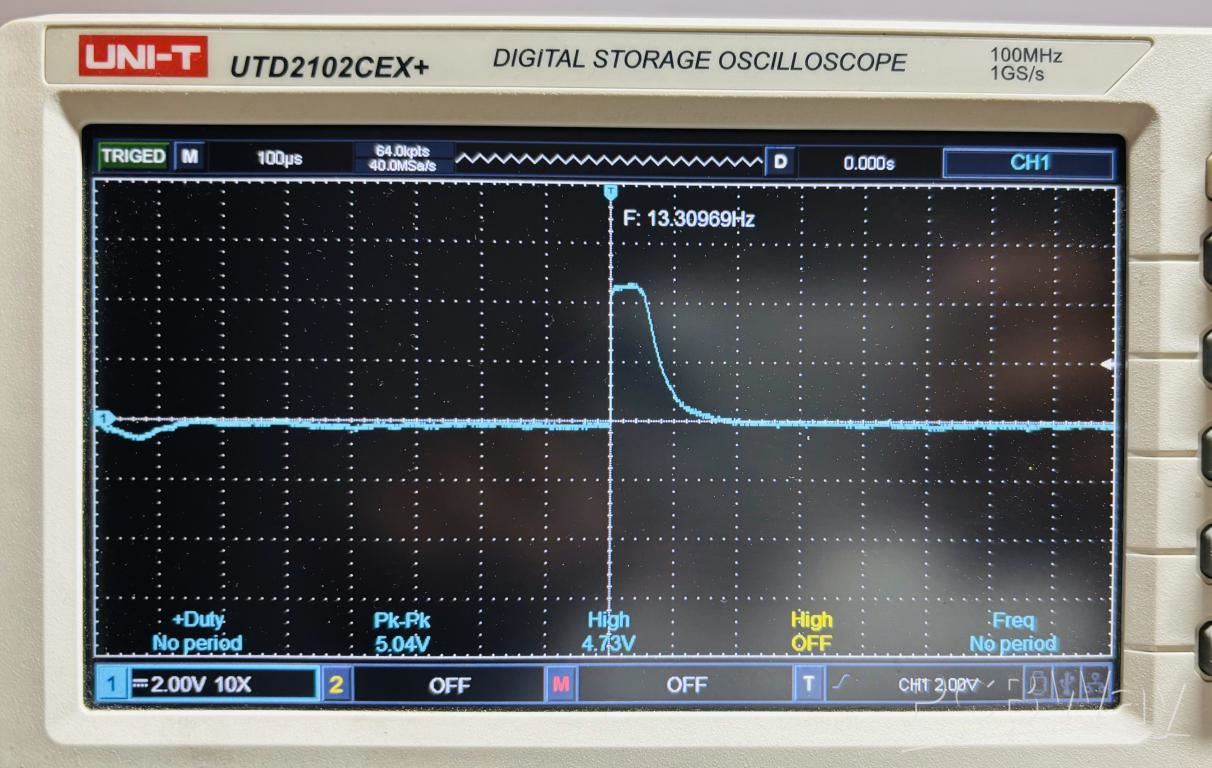
Testing and Working:

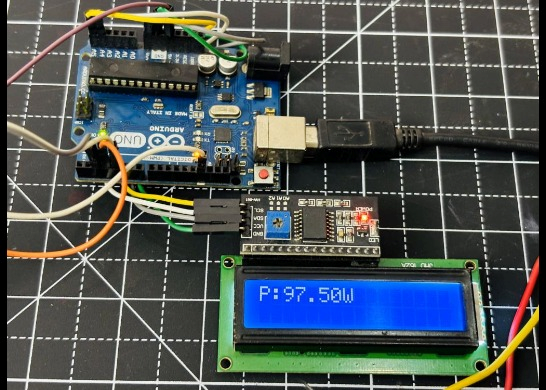
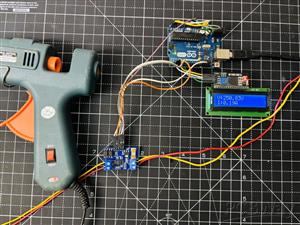
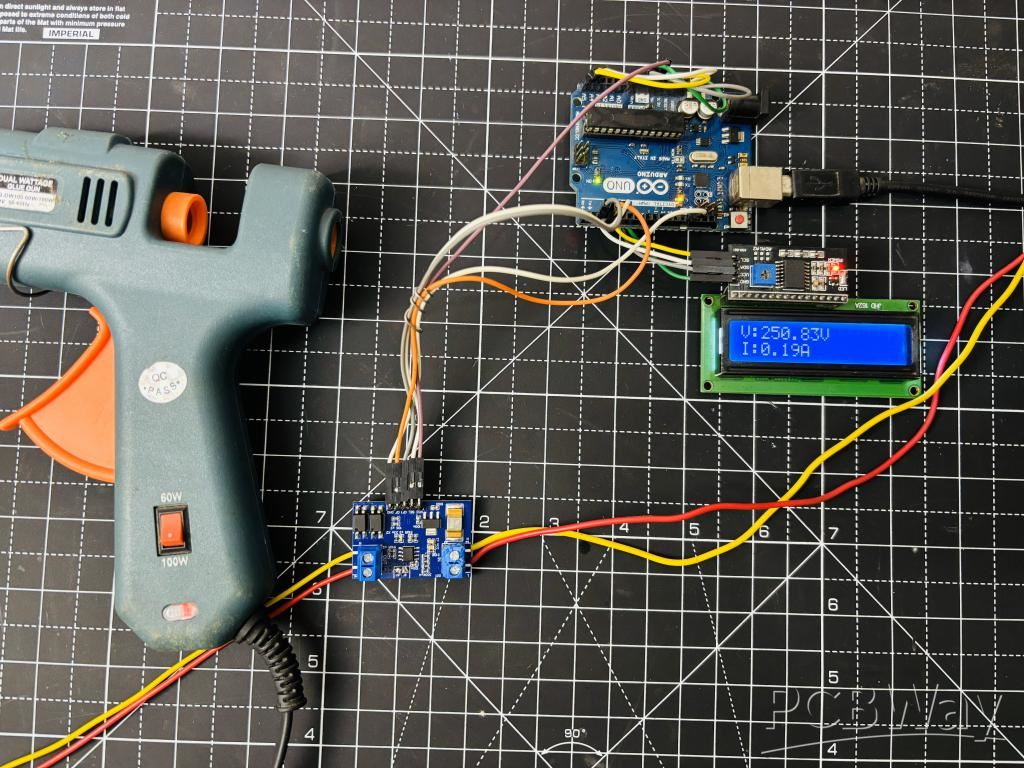
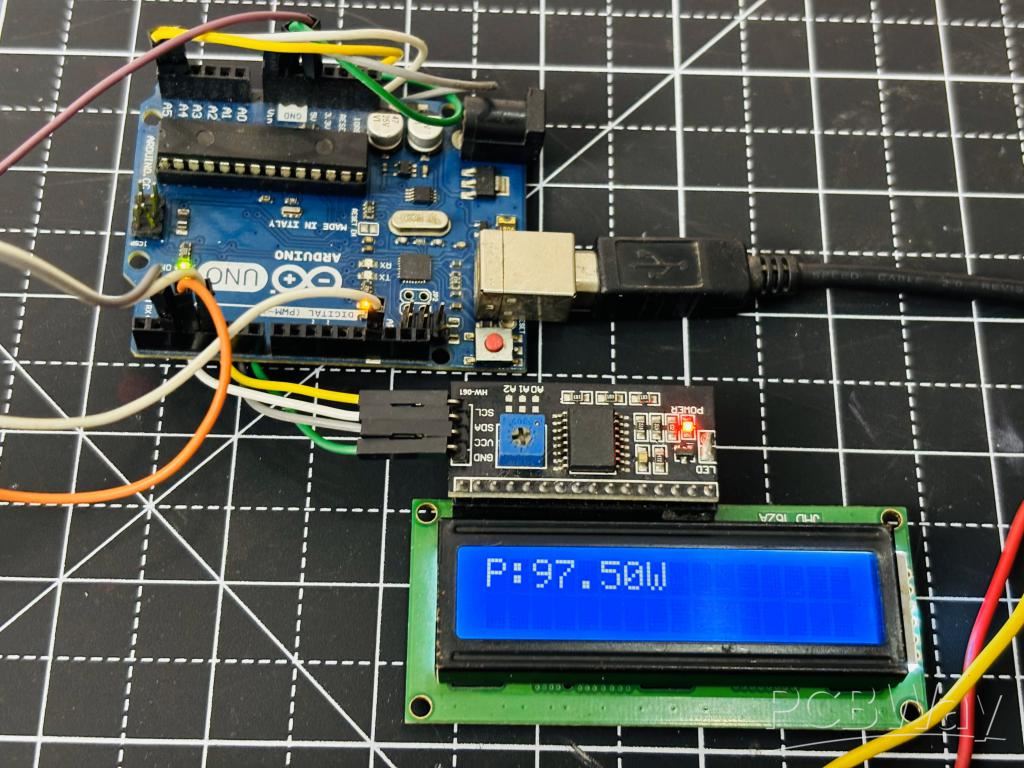
I have tested the circuit by connecting an external microcontroller and a 16x2 LCD screen, the interfacing circuit is given below. A simple interrupt program is used and paired with Arduino UNO here. The circuit can be modified to work on ESP32 and ESP8266 in order to get the data on a web server. We have to tune the variable values to calibrate the board. The values may differ in your case, depending upon the IC batch and microcontroller timer. I have tested it with 60W and 100W power sources and got 90% accurate power readings.
AC Power Monitoring Using BL0937 IC
*PCBWay community is a sharing platform. We are not responsible for any design issues and parameter issues (board thickness, surface finish, etc.) you choose.


Raspberry Pi 5 7 Inch Touch Screen IPS 1024x600 HD LCD HDMI-compatible Display for RPI 4B 3B+ OPI 5 AIDA64 PC Secondary Screen(Without Speaker)
BUY NOW
ESP32-S3 4.3inch Capacitive Touch Display Development Board, 800×480, 5-point Touch, 32-bit LX7 Dual-core Processor
BUY NOW
Raspberry Pi 5 7 Inch Touch Screen IPS 1024x600 HD LCD HDMI-compatible Display for RPI 4B 3B+ OPI 5 AIDA64 PC Secondary Screen(Without Speaker)
BUY NOW


- Comments(0)
- Likes(0)
 Log in to post comments.
More by Manoj kumar
-
 Variable Current/Voltage DC power supply
To power up electronics circuits or while testing different voltage-ampere/power ranges are required...
Variable Current/Voltage DC power supply
To power up electronics circuits or while testing different voltage-ampere/power ranges are required...
-
 PCB soldering reflow hot Plate! A good Idea?
let’s talk about soldering in a new and easy method. Because I am working with SMT components and st...
PCB soldering reflow hot Plate! A good Idea?
let’s talk about soldering in a new and easy method. Because I am working with SMT components and st...
-
 Non-contact Infrared temperature sensor using Arduino
Hello guys, I want to make my own most accurate temperature meter. When coming to the high temperatu...
Non-contact Infrared temperature sensor using Arduino
Hello guys, I want to make my own most accurate temperature meter. When coming to the high temperatu...
-
 Arduino serial Programmer CH340N
There are lot of programmer boards that are compatible with Arduino. But the cheapest and smaller on...
Arduino serial Programmer CH340N
There are lot of programmer boards that are compatible with Arduino. But the cheapest and smaller on...
-
 My own Arduino Nano Microcontroller board
Here is my new Arduino Nano board, This looks better with C-type and one step above compatible drive...
My own Arduino Nano Microcontroller board
Here is my new Arduino Nano board, This looks better with C-type and one step above compatible drive...
-
 50Watts Audio Amplifier using TDA7265
Home theaters and speaker systems are very popular due to Bass songs, releasing everyday and I am ve...
50Watts Audio Amplifier using TDA7265
Home theaters and speaker systems are very popular due to Bass songs, releasing everyday and I am ve...
-
 STK4141 Amplifier is hidden GOLD
Analog audio amplifiers are very powerful enough to make a high noise with stable quality factor. I ...
STK4141 Amplifier is hidden GOLD
Analog audio amplifiers are very powerful enough to make a high noise with stable quality factor. I ...
-
 Solar Power MPPT Control Li-ion Battery Charger
When talking about standalone single cell battery chargers only one popular name came into my mind t...
Solar Power MPPT Control Li-ion Battery Charger
When talking about standalone single cell battery chargers only one popular name came into my mind t...
-
 AC Power Monitoring Using BL0937 IC
AC power monitoring is an amazing feature nowadays in IoT related applications, such as smart fans, ...
AC Power Monitoring Using BL0937 IC
AC power monitoring is an amazing feature nowadays in IoT related applications, such as smart fans, ...
-
 100W Lab Bench Power Supply From a Fast Charger
Power supplies play a very important role in testing electronic circuits. Power supplies are used to...
100W Lab Bench Power Supply From a Fast Charger
Power supplies play a very important role in testing electronic circuits. Power supplies are used to...
-
 MPPT Solar LIPO Battery Charger
I was just charging my Li-ion battery manually with my IP2312 charger, the high current version I ha...
MPPT Solar LIPO Battery Charger
I was just charging my Li-ion battery manually with my IP2312 charger, the high current version I ha...
-
 DIY Portable Power Supply
Whenever I am travelling from one place to another, I used to keep my electronics with me. And somet...
DIY Portable Power Supply
Whenever I am travelling from one place to another, I used to keep my electronics with me. And somet...
-
 I made a Nano USB HUB
I want to use the USB hub internally in my laptop but the available ones are very bulky and do not s...
I made a Nano USB HUB
I want to use the USB hub internally in my laptop but the available ones are very bulky and do not s...
-
 I made an ARDUINO NANO Clone Board
I made a series of Arduino Atmega328 boards and every new version has something new. We always learn...
I made an ARDUINO NANO Clone Board
I made a series of Arduino Atmega328 boards and every new version has something new. We always learn...
-
 Arduino Got Pro Max upgrade!!
I am aware of sensors, modules and integrated circuit used with microcontrollers like Arduino. And I...
Arduino Got Pro Max upgrade!!
I am aware of sensors, modules and integrated circuit used with microcontrollers like Arduino. And I...
-
 Minimal Component tester using Arduino
You might know component tester and its different versions made by many hobbyists. Today I have made...
Minimal Component tester using Arduino
You might know component tester and its different versions made by many hobbyists. Today I have made...
-
 Making a Digital Light Measuring Meter
While working on a home automation project on light, the light intensity unit- lux (lumens per squar...
Making a Digital Light Measuring Meter
While working on a home automation project on light, the light intensity unit- lux (lumens per squar...
-
 IR Jammer circuit using NE555 timer
I am working on IR protocol in university research Centre and then an idea of IR jammer comes into m...
IR Jammer circuit using NE555 timer
I am working on IR protocol in university research Centre and then an idea of IR jammer comes into m...
-
Variable Current/Voltage DC power supply
To power up electronics circuits or while testing different voltage-ampere/power ranges are required...
-
PCB soldering reflow hot Plate! A good Idea?
let’s talk about soldering in a new and easy method. Because I am working with SMT components and st...
-
Non-contact Infrared temperature sensor using Arduino
Hello guys, I want to make my own most accurate temperature meter. When coming to the high temperatu...
-
Arduino serial Programmer CH340N
There are lot of programmer boards that are compatible with Arduino. But the cheapest and smaller on...
-
My own Arduino Nano Microcontroller board
Here is my new Arduino Nano board, This looks better with C-type and one step above compatible drive...
-
50Watts Audio Amplifier using TDA7265
Home theaters and speaker systems are very popular due to Bass songs, releasing everyday and I am ve...
-
STK4141 Amplifier is hidden GOLD
Analog audio amplifiers are very powerful enough to make a high noise with stable quality factor. I ...
-
Solar Power MPPT Control Li-ion Battery Charger
When talking about standalone single cell battery chargers only one popular name came into my mind t...
-
AC Power Monitoring Using BL0937 IC
AC power monitoring is an amazing feature nowadays in IoT related applications, such as smart fans, ...
-
100W Lab Bench Power Supply From a Fast Charger
Power supplies play a very important role in testing electronic circuits. Power supplies are used to...
-
MPPT Solar LIPO Battery Charger
I was just charging my Li-ion battery manually with my IP2312 charger, the high current version I ha...
-
DIY Portable Power Supply
Whenever I am travelling from one place to another, I used to keep my electronics with me. And somet...
-
Commodore 64 1541-II 1581 Floppy Disk Drive C64 Power Supply Unit USB-C 5V 12V DIN connector 5.25
163 1 3 -
Easy to print simple stacking organizer with drawers
87 0 0 -
-
-
Modifying a Hotplate to a Reflow Solder Station
1136 1 6 -
MPL3115A2 Barometric Pressure, Altitude, and Temperature Sensor
638 0 1 -
-
-
V2 Commodore AMIGA USB-C Power Sink Delivery High Efficiency Supply Triple Output 5V ±12V OLED display ATARI compatible shark 100W
1438 4 3


