I made a Nano USB HUB
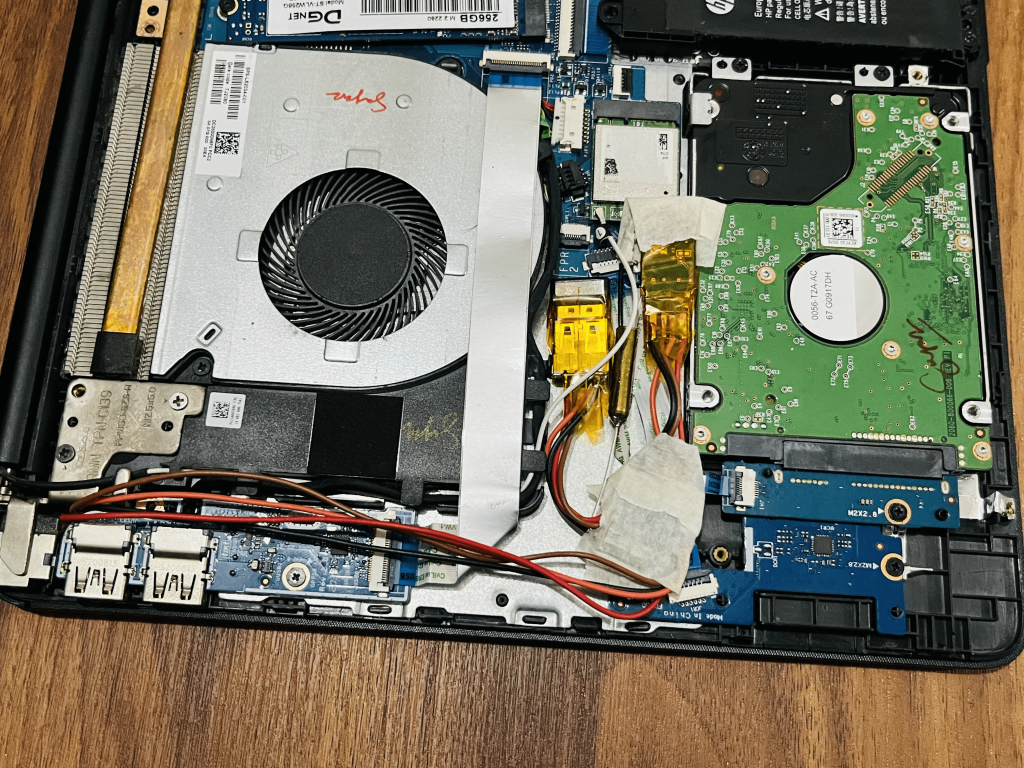
I want to use the USB hub internally in my laptop but the available ones are very bulky and do not satisfy all the required conditions. Usually a USB hub is made to be recognized by the PC when inserted in the port. Similarly the USB hub extra port comes with a port detection option. Whenever we plug USB it will be detected by the system automatically.
But I want to use a USB hub inside of my laptop to add extra Wi-Fi and Bluetooth in it without compromising the USB ports. I want to not detect the USB again and again because once it is placed in the laptop, I will never disconnect it. And this is the type of settings which is done on the hardware level.
I got my hands on a USB series IC from microchip USB2422 which supports two downstream ports and the functions are programmable. Which is the best option for this project. To make the minimal system using this IC the only way to proceed is with Custom PCB from PCBWAY.
USB 2422:
The Microchip USB2422 hub is a low-power, single transaction translator, hub controller IC with two downstream ports for embedded USB solutions. The hub controller can attach to an upstream port as a Hi-Speed and Full-Speed hub or as a Full-Speed only hub. The hub supports Low-Speed, Full-Speed, and Hi-Speed (when configured as a Hi-Speed hub) downstream devices on the enabled downstream ports. All required resistors on the USB ports are integrated into the hub. This includes all series termination resistors on D+ and D- pins and all required pull-down and pull-up resistors on D+ and D- pins. The over-current sense inputs for the downstream facing ports have internal pull-up resistors.
Features:
Supports a single external 3.3 V supply source
On-chip driver for 24 MHz crystal resonator
ESD protection up to 6 kV on all USB pins
Supports self-powered operation
Downstream ports as non-removable ports
USB Battery Charging options
Overcurrent detection
Components required:
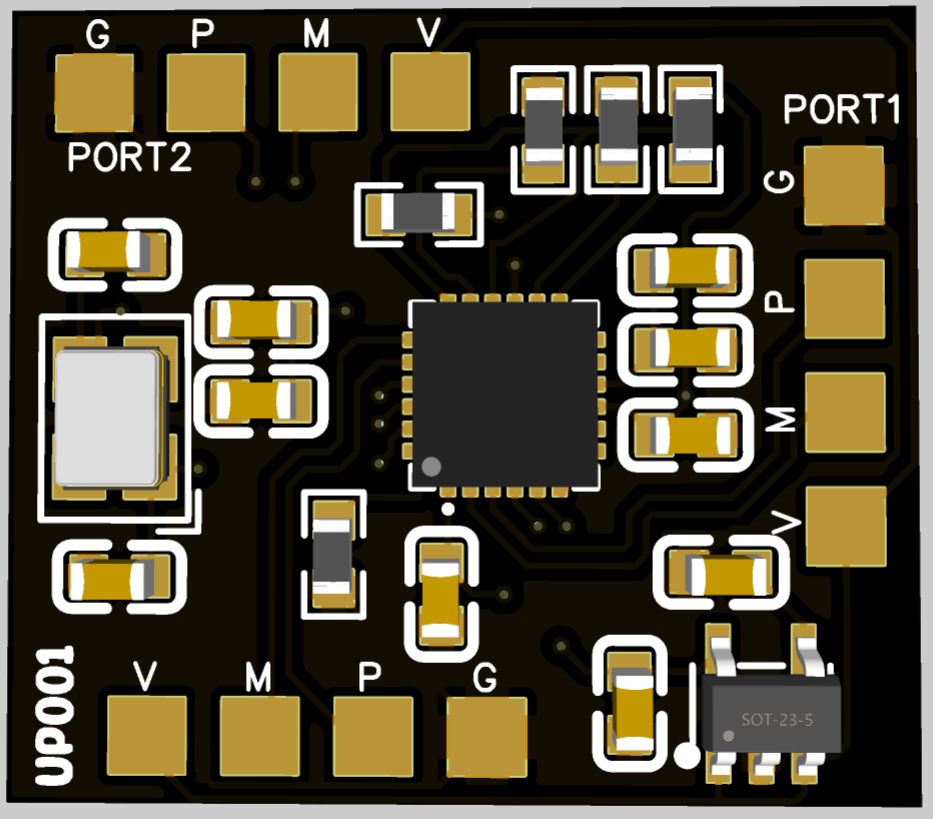
USB2422 IC
SPX3819 3.3V Linear voltage regulator
24MHz Crystal Resonator
18pf loading capacitors
1uf, 100nf, 1nf power line filtering capacitor
47K resistor for pull up/down settings
Custom PCB from PCBWAY
Circuit diagram:
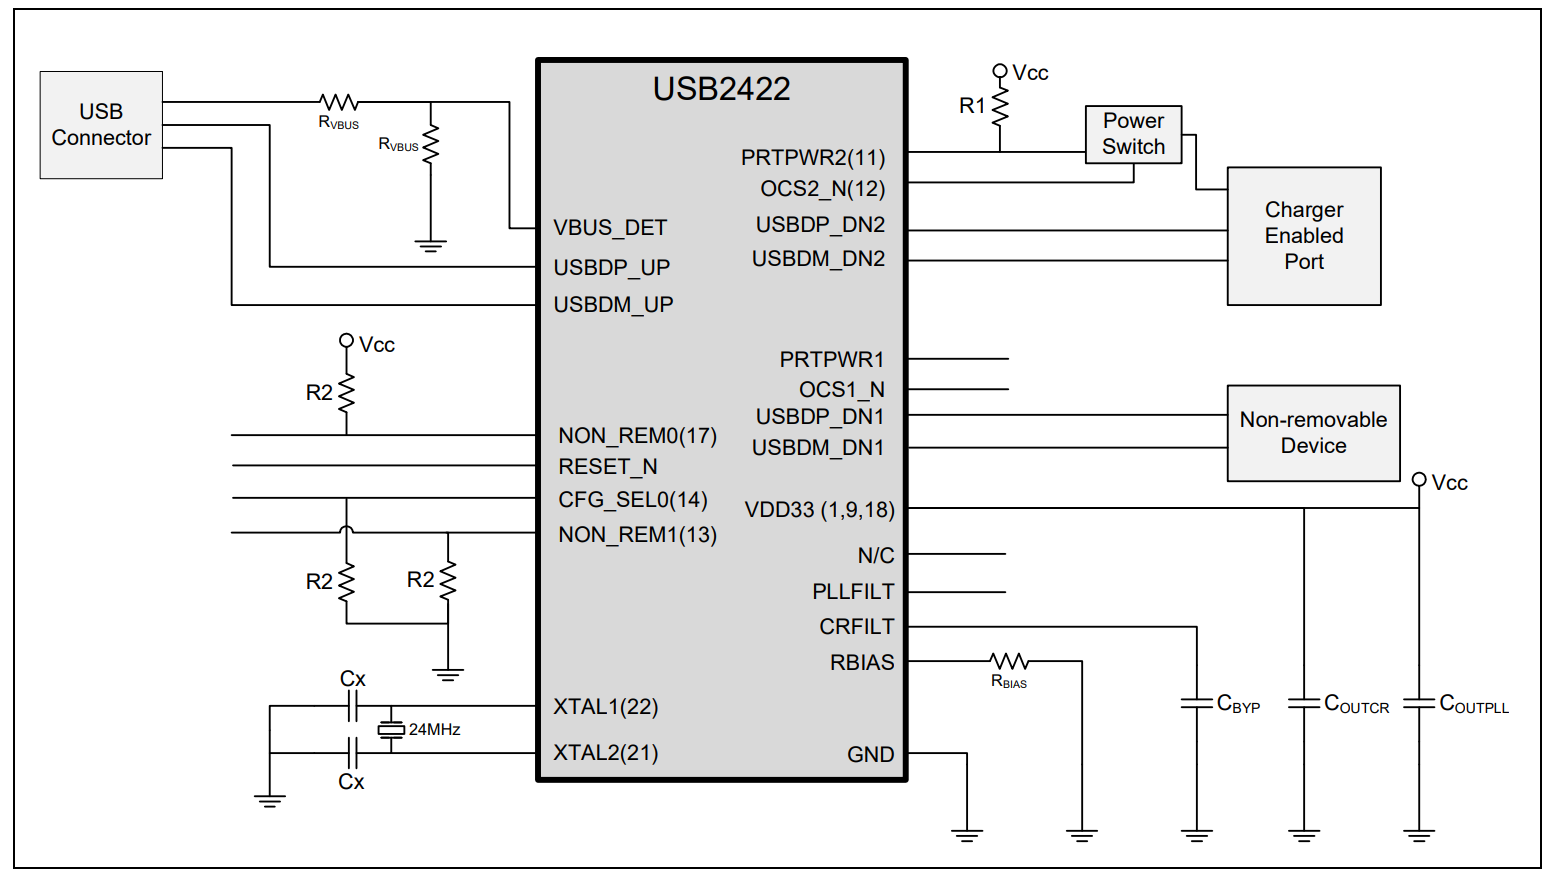
I modified the circuit using the instruction from the datasheet according to a one time USB detection feature (strap options and configuration settings) which may be changed by changing the settings of pull-up and pull-down resistors.
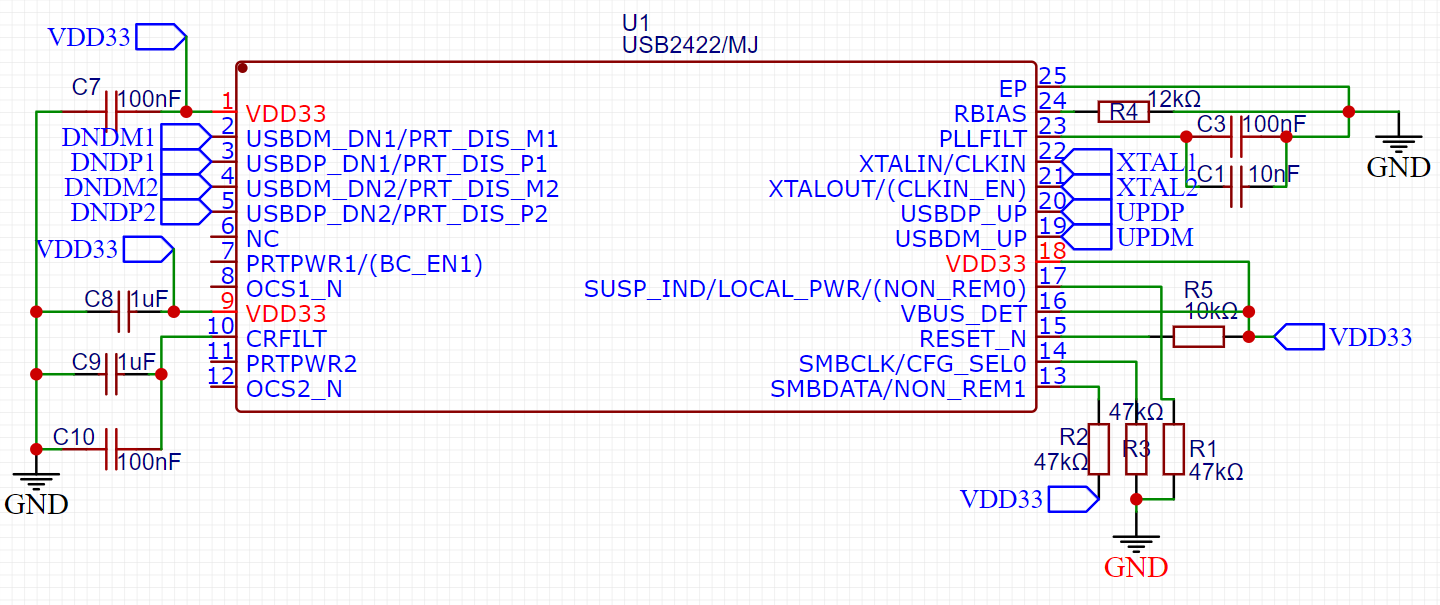
In the datasheet the value of capacitors required for the filtration of power supply, phase lock loop and internal signal is mentioned which is connected accordingly. The IC is powered by the SPX3819 3.3v regulator because it is not compatible with the 5v logic of the USB. External Crystal resonators with 18pf loading capacitors are required on the XTAL pins of the IC. Other configuration settings are Pulled up/ down with a 47k resistor as both the downstream port behave as non detachable and disable the USB charging mode. Reset is pulled up with a small 10k resistor and can be replaced with a tactile switch to reset the Hub in attached conditions.
PCB design Consideration:
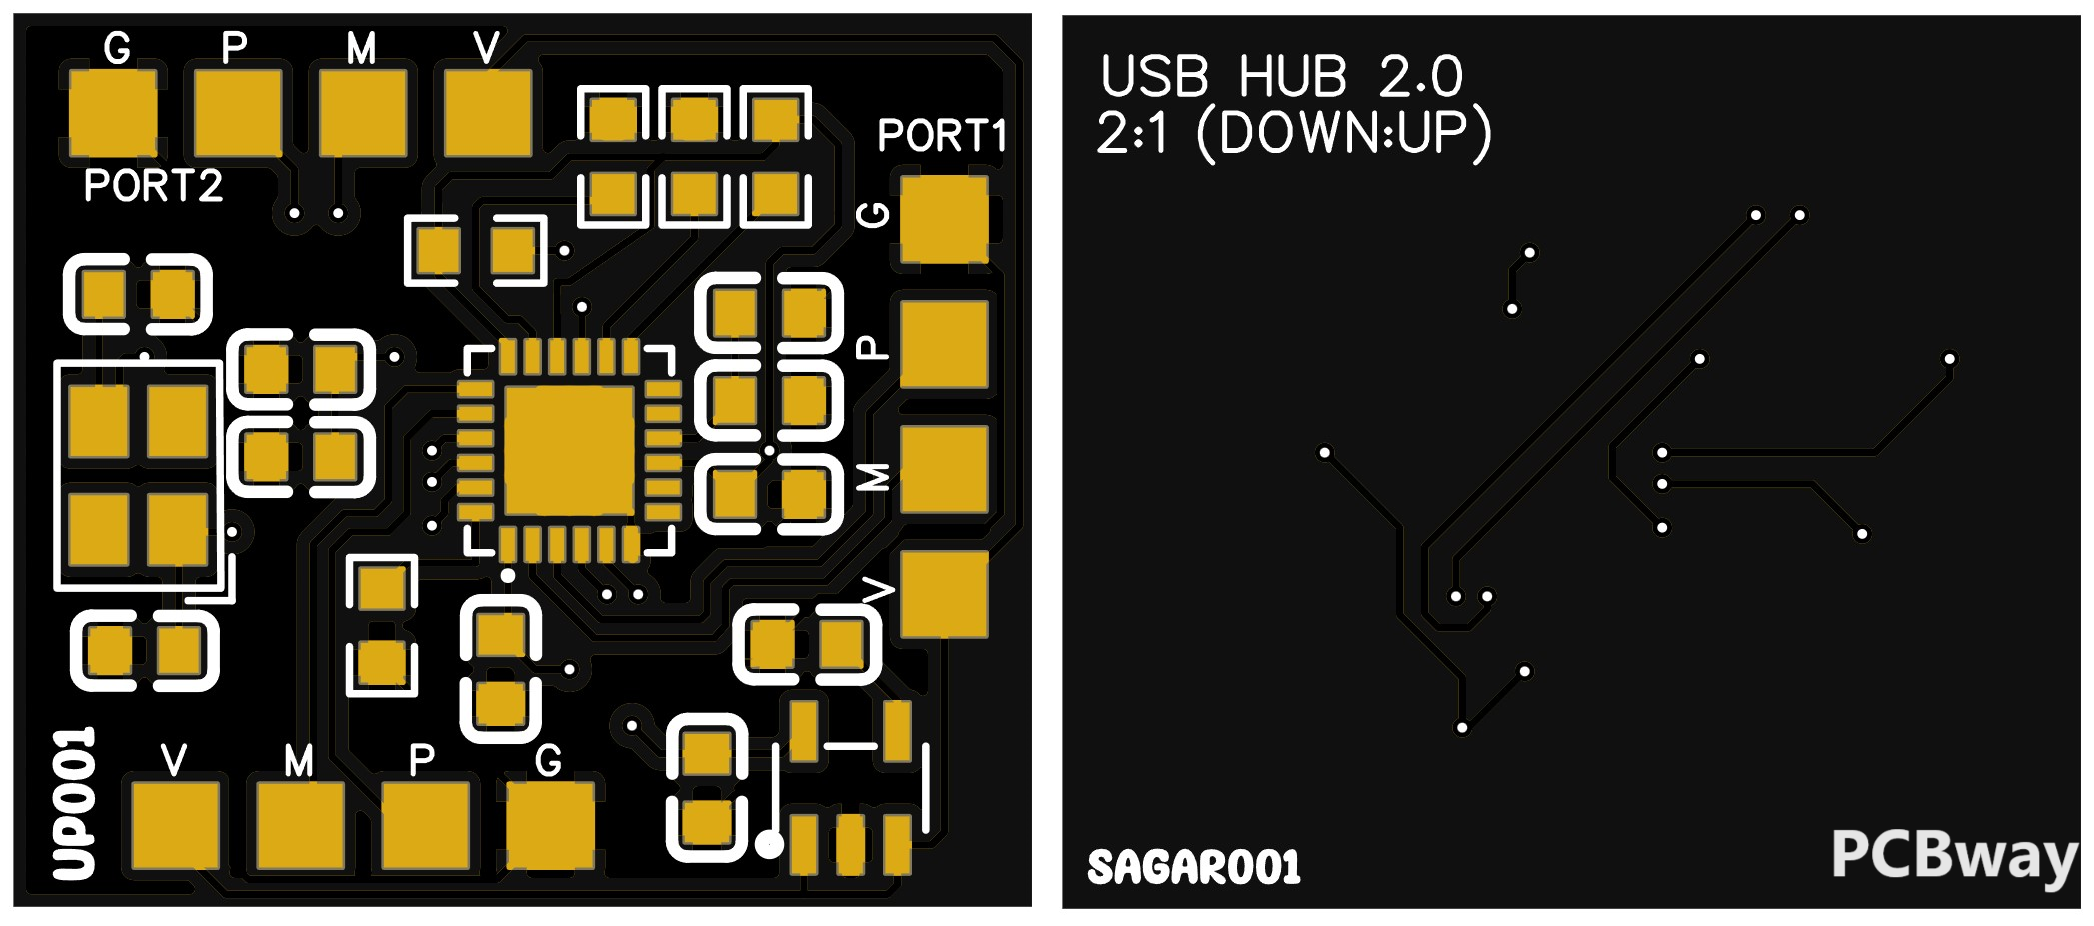
While designing the PCB keep all the filtering capacitors near to the IC which help to remove the EMI. Because the hub works on high speed 2.0 so it is very crucial to route the power lines and data lines separately. USB data lines are differential input and outputs, so it is recommended to route both the D+ and D- lines parallel to each other. In high speed data transfer clock skew also plays an important role so it is suggested to keep the length of both the data lines the same. Any vias and other circuit elements crossing over these data lines are not endorsed.
Connections and PCB work:
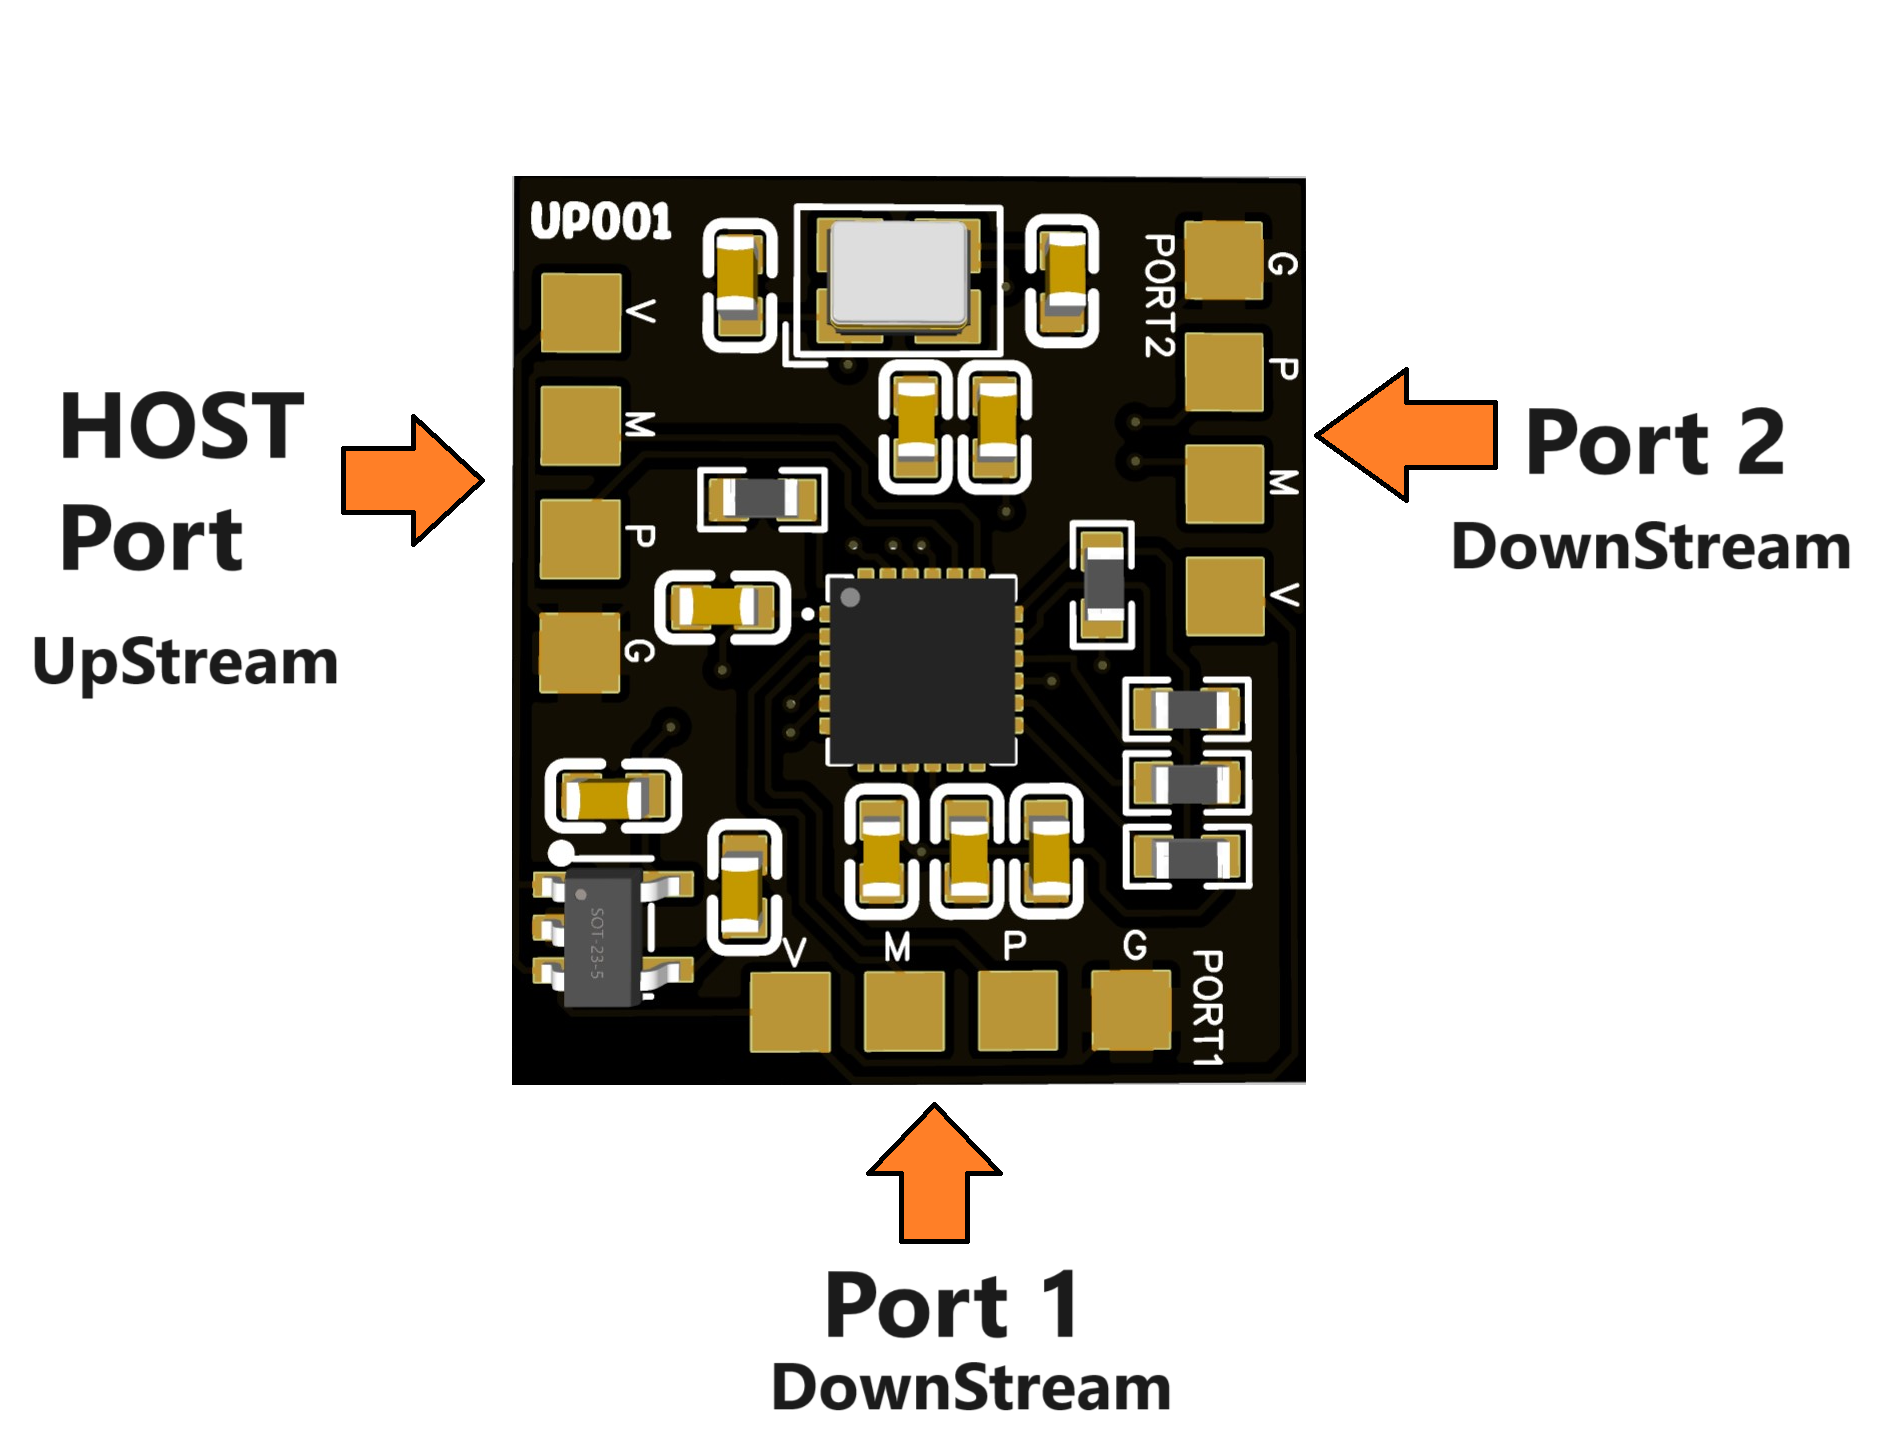
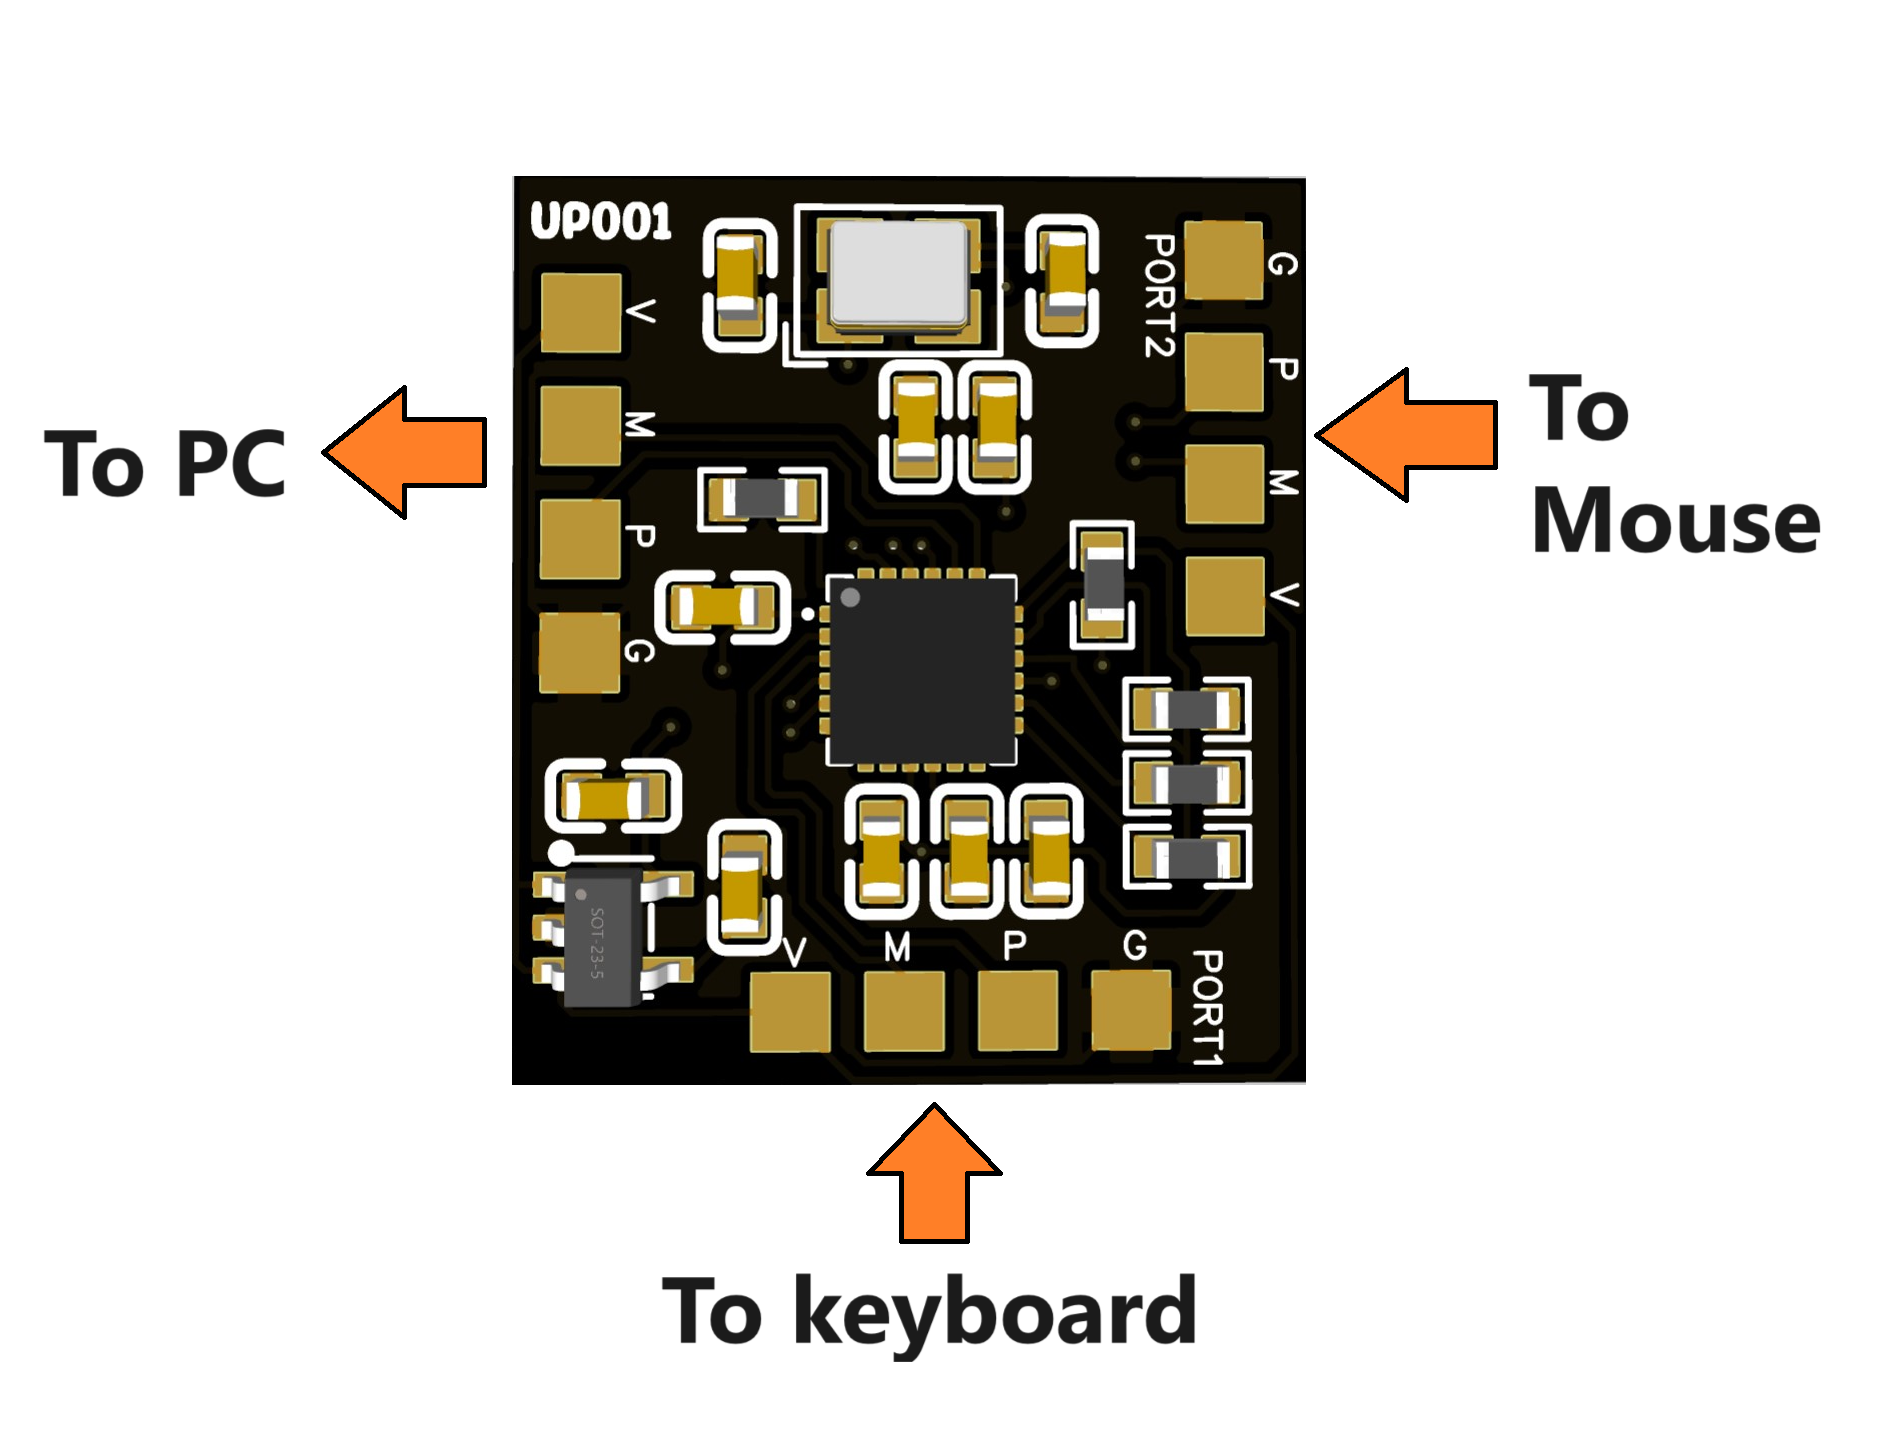
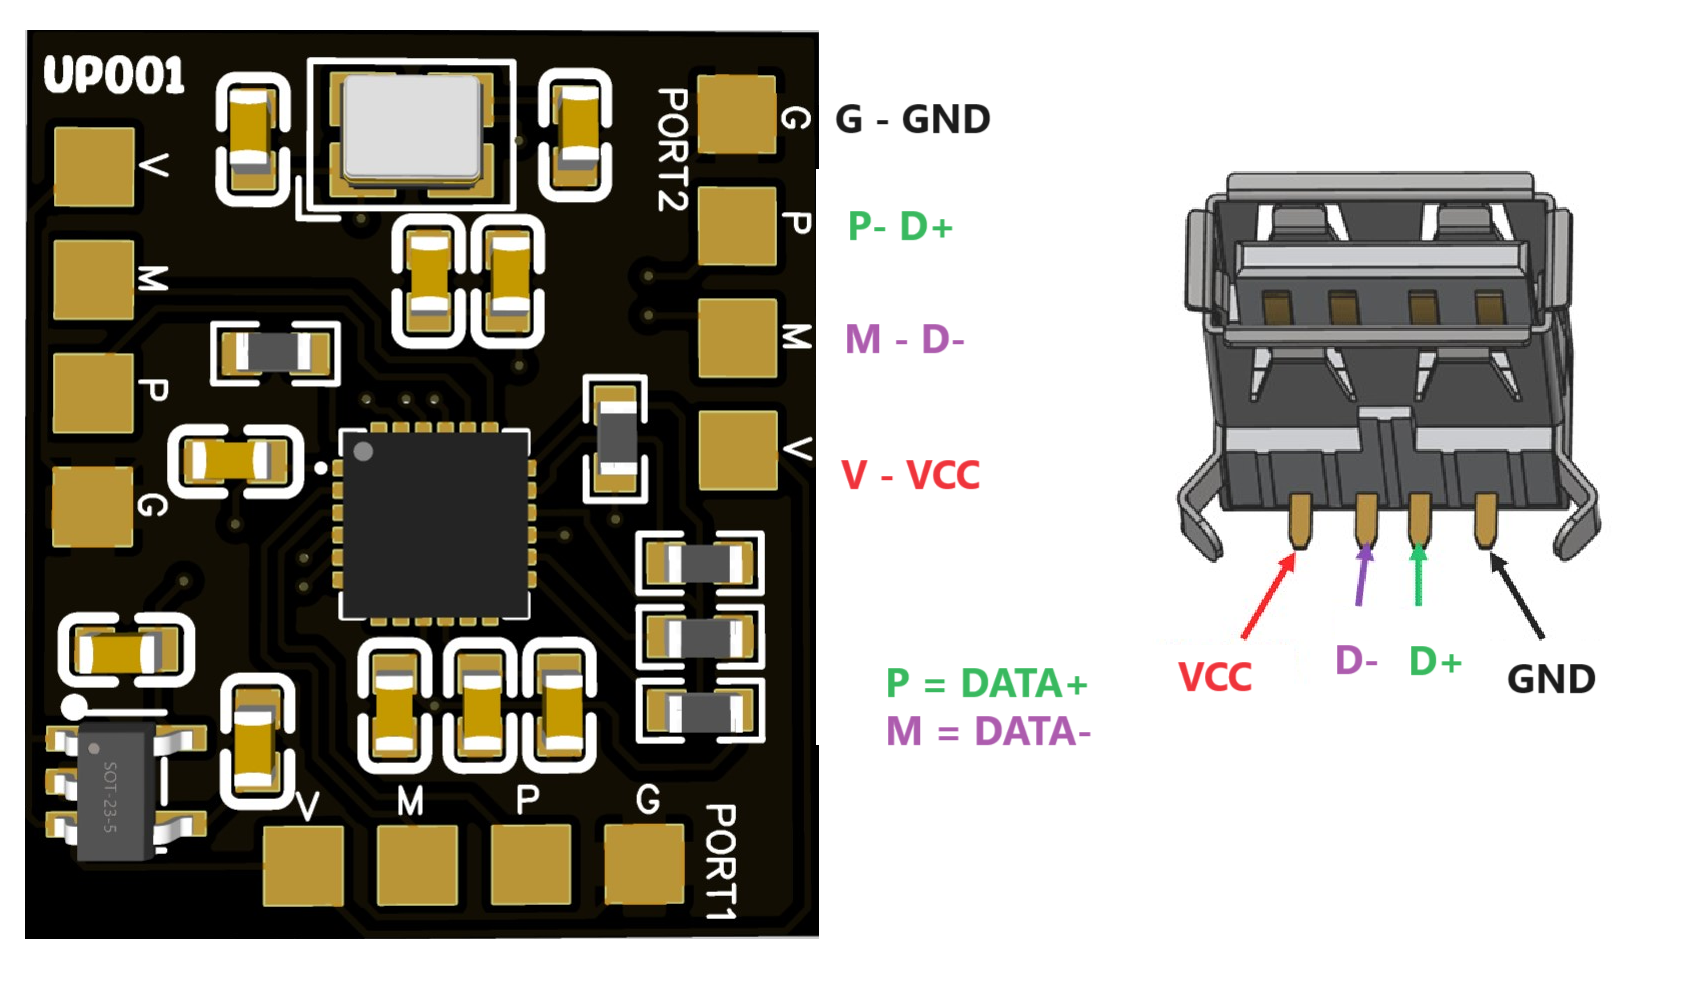
Power to 2 downstream ports is provided directly by the 5v logic from the laptop not from the voltage regulator. Now any external connector USB 2.0 can be connected directly to the port and speeds can be tested under different conditions. Outer connections are quite straightforward; one upstream port goes to the main PC USB and in the downstream ports any peripheral can be connected. The PCB is designed as small as possible with all the design considerations. You can use these designs to order the PCB from PCBWAY directly. Just upload the Gerber files and select the parameters, if you want a fully assembled PCB download BOM and CPL from here.
PCBWAY is the leading PCB manufacturer from China, offering a huge range of PCB services including PCBA, PCB prototyping, Stencil, Metal CNC, RF and flex PCB. Sign-up now using this link and get free PCB coupons (valid for new users).
Installation:
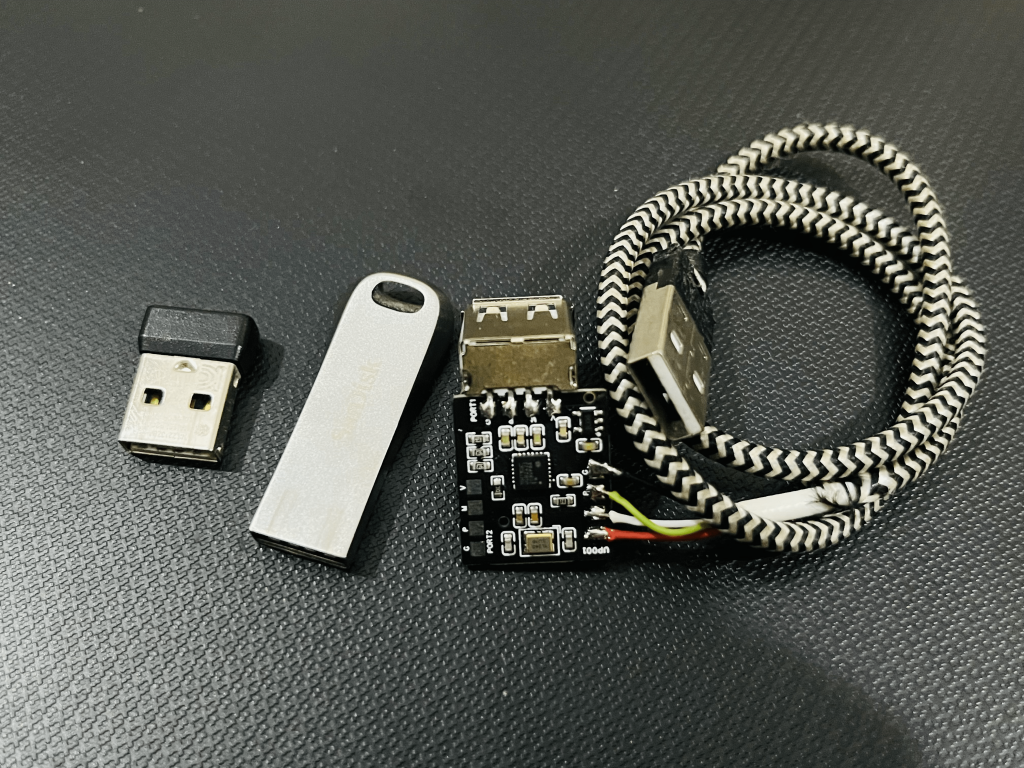
I want to use the USB hub with an external USB Wi-Fi and Bluetooth card. My laptop Wi-Fi card is damaged and it is the best possible solution I can find right now. So, I placed everything together, found some space to place and soldered everything in place. After restarting the PC now everything is working fine without compromising any external USB port and it will also eliminate plugging and carrying problems.
Working:
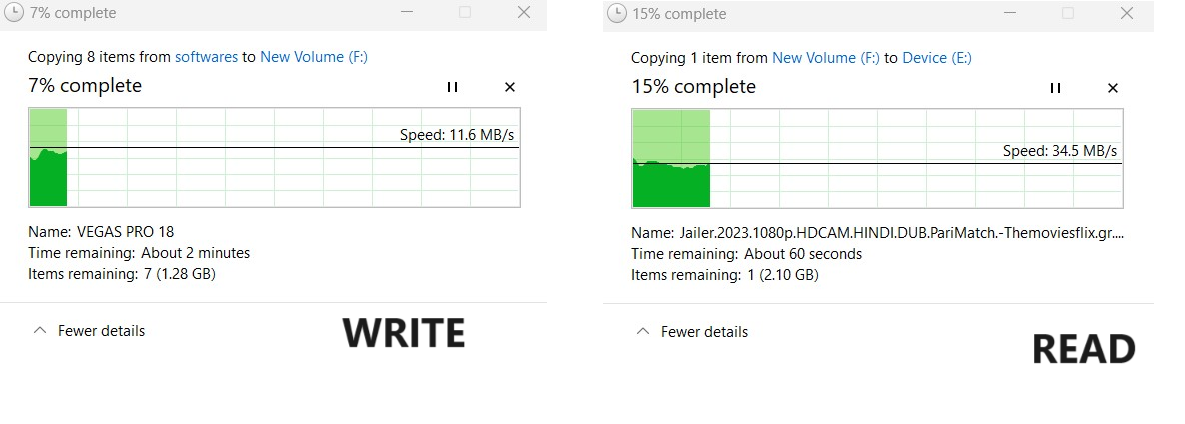
I also have done a small test externally to test the speed of this 2.0 hub with my fast USB drive. And I got fine speeds in uploading/ downloading. Again this USB2422 has a lot of features and I am using only a few required ones. You can change the configuration as per needs and utilize all the features. By the way, the USB hub is fully tested for this type of work, if you want the same designs then download the Gerber and order the PCB from Pcbway.
I made a Nano USB HUB
*PCBWay community is a sharing platform. We are not responsible for any design issues and parameter issues (board thickness, surface finish, etc.) you choose.

Raspberry Pi 5 7 Inch Touch Screen IPS 1024x600 HD LCD HDMI-compatible Display for RPI 4B 3B+ OPI 5 AIDA64 PC Secondary Screen(Without Speaker)
BUY NOW
ESP32-S3 4.3inch Capacitive Touch Display Development Board, 800×480, 5-point Touch, 32-bit LX7 Dual-core Processor
BUY NOW
Raspberry Pi 5 7 Inch Touch Screen IPS 1024x600 HD LCD HDMI-compatible Display for RPI 4B 3B+ OPI 5 AIDA64 PC Secondary Screen(Without Speaker)
BUY NOW- Comments(1)
- Likes(2)
 Log in to post comments.
 Youri de RooijOct 03,20230 CommentsReply
-
 Michal Raška
Sep 14,2024
-
 Engineer
Jul 30,2024
- 0 USER VOTES
- YOUR VOTE 0.00 0.00
- 1
- 2
- 3
- 4
- 5
- 6
- 7
- 8
- 9
- 10
- 1
- 2
- 3
- 4
- 5
- 6
- 7
- 8
- 9
- 10
- 1
- 2
- 3
- 4
- 5
- 6
- 7
- 8
- 9
- 10
- 1
- 2
- 3
- 4
- 5
- 6
- 7
- 8
- 9
- 10
 More by Manoj kumar
-
 Variable Current/Voltage DC power supply
To power up electronics circuits or while testing different voltage-ampere/power ranges are required...
-
 PCB soldering reflow hot Plate! A good Idea?
let’s talk about soldering in a new and easy method. Because I am working with SMT components and st...
-
 Non-contact Infrared temperature sensor using Arduino
Hello guys, I want to make my own most accurate temperature meter. When coming to the high temperatu...
-
 Arduino serial Programmer CH340N
There are lot of programmer boards that are compatible with Arduino. But the cheapest and smaller on...
-
 My own Arduino Nano Microcontroller board
Here is my new Arduino Nano board, This looks better with C-type and one step above compatible drive...
-
 50Watts Audio Amplifier using TDA7265
Home theaters and speaker systems are very popular due to Bass songs, releasing everyday and I am ve...
-
 STK4141 Amplifier is hidden GOLD
Analog audio amplifiers are very powerful enough to make a high noise with stable quality factor. I ...
-
 Solar Power MPPT Control Li-ion Battery Charger
When talking about standalone single cell battery chargers only one popular name came into my mind t...
-
 AC Power Monitoring Using BL0937 IC
AC power monitoring is an amazing feature nowadays in IoT related applications, such as smart fans, ...
-
 100W Lab Bench Power Supply From a Fast Charger
Power supplies play a very important role in testing electronic circuits. Power supplies are used to...
-
 MPPT Solar LIPO Battery Charger
I was just charging my Li-ion battery manually with my IP2312 charger, the high current version I ha...
-
 DIY Portable Power Supply
Whenever I am travelling from one place to another, I used to keep my electronics with me. And somet...
-
 I made a Nano USB HUB
I want to use the USB hub internally in my laptop but the available ones are very bulky and do not s...
-
 I made an ARDUINO NANO Clone Board
I made a series of Arduino Atmega328 boards and every new version has something new. We always learn...
-
 Arduino Got Pro Max upgrade!!
I am aware of sensors, modules and integrated circuit used with microcontrollers like Arduino. And I...
-
 Minimal Component tester using Arduino
You might know component tester and its different versions made by many hobbyists. Today I have made...
-
 Making a Digital Light Measuring Meter
While working on a home automation project on light, the light intensity unit- lux (lumens per squar...
-
 IR Jammer circuit using NE555 timer
I am working on IR protocol in university research Centre and then an idea of IR jammer comes into m...
-
 Variable Current/Voltage DC power supply
To power up electronics circuits or while testing different voltage-ampere/power ranges are required...
-
 PCB soldering reflow hot Plate! A good Idea?
let’s talk about soldering in a new and easy method. Because I am working with SMT components and st...
-
 Non-contact Infrared temperature sensor using Arduino
Hello guys, I want to make my own most accurate temperature meter. When coming to the high temperatu...
-
 Arduino serial Programmer CH340N
There are lot of programmer boards that are compatible with Arduino. But the cheapest and smaller on...
-
 My own Arduino Nano Microcontroller board
Here is my new Arduino Nano board, This looks better with C-type and one step above compatible drive...
-
 50Watts Audio Amplifier using TDA7265
Home theaters and speaker systems are very popular due to Bass songs, releasing everyday and I am ve...
-
 STK4141 Amplifier is hidden GOLD
Analog audio amplifiers are very powerful enough to make a high noise with stable quality factor. I ...
-
 Solar Power MPPT Control Li-ion Battery Charger
When talking about standalone single cell battery chargers only one popular name came into my mind t...
-
 AC Power Monitoring Using BL0937 IC
AC power monitoring is an amazing feature nowadays in IoT related applications, such as smart fans, ...
-
 100W Lab Bench Power Supply From a Fast Charger
Power supplies play a very important role in testing electronic circuits. Power supplies are used to...
-
 MPPT Solar LIPO Battery Charger
I was just charging my Li-ion battery manually with my IP2312 charger, the high current version I ha...
-
 DIY Portable Power Supply
Whenever I am travelling from one place to another, I used to keep my electronics with me. And somet...
-
-
-
-
Modifying a Hotplate to a Reflow Solder Station
1019 1 6 -
MPL3115A2 Barometric Pressure, Altitude, and Temperature Sensor
549 0 1 -
-
Nintendo 64DD Replacement Shell
452 0 2 -
V2 Commodore AMIGA USB-C Power Sink Delivery High Efficiency Supply Triple Output 5V ±12V OLED display ATARI compatible shark 100W
1291 4 2 -
How to measure weight with Load Cell and HX711
769 0 3


