
|
arduino IDEArduino
|
Arduino Temperature Logger With Sd Card
Parts required
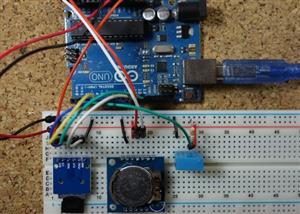
Here’s a complete list of the parts required for this project:

Arduino UNO – read Best Arduino Starter Kits
SD card module
Micro SD card
DHT11 temperature and humidity sensor
RTC module
Breadboard
Jumper wires
Note: alternatively to the SD card module, you can use a data logging shield. The data logging shield comes with built-in RTC and a prototyping area for soldering connections, sensors, etc..
Schematics
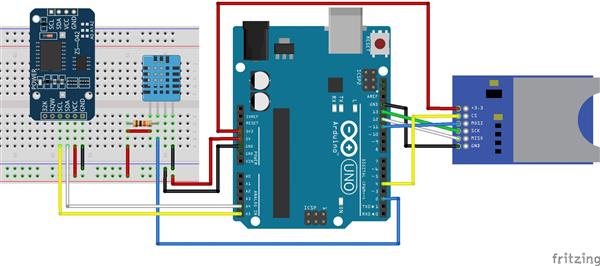
The following figure shows the circuit’s schematics for this project.

Note: make sure your SD card is formatted and working properly. Read “Guide to SD card module with Arduino“.
Installing the DHT sensor library
For this project you need to install the DHT library to read from the DHT11 sensor.
Click here to download the DHT-sensor-library. You should have a .zip folder in your Downloads folder
Unzip the .zip folder and you should get DHT-sensor-library-master folder
Rename your folder from DHT-sensor-library-master to DHT
Move the DHT folder to your Arduino IDE installation libraries folder
Finally, re-open your Arduino IDE
Code
Copy the following code to your Arduino IDE and upload it to your Arduino board.
#include <SPI.h> //for the SD card module
#include <SD.h> // for the SD card
#include <DHT.h> // for the DHT sensor
#include <RTClib.h> // for the RTC
//define DHT pin
#define DHTPIN 2 // what pin we're connected to
// uncomment whatever type you're using
#define DHTTYPE DHT11 // DHT 11
//#define DHTTYPE DHT22 // DHT 22 (AM2302)
//#define DHTTYPE DHT21 // DHT 21 (AM2301)
// initialize DHT sensor for normal 16mhz Arduino
DHT dht(DHTPIN, DHTTYPE);
// change this to match your SD shield or module;
// Arduino Ethernet shield and modules: pin 4
// Data loggin SD shields and modules: pin 10
// Sparkfun SD shield: pin 8
const int chipSelect = 4;
// Create a file to store the data
File myFile;
// RTC
RTC_DS1307 rtc;
void setup() {
//initializing the DHT sensor
dht.begin();
//initializing Serial monitor
Serial.begin(9600);
// setup for the RTC
while(!Serial); // for Leonardo/Micro/Zero
if(! rtc.begin()) {
Serial.println("Couldn't find RTC");
while (1);
}
else {
// following line sets the RTC to the date & time this sketch was compiled
rtc.adjust(DateTime(F(__DATE__), F(__TIME__)));
}
if(! rtc.isrunning()) {
Serial.println("RTC is NOT running!");
}
// setup for the SD card
Serial.print("Initializing SD card...");
if(!SD.begin(chipSelect)) {
Serial.println("initialization failed!");
return;
}
Serial.println("initialization done.");
//open file
myFile=SD.open("DATA.txt", FILE_WRITE);
// if the file opened ok, write to it:
if (myFile) {
Serial.println("File opened ok");
// print the headings for our data
myFile.println("Date,Time,Temperature oC");
}
myFile.close();
}
void loggingTime() {
DateTime now = rtc.now();
myFile = SD.open("DATA.txt", FILE_WRITE);
if (myFile) {
myFile.print(now.year(), DEC);
myFile.print('/');
myFile.print(now.month(), DEC);
myFile.print('/');
myFile.print(now.day(), DEC);
myFile.print(',');
myFile.print(now.hour(), DEC);
myFile.print(':');
myFile.print(now.minute(), DEC);
myFile.print(':');
myFile.print(now.second(), DEC);
myFile.print(",");
}
Serial.print(now.year(), DEC);
Serial.print('/');
Serial.print(now.month(), DEC);
Serial.print('/');
Serial.println(now.day(), DEC);
Serial.print(now.hour(), DEC);
Serial.print(':');
Serial.print(now.minute(), DEC);
Serial.print(':');
Serial.println(now.second(), DEC);
myFile.close();
delay(1000);
}
void loggingTemperature() {
// Reading temperature or humidity takes about 250 milliseconds!
// Sensor readings may also be up to 2 seconds 'old' (its a very slow sensor)
// Read temperature as Celsius
float t = dht.readTemperature();
// Read temperature as Fahrenheit
//float f = dht.readTemperature(true);
// Check if any reads failed and exit early (to try again).
if (isnan(t) /*|| isnan(f)*/) {
Serial.println("Failed to read from DHT sensor!");
return;
}
//debugging purposes
Serial.print("Temperature: ");
Serial.print(t);
Serial.println(" *C");
//Serial.print(f);
//Serial.println(" *F\t");
myFile = SD.open("DATA.txt", FILE_WRITE);
if (myFile) {
Serial.println("open with success");
myFile.print(t);
myFile.println(",");
}
myFile.close();
}
void loop() {
loggingTime();
loggingTemperature();
delay(5000);
}
In this code we create a loggingTime() function and a loggingTemperature() function that we call in the loop() to log the time and temperature to the DATA.txt file in the SD card.
Open the Serial Monitor at a baud rate of 9600 and check if everything is working properly.
Getting the data from the SD card
Let this project run for a few hours to gather a decent amount of data, and when you’re happy with the data logging period, shut down the Arduino and remove the SD from the SD card module.
Insert the SD card on your computer, open it, and you should have a DATA.txt file with the collected data.

You can open the data with a text editor, or use a spreadsheet to analyse and process your data.

The data is separated by commas, and each reading is in a new line. In this format, you can easily import data to Excel or other data processing software.
Arduino Temperature Logger With Sd Card
- Comments(0)
- Likes(0)
- 0 USER VOTES
- YOUR VOTE 0.00 0.00
- 1
- 2
- 3
- 4
- 5
- 6
- 7
- 8
- 9
- 10
- 1
- 2
- 3
- 4
- 5
- 6
- 7
- 8
- 9
- 10
- 1
- 2
- 3
- 4
- 5
- 6
- 7
- 8
- 9
- 10
- 1
- 2
- 3
- 4
- 5
- 6
- 7
- 8
- 9
- 10
 More by Engineer
-
 Esp8266 Task Publisher
In this project you’re going to build an ESP8266 Wi-Fi Button that can trigger any home automation e...
-
 ESP32 Avanced Weather Station
Introducing the BME280 Sensor ModuleThe BME280 sensor module reads temperature, humidity, and pressu...
-
 Esp32 Pir Sensor Time Interrupts
Introducing InterruptsTo trigger an event with a PIR motion sensor, you use interrupts. Interrupts a...
-
 Multiple Temperature Sensor Data Logging With Esp32
Introducing the DS18B20 Temperature SensorThe DS18B20 temperature sensor is a 1-wire digital tempera...
-
 IOT Button
IFTTTFor this project we’re going to use a free service called IFTTT that stands for If This Than Th...
-
 Wemos D1 Multishield Arduino
Project OverviewThe shield consists of a temperature sensor, a motion sensor, an LDR, and a 3 pin so...
-
 Motion Detection Alarm
ABOUT THIS PROJECTIn this project we’ll modify a commercial motion sensor (powered with mains voltag...
-
 Iot Spirit Level
ABOUT THIS PROJECTThe gyroscope measures rotational velocity (rad/s), this is the change of the angu...
-
 PIR Night Security Light
Parts Required:Here’s a list of the parts needed for this project:PIR Motion Sensor 220V (or 110V PI...
-
 Arduino Temperature Logger With Sd Card
Parts requiredHere’s a complete list of the parts required for this project:Arduino UNO – read Best ...
-
 Arduino Location Tracker
Introducing the NEO-6M GPS ModuleThe NEO-6M GPS module is shown in the figure below. It comes with a...
-
 Attendance System With Arduino & Rfid Tag
MFRC522 RFID ReaderIn this project we’re using the MFRC522 RFID reader and that’s the one we recomme...
-
-
AEL-2011 Power Supply Module
525 0 2 -
AEL-2011 50W Power Amplifier
485 0 2 -
-
-
Custom Mechanical Keyboard
693 0 0 -
Tester for Touch Screen Digitizer without using microcontroller
330 2 2 -
Audio reactive glow LED wristband/bracelet with NFC / RFID-Tags
310 0 1 -
-
-


