
|
arduino IDEArduino
|
Esp32 Pir Sensor Time Interrupts
Introducing Interrupts
To trigger an event with a PIR motion sensor, you use interrupts. Interrupts are useful for making things happen automatically in microcontroller programs, and can help solve timing problems.
With interrupts you don’t need to constantly check the current value of a pin. With interrupts, when a change is detected, an event is triggered (a function is called).
To set an interrupt in the Arduino IDE, you use the attachInterrupt() function, that accepts as arguments: the GPIO pin, the name of the function to be executed, and mode:
attachInterrupt(digitalPinToInterrupt(GPIO), function, mode);
GPIO Interrupt
The first argument is a GPIO number. Normally, you should use digitalPinToInterrupt(GPIO) to set the actual GPIO as an interrupt pin. For example, if you want to use GPIO 27 as an interrupt, use:
digitalPinToInterrupt(27)
With an ESP32 board, all the pins highlighted with a red rectangle in the following figure can be configured as interrupt pins. In this example we’ll use GPIO 27 as an interrupt connected to the PIR Motion sensor.
Function to be triggered
The second argument of the attachInterrupt() function is the name of the function that will be called every time the interrupt is triggered.
Mode
The third argument is the mode. There are 5 different modes:
LOW: to trigger the interrupt whenever the pin is LOW;
HIGH: to trigger the interrupt whenever the pin is HIGH;
CHANGE: to trigger the interrupt whenever the pin changes value – for example from HIGH to LOW or LOW to HIGH;
FALLING: for when the pin goes from HIGH to LOW;
RISING: to trigger when the pin goes from LOW to HIGH.
For this example will be using the RISING mode, because when the PIR motion sensor detects motion, the GPIO it is connected to goes from LOW to HIGH.
Introducing Timers
In this example we’ll also introduce timers. We want the LED to stay on for a predetermined number of seconds after motion is detected. Instead of using a delay() function that blocks your code and doesn’t allow you to do anything else for a determined number of seconds, we should use a timer.

The delay() function
You should be familiar with the delay() function as it is widely used. This function is pretty straightforward to use. It accepts a single int number as an argument. This number represents the time in milliseconds the program has to wait until moving on to the next line of code.
delay(time in milliseconds)
When you do delay(1000) your program stops on that line for 1 second.
delay() is a blocking function. Blocking functions prevent a program from doing anything else until that particular task is completed. If you need multiple tasks to occur at the same time, you cannot use delay().
For most projects you should avoid using delays and use timers instead.
The millis() function
Using a function called millis() you can return the number of milliseconds that have passed since the program first started.
millis()
Why is that function useful? Because by using some math, you can easily verify how much time has passed without blocking your code.
Blinking an LED with millis()
The following snippet of code shows how you can use the millis() function to create a blink LED project. It turns an LED on for 1000 milliseconds, and then turns it off.
// constants won't change. Used here to set a pin number :
const int ledPin = 26; // the number of the LED pin
// Variables will change :
int ledState = LOW; // ledState used to set the LED
// Generally, you should use "unsigned long" for variables that hold time
// The value will quickly become too large for an int to store
unsigned long previousMillis = 0; // will store last time LED was updated
// constants won't change :
const long interval = 1000; // interval at which to blink (milliseconds)
void setup() {
// set the digital pin as output:
pinMode(ledPin, OUTPUT);
}
void loop() {
// here is where you'd put code that needs to be running all the time.
// check to see if it's time to blink the LED; that is, if the
// difference between the current time and last time you blinked
// the LED is bigger than the interval at which you want to
// blink the LED.
unsigned long currentMillis = millis();
if (currentMillis - previousMillis >= interval) {
// save the last time you blinked the LED
previousMillis = currentMillis;
// if the LED is off turn it on and vice-versa:
if (ledState == LOW) {
ledState = HIGH;
} else {
ledState = LOW;
}
// set the LED with the ledState of the variable:
digitalWrite(ledPin, ledState);
}
}
How the code works
Let’s take a closer look at this blink sketch that works without a delay() function (it uses the millis() function instead).
Basically, this code subtracts the previous recorded time (previousMillis) from the current time (currentMillis). If the remainder is greater than the interval (in this case, 1000 milliseconds), the program updates the previousMillis variable to the current time, and either turns the LED on or off.
if (currentMillis - previousMillis >= interval) {
// save the last time you blinked the LED
previousMillis = currentMillis;
(...)
Because this snippet is non-blocking, any code that’s located outside of that first if statement should work normally.
You should now be able to understand that you can add other tasks to your loop() function and your code will still be blinking the LED every one second.
You can upload this code to your ESP32 and assemble the following schematic diagram to test it and modify the number of milliseconds to see how it works.
Important: the Mini AM312 PIR Motion Sensor used in this project operates at 3.3V. However, if you’re using another PIR motion sensor like the HC-SR501, it operates at 5V. You can either modify it to operate at 3.3V or simply power it using the Vin pin.
The following figure shows the AM312 PIR motion sensor pinout.

Uploading the Code
After wiring the circuit as shown in the schematic diagram, copy the code provided to your Arduino IDE.
You can upload the code as it is, or you can modify the number of seconds the LED is lit after detecting motion. Simply change the timeSeconds variable with the number of seconds you want.
#define timeSeconds 10
// Set GPIOs for LED and PIR Motion Sensor
const int led = 26;
const int motionSensor = 27;
// Timer: Auxiliary variables
unsigned long now = millis();
unsigned long lastTrigger = 0;
boolean startTimer = false;
// Checks if motion was detected, sets LED HIGH and starts a timer
void IRAM_ATTR detectsMovement() {
Serial.println("MOTION DETECTED!!!");
digitalWrite(led, HIGH);
startTimer = true;
lastTrigger = millis();
}
void setup() {
// Serial port for debugging purposes
Serial.begin(115200);
// PIR Motion Sensor mode INPUT_PULLUP
pinMode(motionSensor, INPUT_PULLUP);
// Set motionSensor pin as interrupt, assign interrupt function and set RISING mode
attachInterrupt(digitalPinToInterrupt(motionSensor), detectsMovement, RISING);
// Set LED to LOW
pinMode(led, OUTPUT);
digitalWrite(led, LOW);
}
void loop() {
// Current time
now = millis();
// Turn off the LED after the number of seconds defined in the timeSeconds variable
if(startTimer && (now - lastTrigger > (timeSeconds*1000))) {
Serial.println("Motion stopped...");
digitalWrite(led, LOW);
startTimer = false;
}
}
Note: if you’ve experienced any issues uploading code to your ESP32, take a look at the ESP32 Troubleshooting Guide.
How the Code Works
Let’s take a look at the code. Start by assigning two GPIO pins to the led and motionSensor variables.
// Set GPIOs for LED and PIR Motion Sensor
const int led = 26;
const int motionSensor = 27;
Then, create variables that will allow you set a timer to turn the LED off after motion is detected.
// Timer: Auxiliar variables
long now = millis();
long lastTrigger = 0;
boolean startTimer = false;
The now variable holds the current time. The lastTrigger variable holds the time when the PIR sensor detects motion. The startTimer is a boolean variable that starts the timer when motion is detected.
setup()
In the setup(), start by initializing the Serial port at 115200 baud rate.
Serial.begin(115200);
Set the PIR Motion sensor as an INPUT PULLUP.
pinMode(motionSensor, INPUT_PULLUP);
To set the PIR sensor pin as an interrupt, use the attachInterrupt() function as described earlier.
attachInterrupt(digitalPinToInterrupt(motionSensor), detectsMovement, RISING);
The pin that will detect motion is GPIO 27 and it will call the function detectsMovement() on RISING mode.
The LED is an OUTPUT whose state starts at LOW.
pinMode(led, OUTPUT);
digitalWrite(led, LOW);
loop()
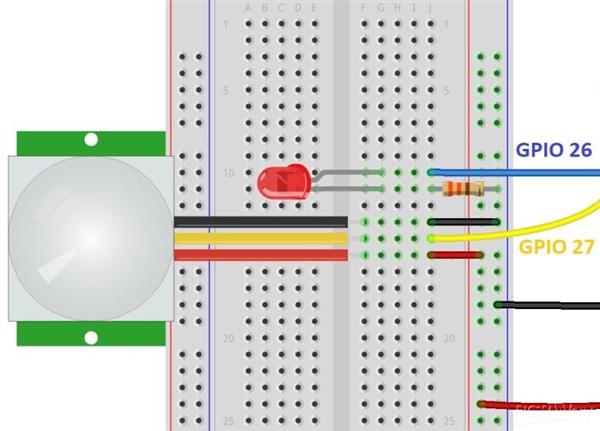
Esp32 Pir Sensor Time Interrupts
- Comments(0)
- Likes(0)
- 0 USER VOTES
- YOUR VOTE 0.00 0.00
- 1
- 2
- 3
- 4
- 5
- 6
- 7
- 8
- 9
- 10
- 1
- 2
- 3
- 4
- 5
- 6
- 7
- 8
- 9
- 10
- 1
- 2
- 3
- 4
- 5
- 6
- 7
- 8
- 9
- 10
- 1
- 2
- 3
- 4
- 5
- 6
- 7
- 8
- 9
- 10
 More by Engineer
-
 Esp8266 Task Publisher
In this project you’re going to build an ESP8266 Wi-Fi Button that can trigger any home automation e...
-
 ESP32 Avanced Weather Station
Introducing the BME280 Sensor ModuleThe BME280 sensor module reads temperature, humidity, and pressu...
-
 Esp32 Pir Sensor Time Interrupts
Introducing InterruptsTo trigger an event with a PIR motion sensor, you use interrupts. Interrupts a...
-
 Multiple Temperature Sensor Data Logging With Esp32
Introducing the DS18B20 Temperature SensorThe DS18B20 temperature sensor is a 1-wire digital tempera...
-
 IOT Button
IFTTTFor this project we’re going to use a free service called IFTTT that stands for If This Than Th...
-
 Wemos D1 Multishield Arduino
Project OverviewThe shield consists of a temperature sensor, a motion sensor, an LDR, and a 3 pin so...
-
 Motion Detection Alarm
ABOUT THIS PROJECTIn this project we’ll modify a commercial motion sensor (powered with mains voltag...
-
 Iot Spirit Level
ABOUT THIS PROJECTThe gyroscope measures rotational velocity (rad/s), this is the change of the angu...
-
 PIR Night Security Light
Parts Required:Here’s a list of the parts needed for this project:PIR Motion Sensor 220V (or 110V PI...
-
 Arduino Temperature Logger With Sd Card
Parts requiredHere’s a complete list of the parts required for this project:Arduino UNO – read Best ...
-
 Arduino Location Tracker
Introducing the NEO-6M GPS ModuleThe NEO-6M GPS module is shown in the figure below. It comes with a...
-
 Attendance System With Arduino & Rfid Tag
MFRC522 RFID ReaderIn this project we’re using the MFRC522 RFID reader and that’s the one we recomme...
-
-
AEL-2011 Power Supply Module
528 0 2 -
AEL-2011 50W Power Amplifier
492 0 2 -
-
-
Custom Mechanical Keyboard
700 0 0 -
Tester for Touch Screen Digitizer without using microcontroller
331 2 2 -
Audio reactive glow LED wristband/bracelet with NFC / RFID-Tags
312 0 1 -
-
-


