|
ESP8266-DEVKITC-02D-FEspressif Systems
|
x 1 | |

|
MPU-6050 Module 3 Axis Gyroscope Accelerometer Module |
x 1 | |

|
40 Pin Jumper Wires Female to Female 20cm |
x 1 | |

|
Mini Breadboard |
x 1 |

|
arduino IDEArduino
|
Iot Spirit Level
ABOUT THIS PROJECT
The gyroscope measures rotational velocity (rad/s), this is the change of the angular position over time along the X, Y and Z axis (roll, pitch and yaw). This allows us to determine the orientation of an object.
The accelerometer measures acceleration (rate of change of the object’s velocity). It senses static forces like gravity (9.8m/s2) or dynamic forces like vibrations or movement. The MPU-6050 measures acceleration over the X, Y an Z axis. Ideally, in a static object the acceleration over the Z axis is equal to the gravitational force, and it should be zero on the X and Y axis.
Using the values from the accelerometer, it is possible to calculate the roll and pitch angles using trigonometry. However, it is not possible to calculate the yaw.
We can combine the information from both sensors to get more accurate information about the sensor orientation.
MPU-6050 Pinout
Here’s the pinout for the MPU-6050 sensor module.
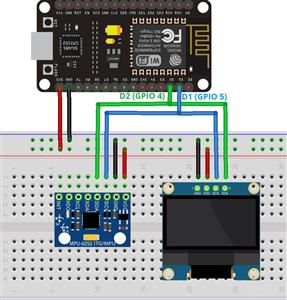
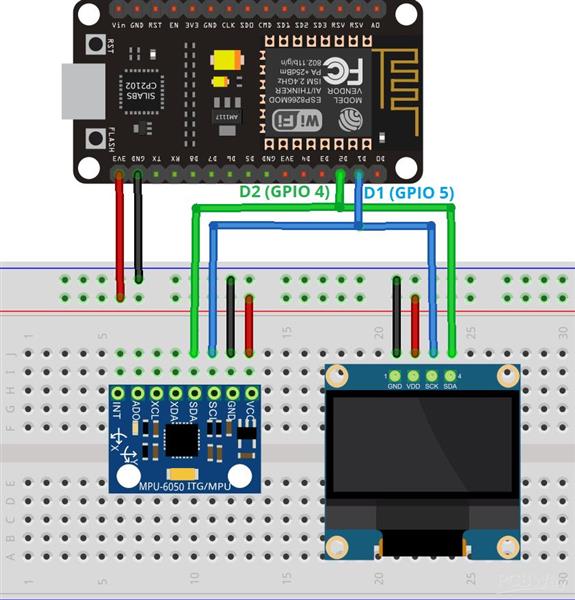
VCCPower the sensor (3.3V or 5V)GNDCommon GNDSCLSCL pin for I2C communication (GPIO 5)SDASDA pin for I2C communication (GPIO 4)XDAUsed to interface other I2C sensors with the MPU-6050XCLUsed to interface other I2C sensors with the MPU-6050AD0Use this pin to change the I2C addressINTInterrupt pin – can be used to indicate that new measurement data is available
Preparing Arduino IDE
Install the ESP8266 NodeMCU Board in Arduino IDE
If you prefer using VS Code + PlatformIO IDE, follow the next guide:
Getting Started with VS Code and PlatformIO IDE for ESP32 and ESP8266
Installing Libraries
?
There are different ways to get readings from the sensor. In this tutorial, we’ll use the Adafruit MPU6050 library. To use this library you also need to install the Adafruit Unified Sensor library and the Adafruit Bus IO Library.
Open your Arduino IDE and go to Sketch > Include Library > Manage Libraries. The Library Manager should open.
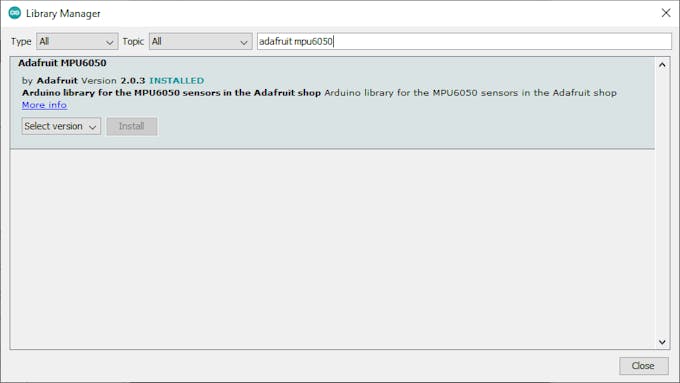
Type “adafruit mpu6050” on the search box and install the library.
Then, search for “Adafruit Unified Sensor”. Scroll all the way down to find the library and install it.
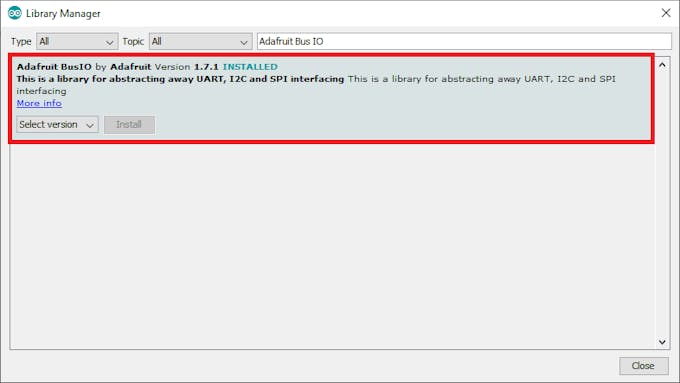
Finally, search for “Adafruit Bus IO” and install it.
CODE
#include <Adafruit_MPU6050.h>
#include <Adafruit_Sensor.h>
#include <Wire.h>
Adafruit_MPU6050 mpu;
void setup(void) {
Serial.begin(115200);
while (!Serial)
delay(10); // will pause Zero, Leonardo, etc until serial console opens
Serial.println("Adafruit MPU6050 test!");
// Try to initialize!
if (!mpu.begin()) {
Serial.println("Failed to find MPU6050 chip");
while (1) {
delay(10);
}
}
Serial.println("MPU6050 Found!");
mpu.setAccelerometerRange(MPU6050_RANGE_8_G);
Serial.print("Accelerometer range set to: ");
switch (mpu.getAccelerometerRange()) {
case MPU6050_RANGE_2_G:
Serial.println("+-2G");
break;
case MPU6050_RANGE_4_G:
Serial.println("+-4G");
break;
case MPU6050_RANGE_8_G:
Serial.println("+-8G");
break;
case MPU6050_RANGE_16_G:
Serial.println("+-16G");
break;
}
mpu.setGyroRange(MPU6050_RANGE_500_DEG);
Serial.print("Gyro range set to: ");
switch (mpu.getGyroRange()) {
case MPU6050_RANGE_250_DEG:
Serial.println("+- 250 deg/s");
break;
case MPU6050_RANGE_500_DEG:
Serial.println("+- 500 deg/s");
break;
case MPU6050_RANGE_1000_DEG:
Serial.println("+- 1000 deg/s");
break;
case MPU6050_RANGE_2000_DEG:
Serial.println("+- 2000 deg/s");
break;
}
mpu.setFilterBandwidth(MPU6050_BAND_5_HZ);
Serial.print("Filter bandwidth set to: ");
switch (mpu.getFilterBandwidth()) {
case MPU6050_BAND_260_HZ:
Serial.println("260 Hz");
break;
case MPU6050_BAND_184_HZ:
Serial.println("184 Hz");
break;
case MPU6050_BAND_94_HZ:
Serial.println("94 Hz");
break;
case MPU6050_BAND_44_HZ:
Serial.println("44 Hz");
break;
case MPU6050_BAND_21_HZ:
Serial.println("21 Hz");
break;
case MPU6050_BAND_10_HZ:
Serial.println("10 Hz");
break;
case MPU6050_BAND_5_HZ:
Serial.println("5 Hz");
break;
}
Serial.println("");
delay(100);
}
void loop() {
/* Get new sensor events with the readings */
sensors_event_t a, g, temp;
mpu.getEvent(&a, &g, &temp);
/* Print out the values */
Serial.print("Acceleration X: ");
Serial.print(a.acceleration.x);
Serial.print(", Y: ");
Serial.print(a.acceleration.y);
Serial.print(", Z: ");
Serial.print(a.acceleration.z);
Serial.println(" m/s^2");
Serial.print("Rotation X: ");
Serial.print(g.gyro.x);
Serial.print(", Y: ");
Serial.print(g.gyro.y);
Serial.print(", Z: ");
Serial.print(g.gyro.z);
Serial.println(" rad/s");
Serial.print("Temperature: ");
Serial.print(temp.temperature);
Serial.println(" degC");
Serial.println("");
delay(500);
}
Iot Spirit Level
- Comments(0)
- Likes(0)
- 0 USER VOTES
- YOUR VOTE 0.00 0.00
- 1
- 2
- 3
- 4
- 5
- 6
- 7
- 8
- 9
- 10
- 1
- 2
- 3
- 4
- 5
- 6
- 7
- 8
- 9
- 10
- 1
- 2
- 3
- 4
- 5
- 6
- 7
- 8
- 9
- 10
- 1
- 2
- 3
- 4
- 5
- 6
- 7
- 8
- 9
- 10
 More by Engineer
-
 Esp8266 Task Publisher
In this project you’re going to build an ESP8266 Wi-Fi Button that can trigger any home automation e...
-
 ESP32 Avanced Weather Station
Introducing the BME280 Sensor ModuleThe BME280 sensor module reads temperature, humidity, and pressu...
-
 Esp32 Pir Sensor Time Interrupts
Introducing InterruptsTo trigger an event with a PIR motion sensor, you use interrupts. Interrupts a...
-
 Multiple Temperature Sensor Data Logging With Esp32
Introducing the DS18B20 Temperature SensorThe DS18B20 temperature sensor is a 1-wire digital tempera...
-
 IOT Button
IFTTTFor this project we’re going to use a free service called IFTTT that stands for If This Than Th...
-
 Wemos D1 Multishield Arduino
Project OverviewThe shield consists of a temperature sensor, a motion sensor, an LDR, and a 3 pin so...
-
 Motion Detection Alarm
ABOUT THIS PROJECTIn this project we’ll modify a commercial motion sensor (powered with mains voltag...
-
 Iot Spirit Level
ABOUT THIS PROJECTThe gyroscope measures rotational velocity (rad/s), this is the change of the angu...
-
 PIR Night Security Light
Parts Required:Here’s a list of the parts needed for this project:PIR Motion Sensor 220V (or 110V PI...
-
 Arduino Temperature Logger With Sd Card
Parts requiredHere’s a complete list of the parts required for this project:Arduino UNO – read Best ...
-
 Arduino Location Tracker
Introducing the NEO-6M GPS ModuleThe NEO-6M GPS module is shown in the figure below. It comes with a...
-
 Attendance System With Arduino & Rfid Tag
MFRC522 RFID ReaderIn this project we’re using the MFRC522 RFID reader and that’s the one we recomme...
-
-
-
kmMiniSchield MIDI I/O - IN/OUT/THROUGH MIDI extension for kmMidiMini
125 0 0 -
DIY Laser Power Meter with Arduino
180 0 2 -
-
-
Box & Bolt, 3D Printed Cardboard Crafting Tools
165 0 2 -


