
|
ESP32-DevKitC-32DEspressif Systems
|
x 1 | |
|
|
EG1271AE-Switch
|
x 1 | |

|
UUD1A102MNL1GSNichicon
|
x 1 | |

|
APT2012SGCKingbright
|
x 1 | |

|
2464Keystone Electronics
|
x 1 |
Esp8266 Task Publisher
In this project you’re going to build an ESP8266 Wi-Fi Button that can trigger any home automation event. This is like a remote control that you can take in your pocket or place anywhere that when pressed sends out an email. It can also be called a DIY Amazon Dash Button clone.
Prerequisites
Before proceeding with this tutorial we recommend taking a look at these resources:
Getting Started with ESP8266 Wi-Fi
ESP8266 Deep Sleep with Arduino IDE
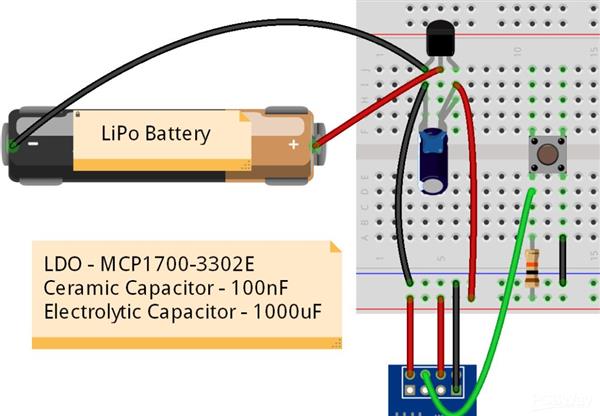
ESP8266 Voltage Regulator (LiPo and Li-ion Batteries)
If you like ESP8266 and you want to learn more about it. I recommend downloading my course: Home Automation using ESP8266.
Introduction
The Wi-Fi button is not a new idea and this concept was popularized by Amazon that created the Dash button, which is a small button that instantly orders a product to your home.
Instead of ordering a product we can turn on a light, toggle a lamp, send a value, trigger an email notification and much more, as you’re going to see by the end of this project.
IFTTT
For this project we’re going to use a free service called IFTTT that stands for If This Than That.
This service is used to automate a wide variety of tasks online. In this case, we will send an email when the ESP pushbutton is pressed.
Type in your browser https://ifttt.com and click the “Get started” button in the middle of the page. Complete the form with your details and create your account.

Creating the Applet
Open the “My Applets” tab, press the create “New Applet” button.

Click the “This” word and search for the “Webhooks” service.

Receive a web request
You need to type in the event name button_pressed. With the Webhooks service you can trigger an action when you make an HTTP request to a specific URL.
Click the “Create trigger” button:

Now press the “That” word and search for the Gmail service.

Send email
If it’s the first time using the Gmail service with IFTTT, a new window opens and you’ll have to grant access, so IFTTT can send out emails through your account.
Choose the “Send email” option and enter the email address in the “To address” field where you want to receive your notification.

You can customize the subject and body of the email, but for demonstration purposes I’ll leave the default values. Finally press the “Create action” button.

You should have your Applet created after clicking “Finish”
:

Testing the Applet
Open the “Search” tab, find the Webhooks service and open it.

Go to the “Documentation” tab.

Here you can find your unique API KEY that you must keep private. Type in the event name, button_pressed. Your final URL should appear in the bottom of the web page. Copy that URL.

Open a new tab in your browser and hit enter. You should see this message saying “Congratulations!”.

Open your email client and the new message should be there.

In case the email didn’t arrive after a few seconds, I recommend double-checking the URL and see if you’re using the correct event name, both in your Applet and in your URL.
Note: if it worked save your unique URL in a Notepad, because you’ll need it later in this project.
code
#include <ESP8266WiFi.h>
// Replace with your SSID and Password
const char* ssid = "REPLACE_WITH_YOUR_SSID";
const char* password = "REPLACE_WITH_YOUR_PASSWORD";
// Replace with your unique IFTTT URL resource
const char* resource = "REPLACE_WITH_YOUR_IFTTT_URL_RESOURCE";
// How your resource variable should look like, but with your own API KEY (that API KEY below is just an example):
//const char* resource = "/trigger/button_pressed/with/key/nAZjOphL3d-ZO4N3k64-1A7gTlNSrxMJdmqy";
// Maker Webhooks IFTTT
const char* server = "maker.ifttt.com";
void setup() {
Serial.begin(115200);
initWifi();
makeIFTTTRequest();
// Deep sleep mode until RESET pin is connected to a LOW signal (pushbutton is pressed)
ESP.deepSleep(0);
}
void loop() {
// sleeping so wont get here
}
// Establish a Wi-Fi connection with your router
void initWifi() {
Serial.print("Connecting to: ");
Serial.print(ssid);
WiFi.begin(ssid, password);
int timeout = 10 * 4; // 10 seconds
while(WiFi.status() != WL_CONNECTED && (timeout-- > 0)) {
delay(250);
Serial.print(".");
}
Serial.println("");
if(WiFi.status() != WL_CONNECTED) {
Serial.println("Failed to connect, going back to sleep");
}
Serial.print("WiFi connected in: ");
Serial.print(millis());
Serial.print(", IP address: ");
Serial.println(WiFi.localIP());
}
// Make an HTTP request to the IFTTT web service
void makeIFTTTRequest() {
Serial.print("Connecting to ");
Serial.print(server);
WiFiClient client;
int retries = 5;
while(!!!client.connect(server, 80) && (retries-- > 0)) {
Serial.print(".");
}
Serial.println();
if(!!!client.connected()) {
Serial.println("Failed to connect, going back to sleep");
}
Serial.print("Request resource: ");
Serial.println(resource);
client.print(String("GET ") + resource +
" HTTP/1.1\r\n" +
"Host: " + server + "\r\n" +
"Connection: close\r\n\r\n");
int timeout = 5 * 10; // 5 seconds
while(!!!client.available() && (timeout-- > 0)){
delay(100);
}
if(!!!client.available()) {
Serial.println("No response, going back to sleep");
}
while(client.available()){
Serial.write(client.read());
}
Serial.println("\nclosing connection");
client.stop();
}
Esp8266 Task Publisher

Raspberry Pi 5 7 Inch Touch Screen IPS 1024x600 HD LCD HDMI-compatible Display for RPI 4B 3B+ OPI 5 AIDA64 PC Secondary Screen(Without Speaker)
BUY NOW
ESP32-S3 4.3inch Capacitive Touch Display Development Board, 800×480, 5-point Touch, 32-bit LX7 Dual-core Processor
BUY NOW
Raspberry Pi 5 7 Inch Touch Screen IPS 1024x600 HD LCD HDMI-compatible Display for RPI 4B 3B+ OPI 5 AIDA64 PC Secondary Screen(Without Speaker)
BUY NOW- Comments(0)
- Likes(0)
 Log in to post comments.
- 0 USER VOTES
- YOUR VOTE 0.00 0.00
- 1
- 2
- 3
- 4
- 5
- 6
- 7
- 8
- 9
- 10
- 1
- 2
- 3
- 4
- 5
- 6
- 7
- 8
- 9
- 10
- 1
- 2
- 3
- 4
- 5
- 6
- 7
- 8
- 9
- 10
- 1
- 2
- 3
- 4
- 5
- 6
- 7
- 8
- 9
- 10
 More by Engineer
-
 Motion Detection Alarm
ABOUT THIS PROJECTIn this project we’ll modify a commercial motion sensor (powered with mains voltag...
-
 Iot Spirit Level
ABOUT THIS PROJECTThe gyroscope measures rotational velocity (rad/s), this is the change of the angu...
-
 PIR Night Security Light
Parts Required:Here’s a list of the parts needed for this project:PIR Motion Sensor 220V (or 110V PI...
-
 Arduino Temperature Logger With Sd Card
Parts requiredHere’s a complete list of the parts required for this project:Arduino UNO – read Best ...
-
 Arduino Location Tracker
Introducing the NEO-6M GPS ModuleThe NEO-6M GPS module is shown in the figure below. It comes with a...
-
 Attendance System With Arduino & Rfid Tag
MFRC522 RFID ReaderIn this project we’re using the MFRC522 RFID reader and that’s the one we recomme...
-
 Esp8266 Task Publisher
In this project you’re going to build an ESP8266 Wi-Fi Button that can trigger any home automation e...
-
 ESP32 Avanced Weather Station
Introducing the BME280 Sensor ModuleThe BME280 sensor module reads temperature, humidity, and pressu...
-
 Esp32 Pir Sensor Time Interrupts
Introducing InterruptsTo trigger an event with a PIR motion sensor, you use interrupts. Interrupts a...
-
 Multiple Temperature Sensor Data Logging With Esp32
Introducing the DS18B20 Temperature SensorThe DS18B20 temperature sensor is a 1-wire digital tempera...
-
 IOT Button
IFTTTFor this project we’re going to use a free service called IFTTT that stands for If This Than Th...
-
 Wemos D1 Multishield Arduino
Project OverviewThe shield consists of a temperature sensor, a motion sensor, an LDR, and a 3 pin so...
-
 Motion Detection Alarm
ABOUT THIS PROJECTIn this project we’ll modify a commercial motion sensor (powered with mains voltag...
-
 Iot Spirit Level
ABOUT THIS PROJECTThe gyroscope measures rotational velocity (rad/s), this is the change of the angu...
-
 PIR Night Security Light
Parts Required:Here’s a list of the parts needed for this project:PIR Motion Sensor 220V (or 110V PI...
-
 Arduino Temperature Logger With Sd Card
Parts requiredHere’s a complete list of the parts required for this project:Arduino UNO – read Best ...
-
 Arduino Location Tracker
Introducing the NEO-6M GPS ModuleThe NEO-6M GPS module is shown in the figure below. It comes with a...
-
 Attendance System With Arduino & Rfid Tag
MFRC522 RFID ReaderIn this project we’re using the MFRC522 RFID reader and that’s the one we recomme...
-
 Esp8266 Task Publisher
In this project you’re going to build an ESP8266 Wi-Fi Button that can trigger any home automation e...
-
 ESP32 Avanced Weather Station
Introducing the BME280 Sensor ModuleThe BME280 sensor module reads temperature, humidity, and pressu...
-
 Esp32 Pir Sensor Time Interrupts
Introducing InterruptsTo trigger an event with a PIR motion sensor, you use interrupts. Interrupts a...
-
 Multiple Temperature Sensor Data Logging With Esp32
Introducing the DS18B20 Temperature SensorThe DS18B20 temperature sensor is a 1-wire digital tempera...
-
 IOT Button
IFTTTFor this project we’re going to use a free service called IFTTT that stands for If This Than Th...
-
 Wemos D1 Multishield Arduino
Project OverviewThe shield consists of a temperature sensor, a motion sensor, an LDR, and a 3 pin so...
-
Commodore 64 1541-II 1581 Floppy Disk Drive C64 Power Supply Unit USB-C 5V 12V DIN connector 5.25
164 1 3 -
Easy to print simple stacking organizer with drawers
87 0 0 -
-
-
-
Modifying a Hotplate to a Reflow Solder Station
1136 1 6 -
MPL3115A2 Barometric Pressure, Altitude, and Temperature Sensor
638 0 1 -
-
Nintendo 64DD Replacement Shell
494 0 2 -
V2 Commodore AMIGA USB-C Power Sink Delivery High Efficiency Supply Triple Output 5V ±12V OLED display ATARI compatible shark 100W
1439 4 3


