|
arduino IDEArduino
|
Motion Detection Alarm
ABOUT THIS PROJECT
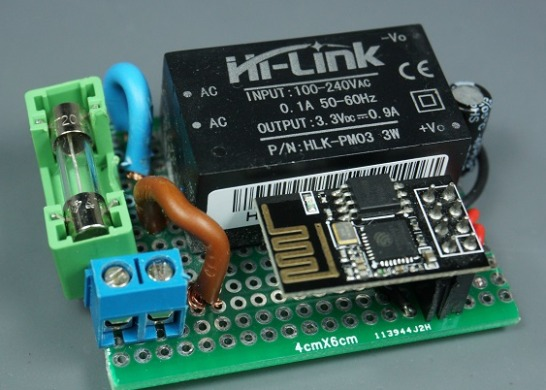
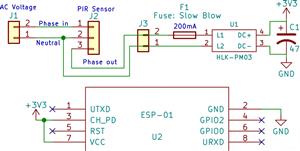
In this project we’ll modify a commercial motion sensor (powered with mains voltage) with an ESP8266 to log data whenever motion is detected. The data will be sent to Node-RED using MQTT communication protocol. The ESP8266 will be powered through the motion sensor phase out wire using the HLK-PM03 AC/DC converter.
Prerequisites
Here’s the imported flow. It receives the ESP8266 MQTT messages and logs the time whenever motion is detected.

We’ve also added two buttons to clear and refresh the log.
Before continuing with this project, we recommend taking a look at the following resources:
Getting Started with ESP8266 WiFi Transceiver (Review)
Power ESP8266 with Mains Voltage using Hi-Link HLK-PM03
What is MQTT and How It Works
You need to have installed in your Raspberry Pi: Node-RED,Node-RED Dashboard, and Mosquitto MQTT broker
ESP8266 GPIOs and Pinout Reference
Parts Required:
Here’s a list of the parts needed for this project:
PIR Motion Sensor 220V (or 110V PIR Motion Sensor)
ESP8266-01 – read Best ESP8266 Wi-Fi Development Boards
ESP8266-01 Serial Adapter (to upload code to the ESP8266)
Hi-Link HLK-PM03 (to convert mains voltage to DC 3.3V)
Small protoboard
Fuse Slow Blow (200mA)
47 uF electrolytic capacitor
Raspberry Pi (to host Node-RED and MQTT broker) – read Best Raspberry Pi Kits
Node-RED Dashboard
After making all the necessary changes, click the Deploy button to save all the changes.

Now, your Node-RED application is ready. To access Node-RED Dashboard and see how your application looks, access any browser in your local network and type:
http://Your_RPi_IP_address:1880/ui
Demonstration
Now, you can test your project. Whenever motion is detected, the ESP8266 powers up and sends a message via MQTT to Node-RED.
If you go to your Node-RED Dashboard you can see all the logs of when motion was detected. Your application should look as in the following figure.

The dashboard shows the last time motion was detected and all previous logs. You also have the option to refresh the log, and clear the log. Please note that clearing the log is irreversible.

Motion Detection Alarm
- Comments(0)
- Likes(0)
- 0 USER VOTES
- YOUR VOTE 0.00 0.00
- 1
- 2
- 3
- 4
- 5
- 6
- 7
- 8
- 9
- 10
- 1
- 2
- 3
- 4
- 5
- 6
- 7
- 8
- 9
- 10
- 1
- 2
- 3
- 4
- 5
- 6
- 7
- 8
- 9
- 10
- 1
- 2
- 3
- 4
- 5
- 6
- 7
- 8
- 9
- 10
 More by Engineer
-
 Esp8266 Task Publisher
In this project you’re going to build an ESP8266 Wi-Fi Button that can trigger any home automation e...
-
 ESP32 Avanced Weather Station
Introducing the BME280 Sensor ModuleThe BME280 sensor module reads temperature, humidity, and pressu...
-
 Esp32 Pir Sensor Time Interrupts
Introducing InterruptsTo trigger an event with a PIR motion sensor, you use interrupts. Interrupts a...
-
 Multiple Temperature Sensor Data Logging With Esp32
Introducing the DS18B20 Temperature SensorThe DS18B20 temperature sensor is a 1-wire digital tempera...
-
 IOT Button
IFTTTFor this project we’re going to use a free service called IFTTT that stands for If This Than Th...
-
 Wemos D1 Multishield Arduino
Project OverviewThe shield consists of a temperature sensor, a motion sensor, an LDR, and a 3 pin so...
-
 Motion Detection Alarm
ABOUT THIS PROJECTIn this project we’ll modify a commercial motion sensor (powered with mains voltag...
-
 Iot Spirit Level
ABOUT THIS PROJECTThe gyroscope measures rotational velocity (rad/s), this is the change of the angu...
-
 PIR Night Security Light
Parts Required:Here’s a list of the parts needed for this project:PIR Motion Sensor 220V (or 110V PI...
-
 Arduino Temperature Logger With Sd Card
Parts requiredHere’s a complete list of the parts required for this project:Arduino UNO – read Best ...
-
 Arduino Location Tracker
Introducing the NEO-6M GPS ModuleThe NEO-6M GPS module is shown in the figure below. It comes with a...
-
 Attendance System With Arduino & Rfid Tag
MFRC522 RFID ReaderIn this project we’re using the MFRC522 RFID reader and that’s the one we recomme...
-
-
mammoth-3D SLM Voron Toolhead – Manual Drill & Tap Edition
69 0 0 -
-
AEL-2011 Power Supply Module
587 0 2 -
AEL-2011 50W Power Amplifier
531 0 2 -
-
-
Custom Mechanical Keyboard
729 0 0 -
Tester for Touch Screen Digitizer without using microcontroller
361 2 2 -
Audio reactive glow LED wristband/bracelet with NFC / RFID-Tags
333 0 1 -
-


