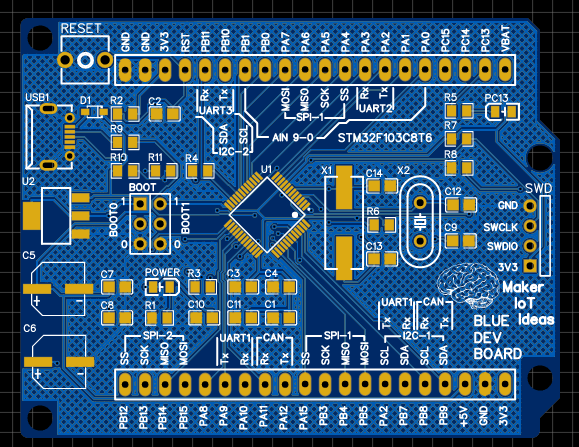
Blue Dev Board - Giving the STM32 Blue Pill a facelift
UPDATE:
6 June 2023
Due to the Oscillator at X2 being almost impossible to find, I decided to do a revision, replacing it with an SMD part. This will change the look of the PCB a little bit, but not affect operation. Everything else stays the same.
FEB 7, 2022 STM32 "Blue Pill", STM32F103C8T6
 Why did I do this?
Of all the various development boards in my electronics lab, surely the most versatile, but most neglected must be the STM32 Blue Pill. Not that there is anything wrong with it, It is a very very nice board, but unfortunately, there are a few issues ( mostly personal ) that make it not jump out at me for use in a new project.
Of these, and quite similar to the Arduino Nano, and original Raspberry Pi Pico is the fact that it was designed to be mostly used on a breadboard, issues with using the USB port, wrong components installed at the factories, and needing magnification to read port numbers, made me decide to solve it in my own way.
It is also not possible to use it (the original Blue-Pill) with any of the ready-made shields for the Arduino Nano, due to different pin-outs etc. Thus requiring a mess of wires and more modules on a breadboard, or lying free on the bench, to add sensors and other devices to this particular development board…
It can be argued that its small size does make it attractive, with which I definitely do not disagree, but unlike the bigger STM32 development boards with a lot of included peripherals, or the Arduino Ecosystem, where it is possible to develop your hardware prototypes on an Arduino Uno, using various shields, and then move on to a custom PCB later, the blue pill’s development cycle seems to be very much tied to the use of a breadboard and/or modules connected with jumper wires etc…
My idea was thus to take some inspiration from the bigger STM32 Nucleo and Discovery type platforms, add very detailed, and readable pin numbers, and peripheral descriptions, as well as lay a foundation onto which I can in future design stackable shields to expand the functionality of the device.
In order to make it easier for Makers and Hobby Electronics Enthusiasts, the new PCB was designed with 0805 SMD components. These are still quite easy to solder by hand, and usually do not require the use of any special equipment (That most beginners just starting out with the hobby won’t necessarily own or have access to by default). All of this was done with the hope that more people will start using this form factor, as well as to stimulate the development of shields and add-on cards to truly bring the blue pill to the same level regarding ease-of-use that the Arduino Ecosystem currently occupies.
What changes did I make?
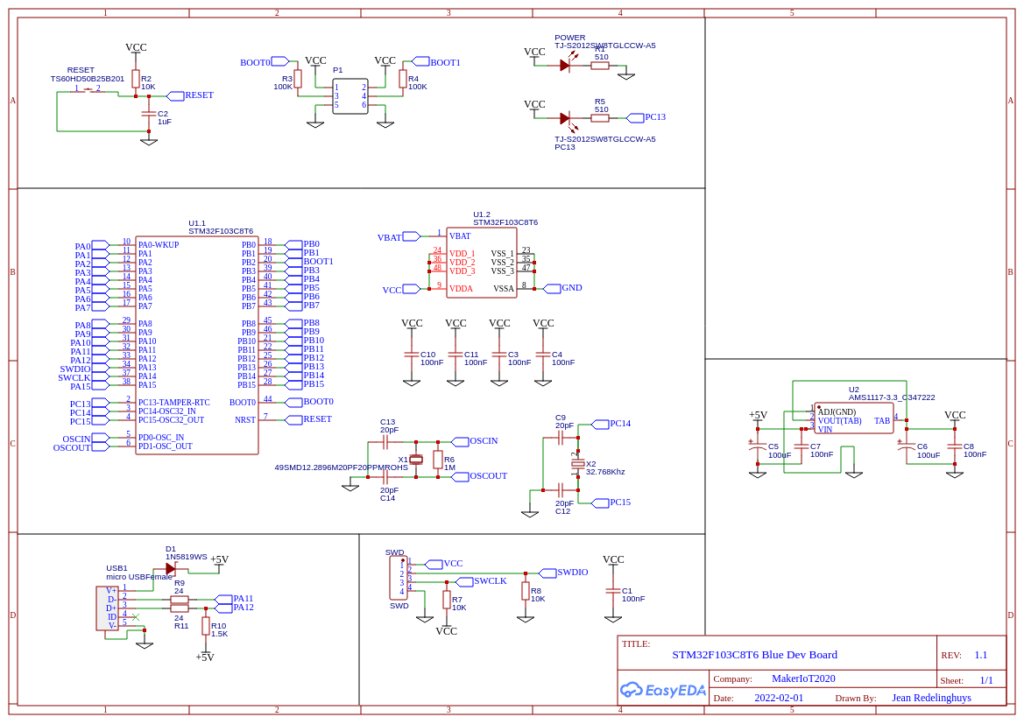
 Blue Dev Board Schematic Diagram – MakerIot2020
The schematic diagram was not changed at all. All ports and pin numbers are 100% compatible with the original Blue Pill. Components sizes were changed from 0402 to 0805. I also made sure that the USB port would be functional, and would not require any modifications to be performed to make it useable (unlike some of the blue pill PCB’s available in Asia, which ships with a wrong value resistor at R10.
The PCB form factor has been changed to be the same size as the Arduino Uno, but with two rows of 20-pin 2.54mm headers. A more powerful 3.3v LDO regulator and additional smoothing capacitors were added. The main changes are to the silkscreen, where the pin numbering was enlarged to be more easily readable, and detailed labelling of the various possible peripherals were added. The board is also a single layer PCB, whereas the original was a double layer PCB, due to its small size.
Due to problems with component shortages, I am unfortunately unable to upload the completed PCB images at this stage. I do plan to update this project as soon as I have received the components that are still outstanding :(

Blue Dev Board - Giving the STM32 Blue Pill a facelift
*PCBWay community is a sharing platform. We are not responsible for any design issues and parameter issues (board thickness, surface finish, etc.) you choose.
- Comments(0)
- Likes(3)
-
 Mr. Marsupial
Aug 14,2023
-
 Engineer
Sep 13,2022
-
 Stephan Schindler
Feb 18,2022
- 0 USER VOTES
- YOUR VOTE 0.00 0.00
- 1
- 2
- 3
- 4
- 5
- 6
- 7
- 8
- 9
- 10
- 1
- 2
- 3
- 4
- 5
- 6
- 7
- 8
- 9
- 10
- 1
- 2
- 3
- 4
- 5
- 6
- 7
- 8
- 9
- 10
- 1
- 2
- 3
- 4
- 5
- 6
- 7
- 8
- 9
- 10
 More by Jean Redelinghuys MakerIoT2020
-
 PCB_MCP23008_2023-10-08
MCP23008 BreakoutI designed this breakout to assist me during prototyping my next version of the “RP...
-
 PCB_XiaoRP2040-Mouse-REV2
Xiao RP2040 Joystick Mouse – revision 2.00Revision 1.0 of the ProjectOver the last few months, I hav...
-
 Multi Purpose IO Card
Multi-Purpose IO CardWhen we are working on a prototype, we always need access to pushbuttons, encod...
-
 Variable Voltage Power Module
Powering electronics projects are always challenging. This Variable vol...
Variable Voltage Power Module
Variable Voltage Power ModulePowering electronics projects are always challenging. This Variable vol...
-
 I2C Matrix Keypad
An I2C Matrix KeypadThe completed I2C Matrix KeypadIn a previous post this month I introduced my 4×4...
-
 ESP32-S Development Board, in "Arduino Uno" form factor
UPDATE 24/06/2023:This board now has a Hardware Revision 2.0 available. It is the same board but wit...
-
 W307186ASC94_Gerber_PCB_USB-Ports
USB Power Supply ModuleUSB Ports are quite handy to power all our day-to-day electronic devices, but...
-
 Atmega 328P based PWM controller Card
ATMega 328P Based PWM controller CardAs part of my recent ESP-12E I2C Base Board project, I designed...
-
 W307186ASC71_Gerber_PCB_ESP-Now Remote
Today we will look at the remote control unit for the Robotic Toy Car – Part 6.The project is close ...
-
 W307186ASV69_Gerber_PCB_Robot-Car-MCU-Board Prototype
In our last project, we started working on repurposing an old toy car. In this part, Robot Toy Car –...
-
 W307186ASV62_Gerber_PCB_DUAL-H-Bridge
by makeriot2020 on May 27, 2022Many of us have old toys laying around the house, they belong to ou...
-
 CAN-BUS Breakout
Breadboard Compatible CAN-BUS Breakout ModuleWhat is this:Some of us have already used the commonly ...
-
 RA-02 Breakout with Level converters
Breadboard and beginner-friendly RA-02 Breakout ModuleMost Makers and electronics enthusiasts may al...
-
 ATMEGA328P Module with integrated LoRa and CAN Bus
ATMEGA328P Module with integrated LoRa and CAN-BUSINTRODUCTIONIn my quest to perfect my LoRa telemet...
-
 Sx127x-Ra-02-Test-Module with ATMEGA328P-AU
SX127x LoRa/FSK/OOK Prototype Radio BoardI recently had a requirement to do some automation/telemetr...
-
 USB-ASP Programmer ATMEGA8
Build your own USB-ASP Programmer CloneBymakeriot2020 FEB 21, 2022 Arduino, ASP programmerUsing mor...
-
 ATTiny1616-LIGHT-Controller-with-CAN_B_PCB_ATTiny1616-LIGHT-Controller-with-C_2024-09-11
Assembly of the ATTiny1616 Can bus controller PCBThe Assembly of the ATTiny1616 Can Bus Controller P...
-
 ATTiny1616QFN-CAN-Remote-Neopixel-Ligh_PCB_ATTiny1616QFN-CAN-Remote-Neopixel-2024-09-11_2024-09-11
NeoPixel CAN-Bus Module with local controlAs part of my current project to add NeoPixels to the cabi...
-
-
mammoth-3D SLM Voron Toolhead – Manual Drill & Tap Edition
188 0 0 -
-
AEL-2011 Power Supply Module
715 0 2 -
AEL-2011 50W Power Amplifier
597 0 2 -
-
-
Custom Mechanical Keyboard
798 0 0 -
Tester for Touch Screen Digitizer without using microcontroller
419 2 2 -
Audio reactive glow LED wristband/bracelet with NFC / RFID-Tags
383 0 1 -
-


