


Beeper with telegram bot and esp32
More info and updates in https://rogerbit.com/wprb/2024/06/beeper/
In this tutorial, you will learn how to configure and use an ESP32 device to receive Telegram messages and display them on an SH1106 display. We will also include the functionality of a button and a buzzer to interact with the system
Requirements
An ESP32.
An SH1106 display (128×64) with I2C interface.
A buzzer.
A button.
Connection cables.
Arduino IDE library installed.
Step 1: Installing the Necessary Libraries
Open the Arduino IDE and make sure you have the following libraries installed:
WiFi.h for WiFi connection.
WiFiClientSecure.h for the secure connection.
UniversalTelegramBot.h to interact with the Telegram bot.
U8g2lib.h to manage the SH1106 display.
You can install them from the Arduino IDE Library Manager by searching for the library names.
Step 2: Hardware Connection
Connect the components according to the following diagram:
Display SH1106:
VCC a 5V del ESP32.
GND a GND del ESP32.
SCL a GPIO 22 del ESP32.
SDA a GPIO 21 del ESP32.
Buzzer:
Positive terminal to GPIO 12 of the ESP32.
Negative terminal to GND of the ESP32.
Button :
A terminal to GPIO 23 of the ESP32.
Another terminal to GND of the ESP32.
Step 3: Telegram Bot Configuration
Create a bot on Telegram using BotFather and get the Bot Token.
Replace TOKEN_BOT in the code with the obtained token.
Replace ssid and password with your WiFi network name and password.
Step 4: Load the Code into the ESP32
Connect the ESP32 to your computer.
Select the ESP32 Dev Module board from the Tools -> Board menu.
Select the correct port from the Tools -> Port menu.
Click Upload to upload the code to the ESP32.
Step 5: System Test
Once the code is loaded, open the Serial Monitor in the Arduino IDE to see the debugging messages.
On the SH1106 display, the message “Waiting for message!” should appear.
Send a message to your Telegram bot. The message should appear on the display and the buzzer should sound.
Electronic components
An Esp32

Features of the ESP32-T module

Connectivity
The ESP32 module has all WiFi variants :
802.11 b/g/n/e/i/n
Wi-Fi Direct (P2P), P2P Discovery, P2P Group Owner mode and P2P Power Management
This new version includes connectivity through low-power Bluetooth
Bluetooth v4.2 BR/EDR and BLE
BLE Beacon
In addition, it can communicate using the SPI, I2C, UART, MAC Ethernet, Host SD protocols.
Microcontroller features
The CPU is made up of a Tensilica LX6 model SoC with the following features and memory
Dual 32-bit core with 160MHz speed
Memoria ROM de 448 kBytes
520kBytes SRAM memory
Dyspnea at 48 Pines
18 ADC de 12 bits
2 DAC de 8 bits
10 pin contact sensors
16 PWM
20 digital inputs/outputs
Food and consumption modes
For correct operation of the ESP32, it is necessary to supply a voltage between 2.8V and 3.6V. The energy it consumes depends on the operating mode. It contains a mode, the Ultra Low Power Solution (ULP) , in which basic tasks (ADC, RTC...) continue to be performed in Sleep mode.
female pins

Male female dupont cables

Display oled sh1106
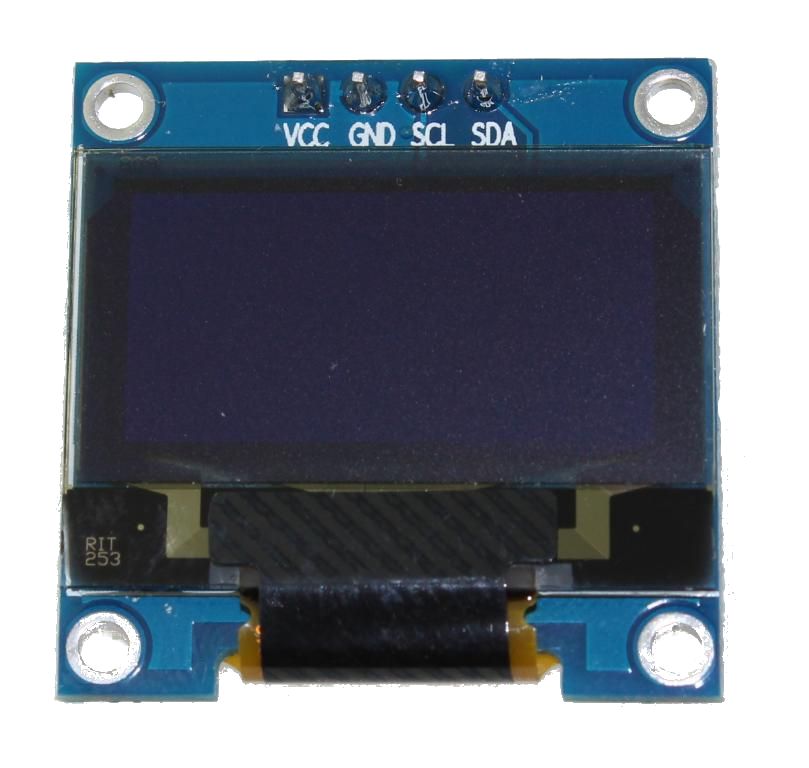
It is a 128x64 dot monochrome OLED display module with I2C interface. It has several advantages compared to LCD screens, and we can highlight its high brightness, very good contrast, a wider viewing angle, and low consumption. of energy. It is compatible with Arduino Rasberry Pi and PIC microcontrollers among others. It works with logic levels from 3.3V to 5V and has a viewing angle greater than 160 degrees. Screen Size is 1.3 inches. It is powered with a voltage of 3.3V to 5V. It can be used in applications such as smart watches, MP3s, thermometers, instruments, and various projects, etc.
Characteristics
Interface: I2C(3.3V / 5V logic level)
Resolution: 128 x 64
Angle of view: >160 degree
Display color: Blue
Display size: 1.3 inch
Driver IC: SH1106
Power supply: DC 3.3V~5V
Operating temperature: -20~70’C
Application: smart watch, MP3, thermometer, instruments, DIY projects, etc.
Buzzer Module

Module ky-004

PCB


Circuit

// Configuración del display SH1106 usando U8g2 U8G2_SH1106_128X64_NONAME_F_HW_I2C u8g2(U8G2_R0, /* reset=*/ U8X8_PIN_NONE, /* clock=*/ 22, /* data=*/ 21); // Configuración WiFi const char* ssid = "Tu-red-WiFi"; const char* contrasena = "Tu-Clave-WiFi"; // Token del bot de Telegram // Configuración del buzzer const int pinBuzzer = 12; const int duracionBuzzer = 100; // Duración del sonido en milisegundos // Configuración del botón const int pinBoton = 23; bool botonPresionado = false; WiFiClientSecure cliente; UniversalTelegramBot bot(TOKEN_BOT, cliente); unsigned long ultimaVezBotCorrio; // ID del último chat para enviar respuestas String idUltimoChat; void setup() { Serial.begin(115200); // Conexión WiFi WiFi.begin(ssid, contrasena); while (WiFi.status() != WL_CONNECTED) { delay(1000); Serial.println("Conectando al WiFi..."); } Serial.println("Conectado al WiFi"); // Configuración del display u8g2.begin(); // Mostrar mensaje inicial en el display u8g2.clearBuffer(); u8g2.setFont(u8g2_font_unifont_t_symbols); u8g2.drawUTF8(0, 10, "Esp. mensaje:"); u8g2.sendBuffer(); // Configuración del buzzer pinMode(pinBuzzer, OUTPUT); digitalWrite(pinBuzzer, LOW); // Configuración del botón pinMode(pinBoton, INPUT_PULLUP); // Configuración de cliente seguro cliente.setCACert(TELEGRAM_CERTIFICATE_ROOT); } // Función para dividir el mensaje en líneas que se ajusten al ancho del display void mostrarTextoLargo(const String &texto) { const int alturaLinea = 10; // Altura de cada línea const int maxLineas = 6; // Máximo número de líneas que caben en el display int indiceInicio = 0; int indiceFin; int linea = 0; while (indiceInicio < texto.length()) { indiceFin = indiceInicio; int anchoLinea = 0; // Encuentra el punto de corte para la línea while (indiceFin < texto.length() && anchoLinea < u8g2.getDisplayWidth()) { indiceFin++; anchoLinea = u8g2.getStrWidth(texto.substring(indiceInicio, indiceFin).c_str()); } // Ajusta el punto de corte para evitar dividir palabras if (indiceFin < texto.length()) { while (indiceFin > indiceInicio && texto[indiceFin] != ' ') { indiceFin--; } } // Muestra la línea en el display u8g2.drawUTF8(0, (linea + 1) * alturaLinea, texto.substring(indiceInicio, indiceFin).c_str()); indiceInicio = indiceFin + 1; linea++; // Si el texto es más largo que el display, desplaza el texto if (linea >= maxLineas) { delay(3000); // Pausa para leer la página actual linea = 0; u8g2.clearBuffer(); } } u8g2.sendBuffer(); } void loop() { // Verificar si el botón ha sido presionado if (digitalRead(pinBoton) == LOW) { if (!botonPresionado) { // Envía un mensaje a Telegram bot.sendMessage(idUltimoChat, "He leído tu mensaje, puedes enviar otro", ""); // Sonar el buzzer digitalWrite(pinBuzzer, HIGH); delay(duracionBuzzer); digitalWrite(pinBuzzer, LOW); // Mostrar mensaje en el display u8g2.clearBuffer(); u8g2.setFont(u8g2_font_unifont_t_symbols); u8g2.drawUTF8(0, 10, "Mens. enviado!"); u8g2.sendBuffer(); botonPresionado = true; } } else { botonPresionado = false; } // Verificar si hay nuevos mensajes de Telegram if (millis() - ultimaVezBotCorrio > 1000) { int numNuevosMensajes = bot.getUpdates(bot.last_message_received + 1); while (numNuevosMensajes) { Serial.println("Nuevo mensaje recibido"); for (int i = 0; i < numNuevosMensajes; i++) { String idChat = bot.messages[i].chat_id; String texto = bot.messages[i].text; // Guardar el ID del último chat para enviar respuestas idUltimoChat = idChat; // Mostrar mensaje en el display u8g2.clearBuffer(); u8g2.setFont(u8g2_font_unifont_t_symbols); // Selecciona la fuente compatible con Unicode mostrarTextoLargo(texto); // Sonar el buzzer digitalWrite(pinBuzzer, HIGH); delay(duracionBuzzer); digitalWrite(pinBuzzer, LOW); bot.sendMessage(idChat, "Mensaje recibido: " + texto, ""); } numNuevosMensajes = bot.getUpdates(bot.last_message_received + 1); } ultimaVezBotCorrio = millis(); } }
Beeper with telegram bot and esp32
*PCBWay community is a sharing platform. We are not responsible for any design issues and parameter issues (board thickness, surface finish, etc.) you choose.


Raspberry Pi 5 7 Inch Touch Screen IPS 1024x600 HD LCD HDMI-compatible Display for RPI 4B 3B+ OPI 5 AIDA64 PC Secondary Screen(Without Speaker)
BUY NOW
ESP32-S3 4.3inch Capacitive Touch Display Development Board, 800×480, 5-point Touch, 32-bit LX7 Dual-core Processor
BUY NOW
Raspberry Pi 5 7 Inch Touch Screen IPS 1024x600 HD LCD HDMI-compatible Display for RPI 4B 3B+ OPI 5 AIDA64 PC Secondary Screen(Without Speaker)
BUY NOW
- Comments(0)
- Likes(0)
 Log in to post comments.
More by CarlosVolt Tutoriales
-
 DTMF decoder for handy with arduino, control over several kilometers
In this tutorial we will see how to make a circuit to connect to our handy, in this case a Baofeng U...
DTMF decoder for handy with arduino, control over several kilometers
In this tutorial we will see how to make a circuit to connect to our handy, in this case a Baofeng U...
-
 Turn on light from thindspeak with esp32
In this tutorial, we will show you how to control lights over the Internet using an ESP32 and the Th...
Turn on light from thindspeak with esp32
In this tutorial, we will show you how to control lights over the Internet using an ESP32 and the Th...
-
 MP3 player control with webserver using ESP32 WIFI
In this tutorial, you will learn how to build a web server using the ESP32 to control the YX5300 mod...
MP3 player control with webserver using ESP32 WIFI
In this tutorial, you will learn how to build a web server using the ESP32 to control the YX5300 mod...
-
 Time clock with fingerprint IoT module, uploading data to thingspeak
More info in and updates in https://rogerbit.com/wprb/2022/07/reloj-de-control-fingerprint/In this t...
Time clock with fingerprint IoT module, uploading data to thingspeak
More info in and updates in https://rogerbit.com/wprb/2022/07/reloj-de-control-fingerprint/In this t...
-
 Make your own logic tip (includes printed circuit board)
In this video tutorial we will see how to make a logic tip, on a printed circuit, with the integrate...
Make your own logic tip (includes printed circuit board)
In this video tutorial we will see how to make a logic tip, on a printed circuit, with the integrate...
-
 Coil or inductor meter with Arduino and OLED display
More info and updates in https://rogerbit.com/wprb/2022/06/medidor-inductores/In this tutorial we wi...
Coil or inductor meter with Arduino and OLED display
More info and updates in https://rogerbit.com/wprb/2022/06/medidor-inductores/In this tutorial we wi...
-
 Infrared stepper motor control with speed control
More info and updates https://rogerbit.com/wprb/2024/09/motor-paso-a-paso-x-infrarrojo/In this proje...
Infrared stepper motor control with speed control
More info and updates https://rogerbit.com/wprb/2024/09/motor-paso-a-paso-x-infrarrojo/In this proje...
-
 Uploading BME280 Sensor Data to ThingSpeak Using ESP32
In this tutorial, we will show you how to connect a BME280 sensor to an ESP32 to read temperature, h...
Uploading BME280 Sensor Data to ThingSpeak Using ESP32
In this tutorial, we will show you how to connect a BME280 sensor to an ESP32 to read temperature, h...
-
 Water pump control for irrigation via telegram and esp32
Water Pump Control by Telegram and ESP32 is an automated system that allows you to remotely control ...
Water pump control for irrigation via telegram and esp32
Water Pump Control by Telegram and ESP32 is an automated system that allows you to remotely control ...
-
 Air conditioning on/off control via telegram and esp32
In this tutorial we will see how to control an air conditioner, with an esp32 and the telegram appli...
Air conditioning on/off control via telegram and esp32
In this tutorial we will see how to control an air conditioner, with an esp32 and the telegram appli...
-
 35 watt stereo amplifier
In this video we will see how to build an audio amplifier, with the TDA7377 integrated circuit, and ...
35 watt stereo amplifier
In this video we will see how to build an audio amplifier, with the TDA7377 integrated circuit, and ...
-
 Laser alarm with RFID module
More info and updates in https://rogerbit.com/wprb/2024/08/alarma-laser-rfid/In this project, we bui...
Laser alarm with RFID module
More info and updates in https://rogerbit.com/wprb/2024/08/alarma-laser-rfid/In this project, we bui...
-
 Control lights by voice commands and keys
In this tutorial we will see how to create a device to control lights by voice commands, with a modu...
Control lights by voice commands and keys
In this tutorial we will see how to create a device to control lights by voice commands, with a modu...
-
 Stepper motor control x bluetooth and app
In this tutorial we will see a circuit, which controls a stepper motor, with an application made in ...
Stepper motor control x bluetooth and app
In this tutorial we will see a circuit, which controls a stepper motor, with an application made in ...
-
 DFplayermini x bluetooth mp3 player control
More info and updates in https://rogerbit.com/wprb/2022/12/dfplayermini-x-bluetooth/In this tutorial...
DFplayermini x bluetooth mp3 player control
More info and updates in https://rogerbit.com/wprb/2022/12/dfplayermini-x-bluetooth/In this tutorial...
-
 Robot with WiFi control and servos driven by ESP32
More info and updates in https://rogerbit.com/wprb/2023/07/robot-wifi/A robot controlled by Wi-Fi, s...
Robot with WiFi control and servos driven by ESP32
More info and updates in https://rogerbit.com/wprb/2023/07/robot-wifi/A robot controlled by Wi-Fi, s...
-
 How to make a water level meter with uln2803
In this tutorial we will see how to make a water level meter circuit with the built-in uln2803.The p...
How to make a water level meter with uln2803
In this tutorial we will see how to make a water level meter circuit with the built-in uln2803.The p...
-
 Color Detector with Arduino and OLED display
In this tutorial we will show you how to build a color detector using the TCS3200 sensor and an SH11...
Color Detector with Arduino and OLED display
In this tutorial we will show you how to build a color detector using the TCS3200 sensor and an SH11...
-
DTMF decoder for handy with arduino, control over several kilometers
In this tutorial we will see how to make a circuit to connect to our handy, in this case a Baofeng U...
-
Turn on light from thindspeak with esp32
In this tutorial, we will show you how to control lights over the Internet using an ESP32 and the Th...
-
MP3 player control with webserver using ESP32 WIFI
In this tutorial, you will learn how to build a web server using the ESP32 to control the YX5300 mod...
-
Time clock with fingerprint IoT module, uploading data to thingspeak
More info in and updates in https://rogerbit.com/wprb/2022/07/reloj-de-control-fingerprint/In this t...
-
Make your own logic tip (includes printed circuit board)
In this video tutorial we will see how to make a logic tip, on a printed circuit, with the integrate...
-
Coil or inductor meter with Arduino and OLED display
More info and updates in https://rogerbit.com/wprb/2022/06/medidor-inductores/In this tutorial we wi...
-
Infrared stepper motor control with speed control
More info and updates https://rogerbit.com/wprb/2024/09/motor-paso-a-paso-x-infrarrojo/In this proje...
-
Uploading BME280 Sensor Data to ThingSpeak Using ESP32
In this tutorial, we will show you how to connect a BME280 sensor to an ESP32 to read temperature, h...
-
Water pump control for irrigation via telegram and esp32
Water Pump Control by Telegram and ESP32 is an automated system that allows you to remotely control ...
-
Air conditioning on/off control via telegram and esp32
In this tutorial we will see how to control an air conditioner, with an esp32 and the telegram appli...
-
35 watt stereo amplifier
In this video we will see how to build an audio amplifier, with the TDA7377 integrated circuit, and ...
-
Laser alarm with RFID module
More info and updates in https://rogerbit.com/wprb/2024/08/alarma-laser-rfid/In this project, we bui...
-
Commodore 64 1541-II Floppy Disk Drive C64 Power Supply Unit USB-C 5V 12V DIN connector 5.25
120 0 2 -
Easy to print simple stacking organizer with drawers
74 0 0 -
-
-
Modifying a Hotplate to a Reflow Solder Station
1116 1 6 -
MPL3115A2 Barometric Pressure, Altitude, and Temperature Sensor
626 0 1 -
-
-
V2 Commodore AMIGA USB-C Power Sink Delivery High Efficiency Supply Triple Output 5V ±12V OLED display ATARI compatible shark 100W
1395 4 3


