|
BeagleBone Black - Rev C |
x 1 | |
|
|
BleuIO - BLE USB dongleSmart Sensor Devices
|
x 1 |

|
Python |
Bluetooth Low Energy (BLE) Tutorial for Beaglebone
1. Introduction
This is a simple example showcasing how to control a BleuIO dongle connected to Beaglebone Black using a python script.
When running the script, it will first ask for the com port where the dongle is connected (usually ‘/dev/ttyACM0’). After that, the BleuIO will start advertising. Every 8th second it will turn on one of the onboard Beaglebone Black LEDs whilst changing the BLE advertising name to indicate which LED is on.
We are using the Linux debian image: ‘OMAP3/DM3730 Debian 9.5 2018-10-07 4GB SD LXQT’ (https://beagleboard.org/latest-images).

2. About the Code
You can get access to the project HERE
https://github.com/smart-sensor-devices-ab/beaglebone_bleuio_example
We are using the Adafruit_BBIO python library that comes with the Beaglebone to control the onboard LEDs. First we define the LEDs names and then set them as GPIO Outputs. Then we define the advertising messages that the BleuIO will switch between. Lets break one down:
“10:09:42:6C:65:75:49:4F:20:4C:45:44:20:30:20:4F:4E:”
“10” is the size of the advertising packet in HEX.
“09” is the flag for device name (Complete Local Name).
“42:6C:65:75:49:4F:20:4C:45:44:20:30:20:4F:4E” is the packet itself, translated from HEX to ASCII it says: “BleuIO LED 0 ON”
Afterwards the user is presented with a message to input the com port the BleuIO is connected to. If you are not using a USB Hub the port should be ‘/dev/ttyACM0’.
You can change the comport name in the Python script and fill in your COM port.
com_input = "/dev/ttyACM0"
The script continues into the main loop, where it will first make sure all LEDs are off and then start BLE advertising.
The loop iterates through all four LEDs. In every iteration it turns one LED on and advertise the LED name then continue to the next LED. This will continue until the script is aborted.
import serial
import time
import Adafruit_BBIO.GPIO as GPIO


LED_USR0 = "USR0"
LED_USR1 = "USR1"
LED_USR2 = "USR2"
LED_USR3 = "USR3"

GPIO.setup(LED_USR0, GPIO.OUT)
GPIO.setup(LED_USR1, GPIO.OUT)
GPIO.setup(LED_USR2, GPIO.OUT)
GPIO.setup(LED_USR3, GPIO.OUT)

LED0_ON_ADV_MSG = "10:09:42:6C:65:75:49:4F:20:4C:45:44:20:30:20:4F:4E:"
LED1_ON_ADV_MSG = "10:09:42:6C:65:75:49:4F:20:4C:45:44:20:31:20:4F:4E:"
LED2_ON_ADV_MSG = "10:09:42:6C:65:75:49:4F:20:4C:45:44:20:32:20:4F:4E:"
LED3_ON_ADV_MSG = "10:09:42:6C:65:75:49:4F:20:4C:45:44:20:33:20:4F:4E:"

# Turn off all LEDs
GPIO.output(LED_USR0, GPIO.LOW)
time.sleep(0.1)
GPIO.output(LED_USR1, GPIO.LOW)
time.sleep(0.1)
GPIO.output(LED_USR2, GPIO.LOW)
time.sleep(0.1)
GPIO.output(LED_USR3, GPIO.LOW)
time.sleep(0.1)

print("\nBlueIO BeagleBone Example!\n\n")
connecting_to_dongle = 0
com_input = ""

start_input = 0
valid_input = 0
while start_input == 0:
    com_input = input(
        "Enter Com port of Dongle (default for BeagleBone: '/dev/ttyACM0'):\n>>"
    )
    print("\nComport to use: " + com_input)
    input_continue = input(
        "If your happy with your choice just press Enter to continue the script. Else type E to exit or R to redo your choice. \n>>"
    )
    if input_continue.upper() == "E":
        start_input = 1
    elif input_continue.upper() == "":
        start_input = 1
    elif input_continue.upper() == "R":
        valid_input = 0
        start_input = 0
if input_continue.upper() == "E":
    print("Exiting script...")
    exit()

console = None

while 1:
    try:
        print("Please wait...")
        time.sleep(0.5)
        console.write(str.encode("AT+DUAL"))
        console.write("\r".encode())
        time.sleep(0.5)
        print("Starting Advertising...")
        console.write(str.encode("AT+ADVSTART"))
        console.write("\r".encode())
        time.sleep(0.5)
        led_turn = 0
        # Turn off all LEDs
        GPIO.output(LED_USR0, GPIO.LOW)
        time.sleep(0.1)
        GPIO.output(LED_USR1, GPIO.LOW)
        time.sleep(0.1)
        GPIO.output(LED_USR2, GPIO.LOW)
        time.sleep(0.1)
        GPIO.output(LED_USR3, GPIO.LOW)
        time.sleep(0.1)
        while True:
            if led_turn == 0:
                print("\nTurning LED USR0 ON")
                console.write(str.encode("AT+ADVRESP="))
                console.write(LED0_ON_ADV_MSG.encode())
                console.write("\r".encode())
                GPIO.output(LED_USR0, GPIO.HIGH)
                GPIO.output(LED_USR1, GPIO.LOW)
                GPIO.output(LED_USR2, GPIO.LOW)
                GPIO.output(LED_USR3, GPIO.LOW)
                led_turn = led_turn + 1
            elif led_turn == 1:
                print("\nTurning LED USR1 ON")
                console.write(str.encode("AT+ADVRESP="))
                console.write(LED1_ON_ADV_MSG.encode())
                console.write("\r".encode())
                GPIO.output(LED_USR0, GPIO.LOW)
                GPIO.output(LED_USR1, GPIO.HIGH)
                GPIO.output(LED_USR2, GPIO.LOW)
                GPIO.output(LED_USR3, GPIO.LOW)
                led_turn = led_turn + 1
            elif led_turn == 2:
                print("\nTurning LED USR2 ON")
                console.write(str.encode("AT+ADVRESP="))
                console.write(LED2_ON_ADV_MSG.encode())
                console.write("\r".encode())
                GPIO.output(LED_USR0, GPIO.LOW)
                GPIO.output(LED_USR1, GPIO.LOW)
                GPIO.output(LED_USR2, GPIO.HIGH)
                GPIO.output(LED_USR3, GPIO.LOW)
                led_turn = led_turn + 1
            elif led_turn == 3:
                print("\nTurning LED USR3 ON")
                console.write(str.encode("AT+ADVRESP="))
                console.write(LED3_ON_ADV_MSG.encode())
                console.write("\r".encode())
                GPIO.output(LED_USR0, GPIO.LOW)
                GPIO.output(LED_USR1, GPIO.LOW)
                GPIO.output(LED_USR2, GPIO.LOW)
                GPIO.output(LED_USR3, GPIO.HIGH)
                led_turn = 0

            time.sleep(8)

    except KeyboardInterrupt:
        GPIO.output(LED_USR0, GPIO.LOW)
        time.sleep(0.1)
        GPIO.output(LED_USR1, GPIO.LOW)
        time.sleep(0.1)
        GPIO.output(LED_USR2, GPIO.LOW)
        time.sleep(0.1)
        GPIO.output(LED_USR3, GPIO.LOW)
        time.sleep(0.1)
        print("Exiting script...")
        exit()
    except:
        print("\n\nDongle not connected.\n")
        connecting_to_dongle = 0
        while connecting_to_dongle == 0:
            try:
                print("Trying to connect to dongle...")
                console = serial.Serial(
                    port=com_input,
                    baudrate=57600,
                    parity="N",
                    stopbits=1,
                    bytesize=8,
                    timeout=0,
                )
                if console.is_open.__bool__():
                    connecting_to_dongle = 1
                    print("\n\nConnected to Dongle in port: " + com_input + ".\n")
            except:
                print(
                    "Dongle not found. Retrying connection to port: "
                    + com_input
                    + "..."
                )
                time.sleep(5)
3. What you will need
- A Computer
- A BleuIO dongle (https://www.bleuio.com/)
- A BeagleBone Black (https://beagleboard.org/black) with Beaglebone Firmware installed (https://beagleboard.org/latest-images)
4. How to setup project
Downloading the project from GitHub
Get access to the project HERE
https://github.com/smart-sensor-devices-ab/beaglebone_bleuio_example
Either clone the project, or download it as a zip file and unzip it, into a folder on your BeagleBone.
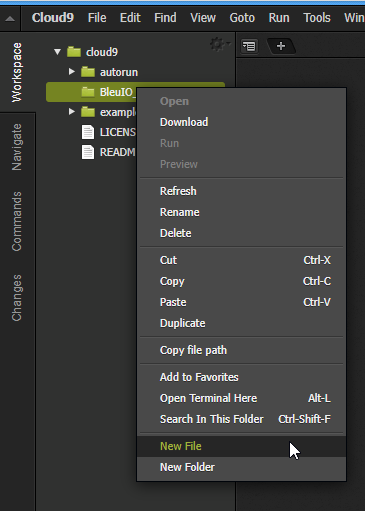
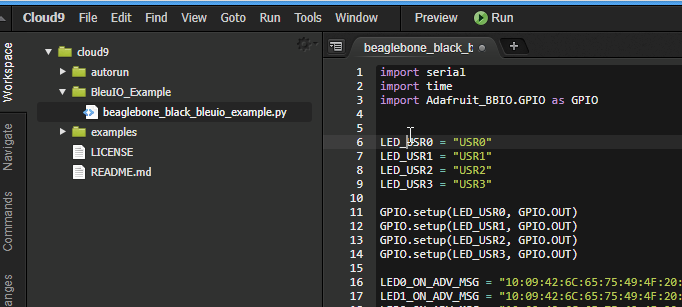
You can also create a new python file using the Cloud9 IDE from the BeagleBone (run by going to http://192.168.7.2:3000/).

Copy the code and pasting it into the newly created file.

Installing pyserial
To run the script you will need to install the python library pyserial.
The easiest way of doing this is just connecting to the BeagleBone via shh (the default password is temppwd):

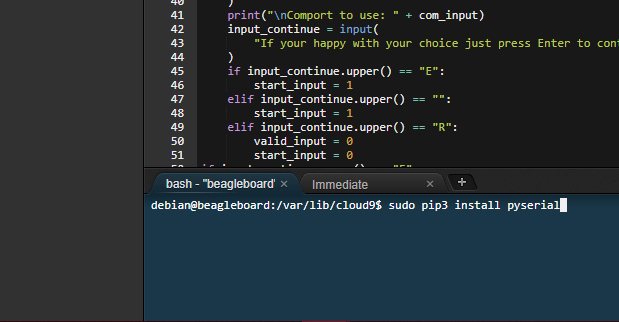
or using the bash tab in the Cloud9 IDE and type:
sudo pip3 install pyserial

5. Running the example
Go to the folder where you have the python script file and run:
(Pyserial needs sudo-privileges to function.)
sudo python3 name_of_script.py
Bluetooth Low Energy (BLE) Tutorial for Beaglebone

Raspberry Pi 5 7 Inch Touch Screen IPS 1024x600 HD LCD HDMI-compatible Display for RPI 4B 3B+ OPI 5 AIDA64 PC Secondary Screen(Without Speaker)
BUY NOW
ESP32-S3 4.3inch Capacitive Touch Display Development Board, 800×480, 5-point Touch, 32-bit LX7 Dual-core Processor
BUY NOW
Raspberry Pi 5 7 Inch Touch Screen IPS 1024x600 HD LCD HDMI-compatible Display for RPI 4B 3B+ OPI 5 AIDA64 PC Secondary Screen(Without Speaker)
BUY NOW- Comments(0)
- Likes(1)
 Log in to post comments.
-
 Marek Kowalski
Jan 08,2022
- 0 USER VOTES
- YOUR VOTE 0.00 0.00
- 1
- 2
- 3
- 4
- 5
- 6
- 7
- 8
- 9
- 10
- 1
- 2
- 3
- 4
- 5
- 6
- 7
- 8
- 9
- 10
- 1
- 2
- 3
- 4
- 5
- 6
- 7
- 8
- 9
- 10
- 1
- 2
- 3
- 4
- 5
- 6
- 7
- 8
- 9
- 10
 More by bleuio
-
 Show Bluetooth LE Sensor readings on LCD screen connected to STM32
1. IntroductionThe project is based on STM32 Nucleo-144 which controls LCD display using BleuIO.For ...
-
 Sensor data collection from STM32 and SHT85 using Bluetooth Low Energy
When the BleuIO Dongle is connected to the Nucleo boards USB port, the STM32 will recognize it and s...
-
 Make a BLE enabled Smart Bulb with STM32
Home automation involves automating household environment equipment. To achieve that, we have create...
-
 Bluetooth Low Energy (BLE) Tutorial for Beaglebone
1. IntroductionThis is a simple example showcasing how to control a BleuIO dongle connected to Beagl...
-
 Bluetooth Low Energy (BLE) Tutorial for Arduino using BleuIO
IntroductionThe project is a simple example showcasing a quick way to setup an Arduino with a USB Ho...
-
 Create BLE project with STM32
IntroductionThe project is a simple example showcasing a quick way to set up a STM32Cube project as ...
-
 Real-Time CO2 Status Indicator and Monitor with BleuIO and Renesas EK-RA4M2
IntroductionIn an age where air quality has become increasingly important, monitoring CO2 levels in ...
-
 Smart Phone Controlled Home Automation using Raspberry Pi
IntroductionThis example is showing how to control a GPIO pin on a RaspberryPi remotely from a smart...
-
 Show Bluetooth LE Sensor readings on LCD screen connected to STM32
1. IntroductionThe project is based on STM32 Nucleo-144 which controls LCD display using BleuIO.For ...
-
 Sensor data collection from STM32 and SHT85 using Bluetooth Low Energy
When the BleuIO Dongle is connected to the Nucleo boards USB port, the STM32 will recognize it and s...
-
 Make a BLE enabled Smart Bulb with STM32
Home automation involves automating household environment equipment. To achieve that, we have create...
-
 Bluetooth Low Energy (BLE) Tutorial for Beaglebone
1. IntroductionThis is a simple example showcasing how to control a BleuIO dongle connected to Beagl...
-
 Bluetooth Low Energy (BLE) Tutorial for Arduino using BleuIO
IntroductionThe project is a simple example showcasing a quick way to setup an Arduino with a USB Ho...
-
 Create BLE project with STM32
IntroductionThe project is a simple example showcasing a quick way to set up a STM32Cube project as ...
-
 Real-Time CO2 Status Indicator and Monitor with BleuIO and Renesas EK-RA4M2
IntroductionIn an age where air quality has become increasingly important, monitoring CO2 levels in ...
-
 Smart Phone Controlled Home Automation using Raspberry Pi
IntroductionThis example is showing how to control a GPIO pin on a RaspberryPi remotely from a smart...
-
 Show Bluetooth LE Sensor readings on LCD screen connected to STM32
1. IntroductionThe project is based on STM32 Nucleo-144 which controls LCD display using BleuIO.For ...
-
 Sensor data collection from STM32 and SHT85 using Bluetooth Low Energy
When the BleuIO Dongle is connected to the Nucleo boards USB port, the STM32 will recognize it and s...
-
 Make a BLE enabled Smart Bulb with STM32
Home automation involves automating household environment equipment. To achieve that, we have create...
-
 Bluetooth Low Energy (BLE) Tutorial for Beaglebone
1. IntroductionThis is a simple example showcasing how to control a BleuIO dongle connected to Beagl...
-
-
-
Modifying a Hotplate to a Reflow Solder Station
840 1 5 -
MPL3115A2 Barometric Pressure, Altitude, and Temperature Sensor
441 0 1 -
-
Nintendo 64DD Replacement Shell
374 0 2 -
V2 Commodore AMIGA USB-C Power Sink Delivery High Efficiency Supply Triple Output 5V ±12V OLED display ATARI compatible shark 100W
1080 4 2 -
How to measure weight with Load Cell and HX711
687 0 3


