|
|
3w RGB LED |
x 6 | |
|
|
White SMD LED 3528 Package |
x 24 |
How to make RGBW lights using Aluminium PCB
When it comes to making electronics projects, a custom PCB board is always one of the top priorities. This so called Printed circuit boards are usually made from a copper plated FR4 sheet. Now that is absolutely okay for most of our projects. But sometimes it doesn’t fulfill all of our demands. Such as proper Heat transfer. The FR4 material is not a very good conductive of heat. Now imagine your circuit has some high power LEDs which produce a lot of heat. And if we didn’t take care of the excessive heat it might damage the LED.
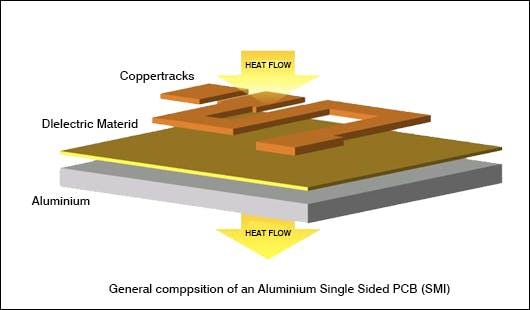
That is why another kind of PCB comes into play. It is called aluminium PCB. It has an isolated base plate made out of aluminium which is a very good conductive of heat. And it is also very affordable. That is why Aluminium PCBs are widely used in LED light bulbs to make the led panel. So let’s have a look how an aluminium PCB works and how to make one.
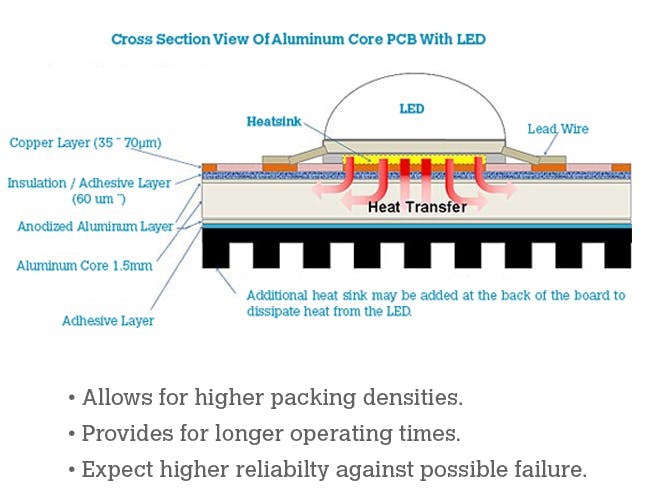
The base material of an aluminium PCB consists of an aluminum core and standard FR4 material. It features a thermal clad layer that dissipates heat in a highly efficient manner while cooling components and increasing the overall performance of the products. It has a copper layer which contains all of our electrical circuitry, on top of the Aluminium substance and a dielectric insulating layer in between.So basically it is a one layer PCB. There also exist multilayer one, but that is not very common.
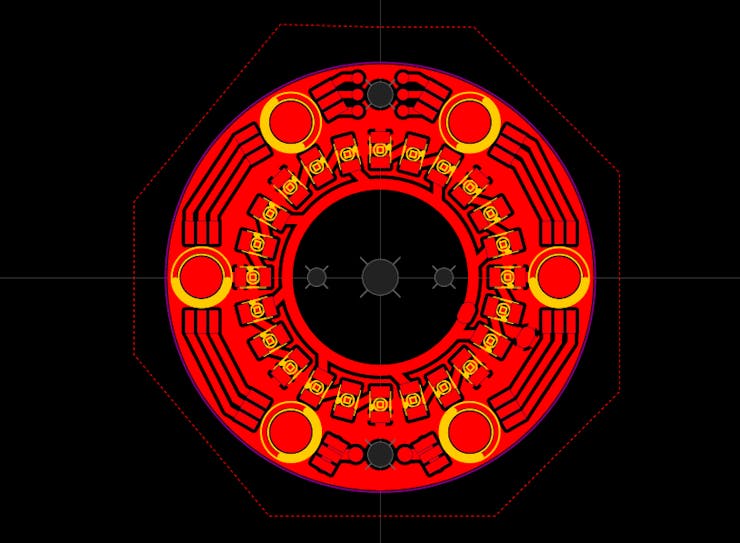
Now, designing this PCB is the same as a regular PCB. You just have to keep in mind that all components should be on one side of the PCB. and nothing will be on the other side.
After designing the PCB I head over to PCBway website for manufacturing the PCB. Ordering PCBs from PCBway is very simple. First go to the Instant quote page and click on quick order PCB then upload your gerber files and select quantity. Then choose single layer and select material type to Aluminium. As we have everything on the top layer so we select that. Finally I choose white color for solder masking and place the order. As you can see it only cost around $26, which is pretty cheap.
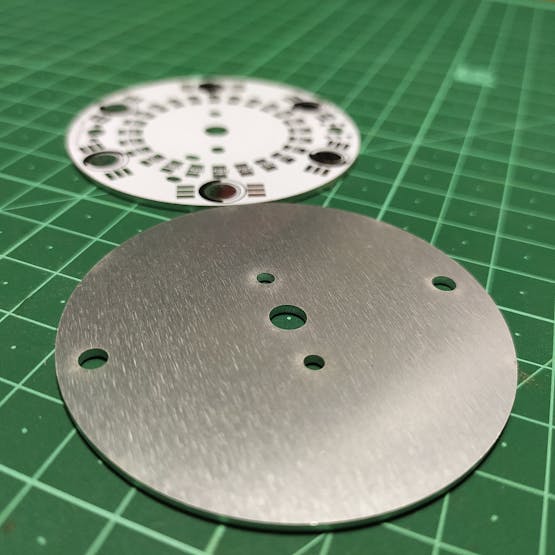
This is how it looks like after manufacturing. The shiny back side is made out of aluminium and all of our circuitry is on the top side.
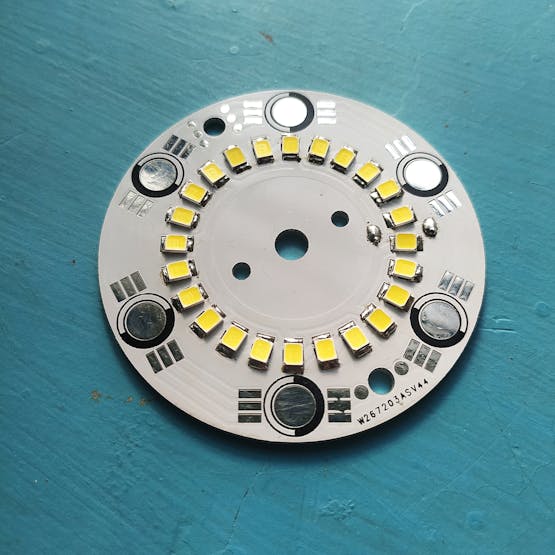
Soldering Aluminium PCBs is not very challenging and your regular soldering iron can get the job done. But things get complicated when it comes to desoldering a component. Because no matter how much you heat the pad the heat gets dissipated almost instantly. So pay attention while soldering.
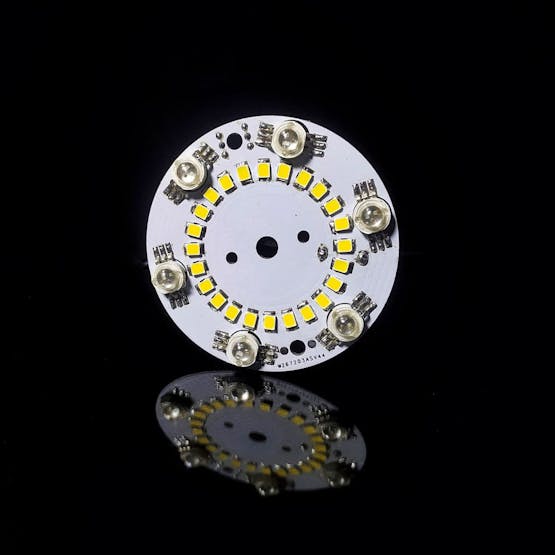
After soldering the PCB looks something like this. It consists of 24 white LEDs of 35 28 package and has 6 RGB LEDs of 3 watts. Originally I planned to run the whole system from 12v. That’s why I put 3 LEDs in series but later it turns out that the LEDs I currently have runs on a much higher voltage, preferably 8 to 12 volts. A good way to test this is by using a multimeter. If it glows a little then it can be driven by 3 to 4 volts. So now I need at least 24 volt to light up the white LEDs. That’s why I have to use a boost converter to step up the 12 volt input to 24 volt.
I also made a little LED driver by using 4 N channel mosfets and an arduino to drive the LEDs. The aluminium base plate absorbs the heat generated by the leds and keeps them cool and also increases their lifespan.
How to make RGBW lights using Aluminium PCB
*PCBWay community is a sharing platform. We are not responsible for any design issues and parameter issues (board thickness, surface finish, etc.) you choose.

Raspberry Pi 5 7 Inch Touch Screen IPS 1024x600 HD LCD HDMI-compatible Display for RPI 4B 3B+ OPI 5 AIDA64 PC Secondary Screen(Without Speaker)
BUY NOW
ESP32-S3 4.3inch Capacitive Touch Display Development Board, 800×480, 5-point Touch, 32-bit LX7 Dual-core Processor
BUY NOW
Raspberry Pi 5 7 Inch Touch Screen IPS 1024x600 HD LCD HDMI-compatible Display for RPI 4B 3B+ OPI 5 AIDA64 PC Secondary Screen(Without Speaker)
BUY NOW- Comments(1)
- Likes(4)
 Log in to post comments.
 Sayanik MandalFeb 11,20210 CommentsReply
-
 Engineer
Apr 11,2025
-
 Engineer
Jan 17,2023
-
 Hunter Abbott
Jul 19,2022
-
 slondell
Jun 07,2022
- 1 USER VOTES
- YOUR VOTE 0.00 0.00
- 1
- 2
- 3
- 4
- 5
- 6
- 7
- 8
- 9
- 10
- 1
- 2
- 3
- 4
- 5
- 6
- 7
- 8
- 9
- 10
- 1
- 2
- 3
- 4
- 5
- 6
- 7
- 8
- 9
- 10
- 1
- 2
- 3
- 4
- 5
- 6
- 7
- 8
- 9
- 10
-
10design
-
6usability
-
7creativity
-
6content
 More by SAYANTAN ElectroPoint4u
-
 How to make RGBW lights using Aluminium PCB
When it comes to making electronics projects, a custom PCB board is always one of the top priorities...
-
 ESP32 BLE GamePad
This is a DIY handheld gamepad, made using ESP32 microcontroller. You might have seen such game cont...
-
 12 Channel Ultimate Home Automation
ESP32 based 12 Channel IOT Home Automation using Blynk Application. Can be controlled using Physical...
-
 World's Slimmest NeoPixel LED Matrix
I always have this idea of what would have happened if we can put the components inside the pcb? Let...
-
 ESP-12E/F Breakout Board
Size:25.4mm x 30mmSignal Layers:2None Signal Layers:10Components:12Pads:57 Surface Pads:35 Plated Th...
-
 PCB Pyramid
In this project I built a rather interesting project which I thought a long time ago. Its basically ...
-
 3D printed Stepper Bot
This is a E.S.P32 based robot that I made which can not only be controlled over the internet but als...
-
 ESP32-C3 NodeMCU
This is a DropIn replacement for NodeMCU ESP8266 AMICA CP2102 WiFi Development Board. The pinout are...
-
 NeoPixel XL
What is it?If you ever been used or seen neopixel LED, then you will be familiar to this concept. It...
-
 ESP32 BLE Macro Keyboard
This is a wireless macro keyboard consist of 10 cherry MX key swathes with individual backlight. It ...
-
 DIY Novatrope
A DIY replica of the popular Novatrope project, an elegant kinetic kinetic sculpture using Attiny85,...
-
 Fanmade 7th Anniversary badge
This is a simple PCB badge that I designed for celebrate 7th anniversary of PCBway. It has 6 RGB bli...
-
 Reflow Hotplate Controller
Story :Last time I made a reflow soldering hotplate from a regular clothing iron. And it works prett...
-
 ESP Programmer
ESP8266 and ESP32 required some special arrangement to pull the chip into boot mode. Typically this ...
-
 Portable Power Supply for microcontroller projects
If you are working on a portable electronics project, or in a remote place where you can’t bring you...
-
 Pico Clock
StoryRaspberry Pi foundation recently launched their first microcontroller based development board R...
-
 Addressable Output using WS2811
So I was needed to control almost 200+ relays using one microcontroller and during research I found ...
-
 Portable wireless touch Remote
An ESP32 module comes with a lot of different features. One of such features is it’s touch capabilit...
-
 How to make RGBW lights using Aluminium PCB
When it comes to making electronics projects, a custom PCB board is always one of the top priorities...
-
 ESP32 BLE GamePad
This is a DIY handheld gamepad, made using ESP32 microcontroller. You might have seen such game cont...
-
 12 Channel Ultimate Home Automation
ESP32 based 12 Channel IOT Home Automation using Blynk Application. Can be controlled using Physical...
-
 World's Slimmest NeoPixel LED Matrix
I always have this idea of what would have happened if we can put the components inside the pcb? Let...
-
 ESP-12E/F Breakout Board
Size:25.4mm x 30mmSignal Layers:2None Signal Layers:10Components:12Pads:57 Surface Pads:35 Plated Th...
-
 PCB Pyramid
In this project I built a rather interesting project which I thought a long time ago. Its basically ...
-
 3D printed Stepper Bot
This is a E.S.P32 based robot that I made which can not only be controlled over the internet but als...
-
 ESP32-C3 NodeMCU
This is a DropIn replacement for NodeMCU ESP8266 AMICA CP2102 WiFi Development Board. The pinout are...
-
 NeoPixel XL
What is it?If you ever been used or seen neopixel LED, then you will be familiar to this concept. It...
-
 ESP32 BLE Macro Keyboard
This is a wireless macro keyboard consist of 10 cherry MX key swathes with individual backlight. It ...
-
 DIY Novatrope
A DIY replica of the popular Novatrope project, an elegant kinetic kinetic sculpture using Attiny85,...
-
 Fanmade 7th Anniversary badge
This is a simple PCB badge that I designed for celebrate 7th anniversary of PCBway. It has 6 RGB bli...
-
-
Commodore 64 1541-II 1581 Floppy Disk Drive C64 Power Supply Unit USB-C 5V 12V DIN connector 5.25
164 1 3 -
Easy to print simple stacking organizer with drawers
87 0 0 -
-
-
-
Modifying a Hotplate to a Reflow Solder Station
1137 1 6 -
MPL3115A2 Barometric Pressure, Altitude, and Temperature Sensor
638 0 1 -
-
Nintendo 64DD Replacement Shell
495 0 2 -
V2 Commodore AMIGA USB-C Power Sink Delivery High Efficiency Supply Triple Output 5V ±12V OLED display ATARI compatible shark 100W
1442 4 3


