


Motion detector with light, esp32 and telegram notifications
In this tutorial we will see how to make a motion detector system, with a PIR sensor, a relay module, to connect a 110V/220V focus, an esp32 that will connect to our Wifi network and send alert notifications, by messages through the telegram messaging service, when the PIR sensor detects a movement.
Circuit

Electronic components
Cables dupont

ESP32

Features of the ESP32-T module

Connectivity
The ESP32 module has all the wiFi variants:
- 802.11 b/g/n/e/i/n
- Wi-Fi Direct (P2P), P2P Discovery, P2P Group Owner mode and P2P Power Management
This new version includes low-power Bluethoot connectivity
- Bluetooth v4.2 BR/EDR and BLE
- BLE Beacon
In addition, you can communicate using SPI, I2C, UART, MAC Ethernet, Host SD protocols
Microcontroller features
The CPU consists of a Tensilica LX6 Model SoC with the following features and memory
- Dual 32-bit core with 160MHz speed
- 448 kBytes ROM
- 520kByteS SRAM
Have 48 Pins
- 18 12-bit ADC
- 2 8-bit DAC
- 10 pin contact sensors
- 16 PWM
- 20 Digital inputs/outputs
Power and consumption modes
For proper operation of the ESP32 it is necessary to supply a voltage between 2.8V and 3.6V. The energy you consume depends on the mode of operation. It contains a mode, the Ultra Low Power Solution (ULP),in which basic tasks (ADC, PSTN…) continue to be performed in Sleep mode.
A focus

Sensor PIR

Electric pyro devices such as pir have elements made of a crystalline material that generates an electrical charge when exposed to infrared radiation. Changes in the amount of radiation produce voltage changes which are measured by an amplifier. The sensor contains special filters called Fresnel lenses that focus infrared signals on the sensor element. When infrared signals from the environment where the sensor is located change rapidly, the amplifier activates the output to indicate movement. This output remains active for a few seconds allowing the micro controller to know if there was movement.
Calibration When the pir sensor is energized requires a preparation time to start operating properly. This is because adaptation to the conditions of operation of the environment where it was installed has to occur. During this moment the sensor learns to recognize the state of rest or non-movement of the environment. The duration of this calibration can be between 10 and 60 seconds and the absence of people in the sensor neighborhood while calibrating is highly recommended.
Features:
- Infrared sensor with control circuit board.
- Sensitivity and retention time can be adjusted.
- Small and light, it is easy to use.
- Detection distance is up to 6 meters.
- Suitable for security field, toy, control automation, etc.
PIR ROBOX IR sensor features
MarchRoboxModelRTHWColorWhite + GreenMaterialPCB + Plastic boardFeaturesStatic power: 50uA; Detection distance: 7m; Detection angle: 110 degrees; Wide voltage range: DC 4.5 20VApplicationDetect motion
Dimensions: 1.26 x 0.94 in x 0.94 in (3.2 cm x 2.4 cm x 2.4 cm)Weight: 0.25 oz (7 g)
PinOut PIR ROBOX AND


Pines macho

Socket

Relay Module

TECHNICAL SPECIFICATIONS
- Operating Voltage: 5V DC
- Control Signal: TTL (3.3V or 5V)
- Number of Relays (channels): 1 CH
- Max capacity: 10A/250VAC, 10A/30VDC
- Max current: 10A (NO), 5A (NC)
- Action time: 10 ms / 5 ms
- To activate output NO: 0 Volts
Printed Circuit

Gerber file
Source
#include <WiFi.h>
#include <WiFiClientSecure.h>
#include <UniversalTelegramBot.h>
#include <ArduinoJson.h>
// Reemplazar con los datos de tu red wifi
const char* ssid = "Tu_red_wifi";
const char* password = "Tu_clave";
//Token de Telegram BOT se obtenienen desde Botfather en telegram
#define token_Bot "Tu_token"
// El ID se obtiene de (IDBot) en telegram no olvidar hacer click en iniciar
#define ID_Chat "Tu_chat_ID"
WiFiClientSecure client;
UniversalTelegramBot bot(token_Bot, client);
const int sensorPIR = 23; // Pin donde está conectada la entrada del sensor PIR
const int luz = 13;// Pin para luz de 110 o 220 V( Con módulo relay)
int conteo = 0;
String mensaje = "";
String conteoString = "";
int PIR = 0;
////Setup////
void setup() {
  Serial.begin(115200);
  // Activamos el resistor de PULLUP para la entrada sensor PIR
  pinMode(sensorPIR, INPUT_PULLUP);
  pinMode(luz, OUTPUT);
  // Intenta conectarse a la red Wifi:
  Serial.print("Conectando a la red wifi... ");
  Serial.println(ssid);
  //Seteo de la red Wifi
  WiFi.mode(WIFI_STA);
  WiFi.begin(ssid, password);
  while (WiFi.status() != WL_CONNECTED) {
    Serial.print(".");
    delay(500);
  }
  Serial.println("");
  Serial.println("Conectado a la red wifi!!!");
  Serial.print("Dirección ip: ");
  Serial.println(WiFi.localIP());//Imprimimos la direción ip local
  bot.sendMessage(ID_Chat, "Sistema preparado!!!", "");//Enviamos un mensaje a telegram para informar que el sistema está listo
}
/////loop//////
void loop() {
   PIR = digitalRead(sensorPIR);//Leemos el estado del del sensor PIR
   //Si es igual a "1" se cumple la condición
  if(PIR == 1){
    digitalWrite(luz, HIGH);//Encendemos la luz
    Serial.println("Luz Encendida!");
      conteo = conteo + 1;//Incremento en el contador de movimientos detectados
    conteoString = String(conteo);//Lo convertimos a una cadena
    mensaje = "Movimiento detectados: " + conteoString;//Concatenamos ambas cadenas
    bot.sendMessage(ID_Chat, mensaje, "");//Enviamos el mensaje a Telegram
    delay(5000);//mantensmos la luz encendida este tiempo
    digitalWrite(luz, LOW);//Luego la apagamos
    Serial.println("Luz apagada!");
    PIR = 0;//Asignamos el valor "0" a la variable PIR para que deje de cumplirse la condición
  }
}
Download Library –> Universal-Arduino-Telegram-Bot-master
Create Bot on Telegram

In telegram we look for BotFather

We write /start and something similar to this will appear to us

Write /newbot
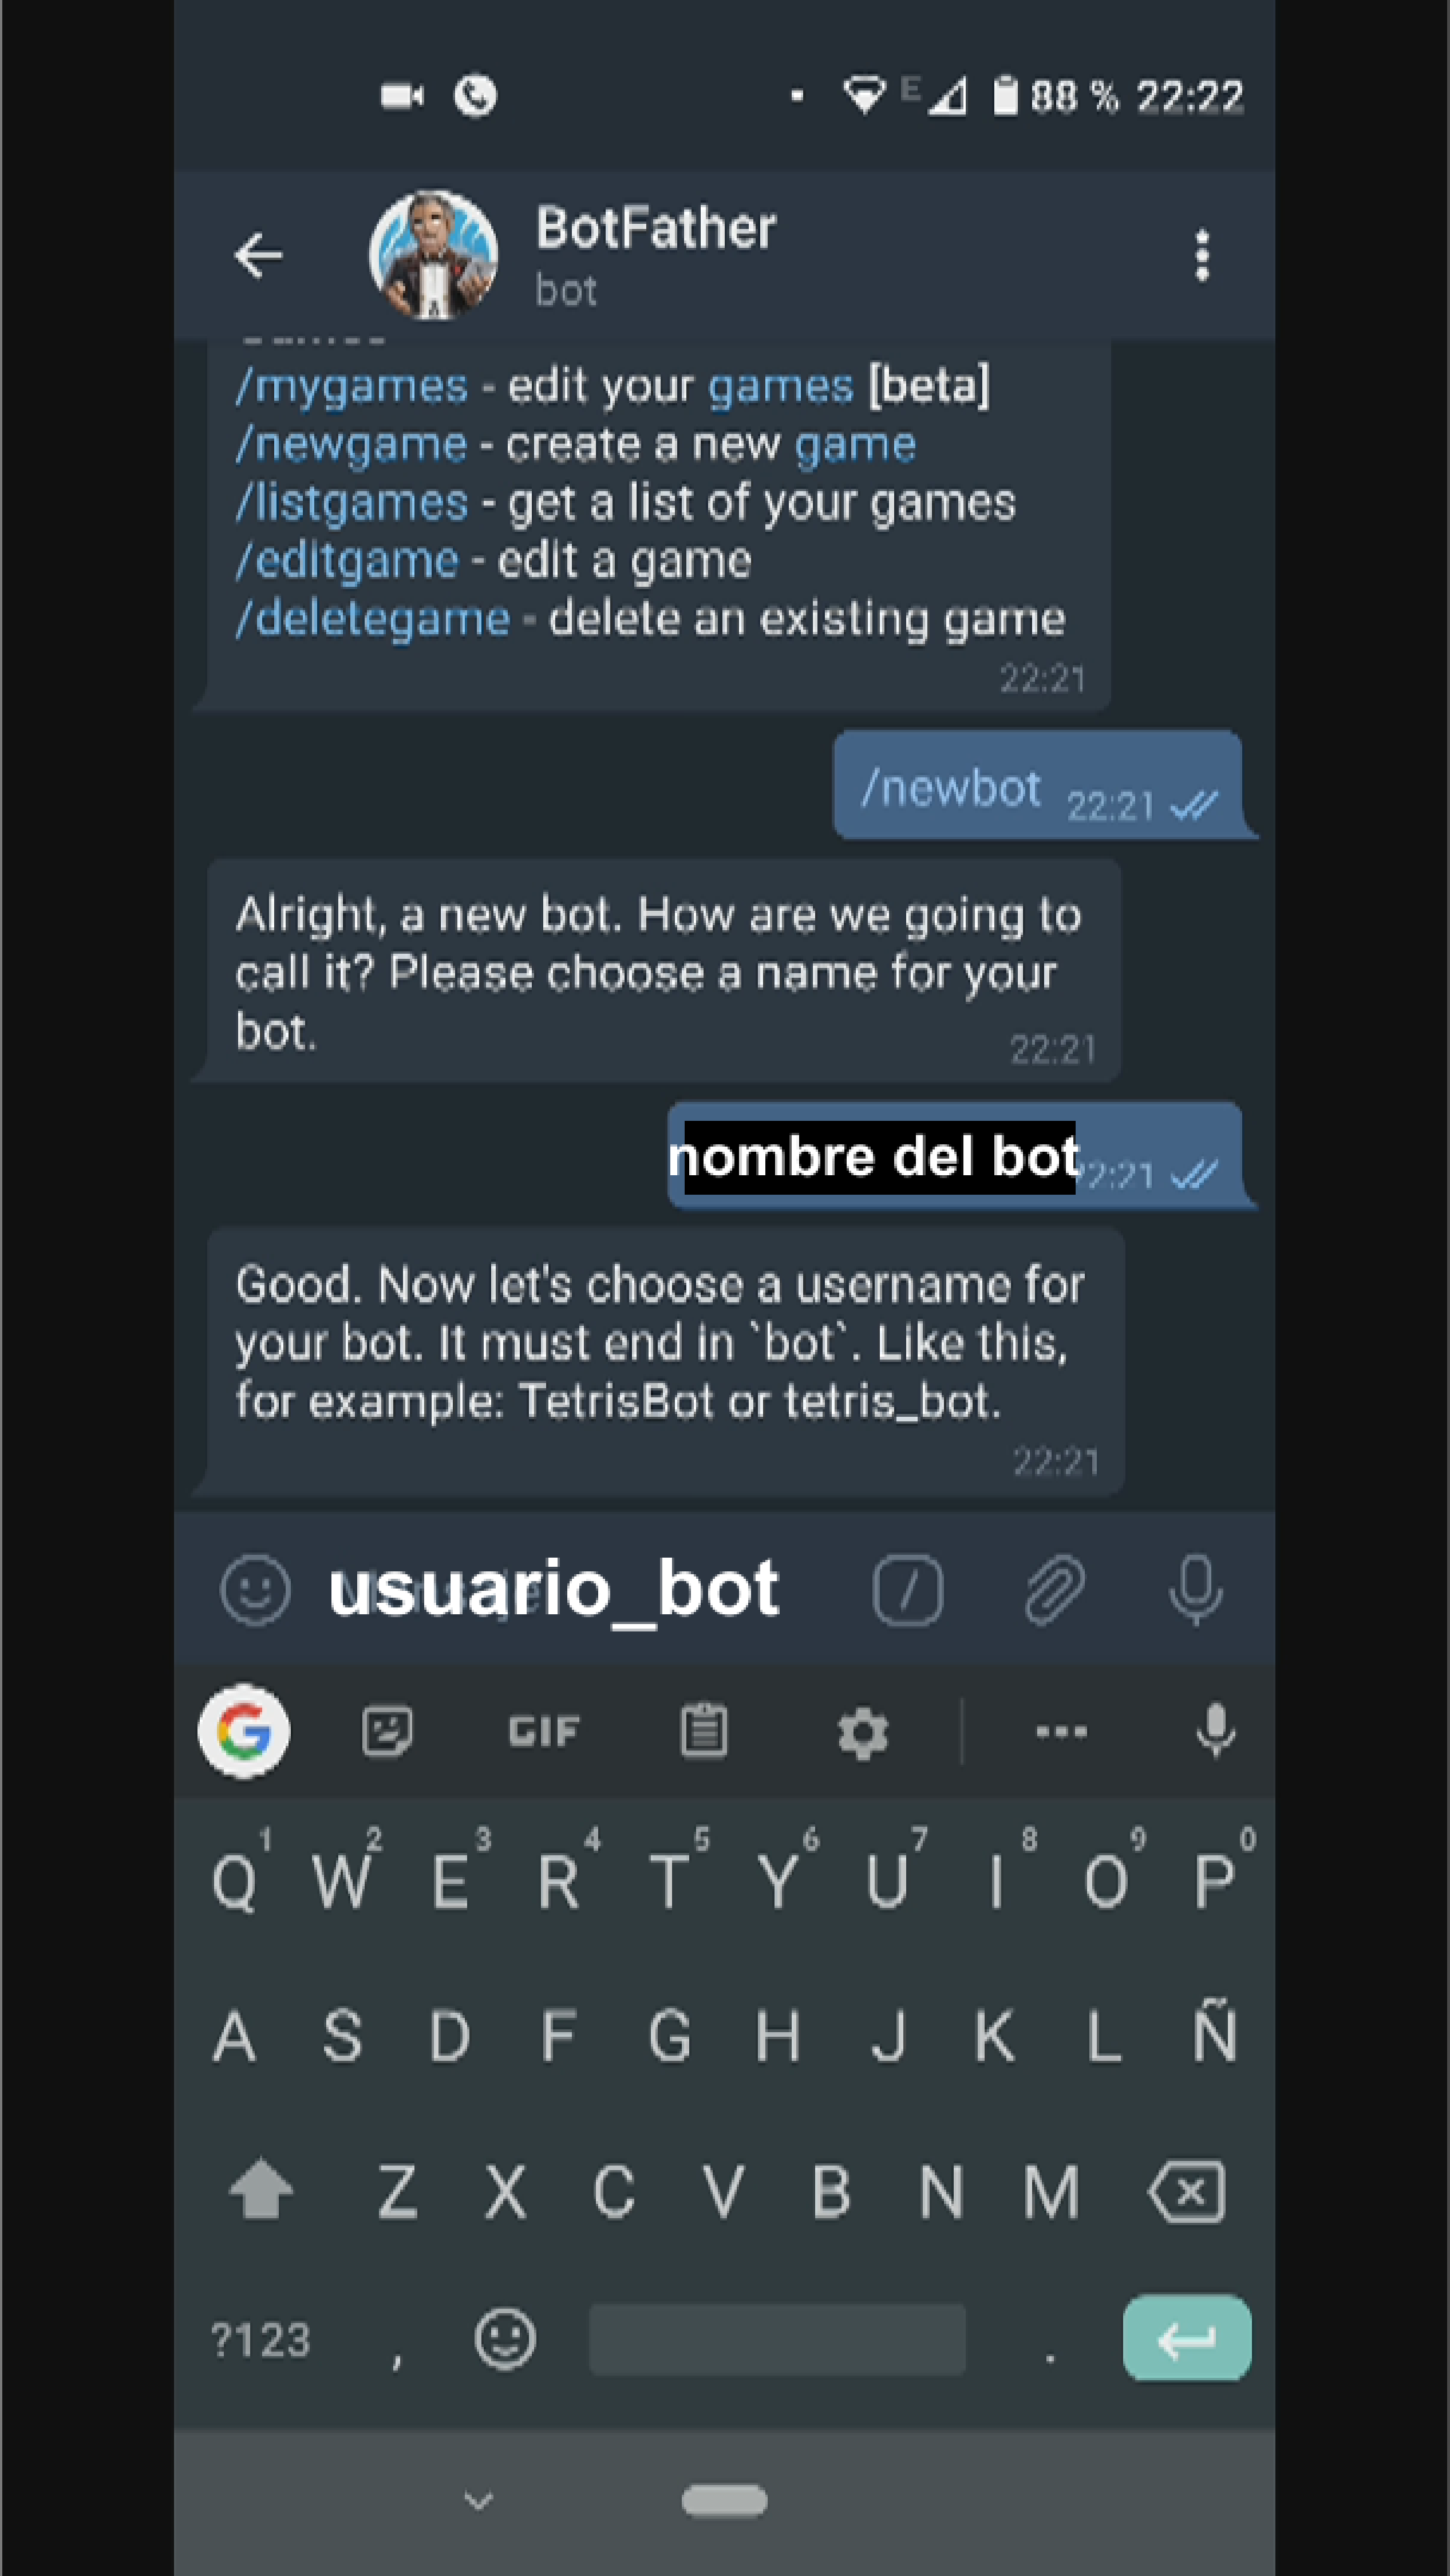
I will see the name of the bot, and we invent a name for our bot, it must be in the format ?usuario_bot?

We’ll get a token that we’re going to use in the source code

Now we’ll look for IDBot, and we’ll start it

We write /getid and it will give us user_id that we should place in the source code
You may be interested in projects in Arduino, pic, robotics, telecommunications, subscribe http://www.youtube.com/user/carlosvolt?sub_confirmation=1 videos with full source code and diagrams
Motion detector with light, esp32 and telegram notifications
*PCBWay community is a sharing platform. We are not responsible for any design issues and parameter issues (board thickness, surface finish, etc.) you choose.


Raspberry Pi 5 7 Inch Touch Screen IPS 1024x600 HD LCD HDMI-compatible Display for RPI 4B 3B+ OPI 5 AIDA64 PC Secondary Screen(Without Speaker)
BUY NOW
ESP32-S3 4.3inch Capacitive Touch Display Development Board, 800×480, 5-point Touch, 32-bit LX7 Dual-core Processor
BUY NOW
Raspberry Pi 5 7 Inch Touch Screen IPS 1024x600 HD LCD HDMI-compatible Display for RPI 4B 3B+ OPI 5 AIDA64 PC Secondary Screen(Without Speaker)
BUY NOW


- Comments(0)
- Likes(1)
 Log in to post comments.
More by CarlosVolt Tutoriales
-
 DTMF decoder for handy with arduino, control over several kilometers
In this tutorial we will see how to make a circuit to connect to our handy, in this case a Baofeng U...
DTMF decoder for handy with arduino, control over several kilometers
In this tutorial we will see how to make a circuit to connect to our handy, in this case a Baofeng U...
-
 Turn on light from thindspeak with esp32
In this tutorial, we will show you how to control lights over the Internet using an ESP32 and the Th...
Turn on light from thindspeak with esp32
In this tutorial, we will show you how to control lights over the Internet using an ESP32 and the Th...
-
 MP3 player control with webserver using ESP32 WIFI
In this tutorial, you will learn how to build a web server using the ESP32 to control the YX5300 mod...
MP3 player control with webserver using ESP32 WIFI
In this tutorial, you will learn how to build a web server using the ESP32 to control the YX5300 mod...
-
 Time clock with fingerprint IoT module, uploading data to thingspeak
More info in and updates in https://rogerbit.com/wprb/2022/07/reloj-de-control-fingerprint/In this t...
Time clock with fingerprint IoT module, uploading data to thingspeak
More info in and updates in https://rogerbit.com/wprb/2022/07/reloj-de-control-fingerprint/In this t...
-
 Make your own logic tip (includes printed circuit board)
In this video tutorial we will see how to make a logic tip, on a printed circuit, with the integrate...
Make your own logic tip (includes printed circuit board)
In this video tutorial we will see how to make a logic tip, on a printed circuit, with the integrate...
-
 Coil or inductor meter with Arduino and OLED display
More info and updates in https://rogerbit.com/wprb/2022/06/medidor-inductores/In this tutorial we wi...
Coil or inductor meter with Arduino and OLED display
More info and updates in https://rogerbit.com/wprb/2022/06/medidor-inductores/In this tutorial we wi...
-
 Infrared stepper motor control with speed control
More info and updates https://rogerbit.com/wprb/2024/09/motor-paso-a-paso-x-infrarrojo/In this proje...
Infrared stepper motor control with speed control
More info and updates https://rogerbit.com/wprb/2024/09/motor-paso-a-paso-x-infrarrojo/In this proje...
-
 Uploading BME280 Sensor Data to ThingSpeak Using ESP32
In this tutorial, we will show you how to connect a BME280 sensor to an ESP32 to read temperature, h...
Uploading BME280 Sensor Data to ThingSpeak Using ESP32
In this tutorial, we will show you how to connect a BME280 sensor to an ESP32 to read temperature, h...
-
 Water pump control for irrigation via telegram and esp32
Water Pump Control by Telegram and ESP32 is an automated system that allows you to remotely control ...
Water pump control for irrigation via telegram and esp32
Water Pump Control by Telegram and ESP32 is an automated system that allows you to remotely control ...
-
 Air conditioning on/off control via telegram and esp32
In this tutorial we will see how to control an air conditioner, with an esp32 and the telegram appli...
Air conditioning on/off control via telegram and esp32
In this tutorial we will see how to control an air conditioner, with an esp32 and the telegram appli...
-
 35 watt stereo amplifier
In this video we will see how to build an audio amplifier, with the TDA7377 integrated circuit, and ...
35 watt stereo amplifier
In this video we will see how to build an audio amplifier, with the TDA7377 integrated circuit, and ...
-
 Laser alarm with RFID module
More info and updates in https://rogerbit.com/wprb/2024/08/alarma-laser-rfid/In this project, we bui...
Laser alarm with RFID module
More info and updates in https://rogerbit.com/wprb/2024/08/alarma-laser-rfid/In this project, we bui...
-
 Control lights by voice commands and keys
In this tutorial we will see how to create a device to control lights by voice commands, with a modu...
Control lights by voice commands and keys
In this tutorial we will see how to create a device to control lights by voice commands, with a modu...
-
 Stepper motor control x bluetooth and app
In this tutorial we will see a circuit, which controls a stepper motor, with an application made in ...
Stepper motor control x bluetooth and app
In this tutorial we will see a circuit, which controls a stepper motor, with an application made in ...
-
 DFplayermini x bluetooth mp3 player control
More info and updates in https://rogerbit.com/wprb/2022/12/dfplayermini-x-bluetooth/In this tutorial...
DFplayermini x bluetooth mp3 player control
More info and updates in https://rogerbit.com/wprb/2022/12/dfplayermini-x-bluetooth/In this tutorial...
-
 Robot with WiFi control and servos driven by ESP32
More info and updates in https://rogerbit.com/wprb/2023/07/robot-wifi/A robot controlled by Wi-Fi, s...
Robot with WiFi control and servos driven by ESP32
More info and updates in https://rogerbit.com/wprb/2023/07/robot-wifi/A robot controlled by Wi-Fi, s...
-
 How to make a water level meter with uln2803
In this tutorial we will see how to make a water level meter circuit with the built-in uln2803.The p...
How to make a water level meter with uln2803
In this tutorial we will see how to make a water level meter circuit with the built-in uln2803.The p...
-
 Color Detector with Arduino and OLED display
In this tutorial we will show you how to build a color detector using the TCS3200 sensor and an SH11...
Color Detector with Arduino and OLED display
In this tutorial we will show you how to build a color detector using the TCS3200 sensor and an SH11...
-
DTMF decoder for handy with arduino, control over several kilometers
In this tutorial we will see how to make a circuit to connect to our handy, in this case a Baofeng U...
-
Turn on light from thindspeak with esp32
In this tutorial, we will show you how to control lights over the Internet using an ESP32 and the Th...
-
MP3 player control with webserver using ESP32 WIFI
In this tutorial, you will learn how to build a web server using the ESP32 to control the YX5300 mod...
-
Time clock with fingerprint IoT module, uploading data to thingspeak
More info in and updates in https://rogerbit.com/wprb/2022/07/reloj-de-control-fingerprint/In this t...
-
Make your own logic tip (includes printed circuit board)
In this video tutorial we will see how to make a logic tip, on a printed circuit, with the integrate...
-
Coil or inductor meter with Arduino and OLED display
More info and updates in https://rogerbit.com/wprb/2022/06/medidor-inductores/In this tutorial we wi...
-
Infrared stepper motor control with speed control
More info and updates https://rogerbit.com/wprb/2024/09/motor-paso-a-paso-x-infrarrojo/In this proje...
-
Uploading BME280 Sensor Data to ThingSpeak Using ESP32
In this tutorial, we will show you how to connect a BME280 sensor to an ESP32 to read temperature, h...
-
Water pump control for irrigation via telegram and esp32
Water Pump Control by Telegram and ESP32 is an automated system that allows you to remotely control ...
-
Air conditioning on/off control via telegram and esp32
In this tutorial we will see how to control an air conditioner, with an esp32 and the telegram appli...
-
35 watt stereo amplifier
In this video we will see how to build an audio amplifier, with the TDA7377 integrated circuit, and ...
-
Laser alarm with RFID module
More info and updates in https://rogerbit.com/wprb/2024/08/alarma-laser-rfid/In this project, we bui...
-
Commodore 64 1541-II Floppy Disk Drive C64 Power Supply Unit USB-C 5V 12V DIN connector 5.25
68 0 2 -
Easy to print simple stacking organizer with drawers
30 0 0 -
-
-
Modifying a Hotplate to a Reflow Solder Station
1068 1 6 -
MPL3115A2 Barometric Pressure, Altitude, and Temperature Sensor
584 0 1 -
-
-
V2 Commodore AMIGA USB-C Power Sink Delivery High Efficiency Supply Triple Output 5V ±12V OLED display ATARI compatible shark 100W
1344 4 3


