Remote Alarm transmitter
As part of my experiments with LoRa and the easy to use ATMega328P, I have recently designed quite a few LoRa based projects. In this final 2 part series, I will look at two additional projects, part of a Remote Alarm Transceiver, where I experimented with a changing a few things:
– Using LM317G adjustable voltage regulators.
– Replacing my standard N-MOS based logic level converters with a dedicated chip.
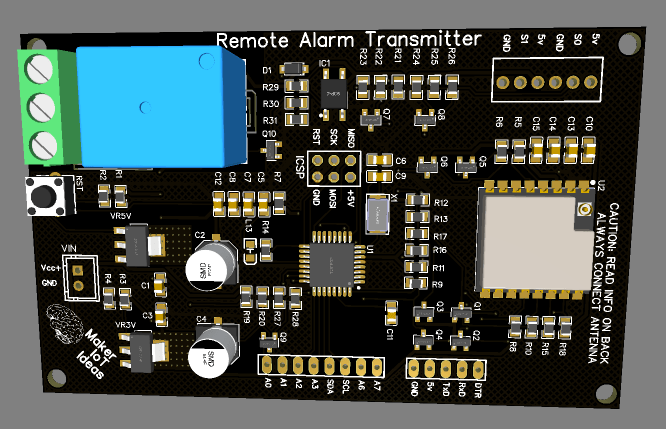 LoRa Remote Alarm Transmitter – with Onboard Relay putout and two sensor inputs
How does this differ from my other LoRa Based projects?
The PCB presented above does in fact not really differ a lot from any of my existing LoRa based projects.
However, there are a few subtle changes, mainly experimental changes, brought on by factors such as component availability and an attempt to reduce component counts and board size.
The first of these changes is using the LM317G voltage regulator, in the place of my usual LM1117 3.3 and 5.0 LDO regulators.
The LM317 is an old device, It has been on the market for a long time. It can supply up to 1.5A of current, and a single device can be configured to supply a wide range of different voltages by just changing two resistors. This seemed quite attractive to me, as it is getting quite difficult to reliably get quite a few components on time, and with decent pricing in the post-Covid-19 world.
The second major change would be moving away from my existing N-Mos based Logic converter setup, where I used the BSS138 and 10K resistors as logic converters. This setup works perfectly, but it has the drawback of requiring quite a lot of components. for example:
To provide logic conversion to an RA-02 module, with access to all the IO Lines (GPIO0-5 included) required 12 BSS138 Mosfets and 24 10k resistors. This is quite a lot of components. A dedicated logic converter chip would thus be a much more attractive solution.
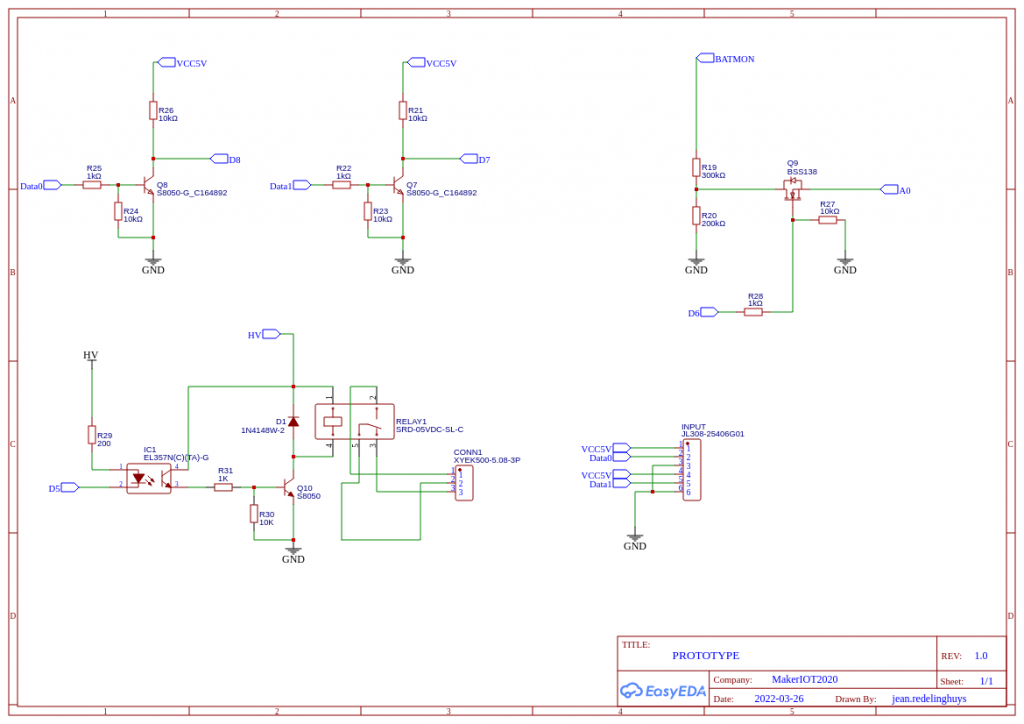
Driver circuitry for sensor Inputs, consisting of a simple transistor input, and an optically isolated Relay output completes the circuit.
Using the LM317
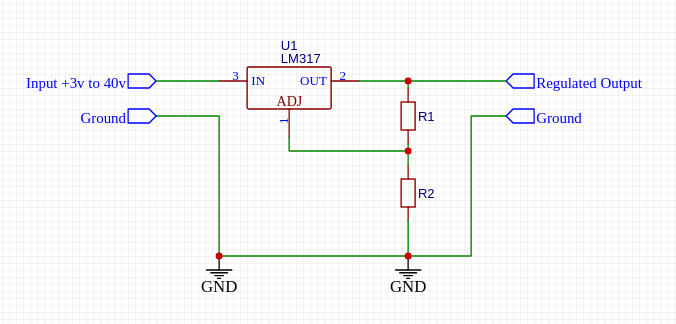
The output voltage of the LM317 is typically set using two resistors, with a suitable current rating, using the following Formula
VOUT = 1.25 * ( 1 + R2/R1 )
It is also common to use a variable resistor at R2, to have fine control over the output voltage. This is due to the fact that stock resistor values do not always give you the exact voltage you require. You should also take into account that using a 5% resistor will be less accurate than a 1% resistor.
Another issue will definitely be heat dissipation. In my PCB design, I have used the SOT-223 package of the component, with a PCB heatsink, built directly into the layers. With the LM1117 LDO regulators, these work extremely well.
Logic Level Conversion
In this design, I used my standard Logic Level conversion circuit, comprised of a BSS138 N-Mos with two 10 k resistors. This circuit, although a bit cumbersome with lots of components if you need many logic converters, is very stable, and functions extremely well.
Conclusion
This circuit was designed as a two-part prototype, with the goal of experimenting with different voltage regulators, and in part 2, with a single chip 8 channel logic converter. As such, I do not feel comfortable releasing the full schematics to you at this stage, do so anyway in the interest of learning. The circuit works, but there are many issues with the regulators:
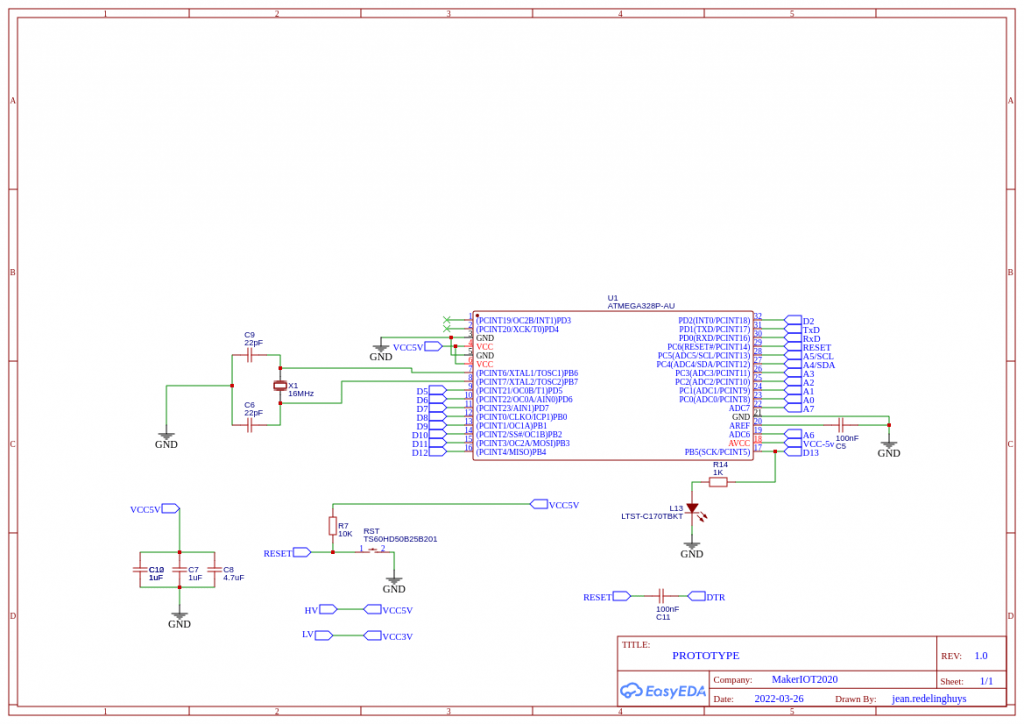
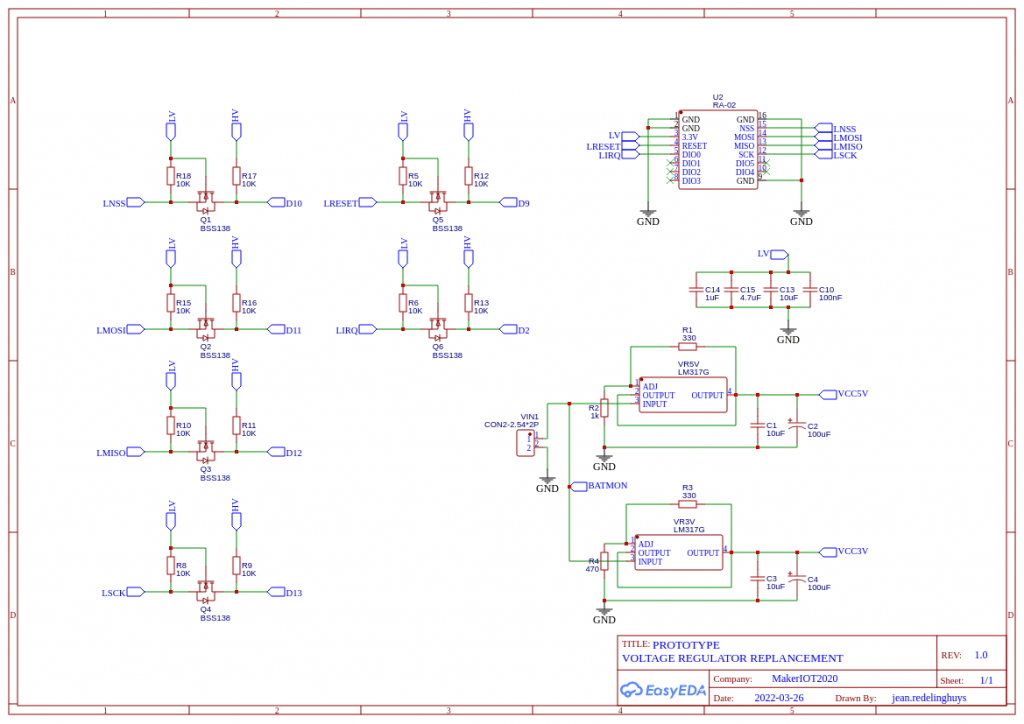
Remote Alarm transmitter
*PCBWay community is a sharing platform. We are not responsible for any design issues and parameter issues (board thickness, surface finish, etc.) you choose.
- Comments(0)
- Likes(0)
- 0 USER VOTES
- YOUR VOTE 0.00 0.00
- 1
- 2
- 3
- 4
- 5
- 6
- 7
- 8
- 9
- 10
- 1
- 2
- 3
- 4
- 5
- 6
- 7
- 8
- 9
- 10
- 1
- 2
- 3
- 4
- 5
- 6
- 7
- 8
- 9
- 10
- 1
- 2
- 3
- 4
- 5
- 6
- 7
- 8
- 9
- 10
 More by Jean Redelinghuys MakerIoT2020
-
 PCB_MCP23008_2023-10-08
MCP23008 BreakoutI designed this breakout to assist me during prototyping my next version of the “RP...
-
 PCB_XiaoRP2040-Mouse-REV2
Xiao RP2040 Joystick Mouse – revision 2.00Revision 1.0 of the ProjectOver the last few months, I hav...
-
 Multi Purpose IO Card
Multi-Purpose IO CardWhen we are working on a prototype, we always need access to pushbuttons, encod...
-
 Variable Voltage Power Module
Powering electronics projects are always challenging. This Variable vol...
Variable Voltage Power Module
Variable Voltage Power ModulePowering electronics projects are always challenging. This Variable vol...
-
 I2C Matrix Keypad
An I2C Matrix KeypadThe completed I2C Matrix KeypadIn a previous post this month I introduced my 4×4...
-
 ESP32-S Development Board, in "Arduino Uno" form factor
UPDATE 24/06/2023:This board now has a Hardware Revision 2.0 available. It is the same board but wit...
-
 W307186ASC94_Gerber_PCB_USB-Ports
USB Power Supply ModuleUSB Ports are quite handy to power all our day-to-day electronic devices, but...
-
 Atmega 328P based PWM controller Card
ATMega 328P Based PWM controller CardAs part of my recent ESP-12E I2C Base Board project, I designed...
-
 W307186ASC71_Gerber_PCB_ESP-Now Remote
Today we will look at the remote control unit for the Robotic Toy Car – Part 6.The project is close ...
-
 W307186ASV69_Gerber_PCB_Robot-Car-MCU-Board Prototype
In our last project, we started working on repurposing an old toy car. In this part, Robot Toy Car –...
-
 W307186ASV62_Gerber_PCB_DUAL-H-Bridge
by makeriot2020 on May 27, 2022Many of us have old toys laying around the house, they belong to ou...
-
 CAN-BUS Breakout
Breadboard Compatible CAN-BUS Breakout ModuleWhat is this:Some of us have already used the commonly ...
-
 RA-02 Breakout with Level converters
Breadboard and beginner-friendly RA-02 Breakout ModuleMost Makers and electronics enthusiasts may al...
-
 ATMEGA328P Module with integrated LoRa and CAN Bus
ATMEGA328P Module with integrated LoRa and CAN-BUSINTRODUCTIONIn my quest to perfect my LoRa telemet...
-
 Sx127x-Ra-02-Test-Module with ATMEGA328P-AU
SX127x LoRa/FSK/OOK Prototype Radio BoardI recently had a requirement to do some automation/telemetr...
-
 USB-ASP Programmer ATMEGA8
Build your own USB-ASP Programmer CloneBymakeriot2020 FEB 21, 2022 Arduino, ASP programmerUsing mor...
-
 ATTiny1616-LIGHT-Controller-with-CAN_B_PCB_ATTiny1616-LIGHT-Controller-with-C_2024-09-11
Assembly of the ATTiny1616 Can bus controller PCBThe Assembly of the ATTiny1616 Can Bus Controller P...
-
 ATTiny1616QFN-CAN-Remote-Neopixel-Ligh_PCB_ATTiny1616QFN-CAN-Remote-Neopixel-2024-09-11_2024-09-11
NeoPixel CAN-Bus Module with local controlAs part of my current project to add NeoPixels to the cabi...
-
RGB LED Matrix input module for the Framework Laptop 16
110 0 1 -
-
📦 StackBox: Modular MDF Storage Solution 📦
35 0 0 -
-
-


