


|
|
D7S sensor board |
x 1 | |
|
|
Arduino Nano R3 |
x 1 | |
|
|
Relay Module (Generic) |
x 1 | |
|
|
Buzzer |
x 1 | |
|
|
LED0805generic
|
x 6 | |
|
|
Resistor 470R |
x 6 |

|
Soldering Iron Kit |
|

|
arduino IDEArduino
|
Arduino Eatrthquake alarm and protection system with D7S seismic Sensor
Earthquakes are extremely common events around the world. On average, there are fifty earthquakes a day, around twenty thousand a year. Many are mild and go unnoticed, but some are catastrophic. It is not always possible to predict when a disastrous event will occur. Using special sensos, designers can make their systems safer and minimise the risk of secondary damage from earthquakes by safely shutting down critical devices and halting their operation. In this project I will describe a device that uses this type of sensor.

Specifically, the sensor I am using is an Omron product and its designation is D7S. A key feature of the sensor is its ability to distinguish between actual seismic activity due to an earthquake and signals due to other causes. When an event occurs, the D7S uses unique Spectral Intensity (SI) calculation algorithm to distinguish between seismic activity and other types of motion. The sensor includes a three-axis accelerometer that can take measurements to calculate the SI (spectral intensity) value and determine the magnitude of the earthquake. Spectral intensity (SI) correlates highly with damage to structures. These facts are the biggest difference between this sensor and, for example, the MPU6050, which, by the way, reacts equally to all types of shocks and vibrations generated from various sources.
And first of all, let me clarify that this sensor is not intendet and sensitive enough to make a seismometer, but its main purpose is to turn off a device during a strong earthquake, which would reduce the damage caused. For example, during a major earthquake, the gas supply to a certain building would be turned off because there is a risk of its collapse, or the power lines would be turned off. To control and read the data from the sensor, I use an Arduino Nano microcontroller board and the appropriate library.
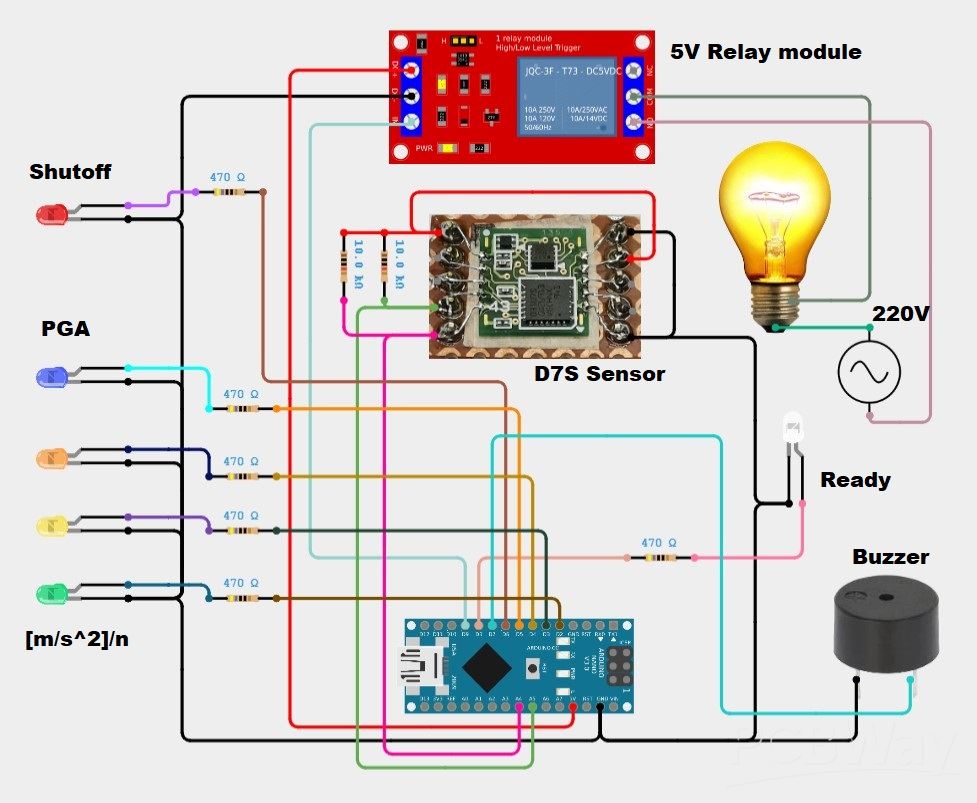
As you can see, the device is very simple and consists of several components.
- Omron D7S seismic sensor
- Arduino Nano microcontroller board
- Buzzer
- 6 Leds with apropriate current limitin resistors
- and optionally small 5V relay module

This project is sponsored by PCBWay. This year, PCBWay organizes the Seventh Project Design Contest where, in addition to Electronic and Mechanical Project, also has been added a new category: STM32 Project. For the best selected projects are provided rich prizes in cash, coupons and special gifts. Submit your project for participation in this Contest from 2nd, Sep, 2024 to 19th, Jan, 2025. For more details and instructions visit the given page. Let PCBway always be your first choice.

The code is based on Alessandro Pasqualini's excellent library, in fact, in one of the examples I added LEDs and a buzzer for signaling and a relay module for controlling other devices.
First, let me explain how the device works. After turning it on, we need to wait a certain amount of time, during which communication and initialization of the sensor are established. During that time, the device should be in a state of complete standstill. Then the white LED lights up, which is a sign that the device is ready to react to a possible shock. We can also observe this startup process on the serial monitor if we connect the Arduino to a PC.


These 4 LEDs are for indication of a possible earthquake. The intensity of the movement is displayed in units of PGA (peak ground acceleration) and is expressed in m/sec^2. Peak Ground Acceleration represents the intensity of the shaking at a specific point on the Earth's surface. It is used to assess the potential for earthquake damage to structures and is particularly relevant for engineering and construction, as buildings and infrastructure are designed to withstand certain accelerations. It is interesting to mention that this sensor has its own memory where it stores previous events. In this case, is displayed the strongest earthquake intensity that occurred in the previous period since the device was turned on. Depending on that value, the corresponding LED lights up.

And, the last largest LED is activated in case the sensor detects a shock in which there is a high probability that the object on which the sensor is mounted will be significantly damaged or collapse. At the same time, the relay module and the buzzer are activated.

Now let's see how the device works in simulated, approximately realistic conditions. For this purpose, I will move this entire structure with a relatively low frequency to be close to a real earthquake. We assume that this is some kind of building. I will connect a lamp to the relay that will simulate an electric control valve for supplying gas to the building.
I will start shaking the object. We see that the first LED lights up. With stronger shaking, the next LED is activated. If in the meantime tremors occur that are of a weaker intensity than this one (which is 0.2m/s‚2), the same diode that signals the strongest tremor so far remains lit. Only if a stronger tremor occurs, the next LED will light up.
In the event of a very strong earthquake that would pose a danger to the structure, the largest red LED lights up and at the same time the buzzer is activated, as well as the relay that turns off the lamp (actually the imaginary valve).

And finally a short conclusion. The D7S is a very compact surface mount module and can be easily incorporated into any system due to its size. Its low current consumption – only 90 microamps in standby, and also allows its integration into battery-powered systems. The main advantage over standard MEMS Acceleration Sensors is in its ability to distinguish between actual seismic activity due to an earthquake and signals due to other causes.

/* Copyright 2017 Alessandro Pasqualini Licensed under the Apache License, Version 2.0 (the "License"); you may not use this file except in compliance with the License. You may obtain a copy of the License at http://www.apache.org/licenses/LICENSE-2.0 Unless required by applicable law or agreed to in writing, software distributed under the License is distributed on an "AS IS" BASIS, WITHOUT WARRANTIES OR CONDITIONS OF ANY KIND, either express or implied. See the License for the specific language governing permissions and limitations under the License. @author Alessandro Pasqualini <alessandro.pasqualini.1105@gmail.com> @url https://github.com/alessandro1105 This project has been developed with the contribution of Futura Elettronica. - http://www.futurashop.it - http://www.elettronicain.it - https://www.open-electronics.org */ #include <D7S.h> int LED1 = 2; int LED2 = 3; int LED3 = 4; int LED4 = 5; int LEDSH = 6; int LEDRE = 8; int BUZZ = 7; int REL = 9; //old earthquake data float oldSI = 0; float oldPGA = 0; float currentPGA = 0; //flag variables to handle collapse/shutoff only one time during an earthquake bool shutoffHandled = false; bool collapseHandled = false; //function to handle shutoff event void handleShutoff() { //put here the code to handle the shutoff event Serial.println("-------------------- SHUTOFF! --------------------"); Serial.println("Shutting down all device!"); //stop all device while (1) ; } //function to handle collapse event void handleCollapse() { //put here the code to handle the collapse event Serial.println("-------------------- COLLAPSE! --------------------"); } void setup() { // Open serial communications and wait for port to open: Serial.begin(9600); pinMode(2, OUTPUT); pinMode(3, OUTPUT); pinMode(4, OUTPUT); pinMode(5, OUTPUT); pinMode(6, OUTPUT); pinMode(7, OUTPUT); pinMode(8, OUTPUT); pinMode(9, OUTPUT); while (!Serial) { ; // wait for serial port to connect. Needed for native USB port only } //--- STARTING --- Serial.print("Starting D7S communications (it may take some time)..."); //start D7S connection D7S.begin(); //wait until the D7S is ready while (!D7S.isReady()) { Serial.print("."); delay(500); } Serial.println("STARTED"); //--- SETTINGS --- //setting the D7S to switch the axis at inizialization time Serial.println("Setting D7S sensor to switch axis at inizialization time."); D7S.setAxis(SWITCH_AT_INSTALLATION); //--- INITIALIZZAZION --- Serial.println("Initializing the D7S sensor in 2 seconds. Please keep it steady during the initializing process."); delay(2000); Serial.print("Initializing..."); //start the initial installation procedure D7S.initialize(); //wait until the D7S is ready (the initializing process is ended) while (!D7S.isReady()) { Serial.print("."); delay(500); } Serial.println("INITIALIZED!"); //--- CHECKING FOR PREVIUS COLLAPSE --- //check if there there was a collapse (if this is the first time the D7S is put in place the installation data may be wrong) if (D7S.isInCollapse()) { handleCollapse(); } //--- RESETTING EVENTS --- //reset the events shutoff/collapse memorized into the D7S D7S.resetEvents(); delay(3000); //--- READY TO GO --- Serial.println("\nListening for earthquakes!"); digitalWrite(LEDRE, HIGH); } void loop() { //checking if there is an earthquake occuring right now if (D7S.isEarthquakeOccuring()) { //check if the shutoff event has been handled and if the shutoff condition is met //the call of D7S.isInShutoff() is executed after to prevent useless I2C call if (!shutoffHandled && D7S.isInShutoff()) { digitalWrite(LED1, LOW); digitalWrite(LED2, LOW); digitalWrite(LED3, LOW); digitalWrite(LED4, LOW); digitalWrite(LEDRE, LOW); digitalWrite(LEDSH, HIGH); digitalWrite(BUZZ, HIGH); digitalWrite(REL, HIGH); handleShutoff(); shutoffHandled = true; } //check if the shutoff event has been handled and if the shutoff condition is met //the call of D7S.isInShutoff() is executed after to prevent useless I2C call if (!collapseHandled && D7S.isInCollapse()) { digitalWrite(LED1, HIGH); digitalWrite(LED2, HIGH); digitalWrite(LED3, HIGH); digitalWrite(LED4, HIGH); digitalWrite(LEDRE, LOW); digitalWrite(LEDSH, HIGH); digitalWrite(BUZZ, HIGH); digitalWrite(REL, HIGH); handleCollapse(); collapseHandled = true; } //print information about the current earthquake float currentSI = D7S.getInstantaneusSI(); float currentPGA = D7S.getInstantaneusPGA(); if (currentSI > oldSI || currentPGA > oldPGA) { //getting instantaneus SI Serial.print("\tInstantaneus SI: "); Serial.print(currentSI); Serial.println(" [m/s]"); //getting instantaneus PGA Serial.print("\tInstantaneus PGA (Peak Ground Acceleration): "); Serial.print(currentPGA); Serial.println(" [m/s^2]\n"); //save the current data oldSI = currentSI; oldPGA = currentPGA; if (currentPGA > 0 && currentPGA <= 0.1) { digitalWrite(LED1, HIGH); digitalWrite(LED2,LOW); digitalWrite(LED3, LOW); digitalWrite(LED4, LOW); } if (currentPGA > 0.1 && currentPGA <= 0.2) { digitalWrite(LED1, LOW); digitalWrite(LED2, HIGH); digitalWrite(LED3,LOW); digitalWrite(LED4,LOW); } if (currentPGA > 0.2 && currentPGA <= 0.3) { digitalWrite(LED3, LOW); digitalWrite(LED2, LOW); digitalWrite(LED3, HIGH); digitalWrite(LED4, LOW); } if (currentPGA > 0.3 ) { digitalWrite(LED1, LOW); digitalWrite(LED2, LOW); digitalWrite(LED3, LOW); digitalWrite(LED4, HIGH); } } else { //reset the old earthquake data oldPGA = 0; oldSI = 0; //reset the flag of the handled events shutoffHandled = false; collapseHandled = false; //reset D7S events D7S.resetEvents(); } } }
Arduino Eatrthquake alarm and protection system with D7S seismic Sensor


Raspberry Pi 5 7 Inch Touch Screen IPS 1024x600 HD LCD HDMI-compatible Display for RPI 4B 3B+ OPI 5 AIDA64 PC Secondary Screen(Without Speaker)
BUY NOW
ESP32-S3 4.3inch Capacitive Touch Display Development Board, 800×480, 5-point Touch, 32-bit LX7 Dual-core Processor
BUY NOW
Raspberry Pi 5 7 Inch Touch Screen IPS 1024x600 HD LCD HDMI-compatible Display for RPI 4B 3B+ OPI 5 AIDA64 PC Secondary Screen(Without Speaker)
BUY NOW


- Comments(0)
- Likes(0)
 Log in to post comments.
More by Mirko Pavleski
-
 Tug of War Arduino Game on WS2812 Led strip
A Tug of War is a classic team-based game where two opposing teams compete to pull a rope in opposi...
Tug of War Arduino Game on WS2812 Led strip
A Tug of War is a classic team-based game where two opposing teams compete to pull a rope in opposi...
-
 DIY ESP32 Bioresonance Rife Machine with ZAPPER function
Rife machine therapy is an alternative treatment developed by Dr. Royal Raymond Rife in the 1930s. H...
DIY ESP32 Bioresonance Rife Machine with ZAPPER function
Rife machine therapy is an alternative treatment developed by Dr. Royal Raymond Rife in the 1930s. H...
-
 Arduino VFO Project with a Large LCD Display
A Variable Frequency Oscillator (VFO) is an electronic oscillator whose output frequency can be adj...
Arduino VFO Project with a Large LCD Display
A Variable Frequency Oscillator (VFO) is an electronic oscillator whose output frequency can be adj...
-
 Exploring the Tesla Coil Driver Board, Full Review & Test Results
Some time ago I presented you a video in which I analyzed a super cheap Tesla Coil driver that cost...
Exploring the Tesla Coil Driver Board, Full Review & Test Results
Some time ago I presented you a video in which I analyzed a super cheap Tesla Coil driver that cost...
-
 Arduino Eatrthquake alarm and protection system with D7S seismic Sensor
Earthquakes are extremely common events around the world. On average, there are fifty earthquakes a...
Arduino Eatrthquake alarm and protection system with D7S seismic Sensor
Earthquakes are extremely common events around the world. On average, there are fifty earthquakes a...
-
 Review and Comparison of Three Inexpensive Metal Detector Kits
A metal detector is a device used to detect the presence of metal objects in the ground or other ma...
Review and Comparison of Three Inexpensive Metal Detector Kits
A metal detector is a device used to detect the presence of metal objects in the ground or other ma...
-
 Arduino 3D Printed self Balancing Cube
Self-balancing devices are electronic devices that use sensors and motors to keep themselves balanc...
Arduino 3D Printed self Balancing Cube
Self-balancing devices are electronic devices that use sensors and motors to keep themselves balanc...
-
 Arduino flame detector with alarms and automatic fire extinguishing
A flame detector is an electronic device designed to sense the presence of flames or fire. There ar...
Arduino flame detector with alarms and automatic fire extinguishing
A flame detector is an electronic device designed to sense the presence of flames or fire. There ar...
-
 OpenWebRX - Simplest Rasprberry Pi + RTLSDR Web SDR Radio
Software-Defined Radio is a radio communication system where components that have traditionally bee...
OpenWebRX - Simplest Rasprberry Pi + RTLSDR Web SDR Radio
Software-Defined Radio is a radio communication system where components that have traditionally bee...
-
 Colorful Arduino Tetris Game - WS2812B LED Matrix Tutorial
Tetris is a puzzle video game created in 1985 by Alexey Pajitnov. Players manipulate falling geomet...
Colorful Arduino Tetris Game - WS2812B LED Matrix Tutorial
Tetris is a puzzle video game created in 1985 by Alexey Pajitnov. Players manipulate falling geomet...
-
 Ultra cheap Ultrasonic levitation Device - functionality and testing
Ultrasonic levitation is phenomenon where objects are suspended in mid-air using the power of sound ...
Ultra cheap Ultrasonic levitation Device - functionality and testing
Ultrasonic levitation is phenomenon where objects are suspended in mid-air using the power of sound ...
-
 DIY -Spirit PI- ESP32 + Smartphone Sensitive Metal Detector
Pulse Induction (PI) metal detector operates on a principle based on sending short pulses of electr...
DIY -Spirit PI- ESP32 + Smartphone Sensitive Metal Detector
Pulse Induction (PI) metal detector operates on a principle based on sending short pulses of electr...
-
 ESP32 Analog style VU meter with GC9A01 Round Dispalys + Peak Meters
A typical VU meter measures audio signals and displays them with a visual indicator. In the classic...
ESP32 Analog style VU meter with GC9A01 Round Dispalys + Peak Meters
A typical VU meter measures audio signals and displays them with a visual indicator. In the classic...
-
 Arduino two weel self Balancing Robot
Self Balancing Robot is device that can balance itself from falling to the ground. Its function is ...
Arduino two weel self Balancing Robot
Self Balancing Robot is device that can balance itself from falling to the ground. Its function is ...
-
 ELECROW CrowPanel ESP32 4.2” E-paper Wi-Fi Info-Dispaly Project
An e-paper display (also known as an electronic paper display or E Ink display) is a type of screen...
ELECROW CrowPanel ESP32 4.2” E-paper Wi-Fi Info-Dispaly Project
An e-paper display (also known as an electronic paper display or E Ink display) is a type of screen...
-
 ESP32 Fluid simulation on 16x16 Led Matrix
Fluid simulation is a way of replicating the movement and behavior of liquids and gases in differen...
ESP32 Fluid simulation on 16x16 Led Matrix
Fluid simulation is a way of replicating the movement and behavior of liquids and gases in differen...
-
 Simple GU50 VTTC Tesla Coil with MOT (25+cm Spark)
Vacuum Tube Tesla Coils are a common choice for homebuilders for several practical reasons. At Soli...
Simple GU50 VTTC Tesla Coil with MOT (25+cm Spark)
Vacuum Tube Tesla Coils are a common choice for homebuilders for several practical reasons. At Soli...
-
 Hourglass ESP8266 Code
A hourglass, also known as an sand clock, is a device used to measure the passage of time. It consi...
Hourglass ESP8266 Code
A hourglass, also known as an sand clock, is a device used to measure the passage of time. It consi...
-
Tug of War Arduino Game on WS2812 Led strip
A Tug of War is a classic team-based game where two opposing teams compete to pull a rope in opposi...
-
DIY ESP32 Bioresonance Rife Machine with ZAPPER function
Rife machine therapy is an alternative treatment developed by Dr. Royal Raymond Rife in the 1930s. H...
-
Arduino VFO Project with a Large LCD Display
A Variable Frequency Oscillator (VFO) is an electronic oscillator whose output frequency can be adj...
-
Exploring the Tesla Coil Driver Board, Full Review & Test Results
Some time ago I presented you a video in which I analyzed a super cheap Tesla Coil driver that cost...
-
Arduino Eatrthquake alarm and protection system with D7S seismic Sensor
Earthquakes are extremely common events around the world. On average, there are fifty earthquakes a...
-
Review and Comparison of Three Inexpensive Metal Detector Kits
A metal detector is a device used to detect the presence of metal objects in the ground or other ma...
-
Arduino 3D Printed self Balancing Cube
Self-balancing devices are electronic devices that use sensors and motors to keep themselves balanc...
-
Arduino flame detector with alarms and automatic fire extinguishing
A flame detector is an electronic device designed to sense the presence of flames or fire. There ar...
-
OpenWebRX - Simplest Rasprberry Pi + RTLSDR Web SDR Radio
Software-Defined Radio is a radio communication system where components that have traditionally bee...
-
Colorful Arduino Tetris Game - WS2812B LED Matrix Tutorial
Tetris is a puzzle video game created in 1985 by Alexey Pajitnov. Players manipulate falling geomet...
-
Ultra cheap Ultrasonic levitation Device - functionality and testing
Ultrasonic levitation is phenomenon where objects are suspended in mid-air using the power of sound ...
-
DIY -Spirit PI- ESP32 + Smartphone Sensitive Metal Detector
Pulse Induction (PI) metal detector operates on a principle based on sending short pulses of electr...
-
Commodore 64 1541-II 1581 Floppy Disk Drive C64 Power Supply Unit USB-C 5V 12V DIN connector 5.25
166 1 3 -
Easy to print simple stacking organizer with drawers
87 0 0 -
-
-
Modifying a Hotplate to a Reflow Solder Station
1137 1 6 -
MPL3115A2 Barometric Pressure, Altitude, and Temperature Sensor
638 0 1 -
-
-
V2 Commodore AMIGA USB-C Power Sink Delivery High Efficiency Supply Triple Output 5V ±12V OLED display ATARI compatible shark 100W
1442 4 3


