


|
Soldering Iron Kit |
|

|
arduino IDEArduino
|
DIY -Spirit PI- ESP32 + Smartphone Sensitive Metal Detector
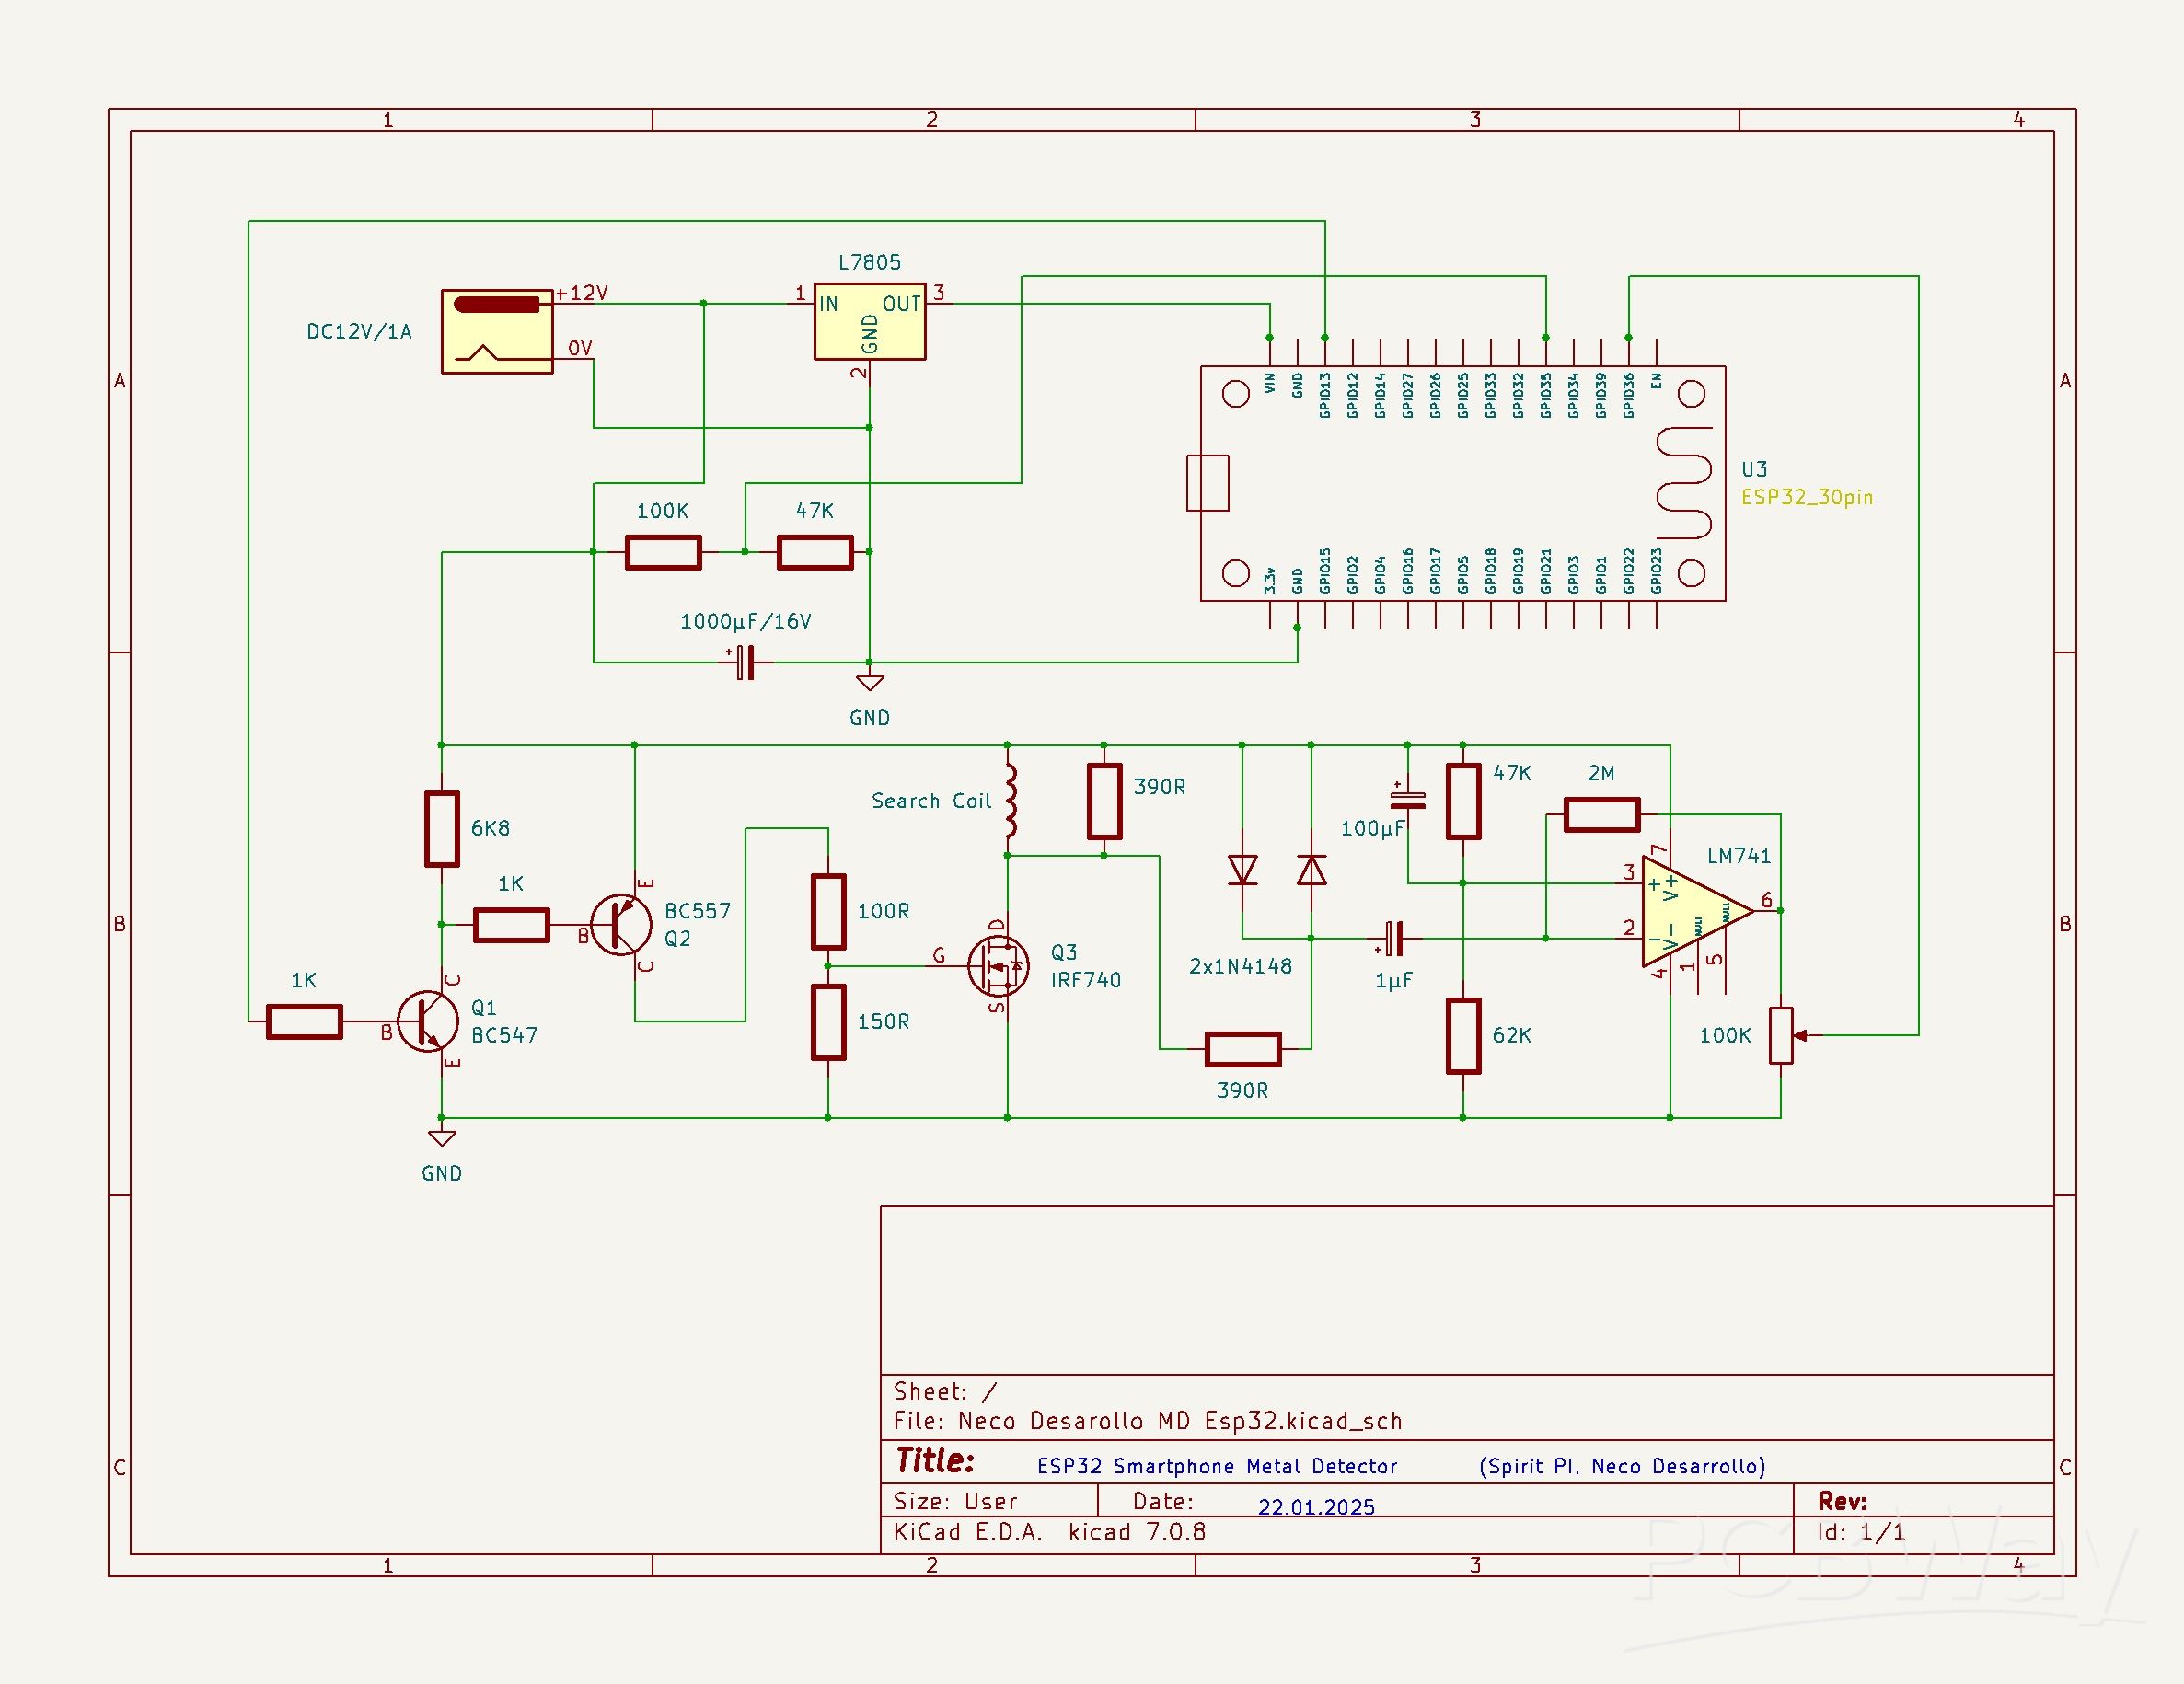
Pulse Induction (PI) metal detector operates on a principle based on sending short pulses of electrical current through a coil to create a magnetic field. This pulse lasts for a very short period, usually microseconds. When the pulse is transmitted, the magnetic field spreads outward from the coil. If there is a metal object near the coil, it disrupts this magnetic field. The coil then detects the change in the magnetic field caused by the metal object, and that results in a reflected pulse which is different from the normal pulse.

This difference is processed and emitted in the form of a sound or short beeps, with a frequency that changes depending on the distance and dimensions of the detected metal object. In several of my previous videos , I presented ways to make such a metal detector, including one very similar, with an Arduino Nano microcontroller. This time the device uses a more powerful ESP32 microcontroller board that also contains built-in Bluetooth, so now the construction is even simpler.
The creator of the original project is Neco Desarrollo and you can find other great projects on the given page. His idea of symbiosis between a microcontroller and a Smartphone is ingenious. The microcontroller easily accepts and transmits signals from an external electronic circuit, and the smartphone is a powerful tool for processing, as well as audiovisual presentation of the results.

This project is sponsored by PCBWay. This year, PCBWay is organizing the 11th badge design contest from March 3rd to April 31st. Follow the design requirements and Submit your designs in one of the given ways, and become the winner of one of the valuable prizes in cash and cupons. This contest is more than a competition—it’s a celebration of 11 years of innovation and a chance to dream about the boundless possibilities ahead with PCBWay.

The input circuit is almost identical in all PI metal detectors and consists of the following components:
- A search coil consisting of 20 turns of insulated copper wire with a cross section of 0.4mm^2 , in the form of a circle with a diameter of 20cm.
- An operational amplifier IC, I specifically use the TL081, but the circuit worked almost identically with OP07, LM741, and CA3130 IC's.
- A power MOSFET with one or two driver transistors. In this case IRF740 , BC547 and BC557 but approximate replacements can be used
- A 7805 voltage stabilizer to power the microcontroller
- And several resistors, capacitors, and diodes.

To power the metal detector I use three lithium batteries connected in series, which is approximately 12V. The maximum total consumption is about 150mA.
During the initial testing, I was unable to fully activate the Android application. The Bluetooth connection was established normally, but at the moment when I pressed the refresh button of the application, it disappeared from the screen, or an error appeared, depending on the version of the Android OS. Since the application is not mine and I normally do not have the conditions and knowledge for any modifications, I focused on modifying the input part with the microcontroller, or Arduino code. The changes consist of the following: I changed the order of the initial duty cycle value from 16 to 13, and the corrected line in the code looks like this:

After this, the Android application will work normally and we can start testing. First, let me explain how the application works. After the first start, we go to setup and select the metal detector version Spirit PI. Then we go to Bluetooth settings and select ESP32-Spirit PI-2 and go back.

Now I press the refresh button and from this moment the device is ready to work. The interesting fact is that we can very easily change the values for the generated frequency and duty cycle, obtaining different performances depending on whether we want to detect massive or small metal objects.
Next, let's use an oscilloscope to trace the shape and changes of the signal that we bring to the input of the microcontroller for further analysis.
Here's how it should look at the beginning, and now by bringing a metal object closer to the search coil, the amplitude and duty cycle of the signal change.

This change is detected by the microcontroller and transmitted via Bluetooth to the smartphone, which then gives an audio and visual notification.
Now let's see how the detector reacts in approximately realistic conditions in the air, keeping in mind that the detection distance is significantly reduced on the ground.
As for the performance of this metal detector, you can notice that they are almost identical to those of the previously presented metal detector with Arduino Nano, taking into account that they largely depend on the Android application, which in both cases is practically the same.
And finally, a short conclusion: This is a great example of cooperation between a microcontroller that receives data from an external circuit and partially processes it, and an Android smartphone. This ingenious idea by Neco Desarrollo has huge potential not only in this area, but in many other devices in general, considering that nowadays we all own a smartphone that has incredibly high processing power.
BluetoothSerial SerialBT; int timer = 200; bool clientConnected = true; char dataG; //**************IMPORTANT******************* //****************************************** const int delayTime = 60; //***************************************** //***************************************** //EEPROM variables int addr_duty = 0; int addr_freq = 1; int stored_value; int duty_cycle; int duty_cycle_temp; int freq; int freq_temp; int duty_def_value = 13; int freq_def_value = 60; //Balance variables int value_count = 0; int value_count_def = 100; int balance_value = 0; int balance_value_temp = 0; //**** unsigned long startMillis; unsigned long currentMillis; long period = 100000; //the value is a number of microseconds //Measuring of level of the battery float resistencia1 = 100000; //Resistencia de 100K para medir la tencion (Voltios)/Resistance of 100k for test volts float resistencia2 = 47000; //Resistencia de 47k para medir la tencion (Voltios)/Resistance 47k for test volts float const arefVolt = 3.6f; //pin "3.3v" SET EXACT VALUE HERE float voutv; float vinv; int raw_bat_data; unsigned long startMillisVolts; unsigned long currentMillisVolts; long periodVolts = 1000; //the value is a number of microseconds int sensorValue = 0.0f; void setup() { SerialBT.begin("ESP32_Spirit_PI-2"); //Bluetooth device name Serial.begin(115200); SerialBT.register_callback(callback); if (!EEPROM.begin(EEPROM_SIZE)) { Serial.println("failed to initialise EEPROM"); delay(1000000); } readFromStorage(addr_duty); duty_cycle = stored_value; readFromStorage(addr_freq); freq = stored_value; if(duty_cycle == 255){ writeToStorage(duty_def_value,addr_duty); readFromStorage(addr_duty); duty_cycle = stored_value; } if(freq == 255){ writeToStorage(freq_def_value,addr_freq); readFromStorage(addr_freq); freq = stored_value; } pinMode(pulsePine, OUTPUT); } void loop() { currentMillis = micros(); currentMillisVolts = millis(); if(SerialBT.available()>0) { dataG = SerialBT.read(); setDutyAndFreq (dataG); } if (currentMillis - startMillis >= period && clientConnected) { period = 1000000 / freq; // Serial.println(period); digitalWrite(pulsePine, HIGH); duty_cycle_temp = duty_cycle * 10; delayMicroseconds(duty_cycle_temp); digitalWrite(pulsePine, LOW); // sensorValue = analogRead(analogPin); delayMicroseconds(delayTime); sensorValue = analogRead(analogPin); sensorValue = sensorValue / 10; sendData(); startMillis = currentMillis; } // Lectura voltios if (currentMillisVolts - startMillisVolts >= periodVolts) { lecturaVoltios(); //Serial.println("Lectura voltios"); startMillisVolts = currentMillisVolts; } } void writeToStorage(int valor,int addr) { EEPROM.write(addr, valor); EEPROM.commit(); } int readFromStorage(int addr) { stored_value = EEPROM.read(addr); return stored_value; } void setDutyAndFreq (char valor) { //"n" valor para aumentar duty cycle //"m" valor para disminuir duty cycle //"j" valor para aumentar la frequencia //"k" valor para des,inuir la frequencia //"+" valor para aumentar el balance //"-" valor para desminuir el balance if(valor == 'n') { // Serial.println("n Recived"); readFromStorage(addr_duty); duty_cycle = stored_value; duty_cycle = duty_cycle + 1; writeToStorage(duty_cycle,addr_duty); } else if(valor == 'm') { // Serial.println("m Recived"); readFromStorage(addr_duty); duty_cycle = stored_value; duty_cycle = duty_cycle - 1; writeToStorage(duty_cycle,addr_duty); } else if(valor == 'j') { // Serial.println("j Recived"); readFromStorage(addr_freq); freq = stored_value; freq = freq + 10; writeToStorage(freq,addr_freq); } else if(valor == 'k') { // Serial.println("k Recived"); readFromStorage(addr_freq); freq = stored_value; freq = freq - 10; writeToStorage(freq,addr_freq); } else if(valor == 'p') { // Serial.println("m Recived"); writeToStorage(0,addr_freq); writeToStorage(0,addr_duty); } } //Volt function void lecturaVoltios(){ vinv=0.0f; voutv=0.0f; for (int i=0;i < 10;i++){ voutv = (analogRead(batLevPin) * arefVolt) / (4095); //Lee el voltaje de entrada vinv += ( (resistencia1 + resistencia2)* voutv) / resistencia2 ; //Fórmula del divisor resistivo para el voltaje final if(vinv < 0.9){ vinv=0.0f; } } vinv = vinv/10; } void sendData() { /* Serial.print("<"); Serial.print(sensorValue); Serial.print("/"); Serial.print(freq); Serial.print("/"); Serial.print( duty_cycle); Serial.print("/"); Serial.print( vinv); Serial.print(">"); Serial.println();*/ String dataG = "<"; dataG +=sensorValue; dataG +="/"; dataG +=freq; dataG +="/"; dataG +=duty_cycle; dataG +="/"; dataG +=vinv; dataG +=">"; /* bluetooth.print("<"); bluetooth.print(sensorValue); bluetooth.print("/"); bluetooth.print(freq); bluetooth.print("/"); bluetooth.print( duty_cycle); bluetooth.print("/"); bluetooth.print( vinv); bluetooth.print(">");*/ SerialBT.println(dataG); Serial.println(dataG); } void callback(esp_spp_cb_event_t event, esp_spp_cb_param_t *param){ // Callback function implementation if(event == ESP_SPP_SRV_OPEN_EVT){ Serial.println("Client Connected"); clientConnected = true; } if(event == ESP_SPP_CLOSE_EVT ){ Serial.println("Client disconnected"); // SerialBT.flush(); // SerialBT.end(); clientConnected = false; delay(1000); ESP.restart(); } }
DIY -Spirit PI- ESP32 + Smartphone Sensitive Metal Detector


Raspberry Pi 5 7 Inch Touch Screen IPS 1024x600 HD LCD HDMI-compatible Display for RPI 4B 3B+ OPI 5 AIDA64 PC Secondary Screen(Without Speaker)
BUY NOW
ESP32-S3 4.3inch Capacitive Touch Display Development Board, 800×480, 5-point Touch, 32-bit LX7 Dual-core Processor
BUY NOW
Raspberry Pi 5 7 Inch Touch Screen IPS 1024x600 HD LCD HDMI-compatible Display for RPI 4B 3B+ OPI 5 AIDA64 PC Secondary Screen(Without Speaker)
BUY NOW


- Comments(0)
- Likes(1)
 Log in to post comments.
More by Mirko Pavleski
-
 Tug of War Arduino Game on WS2812 Led strip
A Tug of War is a classic team-based game where two opposing teams compete to pull a rope in opposi...
Tug of War Arduino Game on WS2812 Led strip
A Tug of War is a classic team-based game where two opposing teams compete to pull a rope in opposi...
-
 DIY ESP32 Bioresonance Rife Machine with ZAPPER function
Rife machine therapy is an alternative treatment developed by Dr. Royal Raymond Rife in the 1930s. H...
DIY ESP32 Bioresonance Rife Machine with ZAPPER function
Rife machine therapy is an alternative treatment developed by Dr. Royal Raymond Rife in the 1930s. H...
-
 Arduino VFO Project with a Large LCD Display
A Variable Frequency Oscillator (VFO) is an electronic oscillator whose output frequency can be adj...
Arduino VFO Project with a Large LCD Display
A Variable Frequency Oscillator (VFO) is an electronic oscillator whose output frequency can be adj...
-
 Exploring the Tesla Coil Driver Board, Full Review & Test Results
Some time ago I presented you a video in which I analyzed a super cheap Tesla Coil driver that cost...
Exploring the Tesla Coil Driver Board, Full Review & Test Results
Some time ago I presented you a video in which I analyzed a super cheap Tesla Coil driver that cost...
-
 Arduino Eatrthquake alarm and protection system with D7S seismic Sensor
Earthquakes are extremely common events around the world. On average, there are fifty earthquakes a...
Arduino Eatrthquake alarm and protection system with D7S seismic Sensor
Earthquakes are extremely common events around the world. On average, there are fifty earthquakes a...
-
 Review and Comparison of Three Inexpensive Metal Detector Kits
A metal detector is a device used to detect the presence of metal objects in the ground or other ma...
Review and Comparison of Three Inexpensive Metal Detector Kits
A metal detector is a device used to detect the presence of metal objects in the ground or other ma...
-
 Arduino 3D Printed self Balancing Cube
Self-balancing devices are electronic devices that use sensors and motors to keep themselves balanc...
Arduino 3D Printed self Balancing Cube
Self-balancing devices are electronic devices that use sensors and motors to keep themselves balanc...
-
 Arduino flame detector with alarms and automatic fire extinguishing
A flame detector is an electronic device designed to sense the presence of flames or fire. There ar...
Arduino flame detector with alarms and automatic fire extinguishing
A flame detector is an electronic device designed to sense the presence of flames or fire. There ar...
-
 OpenWebRX - Simplest Rasprberry Pi + RTLSDR Web SDR Radio
Software-Defined Radio is a radio communication system where components that have traditionally bee...
OpenWebRX - Simplest Rasprberry Pi + RTLSDR Web SDR Radio
Software-Defined Radio is a radio communication system where components that have traditionally bee...
-
 Colorful Arduino Tetris Game - WS2812B LED Matrix Tutorial
Tetris is a puzzle video game created in 1985 by Alexey Pajitnov. Players manipulate falling geomet...
Colorful Arduino Tetris Game - WS2812B LED Matrix Tutorial
Tetris is a puzzle video game created in 1985 by Alexey Pajitnov. Players manipulate falling geomet...
-
 Ultra cheap Ultrasonic levitation Device - functionality and testing
Ultrasonic levitation is phenomenon where objects are suspended in mid-air using the power of sound ...
Ultra cheap Ultrasonic levitation Device - functionality and testing
Ultrasonic levitation is phenomenon where objects are suspended in mid-air using the power of sound ...
-
 DIY -Spirit PI- ESP32 + Smartphone Sensitive Metal Detector
Pulse Induction (PI) metal detector operates on a principle based on sending short pulses of electr...
DIY -Spirit PI- ESP32 + Smartphone Sensitive Metal Detector
Pulse Induction (PI) metal detector operates on a principle based on sending short pulses of electr...
-
 ESP32 Analog style VU meter with GC9A01 Round Dispalys + Peak Meters
A typical VU meter measures audio signals and displays them with a visual indicator. In the classic...
ESP32 Analog style VU meter with GC9A01 Round Dispalys + Peak Meters
A typical VU meter measures audio signals and displays them with a visual indicator. In the classic...
-
 Arduino two weel self Balancing Robot
Self Balancing Robot is device that can balance itself from falling to the ground. Its function is ...
Arduino two weel self Balancing Robot
Self Balancing Robot is device that can balance itself from falling to the ground. Its function is ...
-
 ELECROW CrowPanel ESP32 4.2” E-paper Wi-Fi Info-Dispaly Project
An e-paper display (also known as an electronic paper display or E Ink display) is a type of screen...
ELECROW CrowPanel ESP32 4.2” E-paper Wi-Fi Info-Dispaly Project
An e-paper display (also known as an electronic paper display or E Ink display) is a type of screen...
-
 ESP32 Fluid simulation on 16x16 Led Matrix
Fluid simulation is a way of replicating the movement and behavior of liquids and gases in differen...
ESP32 Fluid simulation on 16x16 Led Matrix
Fluid simulation is a way of replicating the movement and behavior of liquids and gases in differen...
-
 Simple GU50 VTTC Tesla Coil with MOT (25+cm Spark)
Vacuum Tube Tesla Coils are a common choice for homebuilders for several practical reasons. At Soli...
Simple GU50 VTTC Tesla Coil with MOT (25+cm Spark)
Vacuum Tube Tesla Coils are a common choice for homebuilders for several practical reasons. At Soli...
-
 Hourglass ESP8266 Code
A hourglass, also known as an sand clock, is a device used to measure the passage of time. It consi...
Hourglass ESP8266 Code
A hourglass, also known as an sand clock, is a device used to measure the passage of time. It consi...
-
Tug of War Arduino Game on WS2812 Led strip
A Tug of War is a classic team-based game where two opposing teams compete to pull a rope in opposi...
-
DIY ESP32 Bioresonance Rife Machine with ZAPPER function
Rife machine therapy is an alternative treatment developed by Dr. Royal Raymond Rife in the 1930s. H...
-
Arduino VFO Project with a Large LCD Display
A Variable Frequency Oscillator (VFO) is an electronic oscillator whose output frequency can be adj...
-
Exploring the Tesla Coil Driver Board, Full Review & Test Results
Some time ago I presented you a video in which I analyzed a super cheap Tesla Coil driver that cost...
-
Arduino Eatrthquake alarm and protection system with D7S seismic Sensor
Earthquakes are extremely common events around the world. On average, there are fifty earthquakes a...
-
Review and Comparison of Three Inexpensive Metal Detector Kits
A metal detector is a device used to detect the presence of metal objects in the ground or other ma...
-
Arduino 3D Printed self Balancing Cube
Self-balancing devices are electronic devices that use sensors and motors to keep themselves balanc...
-
Arduino flame detector with alarms and automatic fire extinguishing
A flame detector is an electronic device designed to sense the presence of flames or fire. There ar...
-
OpenWebRX - Simplest Rasprberry Pi + RTLSDR Web SDR Radio
Software-Defined Radio is a radio communication system where components that have traditionally bee...
-
Colorful Arduino Tetris Game - WS2812B LED Matrix Tutorial
Tetris is a puzzle video game created in 1985 by Alexey Pajitnov. Players manipulate falling geomet...
-
Ultra cheap Ultrasonic levitation Device - functionality and testing
Ultrasonic levitation is phenomenon where objects are suspended in mid-air using the power of sound ...
-
DIY -Spirit PI- ESP32 + Smartphone Sensitive Metal Detector
Pulse Induction (PI) metal detector operates on a principle based on sending short pulses of electr...
-
-
Commodore 64 1541-II 1581 Floppy Disk Drive C64 Power Supply Unit USB-C 5V 12V DIN connector 5.25
175 1 3 -
Easy to print simple stacking organizer with drawers
88 0 0 -
-
-
Modifying a Hotplate to a Reflow Solder Station
1149 1 6 -
MPL3115A2 Barometric Pressure, Altitude, and Temperature Sensor
642 0 1 -
-
-
V2 Commodore AMIGA USB-C Power Sink Delivery High Efficiency Supply Triple Output 5V ±12V OLED display ATARI compatible shark 100W
1458 4 3


