Parallel Printer (SPP) Emulator Shield
* * HARDWARE OVERVIEW * *
Playing with retro-computers or messing with dated instruments a simple SPP (Standard Parallel Port) Printer Emulator can be an useful tool. So I made one.
To lower down cost and complexity I decided to realize the emulator as a simple Shield for the ever green Arduino UNO board (Arduino UNO R3 or previous versions) using easy to find TH components.
After all the SPP (Standard Parallel Port) has a very simple HW protocol so an Arduino UNO (based on an Atmega328 MCU running at 16MHz) is more then enough to deal with.
From a functional block point of view the Parallel Printer (SPP) Emulator Shield is a simple signal conditioning board, while the "management" is done inside the Arduino UNO:
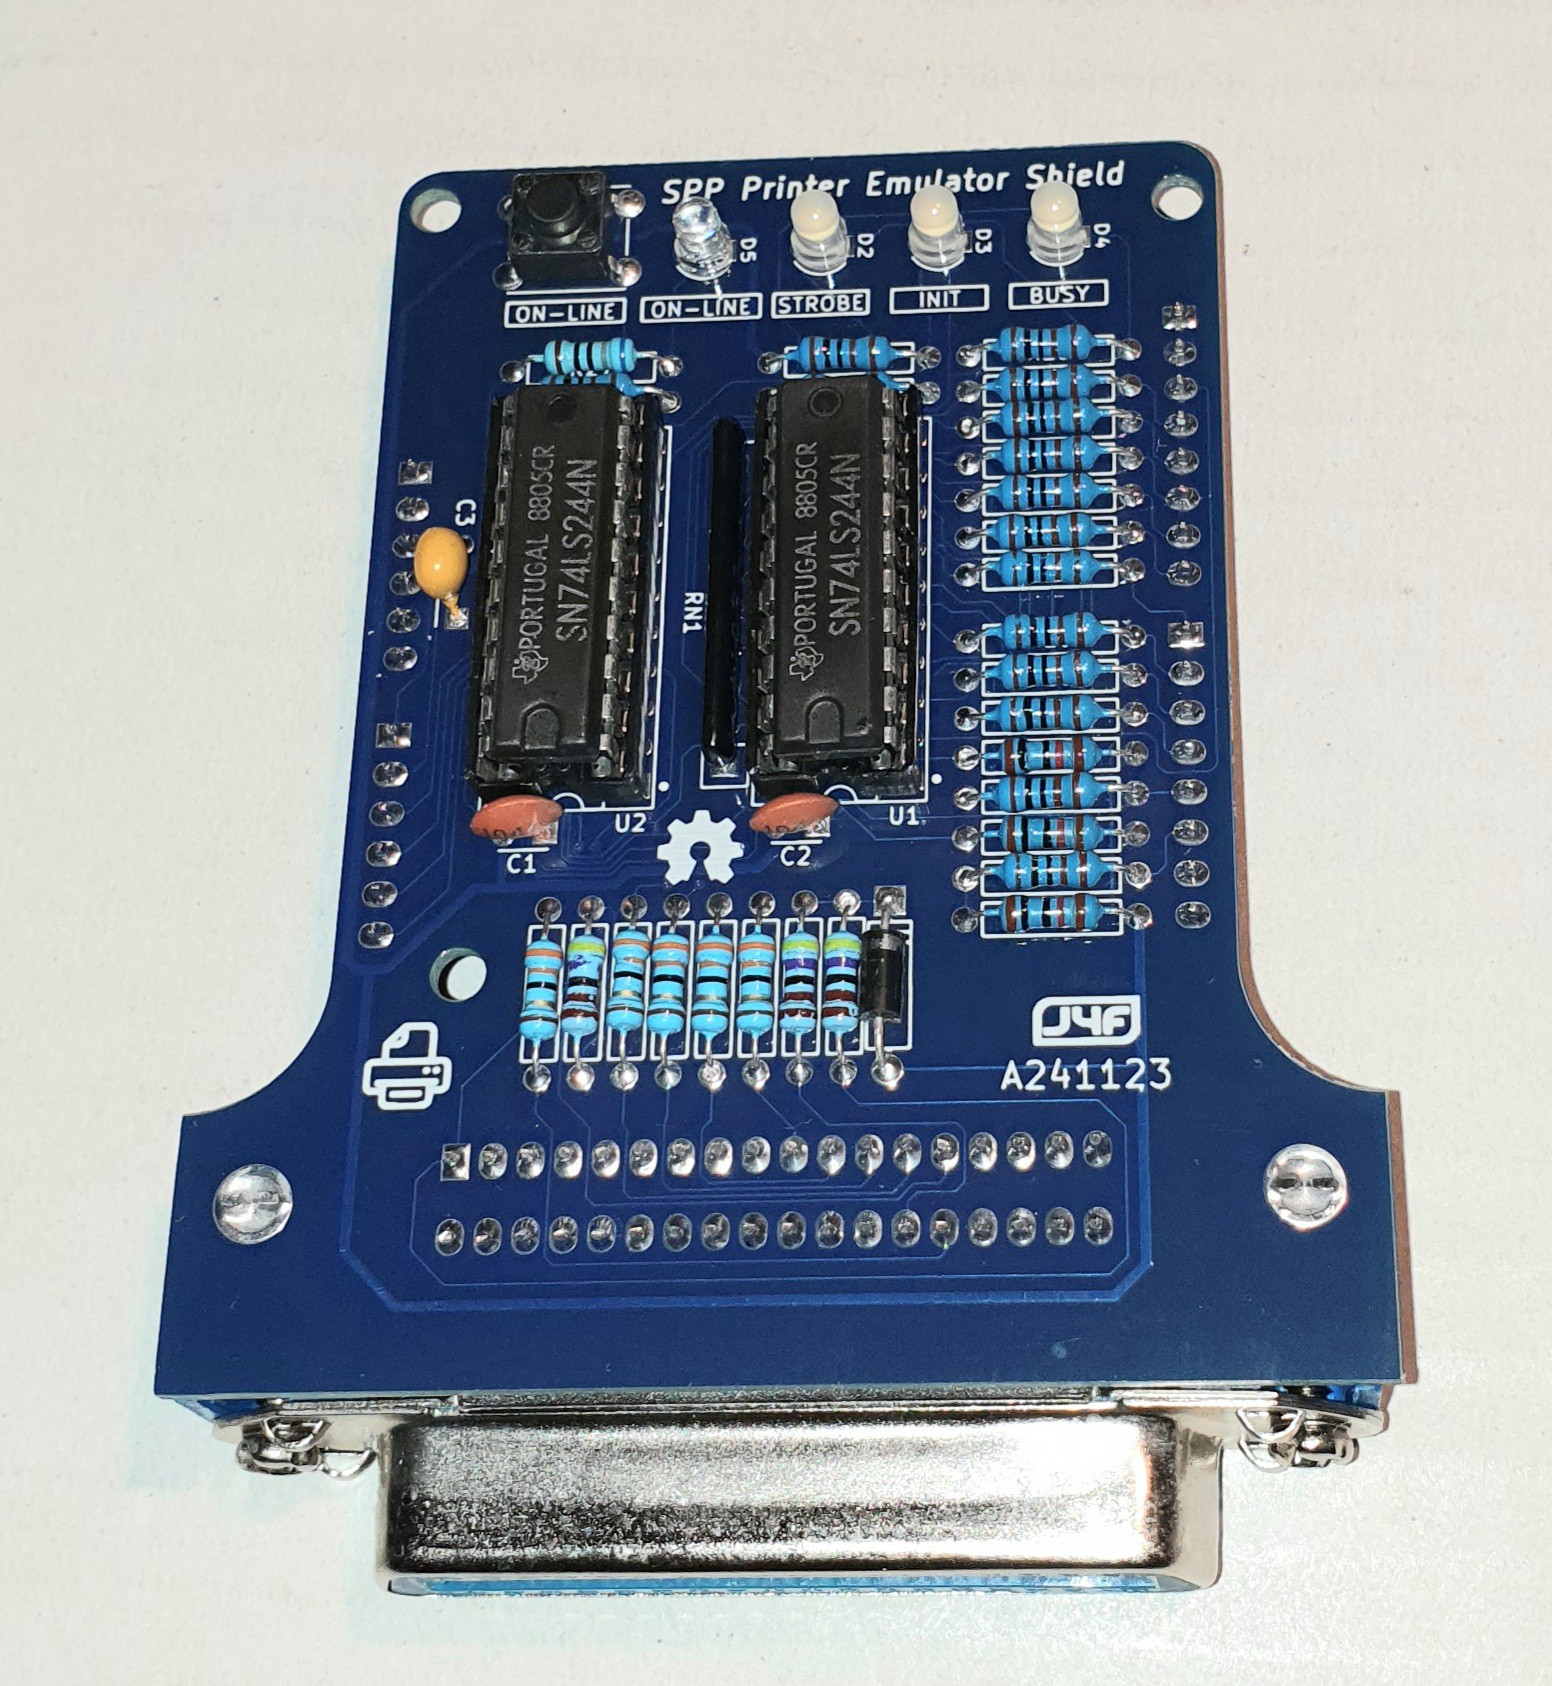
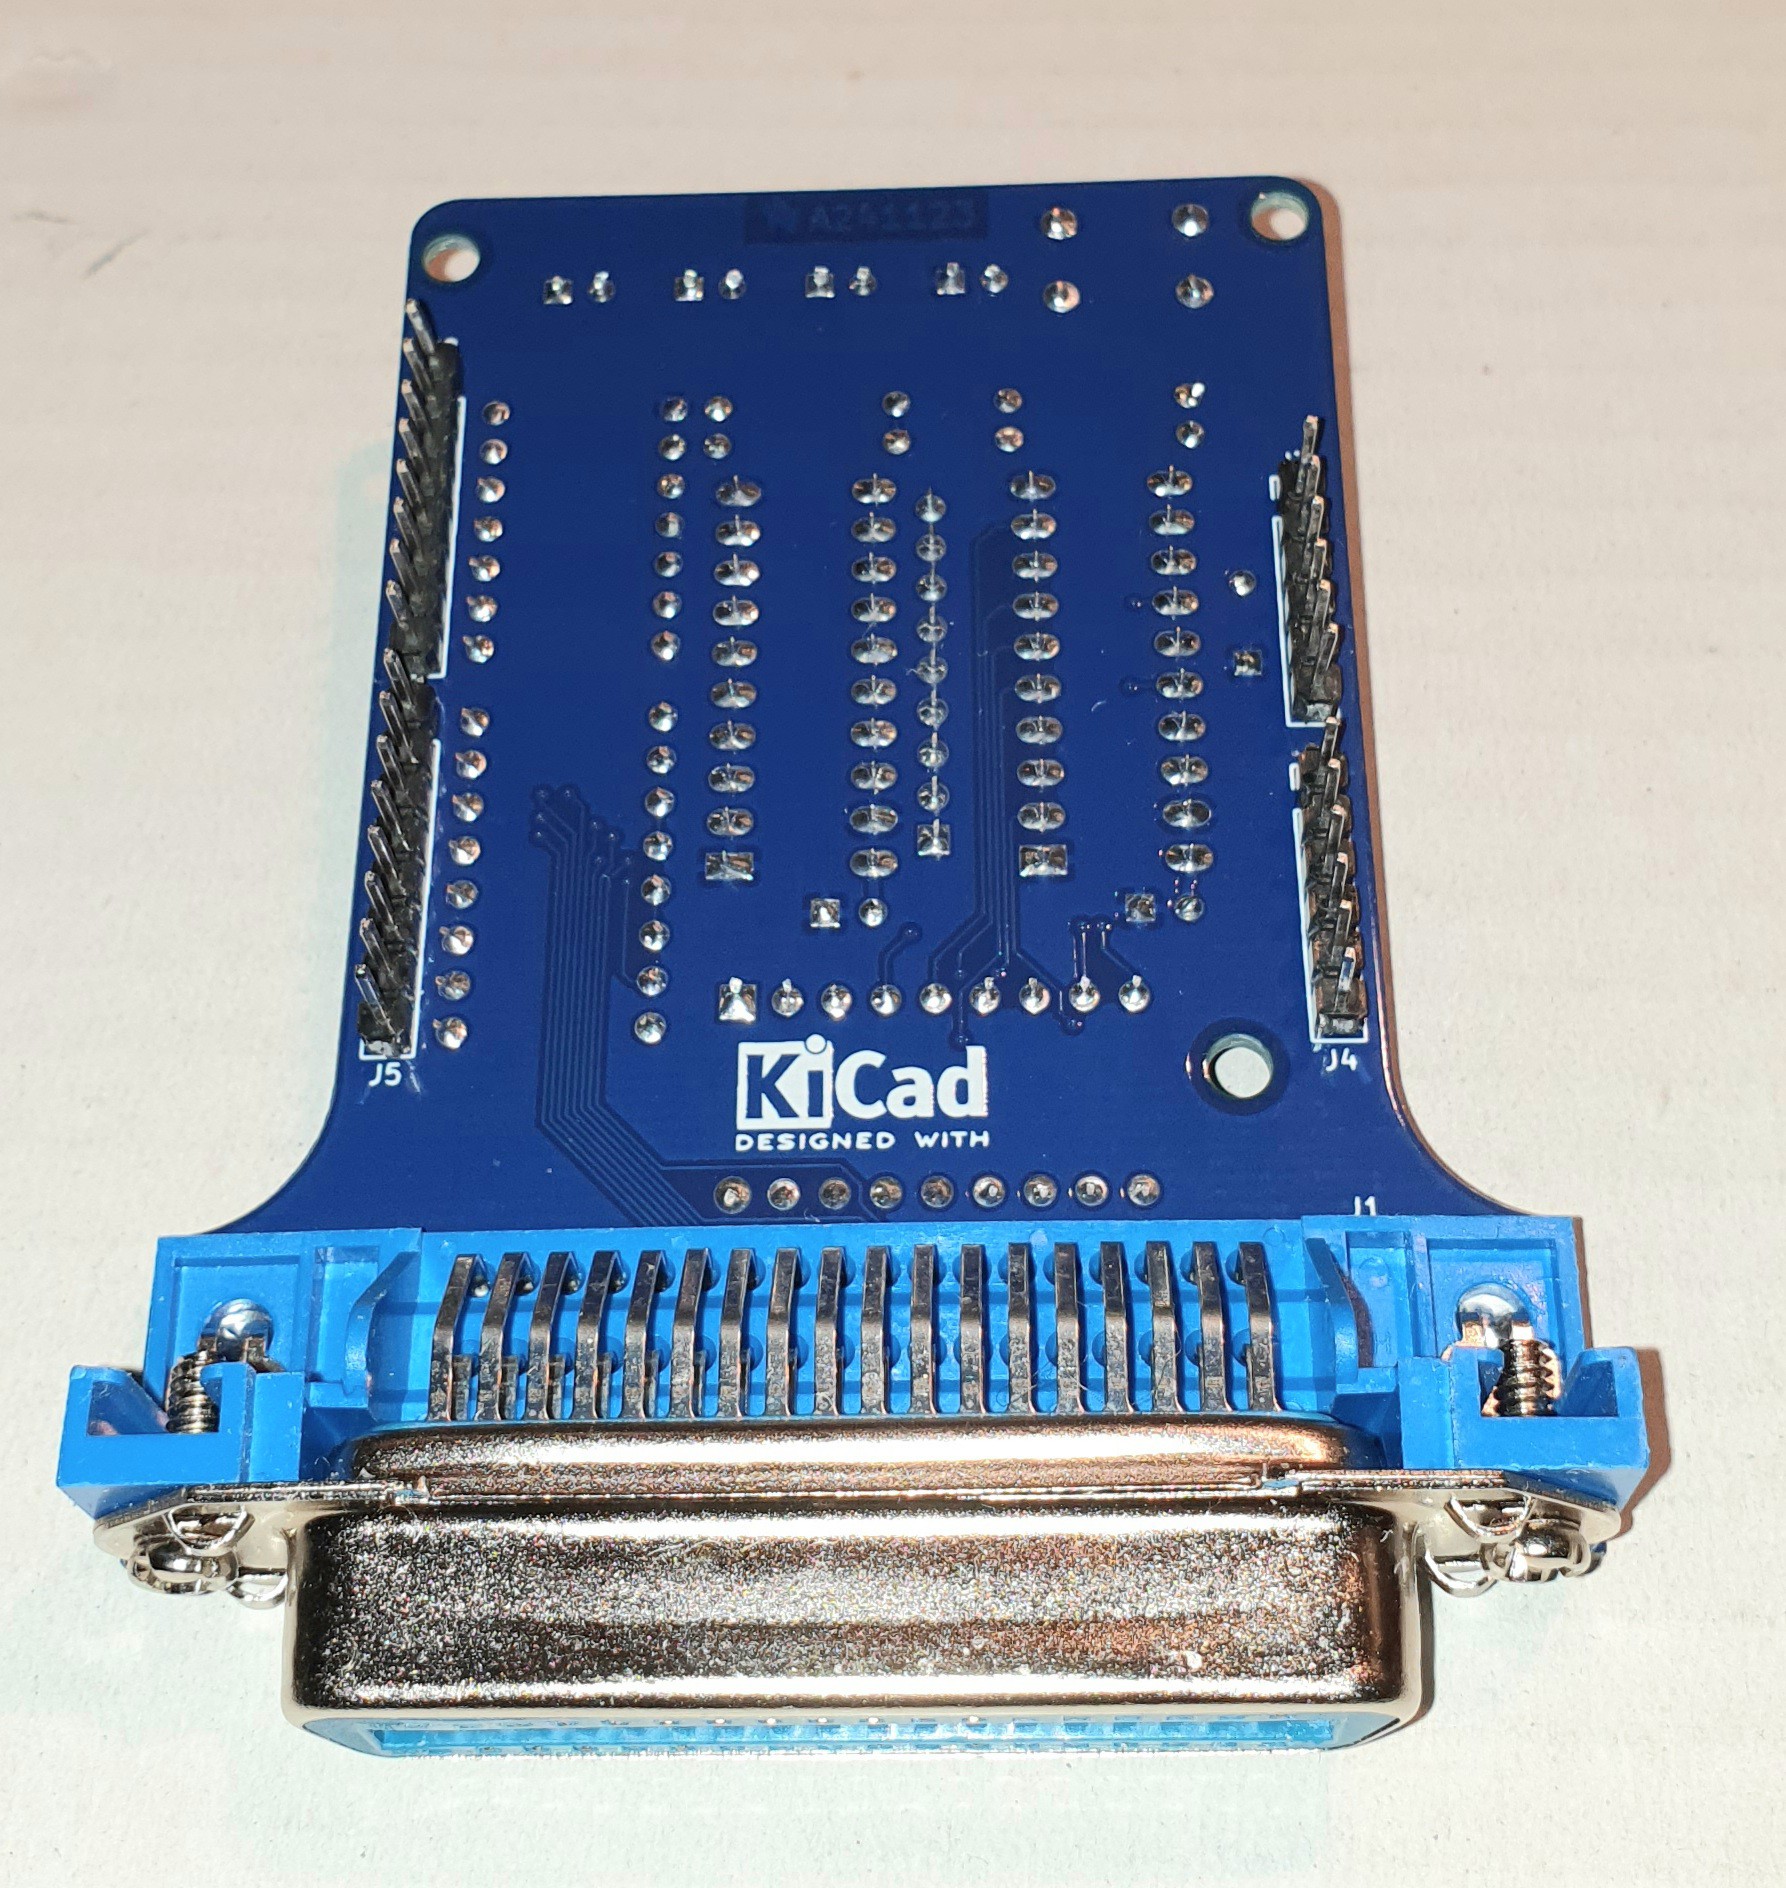
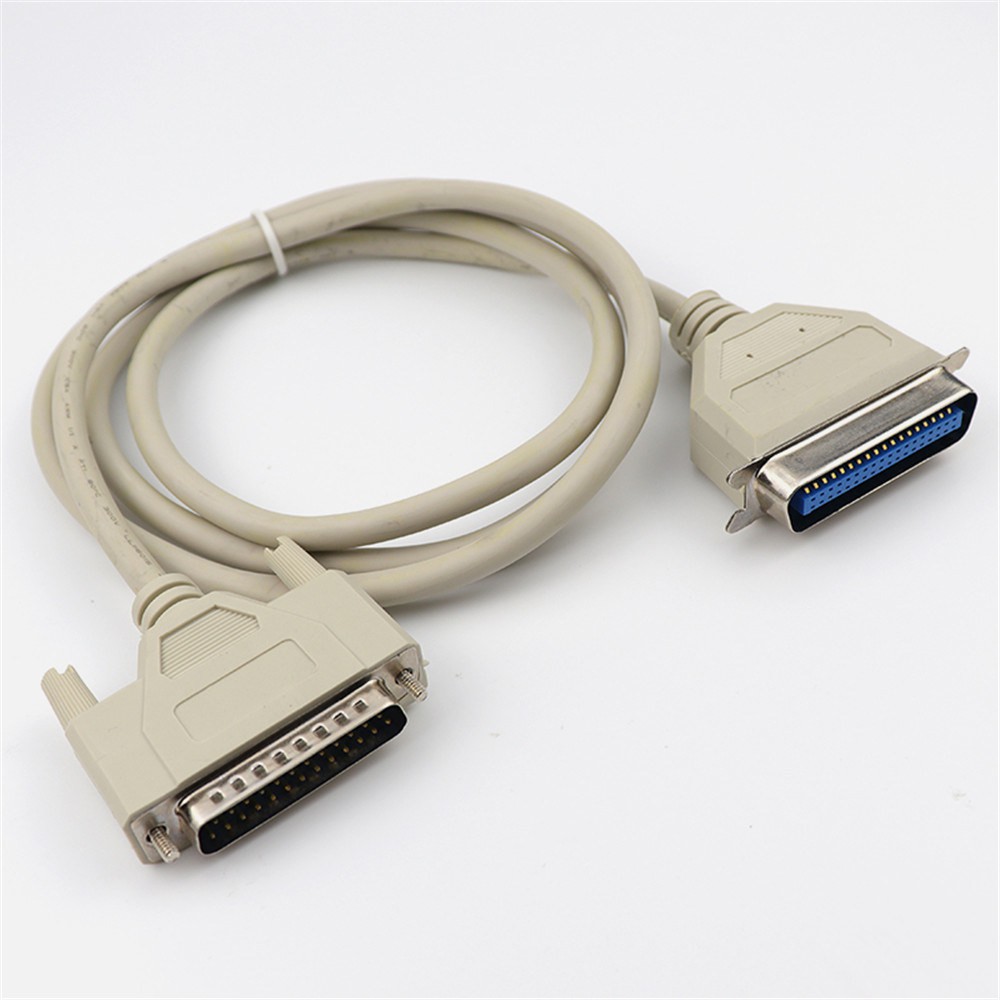
The Shield has a Centronics 36 pin female connector, the same used on parallel printers, so it can be used with the common legacy "parallel cable":
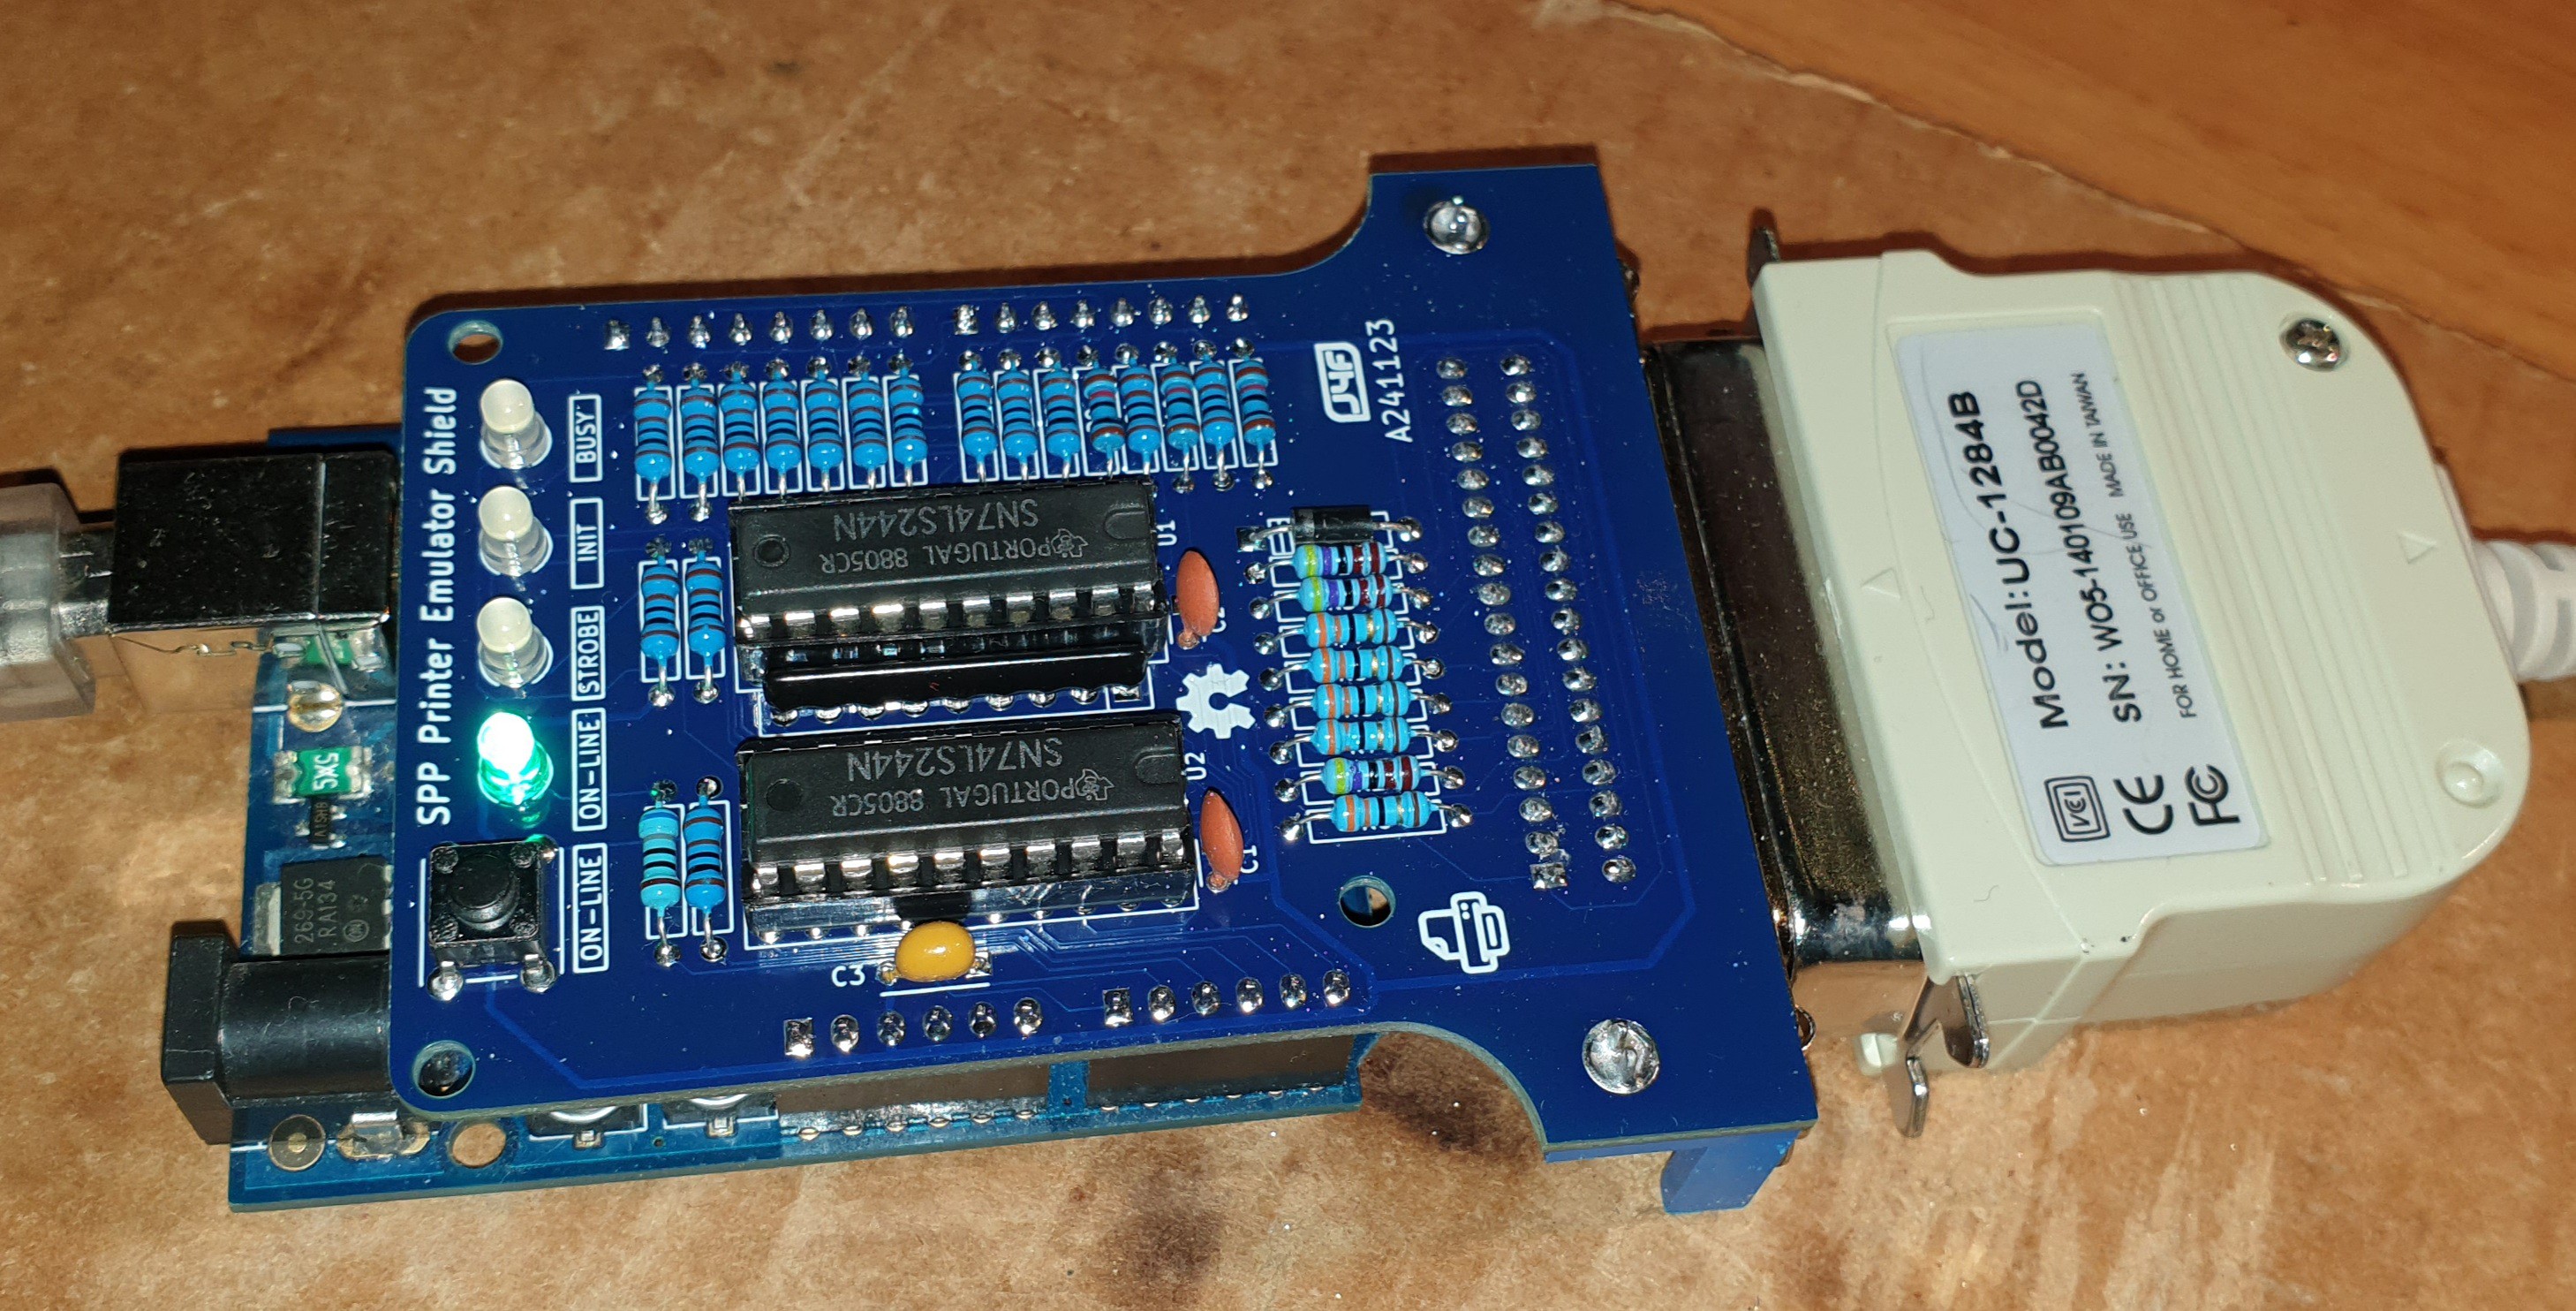
Here the SPP Shield mounted on top of an Arduino UNO and connected to an USB-Parallel adapter (very handy to use with virtual machines):
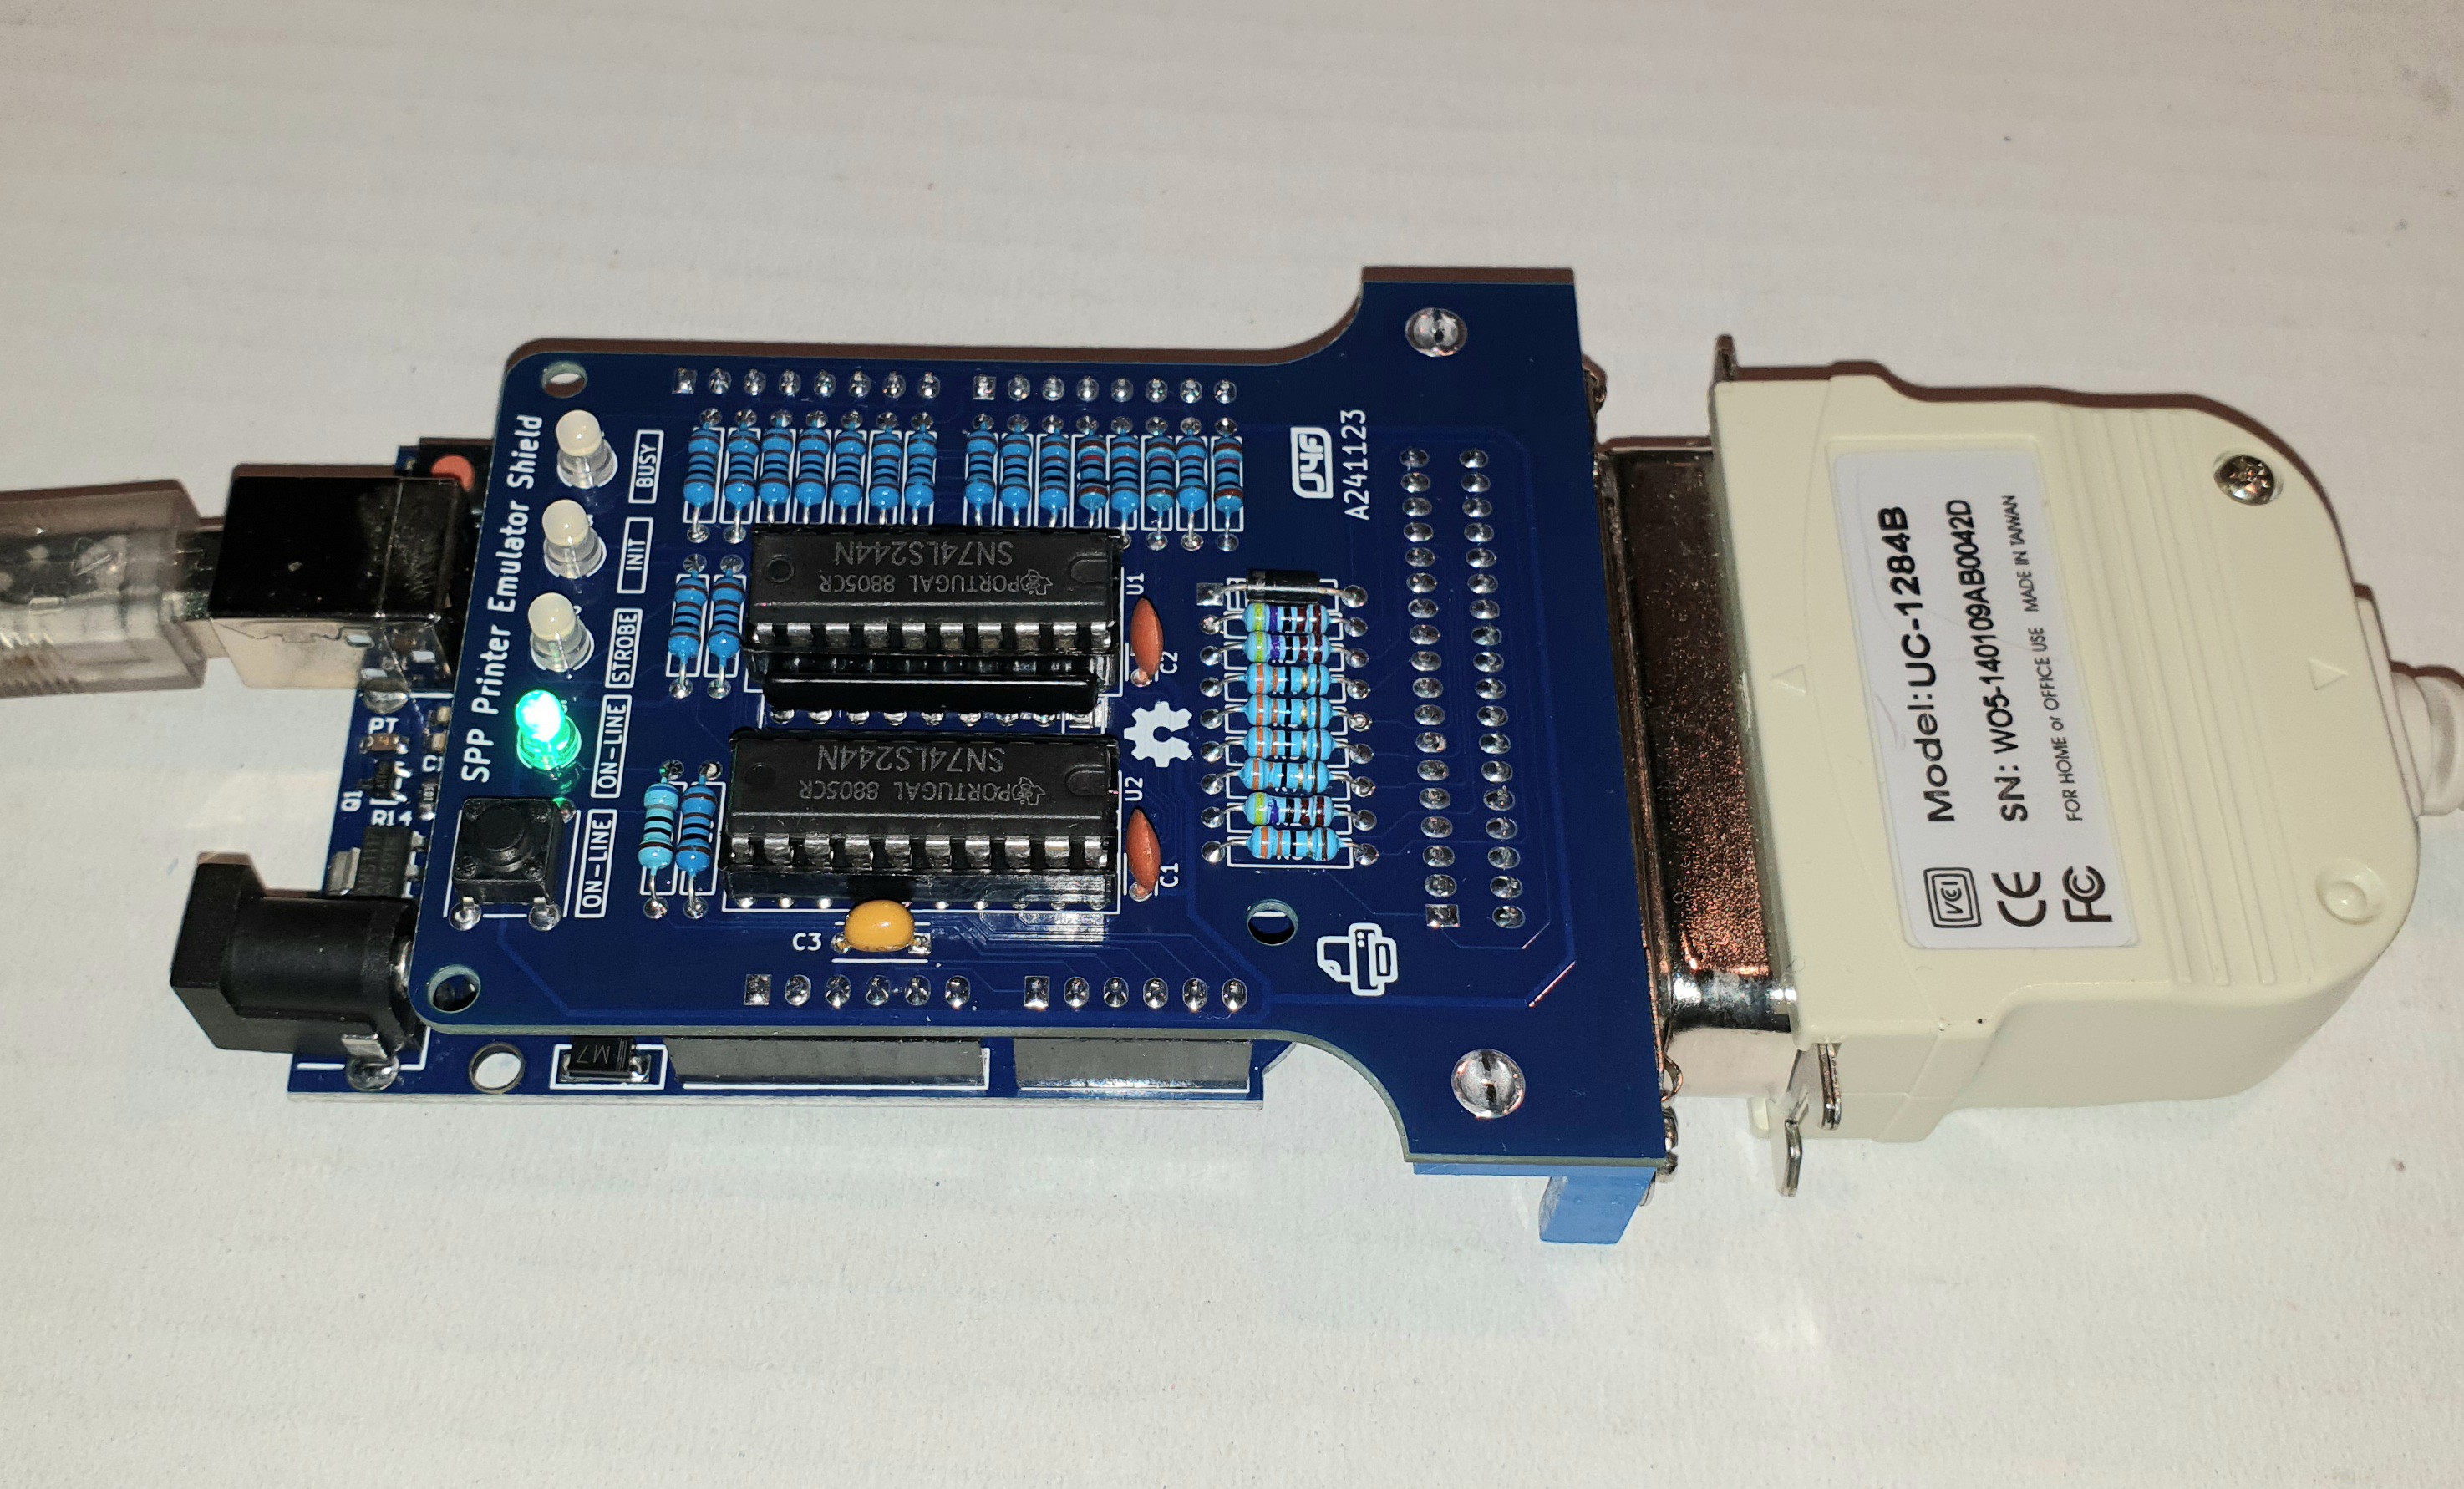
The resulting assembly acts as a parallel to serial-USB converter allowing to capture the data stream from a parallel port with a PC.
If the "print" contains only simple text (ASCII characters) you can simply display it using a terminal simulator, but if you want store it or it is a binary stream (e.g as using a "graphic" printer driver), it must be captured into a file and eventually converted in something readable as a pdf "virtual print".
As in a real printer there is an ON-LINE button and LED to pause the "printing", and other LEDs for the main Centronics signals. I added these LEDs because they can be handy using the emulator as a tool, e.g. during the development of a printing driver for retro-computers.
* * SOFTWARE OVERVIEW * *
In the Files section there is a zip file with the needed "Sketch" to compile and upload into the Arduino UNO board using the Arduino IDE (tested on Arduino IDE 1.8.19 and with an Arduino UNO R3 and R2 board).
The default speed of the serial is set at 500000bps, but it is possible change/check it with the ON-LINE button with a simple procedure (see ahead).
To capture the stream from the parallel port into a file I've taken a python 3 script from a similar project and adapted it for the SPP Printer Emulator.
The script (fake_printer_v2.py) is in the Files section and was tested on a Linux Mint host. Copy it into a directory that you'll use to store the captured files.
To activate the capture script the command is (Linux):
python3 ./fake_printer_v2.py -p /dev/ttyACM0
You have always to specify the USB port used (in this case is /dev/ttyACM0).
The default serial speed setting of the script is 500000bps (to match the default serial speed set by the firmware on the Arduino UNO). To use a different speed, e.g. 1000000bps, the command is:
python3 ./fake_printer_v2.py -p /dev/ttyACM0 -b 1000000
The fake_printer_v2.py script will create a file named printer_capture_<n>.prtcap to store the output from the parallel port, and it will close it after 2 seconds of inactivity. This can be changed with the -t parameter in the command line.
To have a list of all options execute the script without any parameters:
python3 ./fake_printer_v2.py
For more info on the original script see their Github page.
HOW TO CHANGE/READ THE SERIAL SPEED
It is possible to change the serial speed choosing among six possible values. To enter into the speed setting mode press the ON-LINE button and holding it down press and release the RESET button on the Arduino UNO board (if you are using an Arduino UNO R2 board the reset button is under the shield and not accessible, in this case you can just keep the ON-LINE button pressed while powering off and on).
Keep the ON-LINE button down until the ON-LINE led or the BUSY led (or both) start to blink .
The following table shows how to read the blinking code:
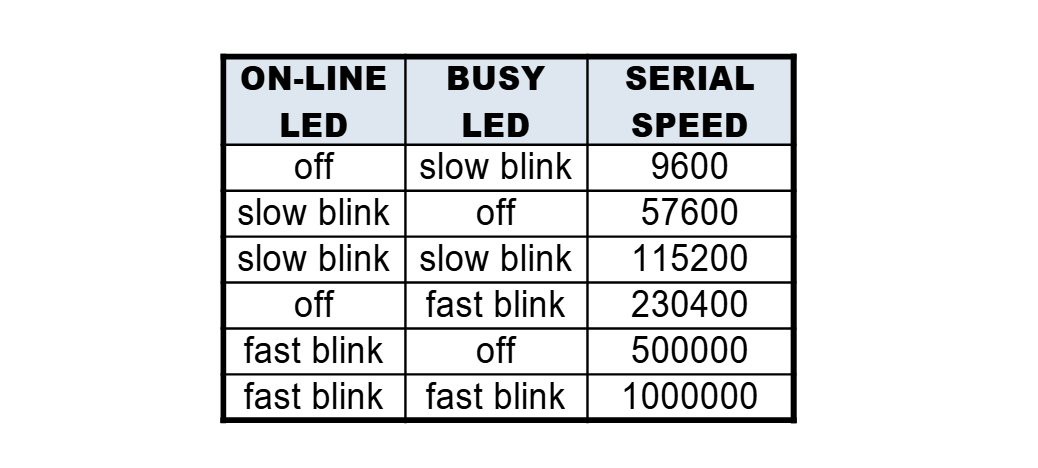
At this point you can "read" the current speed and then reset (or power off and on for an Arduino UNO R2) the Arduino UNO board to resume the normal operations, or change the current serial speed pressing the ON-LINE button until the desired speed is shown with the corresponding blinking code. When ready reset the Arduino UNO to resume the normal operation.
When the speed setting mode is activated, the current speed is also printed on the serial port.
Of course the serial speed set on the Arduino UNO board must be the same set when activating the fake_printer_v2.py script.
IMPORTANT NOTE ABOUT MAXIMUM SERIAL SPEED:
During tests not all the Arduino UNO boards have been able to work at the maximum serial speed of 1000000bps. I found an Arduino UNO R2 clone (using an Atmega8u2 as serial-USB converter) not able to sustain a continuous stream at 1000000bps, so before selecting this maximum speed always check if the Arduino UNO board you are using is capable to sustain it with the following simple test code:
char testString[] = "** This is a test string 1234567890 **\n";
unsigned long serialSpeed = 1000000;
void setup()
{
Serial.begin(serialSpeed);
}
void loop()
{
{
for (byte i = 0; i < sizeof(testString); i++)
{
Serial.write(testString[i]);
}
}
}
Use the Arduino IDE serial monitor to check the result.
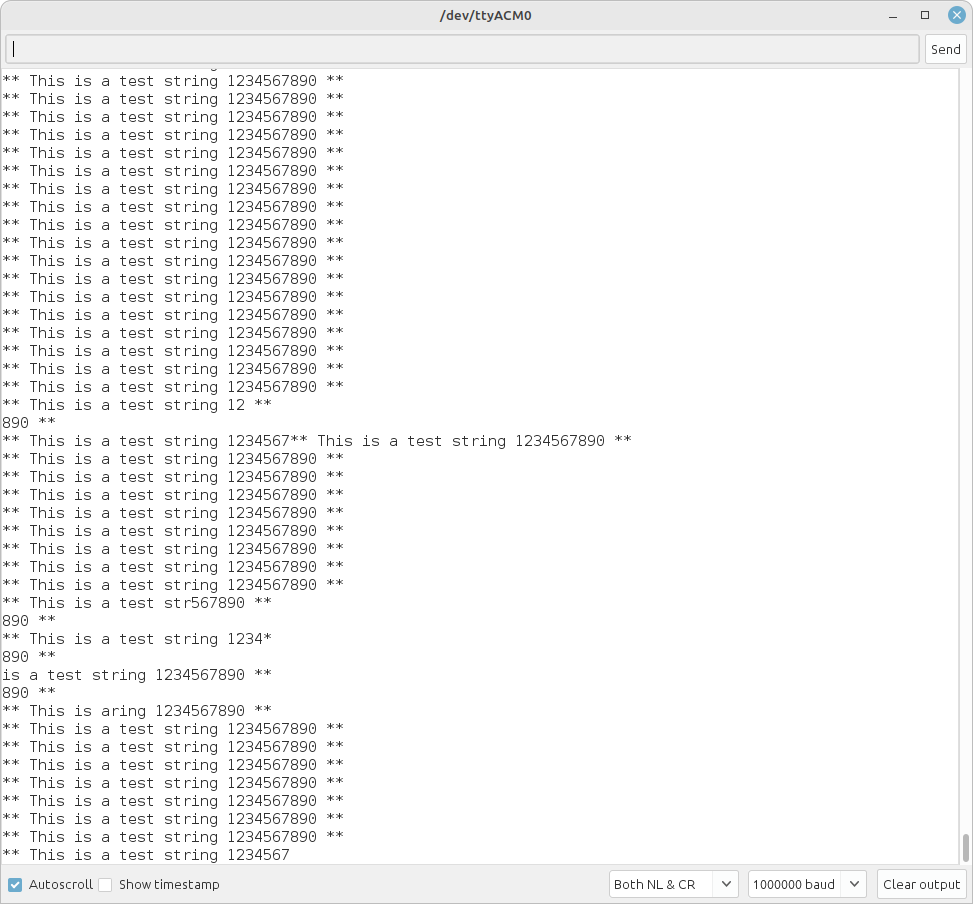
If the result is something like the following image the Arduino board can be used at no more than 500000bps:
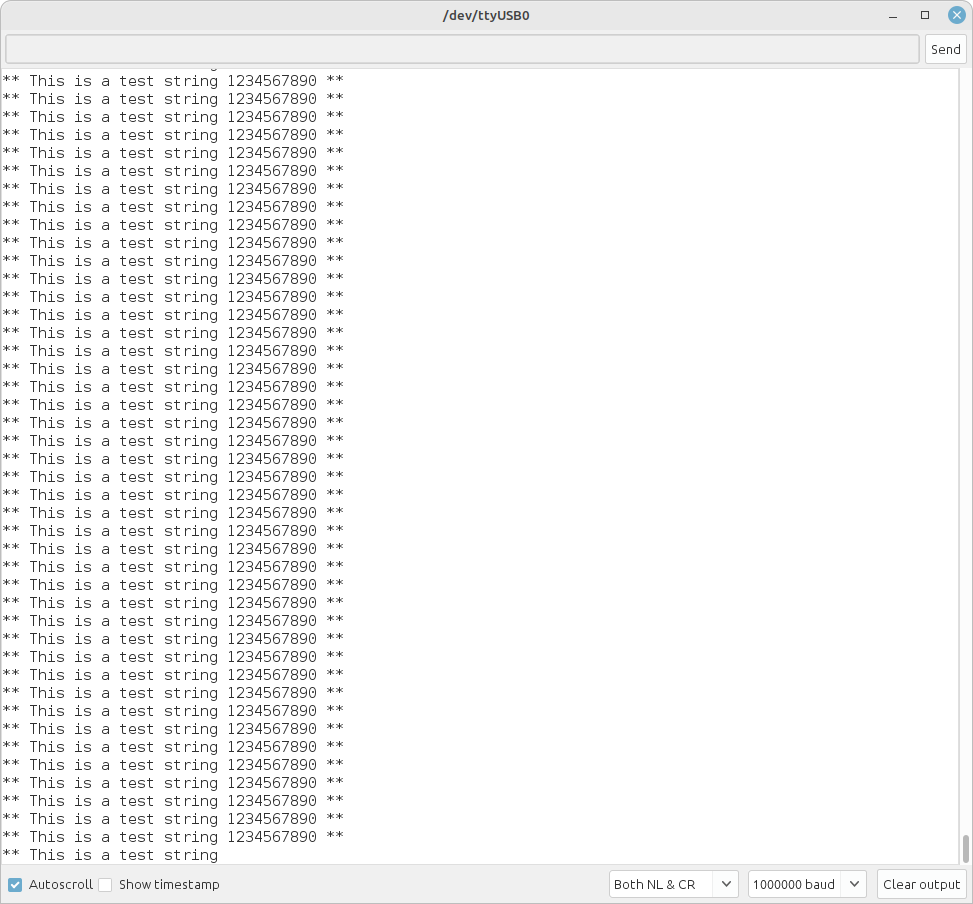
while an Arduino UNO working with no problem at the 1000000bps speed will give this result:
CONVERTING AN ESC/P OR ESC/P2 CAPTURED STREAM
If the captured file contains binary data to drive a printer using the Epson ESC/P or ESC/P2 dot matrix and inkjet printer protocol, you need a tool to convert it into a readable format.
To do this conversion there is an open source tool: PrinterToPDF.
To use it you have to compile it on your Linux host. To do that you need to install some needed libraries.
1. libpng
This library was already installed in my Linux Mint host:
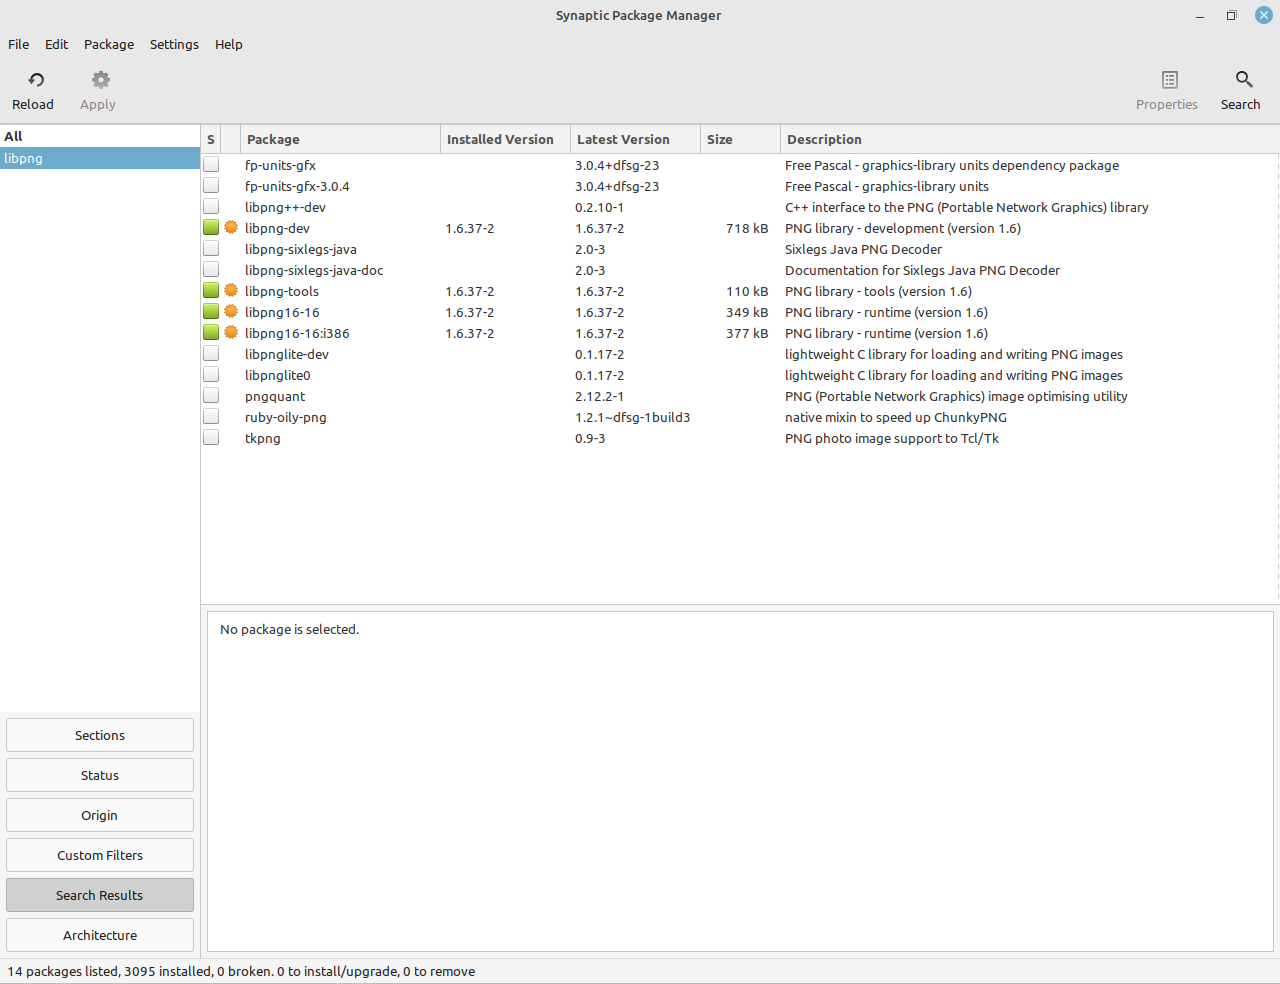
so check if it is you your case too. If not you have to install it.
2. imagemagick
if not already installed as in my host, install with
sudo apt-get install imagemagick
3. libsdl
this library very likely is not already installed, so to install give the commands:
sudo apt-get install libsdl-image1.2-dev
sudo apt-get install libsdl1.2-dev
4. libhpdf
this library is now available with version 2.3.0 and doesn't need to be compiled from source anymore, so to install give the command:
sudo apt install libhpdf-2.3.0 libhpdf-dev
At this point it is possible compile with the usual
make
and install with:
sudo make install
All done!
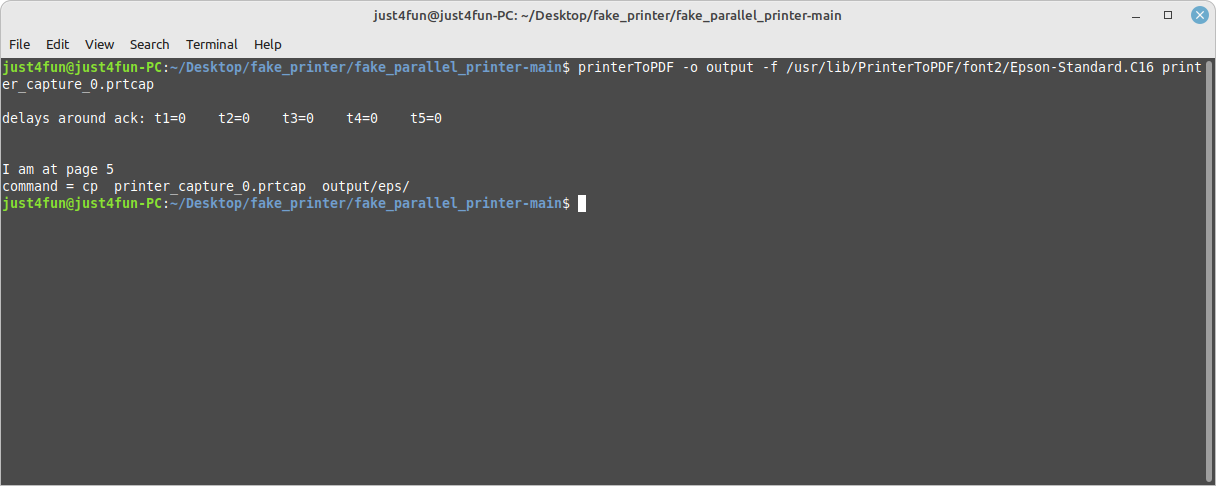
Now to convert a captured ESC/P file (e.g. printer_capture_0.prtcap) to pdf give the command (from the directory where captured files are stored):
printerToPDF -o output -f /usr/lib/PrinterToPDF/font2/Epson-Standard.C16 printer_capture_0.prtcap
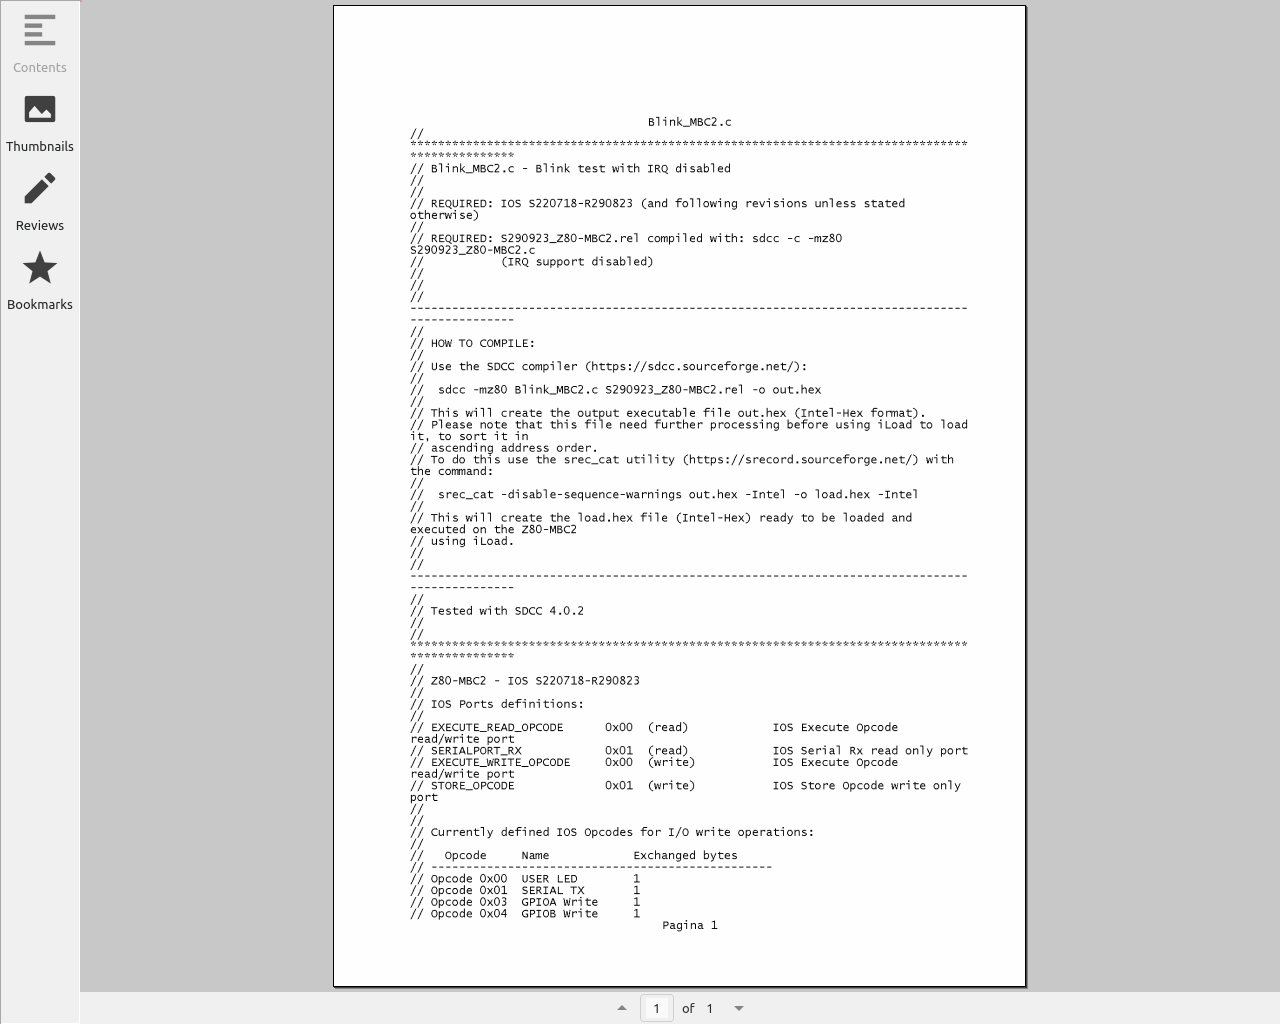
The converted pdf files (one each page) are stored in the output/pdf sub-folder.
OTHER CONVERTERS
I was focused on emulating dot matrix printers, but there are other types of converters, e.g. for PCL. It is possible find more info and examples here.
WINDOWS XP VM PRINT EXAMPLE
Here an example of "printing" from a Windows XP VM using the Epson Compatible 24 pin printer driver. This is the best driver for a standard ESC/P print stream (24 pin dot matrix printer):
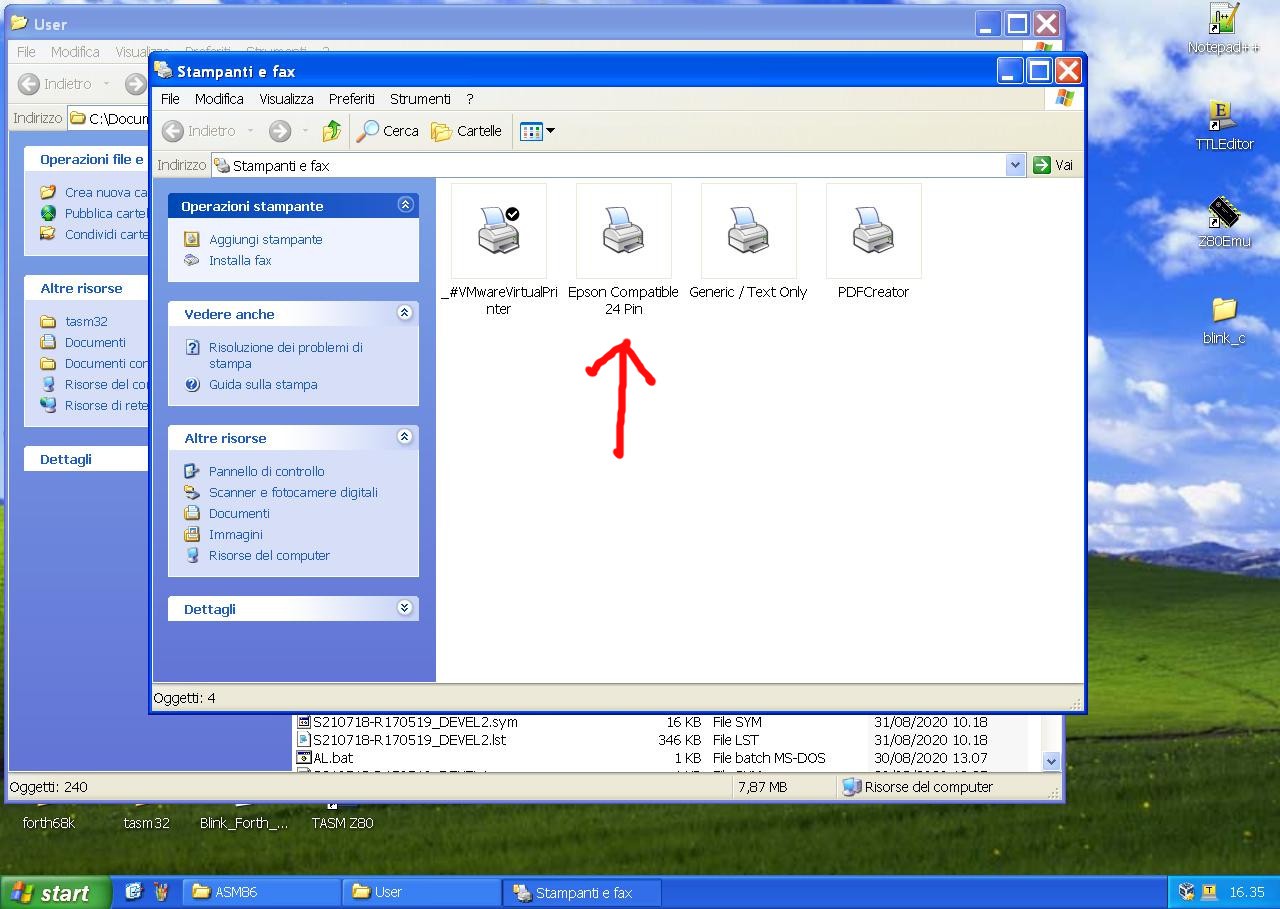
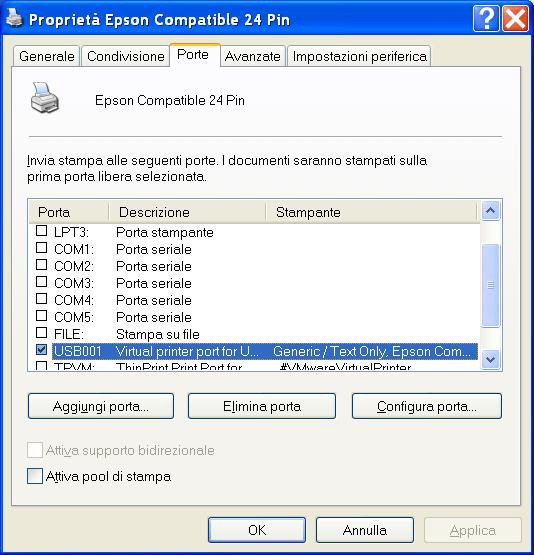
Please note that the Windows XP VM has an USB-Parallel adapter linked, so the printer port is set to the correspondent USB port (not the usual LPT1):
The parallel port of the USB-Parallel adapter is connected with the SPP Printer Emulator, which is connected (and powered) with the Linux host with the USB cable:
Now to activate the script to capture the printing, from the directory storing the captured files the command is (here we are using an Arduino UNO clone with a CH340 USB-serial converter so the serial port is /dev/ttyUSB0 and the serial speed is 1Mbps):
python3 ./fake_printer_v2.py -p /dev/ttyUSB0 -b 1000000
After the print we'll see:
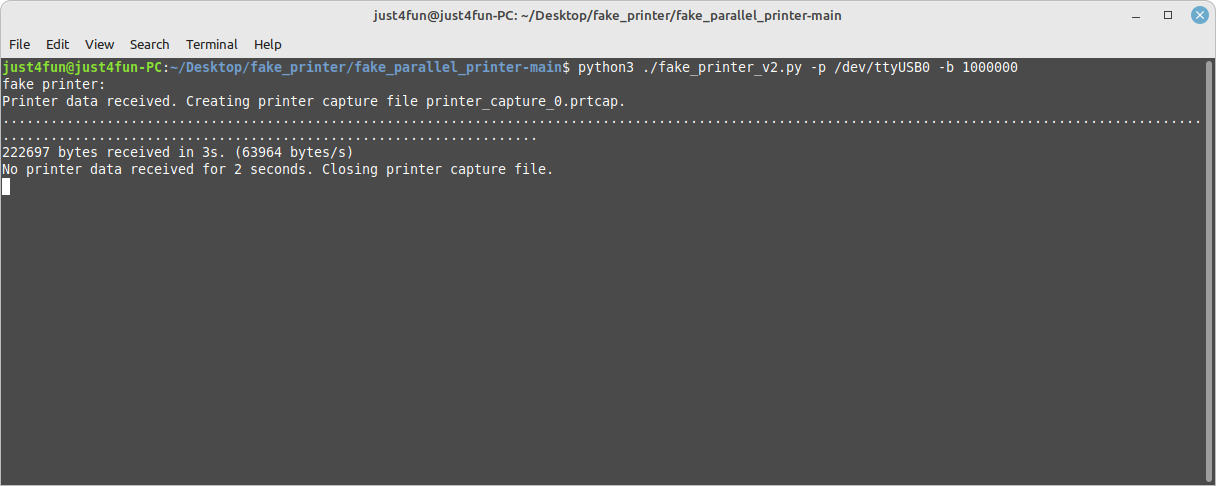
At this point the capture file is ready to be converted in pdf (to terminate the script give a Ctrl-C) with the printerToPDF utility :
And this is the first page converted into pdf (in the output/pdf folder):
* * LICENSING AND CREDITS * *
The python script fake_printer.py comes from the Tom Verbeure project.
The printerToPDF utility comes from the Rich M project.
All the project files (SW & HW) are licensed under GPL v3.
If you use this material in any way a reference to the author (me ☻) will be appreciated.
All the updates and the details to build it (including the firmware for the Arduino UNO) are in the project official page here:
https://hackaday.io/project/194029
Parallel Printer (SPP) Emulator Shield
*PCBWay community is a sharing platform. We are not responsible for any design issues and parameter issues (board thickness, surface finish, etc.) you choose.

Raspberry Pi 5 7 Inch Touch Screen IPS 1024x600 HD LCD HDMI-compatible Display for RPI 4B 3B+ OPI 5 AIDA64 PC Secondary Screen(Without Speaker)
BUY NOW
ESP32-S3 4.3inch Capacitive Touch Display Development Board, 800×480, 5-point Touch, 32-bit LX7 Dual-core Processor
BUY NOW
Raspberry Pi 5 7 Inch Touch Screen IPS 1024x600 HD LCD HDMI-compatible Display for RPI 4B 3B+ OPI 5 AIDA64 PC Secondary Screen(Without Speaker)
BUY NOW- Comments(0)
- Likes(6)
 Log in to post comments.
-
 Anthony Pedotto
Feb 22,2025
-
 Matthew Sword
Dec 09,2024
-
 zoltan.topa
Apr 16,2024
-
 Engineer
Mar 19,2024
-
 Engineer
Mar 13,2024
-
 Engineer
Feb 16,2024
- 0 USER VOTES
- YOUR VOTE 0.00 0.00
- 1
- 2
- 3
- 4
- 5
- 6
- 7
- 8
- 9
- 10
- 1
- 2
- 3
- 4
- 5
- 6
- 7
- 8
- 9
- 10
- 1
- 2
- 3
- 4
- 5
- 6
- 7
- 8
- 9
- 10
- 1
- 2
- 3
- 4
- 5
- 6
- 7
- 8
- 9
- 10
 More by Just4Fun
-
 Dual channel RS232 adapter
This is a simple board I made to play with my FPGA board "The Thing". This board has two RS-232 chan...
-
 uCom (a RS232 adapter for the Z80-MBC2)
uCom (micro-Com) is a RS232 adapter for the Z80-MBC2 (https://hackaday.io/project/159973). It has a ...
-
 uTerm (a VT100-like terminal for the Z80-MBC2)
uTerm (micro-Term) is a VT100-like terminal for the Z80-MBC2 (https://hackaday.io/project/159973). I...
-
 "The Thing": FPGA + STM32, Multicomp compatible
### DESCRIPTIONTwo dev boards into one: a STM32 based Arduino ("Maple Mini" compatible) and a Cyclon...
-
 ESP-01 NanoBoard (ESP8266)
### DESCRIPTIONThe ESP-01 NanoBoard is a little "motherboard" for the well known ESP-01 ...
-
 Z80-MBC2: 4ICs homemade Z80 computer
### DESCRIPTIONThe Z80-MBC2 is an easy to build Z80 SBC (Single Board Computer with 8MHz Z80, 128kB ...
-
 SPP (Standard Parallel Port) Adapter for the 68k-MBC
The Standard Parallel Port (SPP) Adapter board allows to use the GPIO port of the "retro-board" 68k-...
-
 uTerm2-S: a multi-emulation color RS232 terminal
* * HARDWARE OVERVIEW * *The uTerm2-S (micro Term2 stand-alone) is an easy to build multi-emulation ...
-
 68k-MBC: a 3 ICs 68008 homebrew computer
* * DESCRIPTION * *The 68k-MBC is an easy to build 68008 CPU SBC (Single Board Computer), using only...
-
 Parallel Printer (SPP) Emulator Shield
* * HARDWARE OVERVIEW * *Playing with retro-computers or messing with dated instruments a simple SPP...
-
 Azz!Duino: A W806 (Winner Micro) MCU on a Arduino Mega shaped board
* * OVERVIEW * *The W806 is an interesting low cost MCU made by Winner Micro. There is a page about ...
-
 uHat add-on board for uTerm2-S
It is a little add-on board with a PSRAM (specific for the ESP32) and a microSD socket. I've called ...
-
 PicOne (PIC18F47Q10)
I was searching a DIL MCU for another "project" and found this one that seems interesting. It is che...
-
 V20-MBC: an easy to build 8088 + 8080 computer
DescriptionThe V20-MBC2 is an easy to build V20HL CPU SBC (Single Board Computer). It follows the sa...
-
 CH552 Dragon
* * HARDWARE OVERVIEW * *The CH552 is a little MCU with a 8051 core and a USB interface, and is damn...
-
 ARMando (STM32F030R8 board)
I wanted a board with a "standard" form factor as the common dev boards, but that could be easily in...
-
 RC-Z8BASIC
Never used a Z8 MCU before, but when I found that chip "forgotten" for decades and started to read t...
-
 uTerm-S: stand-alone RS232 VT100 terminal with VGA/PS2
* * HARDWARE OVERVIEW * *uTerm-S (micro-Term Stand-alone) is a legacy RS232 VT100-like terminal. It ...
-
 Dual channel RS232 adapter
This is a simple board I made to play with my FPGA board "The Thing". This board has two RS-232 chan...
-
 uCom (a RS232 adapter for the Z80-MBC2)
uCom (micro-Com) is a RS232 adapter for the Z80-MBC2 (https://hackaday.io/project/159973). It has a ...
-
 uTerm (a VT100-like terminal for the Z80-MBC2)
uTerm (micro-Term) is a VT100-like terminal for the Z80-MBC2 (https://hackaday.io/project/159973). I...
-
 "The Thing": FPGA + STM32, Multicomp compatible
### DESCRIPTIONTwo dev boards into one: a STM32 based Arduino ("Maple Mini" compatible) and a Cyclon...
-
 ESP-01 NanoBoard (ESP8266)
### DESCRIPTIONThe ESP-01 NanoBoard is a little "motherboard" for the well known ESP-01 ...
-
 Z80-MBC2: 4ICs homemade Z80 computer
### DESCRIPTIONThe Z80-MBC2 is an easy to build Z80 SBC (Single Board Computer with 8MHz Z80, 128kB ...
-
 SPP (Standard Parallel Port) Adapter for the 68k-MBC
The Standard Parallel Port (SPP) Adapter board allows to use the GPIO port of the "retro-board" 68k-...
-
 uTerm2-S: a multi-emulation color RS232 terminal
* * HARDWARE OVERVIEW * *The uTerm2-S (micro Term2 stand-alone) is an easy to build multi-emulation ...
-
 68k-MBC: a 3 ICs 68008 homebrew computer
* * DESCRIPTION * *The 68k-MBC is an easy to build 68008 CPU SBC (Single Board Computer), using only...
-
 Parallel Printer (SPP) Emulator Shield
* * HARDWARE OVERVIEW * *Playing with retro-computers or messing with dated instruments a simple SPP...
-
 Azz!Duino: A W806 (Winner Micro) MCU on a Arduino Mega shaped board
* * OVERVIEW * *The W806 is an interesting low cost MCU made by Winner Micro. There is a page about ...
-
 uHat add-on board for uTerm2-S
It is a little add-on board with a PSRAM (specific for the ESP32) and a microSD socket. I've called ...
-
Commodore 64 1541-II Floppy Disk Drive C64 Power Supply Unit USB-C 5V 12V DIN connector 5.25
159 1 2 -
Easy to print simple stacking organizer with drawers
87 0 0 -
-
-
-
Modifying a Hotplate to a Reflow Solder Station
1131 1 6 -
MPL3115A2 Barometric Pressure, Altitude, and Temperature Sensor
636 0 1 -
-
Nintendo 64DD Replacement Shell
493 0 2 -
V2 Commodore AMIGA USB-C Power Sink Delivery High Efficiency Supply Triple Output 5V ±12V OLED display ATARI compatible shark 100W
1436 4 3


