TOKEN MACHINE AND QUEUE MANAGEMENT SYSTEM FOR HOSPITALS
ABSTRACT
Patient wait times have a strong influence on patient satisfaction levels. A common scenario in front of clinics, and hospitals are people standing in long queues. These people cannot do any other activity until they are served. In order to save time when standing in long queues, it is better to issue a token to each individual and call them when required. One can be occupied otherwise until that individual‘s token no is displayed or announced. Thereby reducing patient waiting times and reducing the spread of diseases in healthcare organizations.
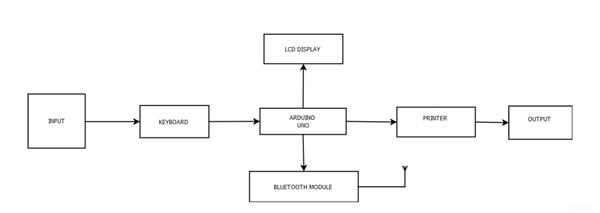
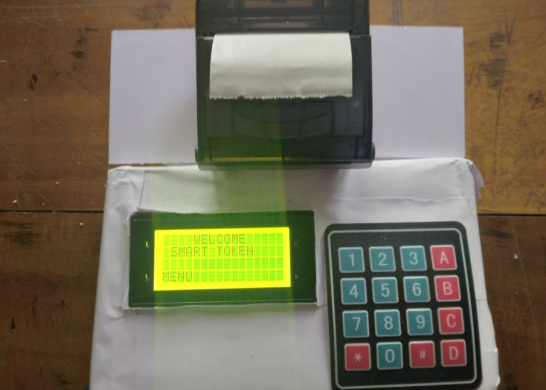
‘Smart Token’ is a device mainly focused on hospitals to manage patients. Here we are using Arduino Uno, LCD Display, Keypad, 7-Segment Display, Bluetooth module, and Printer. A keypad is provided for the user to select respective departments , doctors, and rooms if required without the help of a receptionist and the details are displayed on the LCD display. Bluetooth module conveys the data collected which means the count of the patients to the doctors and the token number is displayed using the seven-segment display and the token is obtained from the printer.
The project is about 70 percent complete and requires additional work.
MATERIALS AND METHODS
Given below are the hardware parts of the ‘Smart Token System’:
- Arduino UNO
- Lcd Display (16x4)
- Seven Segment Display
- Keypad
- Bluetooth Module
- Breadboard
- Connecting Wires
- Arduino IDE Software Platform
Given below are the hardware parts of the ‘Smart Token System’:
1. Arduino IDE Software
2. Fritzing
3. Dia
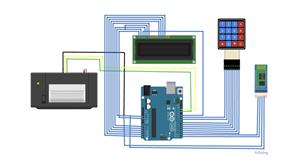
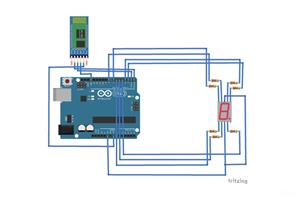
STEP 1 : BUILD THE CIRCUIT
( PATIENT'S UNIT )

( DOCTOR'S UNIT )

FLOWCHART
PATIENT'S UNIT

DOCTOR'S UNIT

STEP 2 : RUN THE CODE
Run the arduino code and upload that.
/*int num_array[10][7] = {  { 1,1,1,1,1,1,0 },    // 0
                          { 0,1,1,0,0,0,0 },    // 1
                          { 1,1,0,1,1,0,1 },    // 2
                          { 1,1,1,1,0,0,1 },    // 3
                          { 0,1,1,0,0,1,1 },    // 4
                          { 1,0,1,1,0,1,1 },    // 5
                          { 1,0,1,1,1,1,1 },    // 6
                          { 1,1,1,0,0,0,0 },    // 7
                          { 1,1,1,1,1,1,1 },    // 8
                          { 1,1,1,0,0,1,1 }};*/   // 9

//function header

#include <SoftwareSerial.h>

SoftwareSerial mySerial(2, 3);
#define led 5
#define button 11


void Num_Write(int);
char invalue=0;


void setup()
{
    pinMode(button, OUTPUT);
   Serial.begin(9600);
  while (!Serial) {
    ; // wait for serial port to connect. Needed for native USB port only
  }


  // set the data rate for the SoftwareSerial port
  mySerial.begin(9600);
  // set pin modes
  pinMode(4, OUTPUT);
  pinMode(5, OUTPUT);
  pinMode(6, OUTPUT);
  pinMode(7, OUTPUT);
  pinMode(8, OUTPUT);
  pinMode(9, OUTPUT);
  pinMode(10, OUTPUT);
   pinMode(button, INPUT);


}

void loop()
{

//if (mySerial.available()) {
//    Serial.write(mySerial.read());
//  }
//  if (Serial.available()) {
//    mySerial.write(Serial.read());
//  }

  {
  // put your main code here, to run repeatedly:
  if(Serial.available())
  {
    char val = Serial.read();
    if(val == 'A')
    {
      digitalWrite(button, HIGH);
    }
    else if(val == 'a')
    {
      digitalWrite(button, LOW);
    }
  }


invalue=mySerial.read();

digitalRead(button);
    if(invalue=='0'){
   digitalWrite(4,LOW);
   digitalWrite(5,LOW);
   digitalWrite(6,LOW);
   digitalWrite(7,LOW);
   digitalWrite(8,LOW);
   digitalWrite(9,LOW);
   digitalWrite(10,HIGH);//0

   delay(1000);
    }
    digitalRead(button);
    if(invalue=='1'){

   digitalWrite(4,HIGH);
   digitalWrite(5,LOW);
   digitalWrite(6,LOW);
   digitalWrite(7,HIGH);
   digitalWrite(8,HIGH);
   digitalWrite(9,HIGH);
   digitalWrite(10,HIGH);//1

   delay(1000);
    }
    digitalRead(button);
    if(invalue=='2')
    {
   digitalWrite(4,LOW);
   digitalWrite(5,LOW);
   digitalWrite(6,HIGH);
   digitalWrite(7,LOW);
   digitalWrite(8,LOW);
   digitalWrite(9,HIGH);
   digitalWrite(10,LOW);//2

   delay(1000);
    }
    if(invalue=='3'){
   digitalWrite(4,LOW);
   digitalWrite(5,LOW);
   digitalWrite(6,LOW);
   digitalWrite(7,LOW);
   digitalWrite(8,HIGH);
   digitalWrite(9,HIGH);
   digitalWrite(10,LOW);//3

   delay(1000);
    }
    if(invalue=='4'){
   digitalWrite(4,HIGH);
   digitalWrite(5,LOW);
   digitalWrite(6,LOW);
   digitalWrite(7,HIGH);
   digitalWrite(8,HIGH);
   digitalWrite(9,LOW);
   digitalWrite(10,LOW);//4

   delay(1000);
    }if(invalue=='5'){
   digitalWrite(4,LOW);
   digitalWrite(5,HIGH);
   digitalWrite(6,LOW);
   digitalWrite(7,LOW);
   digitalWrite(8,HIGH);
   digitalWrite(9,LOW);
   digitalWrite(10,LOW);//5

   delay(1000);
    }if(invalue=='6'){
   digitalWrite(4,LOW);
   digitalWrite(5,HIGH);
   digitalWrite(6,LOW);
   digitalWrite(7,LOW);
   digitalWrite(8,LOW);
   digitalWrite(9,LOW);
   digitalWrite(10,LOW);//6

   delay(1000);
    }if(invalue=='7'){
   digitalWrite(4,LOW);
   digitalWrite(5,LOW);
   digitalWrite(6,LOW);
   digitalWrite(7,HIGH);
   digitalWrite(8,HIGH);
   digitalWrite(9,HIGH);
   digitalWrite(10,HIGH);//7

   delay(1000);
    }if(invalue=='8'){
   digitalWrite(4,LOW);
   digitalWrite(5,LOW);
   digitalWrite(6,LOW);
   digitalWrite(7,LOW);
   digitalWrite(8,LOW);
   digitalWrite(9,LOW);
   digitalWrite(10,LOW);//8

   delay(1000);
    }if(invalue=='9'){
   digitalWrite(4,LOW);
   digitalWrite(5,LOW);
   digitalWrite(6,LOW);
   digitalWrite(7,LOW);
   digitalWrite(8,HIGH);
   digitalWrite(9,LOW);
   digitalWrite(10,LOW);//9

   delay(1000);
  }
  }
}


TOKEN MACHINE AND QUEUE MANAGEMENT SYSTEM FOR HOSPITALS
- Comments(0)
- Likes(1)
-
 Engineer
Oct 01,2024
- 0 USER VOTES
- YOUR VOTE 0.00 0.00
- 1
- 2
- 3
- 4
- 5
- 6
- 7
- 8
- 9
- 10
- 1
- 2
- 3
- 4
- 5
- 6
- 7
- 8
- 9
- 10
- 1
- 2
- 3
- 4
- 5
- 6
- 7
- 8
- 9
- 10
- 1
- 2
- 3
- 4
- 5
- 6
- 7
- 8
- 9
- 10
 More by mohdazhar
-
 Automatic Bus Stop Announcement System
When we travel by bus ,the route of the bus is unknown to a new passenger. It mostly affects the ill...
-
 Earthquake Alert System Based On IOT
Many countries have implemented EEW(early earthquake warning) systems to save human lives. The earth...
-
 Smart Street Light
 spotlights different restrictions and difficulties identified with traditional an...
Smart Street Light
Smart Street Light spotlights different restrictions and difficulties identified with traditional an...
-
 Line Break Detector With Alert System
 is a mechanism which helps the consumer and KSEB officers to d...
Line Break Detector With Alert System
Line Break Detector With Alert System is a mechanism which helps the consumer and KSEB officers to d...
-
 Smart Railway Gate Opening System Using IOT
The railway crossing accidents are increasing day by day due to human-manned railway crossings. Live...
-
 Advanced Biometric Finger Print Scanner
We took the case of our hostel mess and concluded that there is no proper way to manage the hostel m...
-
 Baby Monitoring System
We are very well familiar with the hurdles faced by Parents to nurture their infant and especially i...
-
 TOKEN MACHINE AND QUEUE MANAGEMENT SYSTEM FOR HOSPITALS
ABSTRACTPatient wait times have a strong influence on patient satisfaction levels. A common scenario...
-
 Make your own branded ESP32 development board with PCBWay!
What about making your own custom PCB boards with your own branding? Doesn't that sound nice? PCB ma...
-
 FOODIE BOT
Automation has become an integral part of today's modern life. We are increasingly noticing that mor...
-
 A ESP32 BASED BLUETOOTH MINI ROBOT
A simple mini robot that you can control with your phone. The robot can be improvised and implemente...
-
 IOT smart AC plug
A smart plug is a home automation device and is a hot new thing. Several types of smart plugs are av...
-
 "A perfectly working line follower robot using arduino"
LINE FOLLOWER ROBOT - THE EASIEST!This is a simple tutorial to make a line follower robot using Ardu...
-
 IOT PLANT - GROW YOUR PLANTS FROM ANYWHERE AROUND THE WORLD.
Watch the video The device and plant setupWhat about growing any plants from anywhere around the wor...
-
 HOW TO PROGRAM ESP8266 - 01
In this tutorial, I am going to show how to program ESP8266 - 01 using an Arduino board or using FTD...
-
 Make Your First Arduino Robot - the Best Tutorial Out There
Smartphone-controlled obstacle avoiding and wall follower robot.Are you a beginner in Arduino and ha...
-
 THE ULTIMATE OFFROAD RC ROVER
Let's make an all-terrain remote-controlled rover bot. This is a great starter project for hobbyists...
-
 MAKE A 3.3 VOLT REGULATOR FOR ESP8266
The 3.3-volt power supply is one of the main issues when we use ESP8266 - 01 as a standalone board. ...
-
-
mammoth-3D SLM Voron Toolhead – Manual Drill & Tap Edition
173 0 0 -
-
AEL-2011 Power Supply Module
690 0 2 -
AEL-2011 50W Power Amplifier
588 0 2 -
-
-
Custom Mechanical Keyboard
788 0 0 -
Tester for Touch Screen Digitizer without using microcontroller
410 2 2 -
Audio reactive glow LED wristband/bracelet with NFC / RFID-Tags
374 0 1 -
-


