


|
|
Arduino_UNO_R3 |
x 1 | |
|
|
CNC shield |
x 1 | |
|
|
A4988 STEPPER MOTOR DRIVER CARRIER BLACKPololu
|
x 4 | |
|
|
stepper motor nema 17 |
x 4 | |
|
|
HC05 Bluetooth |
x 1 | |
|
|
Lipo Battery 11, 1 V 3000mAH |
x 1 |

|
Arduino Web Editor |
|

|
MIT App InventorMIT
|
How to build a Mecanum Wheels Robot_V1
The story
How to bulild a Robot usually is an assay and error process, you can see my first prototype in the next two videos.
I am follower of "how to mechatronics " and this is my version and my experience replicating a similar project.
Changes were:
- I bought mecanum wheels from a chinese vendor
- I implemented CNSshield for arduino instead a PCB
- I add ESD button and different Power ON switch
- In the near future I will implement Computer Vision to use this robot in a Wheelchair to play tennis
- MDF thickness is 5 mm -More ligtht
The app was adapted in MIT app inventor from the ideas, and code of Dejan- Author of "How to mechatronics".
Once this prototypes was built in the test were detected a big conceptual issue this do not comply with:
The rotation axis of each wheel’s top roller should point to the center of the robot.
Even apparently all the features was working well, the side away had problem and the audible noise of the robot was high
In this tutorial we will show how to built the the first prototype :
Future improvements to make in Version 2:
- Frame extended MDF - paint and 45 grades acomplishment
- PCB fabricatd and ordered from PCB way no cnc shield
- Weight Tests
- Computer Vision extension
- Routines and navigation tests
- ON/FF Swithc
- ESD Buttom
- Battery monitoring LED
- Arduno MEGA 2560 controller
Hardware electronics
CNC SHIELD:
HC-05: Bluetooth module:
Stepper motors Nema 17: 4
Batteries:
Lipo: 11.1 for the motor power source for the cncshield
Li Ion: 12 V for the electonics
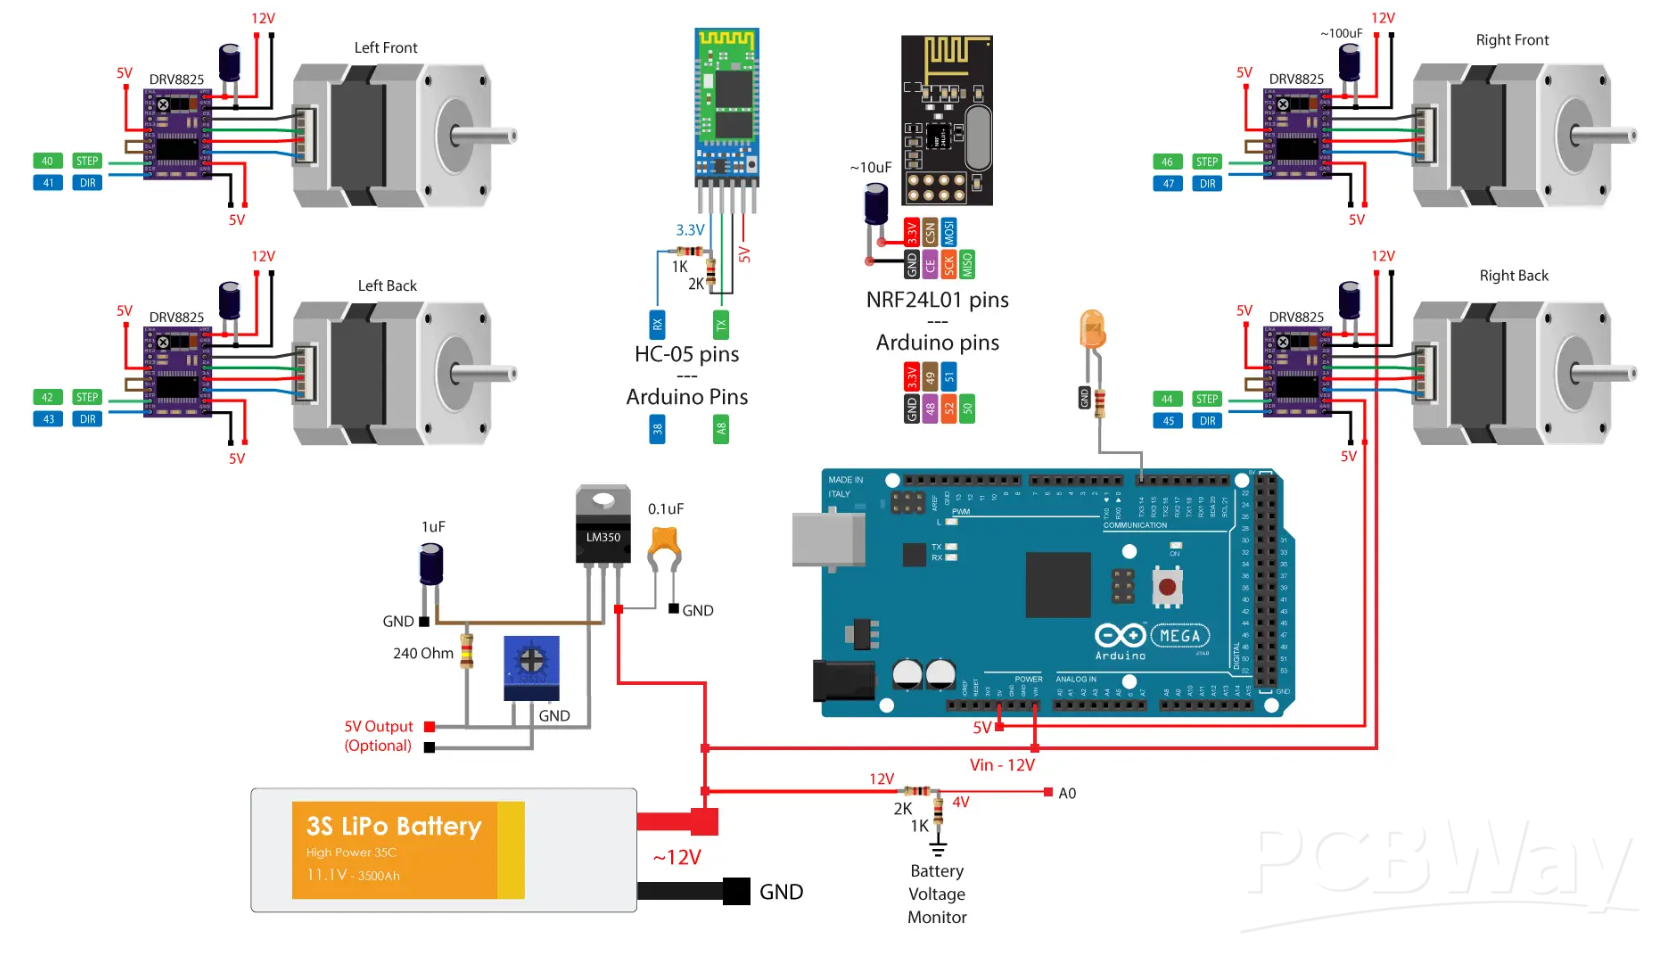
Schematics

Source: How to mechatronics (https://howtomechatronics.com/projects/arduino-robot-arm-and-mecanum-wheels-platform-automatic-operation/)
- Software
Arduino
APP MIT APP Inventor
Computer Vision Tests - work in progress
/*
   === Arduino Mecanum Wheels Robot ===
     Smartphone control via Bluetooth
  by Dejan, www.HowToMechatronics.com
  Libraries:
  RF24, https://github.com/tmrh20/RF24/
  AccelStepper by Mike McCauley: http://www.airspayce.com/mikem/arduino/AccelStepper/index.html
Minimun adaptation to work with a CNCshield for Arduino UNO-
Be aware about  the speed of the BTH module you can get crazy trying to solve a easy issue.
*/

#include <SoftwareSerial.h>
#include <AccelStepper.h>

SoftwareSerial Bluetooth(A0, 11); // Arduino(RX, TX) - HC-05 Bluetooth (TX, RX)

// Define the stepper motors and the pins the will use
AccelStepper LeftBackWheel(1, 4, 7);   // (Type:driver, STEP, DIR) - Stepper1
AccelStepper LeftFrontWheel(1, 2, 5);  // Stepper2
AccelStepper RightBackWheel(1, 12, 13);  // Stepper3
AccelStepper RightFrontWheel(1, 3, 6); // Stepper4

#define led 10

int wheelSpeed = 1500;

int dataIn, m;

int lbw[50], lfw[50], rbw[50], rfw[50]; // for storing positions/steps
int index = 0;

void setup() {
  // Set initial seed values for the steppers
  LeftFrontWheel.setMaxSpeed(3000);
  LeftBackWheel.setMaxSpeed(3000);
  RightFrontWheel.setMaxSpeed(3000);
  RightBackWheel.setMaxSpeed(3000);

  Serial.begin(9600);
  Bluetooth.begin(9600); // Default baud rate of the Bluetooth module
  Bluetooth.setTimeout(1);
  delay(20);

  pinMode(led, OUTPUT);

}

void loop() {
  // Check for incoming data

  if (Bluetooth.available() > 0) {
    dataIn = Bluetooth.read();  // Read the data

    if (dataIn == 0) {
      m = 0;
    }
    if (dataIn == 1) {
      m = 1;
    }
    if (dataIn == 2) {
      m = 2;
    }
    if (dataIn == 3) {
      m = 3;
    }
    if (dataIn == 4) {
      m = 4;
    }
    if (dataIn == 5) {
      m = 5;
    }
    if (dataIn == 6) {
      m = 6;
    }
    if (dataIn == 7) {
      m = 7;
    }
    if (dataIn == 8) {
      m = 8;

    }
    if (dataIn == 9) {
      m = 9;
    }
    if (dataIn == 10) {
      m = 10;
    }
    if (dataIn == 11) {
      m = 11;
    }

    if (dataIn == 12) {
      m = 12;
    }
    if (dataIn == 14) {
      m = 14;
    }
    // Set speed
    if (dataIn >= 16) {
      wheelSpeed = dataIn * 10;
      Serial.println(wheelSpeed);
    }
  }
  if (m == 4) {
    moveSidewaysLeft();
  }
  if (m == 5) {
    moveSidewaysRight();
  }
  if (m == 2) {
    moveForward();
  }
  if (m == 7) {
    moveBackward();
  }
  if (m == 3) {
    moveRightForward();
  }
  if (m == 1) {
    moveLeftForward();
  }
  if (m == 8) {
    moveRightBackward();
  }
  if (m == 6) {
    moveLeftBackward();
  }
  if (m == 9) {
    rotateLeft();
  }
  if (m == 10) {
    rotateRight();
  }

  if (m == 0) {
    stopMoving();
  }
  //Serial.println(dataIn);
  // If button "SAVE" is pressed
  if (m == 12) {
    if (index == 0) {
      LeftBackWheel.setCurrentPosition(0);
      LeftFrontWheel.setCurrentPosition(0);
      RightBackWheel.setCurrentPosition(0);
      RightFrontWheel.setCurrentPosition(0);
    }
    lbw[index] = LeftBackWheel.currentPosition();  // save position into the array
    lfw[index] = LeftFrontWheel.currentPosition();
    rbw[index] = RightBackWheel.currentPosition();
    rfw[index] = RightFrontWheel.currentPosition();
    index++;                        // Increase the array index
    m = 0;
  }

  if (m == 14) {
    runSteps();
    if (dataIn != 14) {
      stopMoving();
      memset(lbw, 0, sizeof(lbw)); // Clear the array data to 0
      memset(lfw, 0, sizeof(lfw));
      memset(rbw, 0, sizeof(rbw));
      memset(rfw, 0, sizeof(rfw));
      index = 0;  // Index to 0
    }
  }

  LeftFrontWheel.runSpeed();
  LeftBackWheel.runSpeed();
  RightFrontWheel.runSpeed();
  RightBackWheel.runSpeed();

  // Monitor the battery voltage
  int sensorValue = analogRead(A0);
  float voltage = sensorValue * (5.0 / 1023.00) * 3; // Convert the reading values from 5v to suitable 12V i
  //Serial.println(voltage);
  // If voltage is below 11V turn on the LED
  if (voltage < 11) {
    digitalWrite(led, HIGH);
  }
  else {
    digitalWrite(led, LOW);
  }

}

void runSteps() {
  for (int i = index - 1; i >= 0; i--) { // Run through all steps(index)
    LeftFrontWheel.moveTo(lfw[i]);
    LeftFrontWheel.setSpeed(wheelSpeed);
    LeftBackWheel.moveTo(lbw[i]);
    LeftBackWheel.setSpeed(wheelSpeed);
    RightFrontWheel.moveTo(rfw[i]);
    RightFrontWheel.setSpeed(wheelSpeed);
    RightBackWheel.moveTo(rbw[i]);
    RightBackWheel.setSpeed(wheelSpeed);

    while (LeftBackWheel.currentPosition() != lbw[i] & LeftFrontWheel.currentPosition() != lfw[i] & RightFrontWheel.currentPosition() != rfw[i] & RightBackWheel.currentPosition() != rbw[i]) {
      LeftFrontWheel.runSpeedToPosition();
      LeftBackWheel.runSpeedToPosition();
      RightFrontWheel.runSpeedToPosition();
      RightBackWheel.runSpeedToPosition();

      if (Bluetooth.available() > 0) {      // Check for incomding data
        dataIn = Bluetooth.read();
        if ( dataIn == 15) {           // If button "PAUSE" is pressed
          while (dataIn != 14) {         // Wait until "RUN" is pressed again
            if (Bluetooth.available() > 0) {
              dataIn = Bluetooth.read();
              if ( dataIn == 13) {
                stopMoving();
                break;
              }
            }
          }
        }
        if (dataIn >= 16) {
          wheelSpeed = dataIn * 10;
          dataIn = 14;
        }
        if ( dataIn == 13) {
          break;
        }
      }
    }
  }
  // Go back through steps
  for (int i = 1; i <= index - 1; i++) { // Run through all steps(index)

    LeftFrontWheel.moveTo(lfw[i]);
    LeftFrontWheel.setSpeed(wheelSpeed);
    LeftBackWheel.moveTo(lbw[i]);
    LeftBackWheel.setSpeed(wheelSpeed);
    RightFrontWheel.moveTo(rfw[i]);
    RightFrontWheel.setSpeed(wheelSpeed);
    RightBackWheel.moveTo(rbw[i]);
    RightBackWheel.setSpeed(wheelSpeed);

    while (LeftBackWheel.currentPosition() != lbw[i]& LeftFrontWheel.currentPosition() != lfw[i] & RightFrontWheel.currentPosition() != rfw[i] & RightBackWheel.currentPosition() != rbw[i]) {

      LeftFrontWheel.runSpeedToPosition();
      LeftBackWheel.runSpeedToPosition();
      RightFrontWheel.runSpeedToPosition();
      RightBackWheel.runSpeedToPosition();
      //Serial.print("  current: ");
      //Serial.println(LeftBackWheel.currentPosition());

      if (Bluetooth.available() > 0) {      // Check for incomding data
        dataIn = Bluetooth.read();
        if ( dataIn == 15) {           // If button "PAUSE" is pressed
          while (dataIn != 14) {         // Wait until "RUN" is pressed again
            if (Bluetooth.available() > 0) {
              dataIn = Bluetooth.read();
              if ( dataIn == 13) {
                stopMoving();
                break;
              }
            }
          }
        }
        if (dataIn >= 16) {
          wheelSpeed = dataIn * 10;
          dataIn = 14;
        }
        if ( dataIn == 13) {
          //Serial.println("DEKI");
          break;
        }
      }
    }
  }
}

void moveForward() {
  LeftFrontWheel.setSpeed(wheelSpeed);
  LeftBackWheel.setSpeed(wheelSpeed);
  RightFrontWheel.setSpeed(wheelSpeed);
  RightBackWheel.setSpeed(wheelSpeed);
}
void moveBackward() {
  LeftFrontWheel.setSpeed(-wheelSpeed);
  LeftBackWheel.setSpeed(-wheelSpeed);
  RightFrontWheel.setSpeed(-wheelSpeed);
  RightBackWheel.setSpeed(-wheelSpeed);
}
void moveSidewaysRight() {
  LeftFrontWheel.setSpeed(wheelSpeed);
  LeftBackWheel.setSpeed(-wheelSpeed);
  RightFrontWheel.setSpeed(-wheelSpeed);
  RightBackWheel.setSpeed(wheelSpeed);
}
void moveSidewaysLeft() {
  LeftFrontWheel.setSpeed(-wheelSpeed);
  LeftBackWheel.setSpeed(wheelSpeed);
  RightFrontWheel.setSpeed(wheelSpeed);
  RightBackWheel.setSpeed(-wheelSpeed);
}
void rotateLeft() {
  LeftFrontWheel.setSpeed(-wheelSpeed);
  LeftBackWheel.setSpeed(-wheelSpeed);
  RightFrontWheel.setSpeed(wheelSpeed);
  RightBackWheel.setSpeed(wheelSpeed);
}
void rotateRight() {
  LeftFrontWheel.setSpeed(wheelSpeed);
  LeftBackWheel.setSpeed(wheelSpeed);
  RightFrontWheel.setSpeed(-wheelSpeed);
  RightBackWheel.setSpeed(-wheelSpeed);
}
void moveRightForward() {
  LeftFrontWheel.setSpeed(wheelSpeed);
  LeftBackWheel.setSpeed(0);
  RightFrontWheel.setSpeed(0);
  RightBackWheel.setSpeed(wheelSpeed);
}
void moveRightBackward() {
  LeftFrontWheel.setSpeed(0);
  LeftBackWheel.setSpeed(-wheelSpeed);
  RightFrontWheel.setSpeed(-wheelSpeed);
  RightBackWheel.setSpeed(0);
}
void moveLeftForward() {
  LeftFrontWheel.setSpeed(0);
  LeftBackWheel.setSpeed(wheelSpeed);
  RightFrontWheel.setSpeed(wheelSpeed);
  RightBackWheel.setSpeed(0);
}
void moveLeftBackward() {
  LeftFrontWheel.setSpeed(-wheelSpeed);
  LeftBackWheel.setSpeed(0);
  RightFrontWheel.setSpeed(0);
  RightBackWheel.setSpeed(-wheelSpeed);
}
void stopMoving() {
  LeftFrontWheel.setSpeed(0);
  LeftBackWheel.setSpeed(0);
  RightFrontWheel.setSpeed(0);
  RightBackWheel.setSpeed(0);
}
How to build a Mecanum Wheels Robot_V1


- Comments(0)
- Likes(0)
More by Bolaños Hernando
-
 How to built a Hybrid Bike Computer
Hybrid Bike ComputerThis PCB is a Cheap solution to track your training preformanceBased o esp32 , r...
How to built a Hybrid Bike Computer
Hybrid Bike ComputerThis PCB is a Cheap solution to track your training preformanceBased o esp32 , r...
-
 My nunchuck adapter (PCB) for my Galagino Retro console_Running on a ESP32 device
Galagino is an open source idea of hardware and software from Tiil Harbaum (https://github.com/harba...
My nunchuck adapter (PCB) for my Galagino Retro console_Running on a ESP32 device
Galagino is an open source idea of hardware and software from Tiil Harbaum (https://github.com/harba...
-
 PCB DESIGN FOR BIKE COMPUTER DIY
PCB DESIGN FOR A BIKE COMPUTER DIY - QBIKOThis PCB was designed to run a BIke computer based on ESP3...
PCB DESIGN FOR BIKE COMPUTER DIY
PCB DESIGN FOR A BIKE COMPUTER DIY - QBIKOThis PCB was designed to run a BIke computer based on ESP3...
-
 How to build a Mecanum Wheels Robot with an Arduino Mega and a PCB
Once I finished my first version of this robot I found it interesting to develop a PCB, mount and so...
How to build a Mecanum Wheels Robot with an Arduino Mega and a PCB
Once I finished my first version of this robot I found it interesting to develop a PCB, mount and so...
-
 How to build a Bike computer DIY-Heart Rate sensor comparison and selection
This project is about a tutorial to evaluate 3 hear rate Sensor. In this way I will choose the bette...
How to build a Bike computer DIY-Heart Rate sensor comparison and selection
This project is about a tutorial to evaluate 3 hear rate Sensor. In this way I will choose the bette...
-
 How to build a Bike computer with a ESP32 -WROOM + 2 Reed Switches + 1 Cellular Phone(old with GPS and BTH)
The complete tutorial explaining all the details for this project, can be watched in the next vide...
How to build a Bike computer with a ESP32 -WROOM + 2 Reed Switches + 1 Cellular Phone(old with GPS and BTH)
The complete tutorial explaining all the details for this project, can be watched in the next vide...
-
 How to build a Table Tennis Robot - V2
Story: Once I finished my first protoype for a TTR , I recognize and learnt about a lot of improveme...
How to build a Table Tennis Robot - V2
Story: Once I finished my first protoype for a TTR , I recognize and learnt about a lot of improveme...
-
 How to build a Mecanum Wheels Robot_V1
The storyHow to bulild a Robot usually is an assay and error process, you can see my first prototype...
How to build a Mecanum Wheels Robot_V1
The storyHow to bulild a Robot usually is an assay and error process, you can see my first prototype...
-
 How to use AI to program a 2DOF ROBOT- Arduino+ pyhton+opencv+chatgp+ps3eyecam
The challenge was to obtanin a mix of code generated by chatgpt for pyhton, opencv, and arduino and ...
How to use AI to program a 2DOF ROBOT- Arduino+ pyhton+opencv+chatgp+ps3eyecam
The challenge was to obtanin a mix of code generated by chatgpt for pyhton, opencv, and arduino and ...
-
 Node MCU based Wi Fi Servo Switch- DIY
About:Regulations usually forbide to introduce pieces of equipment in the conecctions and wiring of ...
Node MCU based Wi Fi Servo Switch- DIY
About:Regulations usually forbide to introduce pieces of equipment in the conecctions and wiring of ...
-
 CNC_DIY_LASER_PLOTTER_VYNIL CUTTER
ABOUT THIS PROJECTSummaryTo develop a CNC need you to learn about code, IT, electricity, electronics...
CNC_DIY_LASER_PLOTTER_VYNIL CUTTER
ABOUT THIS PROJECTSummaryTo develop a CNC need you to learn about code, IT, electricity, electronics...
-
 Arduino Based Table Tennis Robot V1 DIY
AboutThis project is about a TTR(Table Tennis Robot) made at home with cardboard and wood, using som...
Arduino Based Table Tennis Robot V1 DIY
AboutThis project is about a TTR(Table Tennis Robot) made at home with cardboard and wood, using som...
-
 Robot Arm to implement CV projects
StoryFour years ago I was looking for a good robot arm, this year I have time and decided to replica...
Robot Arm to implement CV projects
StoryFour years ago I was looking for a good robot arm, this year I have time and decided to replica...
-
 MINI ROBOT ARM
 - YouTubeIdea based on Tutorials shared by Mr. Pinaut for :software -schematics -inst...
MINI ROBOT ARM
MINI ROBOT ARM - YouTubeIdea based on Tutorials shared by Mr. Pinaut for :software -schematics -inst...
-
 Bluetooth Controlled LEGO Toy Car
MotivationMy motivation was my kids. I want to share time and have fun with them teaching them some ...
Bluetooth Controlled LEGO Toy Car
MotivationMy motivation was my kids. I want to share time and have fun with them teaching them some ...
-
 Integrated HOME Irrigation System
Motivation:Since I left the university, 24 years ago, I haven't had the chance to update my knowledg...
Integrated HOME Irrigation System
Motivation:Since I left the university, 24 years ago, I haven't had the chance to update my knowledg...
-
 Rubik's Cube Solver Robot DIY - V.3.0
Scope of the projectThe idea was to build a Rubik's cube solver robot, as simple as possible, easy t...
Rubik's Cube Solver Robot DIY - V.3.0
Scope of the projectThe idea was to build a Rubik's cube solver robot, as simple as possible, easy t...
-
 Rubik's Cube Solver Robot v1
The drivers to develop my project were:Rubik′s cube is a "best seller" category toy, more than 350 m...
Rubik's Cube Solver Robot v1
The drivers to develop my project were:Rubik′s cube is a "best seller" category toy, more than 350 m...
-
-
-
-
Tester for Touch Screen Digitizer without using microcontroller
335 2 2 -
Audio reactive glow LED wristband/bracelet with NFC / RFID-Tags
317 0 1 -
-
-


