|
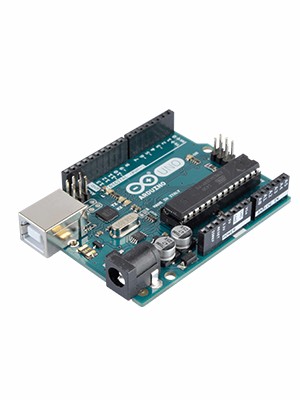
ARDUINO UNO REV3 |
x 1 | |

|
servomotor |
x 3 | |

|
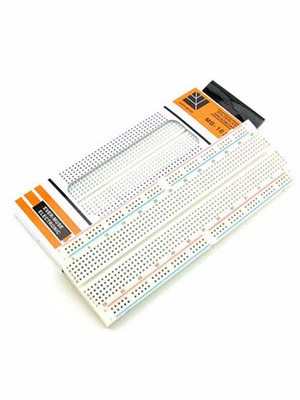
Breadboard 830 Point Solderless PCB Bread Board MB-102 MB102 Test Develop DIY |
x 1 | |
|
|
Jumpers dupontdupont
|
x 1 |
|
|
opencvopencv
|
|

|
arduino IDEArduino
|
|

|
Python |
Rubik's Cube Solver Robot v1
The drivers to develop my project were:
Rubik′s cube is a "best seller" category toy, more than 350 millions of units
Time to solve by humans has been decreasing from 22 seconds in 1982 to 3.47 second in 2018
Brilliant mathematicians as Kociemba, Rokiki and Fridrich has been fascinated with the toy - at adult age!!!
Thera are people solving cubes blindfolded - 48 cubes in less than one hour
Opencv and Python are subject I wanted to know, so I choose this challenge
I need a pandemic project to maintain soul balance and my mind working in new knowledge as a mechanism to use the spare time
Conceptualization:
I took the Matt2uy design and optimize the image recognition and algorithm to solve by implementing the Herbert kociemba algorithm.
Process of development
It was an instinctive and observation process of the mechanics -assay and error - 4 models I built until found the more accurate and with more repeatibility featuring.
The idea was to built knowledge based on existent knowledge, so Instructables, youtube, github were very important knowledge's sources.
Results
Implementing some changes I got to save about 20-24 minutes solving the cube - Average time is 6 to 8 minutes to solve.
If you are looking for speed solving, please see my other project, this is more about strategies to solve a problem, learning and patient.
This video summarize, as integrated view, what I did:
Rubik′s cube solver Robot - 6-8 mins to solve
Process:
Cube images are captured by a python program module, then color extraction for each sticker is proceesed by other program module and finally the cube is solved by Kociemba algorithm, the solution is sent to Arduino trough a serial port. Once the solution is received the arduino code start to processing the movements, after 6-8 minutes the process finish and the robot show all the faces of the cube solved.
Next challenge
Based on this project I moved forward and got from 6 minutes to 30 seconds, 18 seconds time to solve. In other video I explain how can we reach 18 seconds. Please watch, below, my comparison video:
30 seconds vs.6-8 minutes
What for?
This robot is designed to teach:
1. Patient, resilience, frustration management
2. Repeatability and Accuracy, applied to robots
3. Rubik's cube notation, solving algorithms
4. Maths: matrixes theory, statistical, group theory,
5. Programming: Arduino-Python
6. Image processing with openCV

Rubik's Cube Solver Robot v1
- Comments(0)
- Likes(0)
- 0 USER VOTES
- YOUR VOTE 0.00 0.00
- 1
- 2
- 3
- 4
- 5
- 6
- 7
- 8
- 9
- 10
- 1
- 2
- 3
- 4
- 5
- 6
- 7
- 8
- 9
- 10
- 1
- 2
- 3
- 4
- 5
- 6
- 7
- 8
- 9
- 10
- 1
- 2
- 3
- 4
- 5
- 6
- 7
- 8
- 9
- 10
 More by Bolaños Hernando
-
 How to built a Hybrid Bike Computer
Hybrid Bike ComputerThis PCB is a Cheap solution to track your training preformanceBased o esp32 , r...
-
 My nunchuck adapter (PCB) for my Galagino Retro console_Running on a ESP32 device
Galagino is an open source idea of hardware and software from Tiil Harbaum (https://github.com/harba...
-
 PCB DESIGN FOR BIKE COMPUTER DIY
PCB DESIGN FOR A BIKE COMPUTER DIY - QBIKOThis PCB was designed to run a BIke computer based on ESP3...
-
 How to build a Mecanum Wheels Robot with an Arduino Mega and a PCB
Once I finished my first version of this robot I found it interesting to develop a PCB, mount and so...
-
 How to build a Bike computer DIY-Heart Rate sensor comparison and selection
This project is about a tutorial to evaluate 3 hear rate Sensor. In this way I will choose the bette...
-
 How to build a Bike computer with a ESP32 -WROOM + 2 Reed Switches + 1 Cellular Phone(old with GPS and BTH)
The complete tutorial explaining all the details for this project, can be watched in the next vide...
-
 How to build a Table Tennis Robot - V2
Story: Once I finished my first protoype for a TTR , I recognize and learnt about a lot of improveme...
-
 How to build a Mecanum Wheels Robot_V1
The storyHow to bulild a Robot usually is an assay and error process, you can see my first prototype...
-
 How to use AI to program a 2DOF ROBOT- Arduino+ pyhton+opencv+chatgp+ps3eyecam
The challenge was to obtanin a mix of code generated by chatgpt for pyhton, opencv, and arduino and ...
-
 Node MCU based Wi Fi Servo Switch- DIY
About:Regulations usually forbide to introduce pieces of equipment in the conecctions and wiring of ...
-
 CNC_DIY_LASER_PLOTTER_VYNIL CUTTER
ABOUT THIS PROJECTSummaryTo develop a CNC need you to learn about code, IT, electricity, electronics...
-
 Arduino Based Table Tennis Robot V1 DIY
AboutThis project is about a TTR(Table Tennis Robot) made at home with cardboard and wood, using som...
-
 Robot Arm to implement CV projects
StoryFour years ago I was looking for a good robot arm, this year I have time and decided to replica...
-
 MINI ROBOT ARM
 - YouTubeIdea based on Tutorials shared by Mr. Pinaut for :software -schematics -inst...
MINI ROBOT ARM
MINI ROBOT ARM - YouTubeIdea based on Tutorials shared by Mr. Pinaut for :software -schematics -inst...
-
 Bluetooth Controlled LEGO Toy Car
MotivationMy motivation was my kids. I want to share time and have fun with them teaching them some ...
-
 Integrated HOME Irrigation System
Motivation:Since I left the university, 24 years ago, I haven't had the chance to update my knowledg...
-
 Rubik's Cube Solver Robot DIY - V.3.0
Scope of the projectThe idea was to build a Rubik's cube solver robot, as simple as possible, easy t...
-
 Rubik's Cube Solver Robot v1
The drivers to develop my project were:Rubik′s cube is a "best seller" category toy, more than 350 m...
-
-
AEL-2011 Power Supply Module
545 0 2 -
AEL-2011 50W Power Amplifier
505 0 2 -
-
-
Custom Mechanical Keyboard
706 0 0 -
Tester for Touch Screen Digitizer without using microcontroller
337 2 2 -
Audio reactive glow LED wristband/bracelet with NFC / RFID-Tags
317 0 1 -
-
-


