|
|
M5Stack Core2 ESP32 IoT Development Kit |
x 1 |
|
|
Neuton Tiny ML Neuton |
|

|
arduino IDEArduino
|
Unlock Passwords With Tinyml-based Digit Recognition
Story
? Introduction
The active development of smart gadgets with touch interfaces is trending nowadays. Lately, I've just got carried away by searching for different ways to solve digit recognition tasks using the machine learning approach (this is my third project on this topic).
This time I made a solution for a simple digital lock with a 4-digit pin code added. The device initially allows you to set a custom 4-digit PIN which could be later reused to unlock the device.
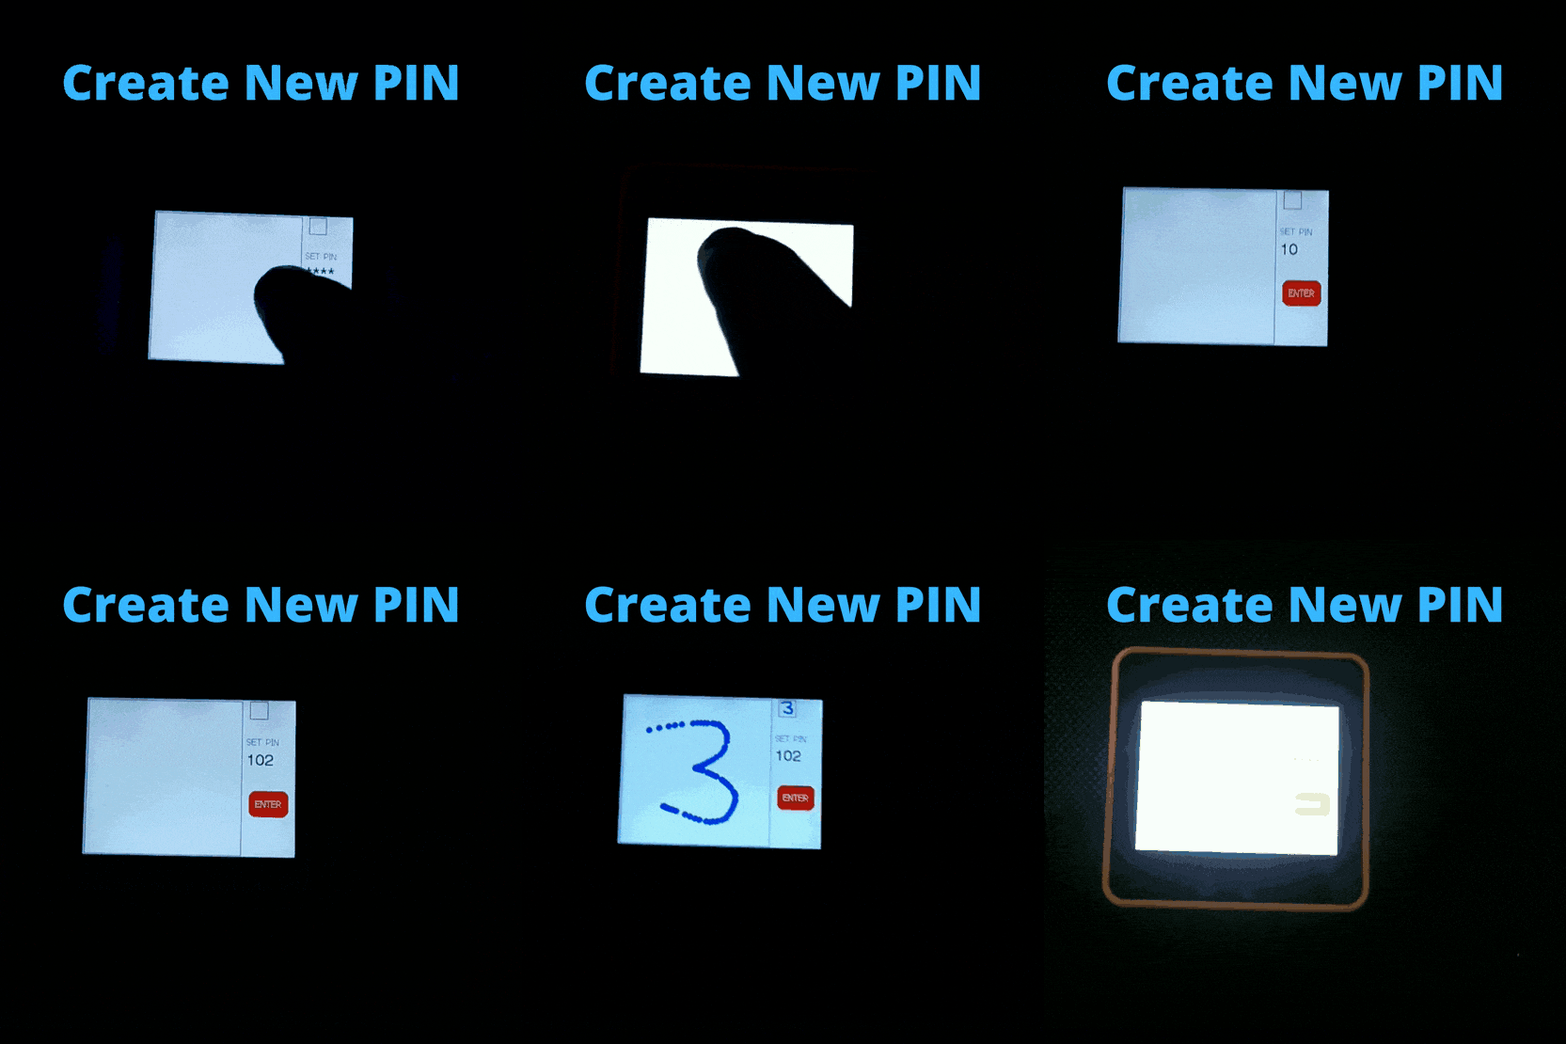
This simple example can be extended in several ways and used in more complex gesture recognition cases, such as map navigation and routes creation, TV interface control when playing games or switching channels, control of children's toys by hand movements, etc.
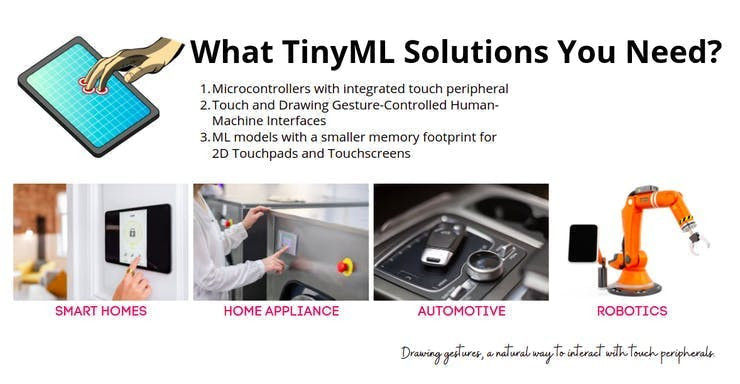
In practice, replacing mechanical pushbuttons with a gesture-controlled interface is an excellent way to:
- add value and advanced features to your device
- improve your product’s performance and reliability
- increase customer appeal
As such, in this project, I decided to focus on handwritten digit recognition in embedded systems through deep learning. I’ll explain how to create an embedded machine learning application that can classify handwritten digits and present an example solution based on Neuton TinyML and M5Stack MCUs.
Brief Task Overview
Handwritten digit recognition with models trained on the MNIST dataset is a popular “Hello World” project for deep learning as it is simple to build a network that achieves over 90% accuracy for it. There are lots of existing open-source implementations of MNIST models on the Internet, making it a well-documented starting point for machine learning beginners.
Deep Learning models usually require a considerable amount of resources for inference, but we are interested in running neural networks on low-power embedded systems with limited available resources.
In my case, the MNIST digit recognition will be performed by a Neuton TinyML model and a GUI interface to increase usability. The model allocation, input, and output processing and inference will be handled by the Neuton C SDK and custom code written specifically for the example.
A Look at the MNIST Dataset
The dataset used in this article consists of 60, 000 training and 10, 000 testing examples of centered grayscale images of handwritten digits. Each sample has a resolution of 28x28 pixels:
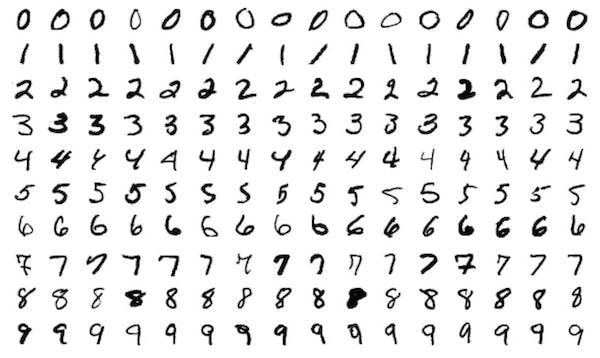
The samples were collected from high-school students and Census Bureau employees in the US, so the dataset contains mostly examples of numbers as they are written in North America. For European-style numbers, a different dataset has to be used. Convolutional neural networks typically give the best result when used with this dataset, and even simple networks can achieve high accuracy.
The data is available on Kaggle:https://www.kaggle.com/competitions/digit-recognizer/data
Dataset Description
The data files train.csv and test.csv contain grey-scale images of hand-drawn digits, from 0 to 9.
Each image is 28 pixels in height and 28 pixels in width, 784 pixels in total. Each pixel has a single pixel value associated with it, indicating the lightness or darkness of that pixel, with higher numbers meaning darker. This pixel value is an integer between 0 and 255, inclusive.
Each pixel column in the training set has a name like pixelx, where x is an integer between 0 and 783, inclusive. To locate this pixel on the image, suppose that we have decomposed x as x = I * 28 + j, where I and j are integers between 0 and 27, inclusive. Then pixelx is located on row I and column j of a 28 x 28 matrix, (indexing by zero)
Application Functionality
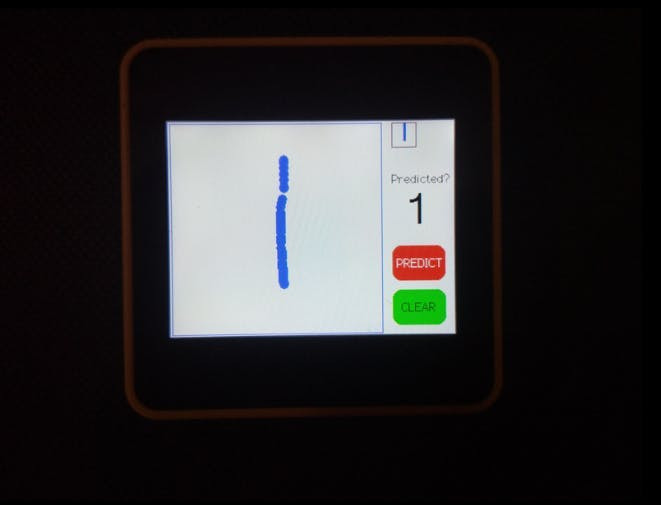
The application is controlled through a GUI displayed on a touch-sensitive TFT LCD. The GUI, as shown, includes a touch-based input area for writing digits, an output area for displaying the results of inference, and two buttons, one for running the inference and the other for clearing the input and output areas. It also outputs the result and the confidence of the prediction to standard output, which can be read by using programs like PuTTY and listening on the associated COM port while the board is connected to the PC.
Procedure
Training MNIST model on Neuton Platform
To skip grayscale conversions in the original Kaggle dataset, pixels of the main color, regardless of what it is, are considered white[1] and everything else black[0]. I modified the original MNIST dataset to get rid of grayscale values using this python script.
import csv
import numpy as np

f = open('train.csv', 'r')

out_file = open("out.csv", "w")

with f:
    file_read = csv.reader(f)
    writer = csv.writer(out_file)
    data = list(file_read)
    for row in data:
        # print(row)
        row_buff = []
        for col in row:
            if int(col) > 0:
                row_buff.append("1")
                # print("1", end=",")
            else:
                row_buff.append(col)
                # print(col, end=",")
        writer.writerow(row_buff)

f.close()
out_file.close()
The above would result in a dataset containing minimum value = 0 and maximum value = 1.
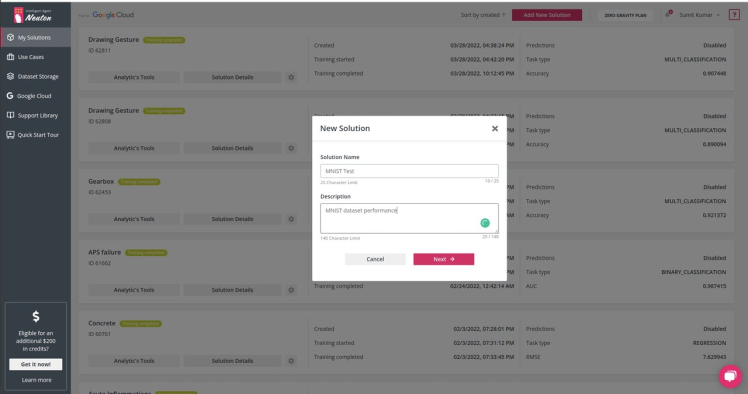
Step 1: Create a new solution on the Neuton AI platform
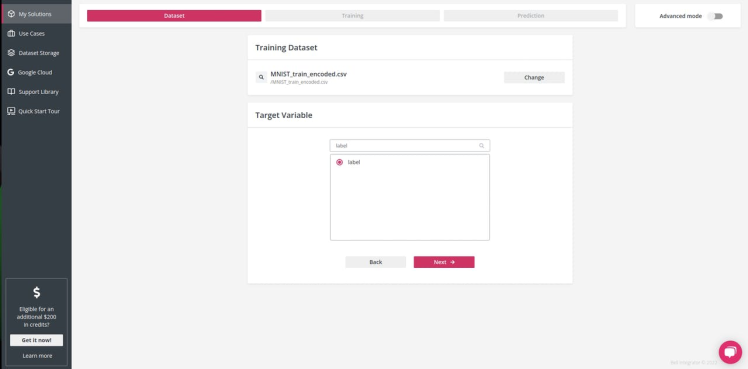
Step 2: Upload the dataset and select the target variable, in our case 'label'

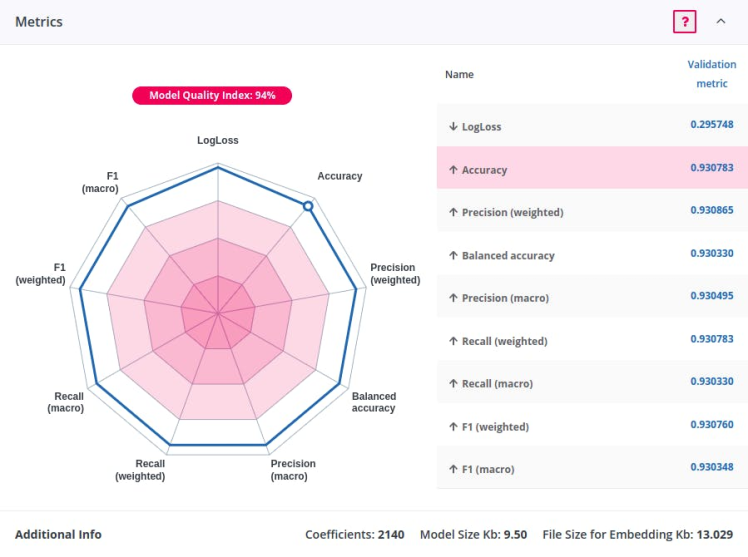
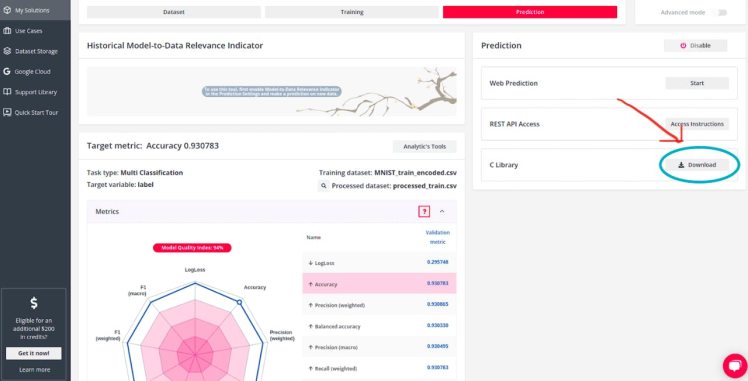
Step 3: Start the training (Since MNIST is a vast dataset, training could be time-consuming but you can stop it once you are convinced that the accuracy is appropriate). I stopped the training at ~94% accuracy.
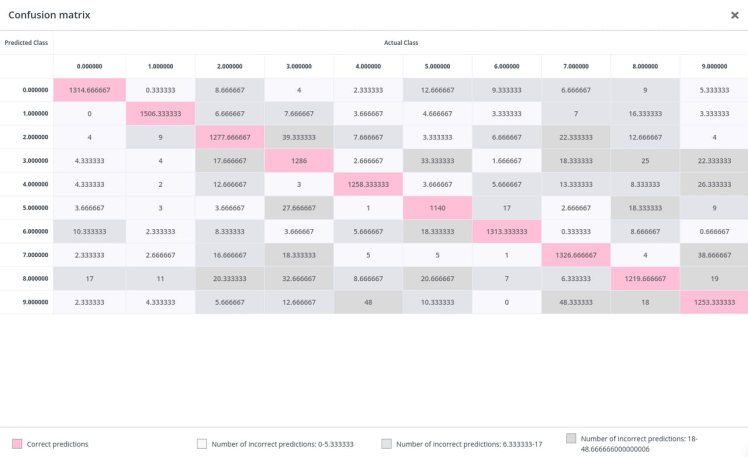
Here's the confusion matrix which would give a better idea about our model accuracy per label.
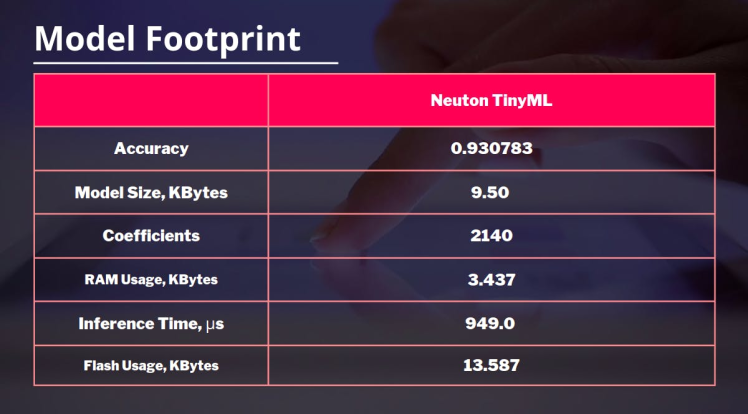
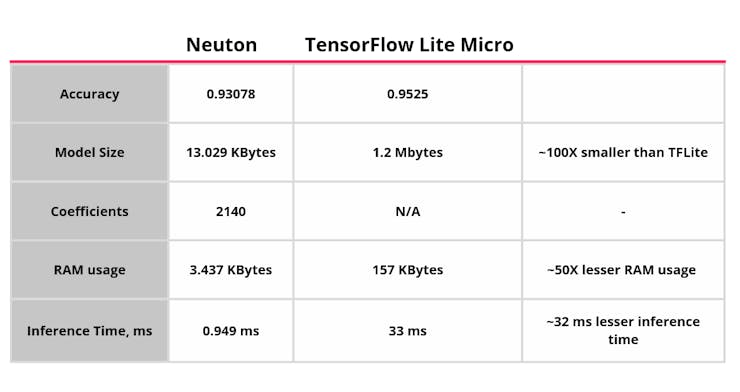
Download the model which we will embed on our device. The best part about Neuton TinyML is that it builds extremely light models, even on large datasets like MNIST. Coefficients: 2140 Model Size Kb: 9.50 File Size for Embedding Kb: 13.029
Implementation details
When a user drags a finger over the input area, the M5Core2 library continually draws a single-pixel under the finger. The Clear button simply sets the color of pixels inside both the input and result areas to the background color. The Predict button saves references to the input area, the underlying bitmap, and the width and height of the area, and then passes them to a native Neuton Inference Handler code, which processes the input image.
To make the application use more comfortable, the created input area has a size of 240x240px. However, the actual input image for the machine learning model must be 28x28 pixels large. Therefore, we scale down the input area image by a factor of 28/240, no heavy distortion of the input image was found using this technique for MNIST digits.
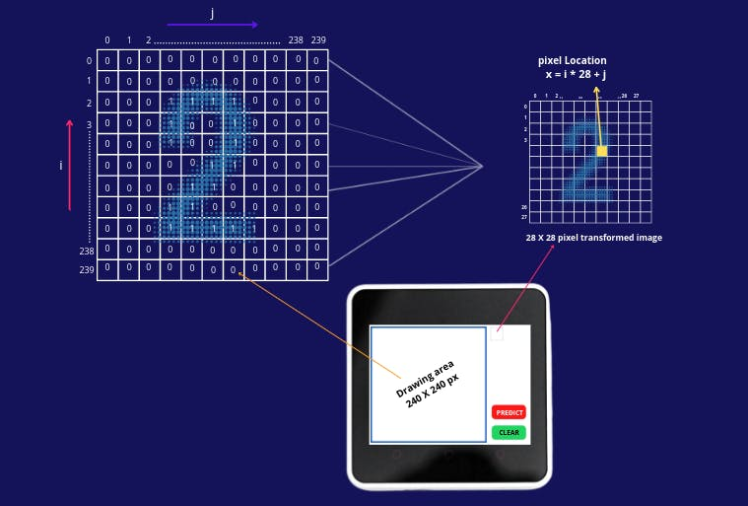
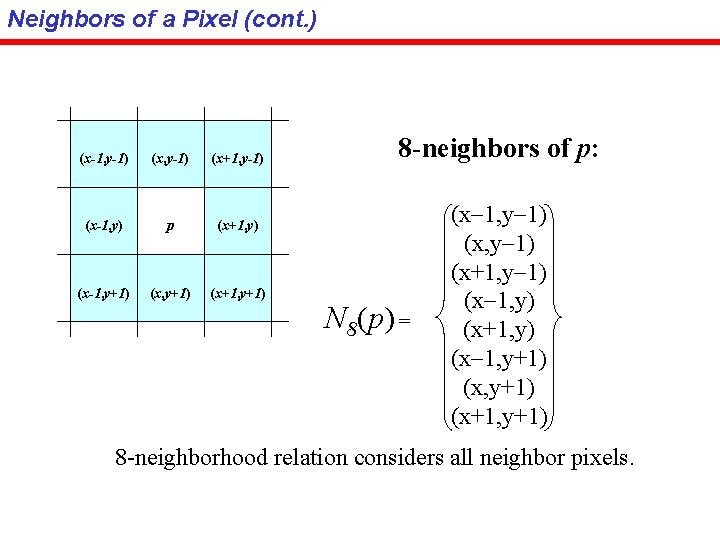
First, a 2D array with the width and height of the image area [28 X 28] is created. We then use the 8-neighbors pixel grouping technique to resize our 240 X 240 px drawing area to 28 X 28 pixels.
We first locate the TouchPoint coordinates for our LCD and translate them to get new x and y coordinates for our target image.
TouchPoint_t coordinate;
coordinate = M5.Touch.getPressPoint();

int x = coordinate.y * ((float)28 / 240);
int y = coordinate.x * ((float)28 / 240);
For the new coordinates X and Y, we set value 1 to all 8 neighboring pixels, this way we ensure the proper thickness and size to be fed into the Neural Net model.
in_data[x + 1][y + 1] = 1.0;
in_data[x - 1][y - 1] = 1.0;
in_data[x + 1][y] = 1.0;
in_data[x - 1][y] = 1.0;
in_data[x][y + 1] = 1.0;
in_data[x][y - 1] = 1.0;
in_data[x + 1][y - 1] = 1.0;
in_data[x - 1][y + 1] = 1.0;
in_data[x][y] = 1.0;
Source: https://slidetodoc.com/digital-image-processing-chapter-2-digital-image-fundamental/
Source: https://slidetodoc.com/digital-image-processing-chapter-2-digital-image-fundamental/
We must eliminate the irrelevant pixels outside the input area when detecting touched pixels. The amount is always the same since the pixels are stored continuously by row from left to right. Once the input is extracted, it resembles the format of the MNIST images a bit more. See the below image for our resized input image of 28 X 28 pixels after processing the pixels obtained on the 240 X 240 drawing area.
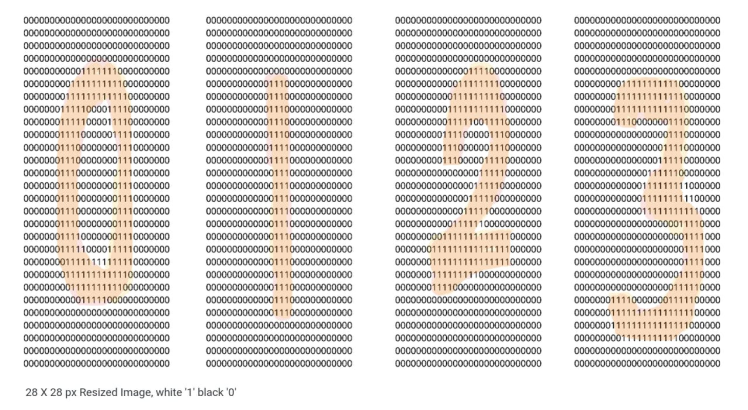
Once you get the input image of 28 X 28 pixels, we flatten the 2D input image array to a 1D array using the pixel array decomposition method used in the Kaggle dataset x = i * 28 + j
for (int i = 0; i < INPUT_IMAGE_WIDTH; ++i)
      {
        for (int j = 0; j < INPUT_IMAGE_HEIGHT;  ++j)
        {
          if (in_data[i][j] > 0.0)
          {
            M5.Lcd.drawPixel(j + 250, i, 255);
            //Serial.print(int(in_data[i][j]));
          }
          Serial.print(int(in_data[i][j]));
          targetBuff[i * 28 + j] = in_data[i][j];
        }
        printf("n");
      }
When the decomposed array is ready, we will run the Neuton model inference.
if (neuton_model_set_inputs(targetBuff) == 0 && counter > 50)
      {
        uint16_t predictedClass;
        float* probabilities;

        if (neuton_model_run_inference(&predictedClass, &probabilities) == 0)
        {
          RedTail();
          // code for handling prediction result
          if (predictedClass == 1)
          {
            M5.Lcd.drawChar('1', 265, 80, 6);
            Serial.println("Output 1");
          }
          if (predictedClass == 2)
          {
            M5.Lcd.drawChar('2', 265, 80, 6);
            Serial.println("Output 2");
          }
          if (predictedClass == 3)
          {
            M5.Lcd.drawChar('3', 265, 80, 6);
            Serial.println("Output 3");
          }
          if (predictedClass == 4)
          {
            M5.Lcd.drawChar('4', 265, 80, 6);
            Serial.println("Output 4");
          }
          if (predictedClass == 5)
          {
            M5.Lcd.drawChar('5', 265, 80, 6);
            Serial.println("Output 5");
          }
          if (predictedClass == 6)
          {
            M5.Lcd.drawChar('6', 265, 80, 6);
            Serial.println("Output 6");
          }
          if (predictedClass == 7)
          {
            M5.Lcd.drawChar('7', 265, 80, 6);
            Serial.println("Output 7");
          }
          if (predictedClass == 8)
          {
            M5.Lcd.drawChar('8', 265, 80, 6);
            Serial.println("Output 8");
          }
          if (predictedClass == 9)
          {
            M5.Lcd.drawChar('9', 265, 80, 6);
            Serial.println("Output 9");
          }
          if (predictedClass == 0)
          {
            M5.Lcd.drawChar('0', 265, 80, 6);
            Serial.println("Output 0");
          }
        }
      }
The inference result is written out both into standard output and the output area in the GUI.
Extending the application example
In this extended version, inference gets triggered every time the digit is drawn and the ENTER button is pressed. Once the PIN is set, the user can then unlock the device using the created PIN. Check the video below:
Metrics
This experiment demonstrates much better results compared to TensorFlow Lite MCU models where the entire network needs 157 KBytes of RAM and 1.2 MBytes of Flash. In our case, the model only required ~3 KBytes of RAM and ~10 KBytes of Flash.
Can such tinyML models be used for smart wearables?
A similar technique is also used on highly popular Apple smartwatches for user text and number input tasks. Since smartwatch displays are very small, an ordinary touch keyboard layout would not be comfortable for any user, so they use drawing gestures on the watch. Check the video below,
In short, tiny models would help companies add cool features to tiny wearables with just three steps - upload, train and deploy!
Conclusion
Is that complicated to deploy an innovative user interface on a device? I hope this project proved that recognizing handwritten digits using TinyML algorithms is not a problem at all. I showcased how to develop an application for the M5Stack Core2 and apply machine learning capabilities for more complex scenarios, like a digital lock.
The potential of machine learning for embedded platforms is huge so I really enjoy experimenting and searching for new solutions in this field. Don’t hesitate to repeat the project and share your feedback. :)

Unlock Passwords With Tinyml-based Digit Recognition

Raspberry Pi 5 7 Inch Touch Screen IPS 1024x600 HD LCD HDMI-compatible Display for RPI 4B 3B+ OPI 5 AIDA64 PC Secondary Screen(Without Speaker)
BUY NOW
ESP32-S3 4.3inch Capacitive Touch Display Development Board, 800×480, 5-point Touch, 32-bit LX7 Dual-core Processor
BUY NOW
Raspberry Pi 5 7 Inch Touch Screen IPS 1024x600 HD LCD HDMI-compatible Display for RPI 4B 3B+ OPI 5 AIDA64 PC Secondary Screen(Without Speaker)
BUY NOW- Comments(0)
- Likes(0)
 Log in to post comments.
- 0 USER VOTES
- YOUR VOTE 0.00 0.00
- 1
- 2
- 3
- 4
- 5
- 6
- 7
- 8
- 9
- 10
- 1
- 2
- 3
- 4
- 5
- 6
- 7
- 8
- 9
- 10
- 1
- 2
- 3
- 4
- 5
- 6
- 7
- 8
- 9
- 10
- 1
- 2
- 3
- 4
- 5
- 6
- 7
- 8
- 9
- 10
 More by vilaksh01
-
 CliSensio - Climate Sensing and Insect Infestation Control
Overview:Climate Change, is a highly debated high school topic, but do we really care about it? We s...
-
 AI For truck APS Failure Detection on a $4 MCU
IntroductionThe automotive industry is among the pioneers to adopt cutting-edge technologies, machin...
-
 New Era Farming with TensorFlow on Lowest Power Consumption
Overview:This project demonstrates how to build a device using TensorFlow and Artemis module to solv...
-
 TinyML Gearbox Fault Prediction on a $4 MCU
StoryIs it possible to make an AI-driven system that predicts gearbox failure on a simple $4 MCU? Ho...
-
 AREC - Agricultural Records On Electronic Contracts
Objective:One of the biggest reasons behind the growth of fake products in the agrochemical industry...
-
 AquaMon - Aquaponics and Fish Tank Monitoring with Tuya IoT
IntroductionDo you love sea creatures? I don't think I would find a single person who would not fall...
-
 Predictive Maintenance Of Compressor Water Pumps
An ordinary resident of a metropolis rarely thinks about how water enters taps or central heating pi...
-
 Unlock Passwords With Tinyml-based Digit Recognition
Story? IntroductionThe active development of smart gadgets with touch interfaces is trending nowaday...
-
 Handmade Drawing Recognition Interface As From My Smartphone
StoryIntroductionI was inspired by such features on our smartphones. My smartphone “Vivo V7” has a f...
-
 Recognizing MNIST-based Handwritten Digits on M5Stack Core2
IntroductionIn my previous experiment, I had great fun adding handmade drawing gestures for our M5St...
-
 Tuya Link SDK IoT Smart Environment Sensing And Humidifier
IntroductionI had been exploring the Tuya IoT platform for the past few months and they never fail t...
-
 Tuya IoT Cloud Smart Weather Lamp
IntroductionHello everybody, ever felt like having a smart home device to visually show/signal you t...
-
 Getting Started With Arduino IoT Control With Tuya
Introduction:I have always enjoyed using Arduino UNO since it was my first programmable board but it...
-
 Coronavirus - India cases tracker
Today everyone is gazing at their phone to keep track of the coronavirus in their country but we ten...
-
 CliSensio - Climate Sensing and Insect Infestation Control
Overview:Climate Change, is a highly debated high school topic, but do we really care about it? We s...
-
 AI For truck APS Failure Detection on a $4 MCU
IntroductionThe automotive industry is among the pioneers to adopt cutting-edge technologies, machin...
-
 New Era Farming with TensorFlow on Lowest Power Consumption
Overview:This project demonstrates how to build a device using TensorFlow and Artemis module to solv...
-
 TinyML Gearbox Fault Prediction on a $4 MCU
StoryIs it possible to make an AI-driven system that predicts gearbox failure on a simple $4 MCU? Ho...
-
 AREC - Agricultural Records On Electronic Contracts
Objective:One of the biggest reasons behind the growth of fake products in the agrochemical industry...
-
 AquaMon - Aquaponics and Fish Tank Monitoring with Tuya IoT
IntroductionDo you love sea creatures? I don't think I would find a single person who would not fall...
-
 Predictive Maintenance Of Compressor Water Pumps
An ordinary resident of a metropolis rarely thinks about how water enters taps or central heating pi...
-
 Unlock Passwords With Tinyml-based Digit Recognition
Story? IntroductionThe active development of smart gadgets with touch interfaces is trending nowaday...
-
 Handmade Drawing Recognition Interface As From My Smartphone
StoryIntroductionI was inspired by such features on our smartphones. My smartphone “Vivo V7” has a f...
-
 Recognizing MNIST-based Handwritten Digits on M5Stack Core2
IntroductionIn my previous experiment, I had great fun adding handmade drawing gestures for our M5St...
-
 Tuya Link SDK IoT Smart Environment Sensing And Humidifier
IntroductionI had been exploring the Tuya IoT platform for the past few months and they never fail t...
-
 Tuya IoT Cloud Smart Weather Lamp
IntroductionHello everybody, ever felt like having a smart home device to visually show/signal you t...
-
-
Commodore 64 1541-II 1581 Floppy Disk Drive C64 Power Supply Unit USB-C 5V 12V DIN connector 5.25
173 1 3 -
Easy to print simple stacking organizer with drawers
88 0 0 -
-
-
-
Modifying a Hotplate to a Reflow Solder Station
1145 1 6 -
MPL3115A2 Barometric Pressure, Altitude, and Temperature Sensor
642 0 1 -
-
Nintendo 64DD Replacement Shell
497 0 2 -
V2 Commodore AMIGA USB-C Power Sink Delivery High Efficiency Supply Triple Output 5V ±12V OLED display ATARI compatible shark 100W
1457 4 3


