|
|
ESP32-S3FN8Espressif Systems
|
x 1 | |
|
|
BMP180 |
x 1 | |

|
Bread Board 3.3/5V Power Supply Module |
x 1 |

|
Arduino Web Editor |
ESP32 Weather Station
In this project, we will learn how to create a weather station, which will display reading from a BME280 module and live weather data from OpenWeatherMap API in a webserver. The device will get temperature, humidity, barometric pressure, and altitude from the BME280 sensor and external temperature, humidity, weather condition, and sunrise and sunset from OpenWeatherMap API. We can see those reading in a web browser.

BME280 Temperature, Humidity & Pressure Sensor
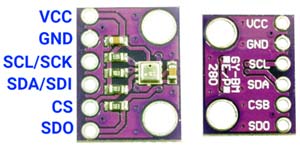
The BME280 is an integrated environmental sensor developed specifically for mobile applications and wearables where size and low power consumption are key design parameters. The unit combines high linearity and high accuracy sensors and is perfectly feasible for low current consumption and long-term stability. The BME280 sensor offers an extremely fast response time and therefore supports performance requirements for emerging applications such as context awareness, and high accuracy over a wide temperature range.

This sensor can measure relative humidity from 0 to 100% with ±3% accuracy, barometric pressure from 300Pa to 1100 hPa with ±1 hPa absolute accuracy, and temperature from -40°C to 85°C with ±1.0°C accuracy.
The BME280 supports I2C and SPI interfaces. The module we are using supports a voltage range of 1.7 – 3.3V. The BME280 has an average current consumption of 3.6μA when measuring all the parameters at a refresh rate of 1Hz. The sensor can be operated in three power modes: Sleep, normal, and forced mode.
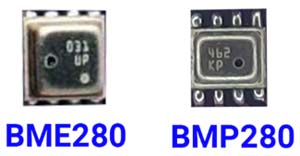
One thing to keep in mind while buying a BME280 module is that a similar-looking module also comes with a BMP280 sensor which lacks the humidity measurement capability, which makes it way cheaper than the BME280. The best way to identify between BME280 and BMP280 sensors is to look at the product code. BME280 sensor will have a product code starting with ‘U’, e.g., UP, UN, etc. While the BMP280 will have a product code starting with “K”, e.g., KN, KP, etc. Another visual difference is that BME280 is somewhat square while BMP280 is rectangular.

OpenWeatherMap API
OpenWeatherMap is an online service, that provides global weather data via API, including current weather data, forecasts, nowcasts, and historical weather data for any geographical location. Through their API we can access current weather data for any location on Earth including over 200,000 cities! They collect and process weather data from different sources such as global and local weather models, satellites, radars, and a vast network of weather stations. Data is available in JSON, XML, or HTML format. We will be using HTTP GET to request the JSON data for this project.
Weather Station Circuit Diagram

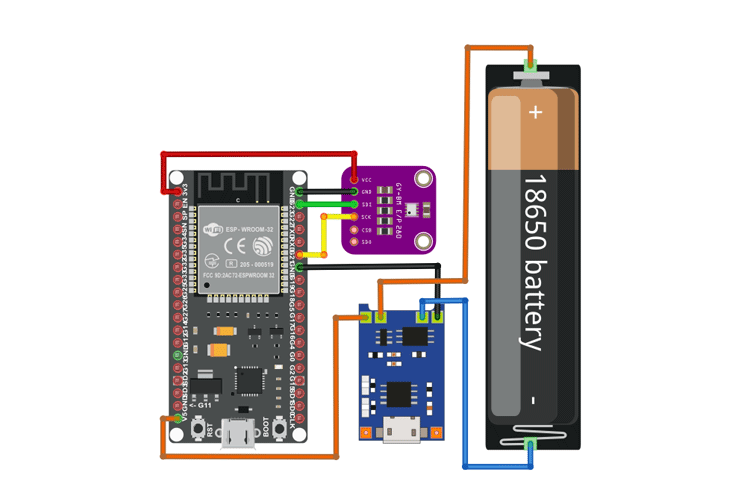
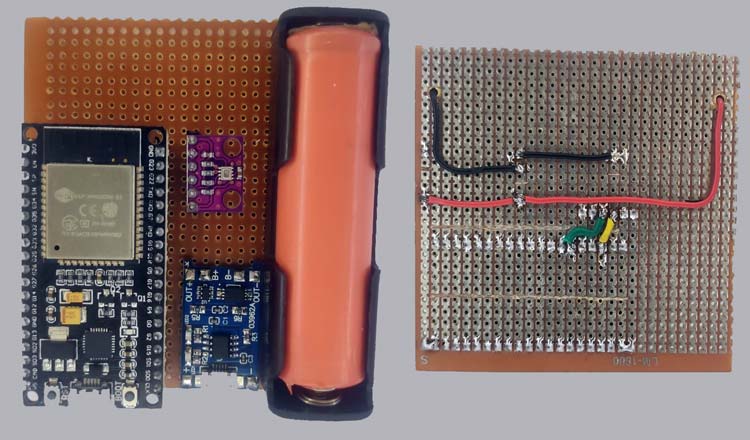
Connections are fairly simple. Follow the connection diagram above. We have added a 18650 battery and TP4056 charging module with protection for the backup. Start by connecting the negative of the battery to the B- pin of the TP4056 module and the positive to the B+ pin of the module. Now connect the OUT+ of the module to the VIN pin of ESP32 Devkit and B- to the GND pin. The TP4056 module also contains the DW01 protection chip which will protect the battery from over-discharge and short circuits.
Now let’s connect the BME280 module to the ESP32 Devkit. Connect the VCC pin of BME280 to the 3.3V pin and GND to the GND pin. The module supports both SPI and I2C. We will be using the I2C interface for communication. For that connect the SDA pin to D22 and the SCL pin to D21 of the ESP32 Devkit.


Uploading the Code and Files
Uploading the code is straightforward. Just like any other Arduino board connect the ESP32 Devkit to the PC. Select the correct Board and Port, click upload. That’s it. To upload the Web Server files, make sure that all the files are in the folder named data, which is in the same folder as the .ino file. Go to Tools -> ESP32 Sketch Data Upload.
#include <Arduino.h>

#include <WiFi.h>

#include <HTTPClient.h>

#include <AsyncTCP.h>

#include <ESPAsyncWebServer.h>

#include <ESPmDNS.h>

#include <Arduino_JSON.h>

#include "SPIFFS.h"

#include <Adafruit_Sensor.h>

#include <Adafruit_BME80.h>

// Create a sensor object

Adafruit_BME280 bme; // use I2C interface

// Replace with your network credentials

const char* ssid = "SKYNET 4G";

const char* password = "jobitjos";

// OPENWEATHER API CONFIGURATION

String openWeatherMapApiKey = "02f3dcd78793160081a1667f73ffcc4d";

String temperature_unit = "metric";

// Replace with your country code and city

String city = "Kannur";

String endpoint;

float OutTemperature ;

int OutHumidity;

String Icon_;

int Sun_rise;

int Sun_set;

String jsonBuffer;

// Create AsyncWebServer object on port 80

AsyncWebServer server(80);

// Create an Event Source on /events

AsyncEventSource events("/events");

// Json Variable to Hold Sensor Readings

JSONVar readings;

JSONVar owmreadings;

// Timer variables

unsigned long lastTime = 0;

unsigned long lastTimeTemperature = 0;

unsigned long lastTimeAcc = 0;

unsigned long SensorDelay = 10;

unsigned long OWMapDelay = 1000;

float in_temperature, in_presssure, in_altitude, in_humidity;

float out_temperature, out_humidity, out_weathe;

int in_temperatureD , out_temperatureD;

sensors_event_t a, g, temp;

// Initialize Sensor

void initSensor() {

  Serial.println(F("BME280 Sensor event test"));

  unsigned status;

  status = bme.begin(0x76);

  if (!status) {

    Serial.println(F("Could not find a valid BME280 sensor, check wiring or "

                     "try a different address!"));

    while (1) delay(10);

  }

}

void initSPIFFS() {

  if (!SPIFFS.begin()) {

    Serial.println("An error has occurred while mounting SPIFFS");

  }

  Serial.println("SPIFFS mounted successfully");

}

// Initialize WiFi

void initWiFi() {

  WiFi.mode(WIFI_STA);

  WiFi.begin(ssid, password);

  Serial.println("");

  Serial.print("Connecting to WiFi...");

  while (WiFi.status() != WL_CONNECTED) {

    Serial.print(".");

    delay(1000);

  }

  if (!MDNS.begin("esp32")) {

    Serial.println("Error starting mDNS");

    return;

  }

  MDNS.addService("http", "tcp", 80);

  Serial.println("");

  Serial.println(WiFi.localIP());

  Serial.print("Local Address");

  Serial.println("esp32.local");

}

String httpGETRequest(const char* serverName) {

  WiFiClient client;

  HTTPClient http;

  // Your Domain name with URL path or IP address with path

  http.begin(client, serverName);

  // Send HTTP POST request

  int httpResponseCode = http.GET();

  String payload = "{}";

  if (httpResponseCode > 0) {

    Serial.print("HTTP Response code: ");

    Serial.println(httpResponseCode);

    payload = http.getString();

  }

  else {

    Serial.print("Error code: ");

    Serial.println(httpResponseCode);

  }

  // Free resources

  http.end();

  return payload;

}

String getReadings() {

  int sensetemp;

  sensetemp = bme.readTemperature();

  readings["in_temperature"] = String(sensetemp);

  sensetemp = bme.readTemperature() * 10;

  readings["in_temperatureD"] = String(sensetemp % 10);

  sensetemp = bme.readHumidity();

  readings["in_humidity"] = String(sensetemp);

  readings["in_presssure"] = String(bme.readPressure());

  readings["in_altitude"] = String(bme.readAltitude(1013.25));

  String jsonString = JSON.stringify(readings);

  return jsonString;

}

String getOWMReadings() {

  if (WiFi.status() == WL_CONNECTED) {

    endpoint = "http://api.openweathermap.org/data/2.5/weather?q=" + city + "&units=" + temperature_unit  + "&appid=" + openWeatherMapApiKey;

    jsonBuffer = httpGETRequest(endpoint.c_str());

    JSONVar myObject = JSON.parse(jsonBuffer);

    // JSON.typeof(jsonVar) can be used to get the type of the var

    if (JSON.typeof(myObject) == "undefined") {

      Serial.println("Parsing input failed!");

    }

    Icon_ = myObject["weather"][0]["icon"];

    OutTemperature = double(myObject["main"]["temp"]);

    OutHumidity    = int(myObject["main"]["humidity"]);

    Sun_rise     = int(myObject["sys"]["sunrise"]);

    Sun_set      = int(myObject["sys"]["sunset"]);

  }

  else {

    Serial.println("WiFi Disconnected");

  }

  int sensetemp;

  sensetemp = OutTemperature;

  owmreadings["out_temperature"] = String(sensetemp);

  sensetemp = OutTemperature * 10;

  owmreadings["out_temperatureD"] = String(sensetemp % 10);

  owmreadings["out_humidity"] = String(OutHumidity);

  owmreadings["weather_icon"] = String("icons/" + Icon_ + ".png");

  owmreadings["Sunset"] = String(Sun_set);

  owmreadings["Sunrise"] = String(Sun_rise);

  owmreadings["City"] = String(city);

  owmreadings["Key"] = String(openWeatherMapApiKey);

  String jsonString = JSON.stringify(owmreadings);

  Serial.println(jsonString);

  return jsonString;

}

void setup() {

  Serial.begin(115200);

  initWiFi();

  initSPIFFS();

  initSensor();


  // Handle Web Server

  server.on("/", HTTP_GET, [](AsyncWebServerRequest * request) {

    request->send(SPIFFS, "/index.html", "text/html");

  });

  server.serveStatic("/", SPIFFS, "/");

  server.on("/reset", HTTP_GET, [](AsyncWebServerRequest * request) {

    in_temperature = 0;

    in_temperatureD = 0;

    in_humidity = 0;

    in_presssure = 0;

    in_altitude = 0;

    out_temperature = 0;

    out_temperatureD = 0;

    out_humidity = 0;

    request->send(200, "text/plain", "OK");

  });

  // Handle Web Server Events

  events.onConnect([](AsyncEventSourceClient * client) {

    if (client->lastId()) {

      Serial.printf("Client reconnected! Last message ID that it got is: %u\n", client->lastId());

    }

    // send event with message "CircuitDigest", id current millis

    // and set reconnect delay to 1 second

    client->send("CircuitDigest!", NULL, millis(), 10000);

  });

  server.addHandler(&events);

  server.begin();

}

void loop() {

  if ((millis() - lastTime) > SensorDelay) {

    // Send Events to the Web Server with the Sensor Readings

    events.send(getReadings().c_str(), "BME_readings", millis());

    lastTime = millis();

  }

  if ((millis() - lastTimeAcc) > OWMapDelay) {

    // Send Events to the Web Server with the Sensor Readings

    events.send(getOWMReadings().c_str(), "OWM_readings", millis());

    lastTimeAcc = millis();

  }

}

ESP32 Weather Station
- Comments(0)
- Likes(1)
-
 DT-Electronics
Sep 13,2022
- 0 USER VOTES
- YOUR VOTE 0.00 0.00
- 1
- 2
- 3
- 4
- 5
- 6
- 7
- 8
- 9
- 10
- 1
- 2
- 3
- 4
- 5
- 6
- 7
- 8
- 9
- 10
- 1
- 2
- 3
- 4
- 5
- 6
- 7
- 8
- 9
- 10
- 1
- 2
- 3
- 4
- 5
- 6
- 7
- 8
- 9
- 10
 More by electronicguru0007
-
 How to make an alarm clock with pic microcontroller
he five push buttons will act as an input for setting the alarm for the required time. So one end of...
-
 How to make RMS to DC Converter using IC AD736
A True-RMS or TRMS is a type of converter which converts RMS value to equivalent DC value. Here in t...
-
 STM32 SPI Communcation and Data Sent
SPI in STM32F103C8Comparing SPI bus in Arduino & STM32F103C8 Blue Pill board, STM32 has 2 SPI bu...
-
 How to Communicate Arduinos via RS-485
What project will you develop?The project consists of 3 Arduino's. We have an Arduino UNO, a Nano, a...
-
 PIC16F877A Temperature and Humidity Measurement Board
Temperature and Humidity measurement is often useful in many applications like Home Automation, Envi...
-
 Diy Buck Converter
n the field of DC-DC Converters, A single-ended primary-inductor converter or SEPIC converter is a t...
-
 Iot AC Current Measuring System
Smart power monitoring is getting increasingly popular to improve energy efficiency in medium/small ...
-
 ESP32 Weather Station
In this project, we will learn how to create a weather station, which will display reading from a BM...
-
 NRF Data Transfer Via 2 Boards
There are various wireless communication technologies used in building IoT applications and RF (Radi...
-
 Iot patient monitoring system
When we are talking about major vital signs of a human body, there are four major parameters that we...
-
 Setting up zigbee communication with nodemcu and arduino
Zigbee is a popular wireless communication protocol used to transfer a small amount of data with ver...
-
 Ac Dimmer Remote PCB
The brightness can be controlled using the IR remote of TV, DVD, etc. Dimming Control system using M...
-
 Esp32 Home Automation
There are relay modules whose electromagnet can be powered by 5V and with 3.3V. Both can be used wit...
-
 Lora Communication With Network
This was a very simple project and can come in handy for various applications. But what it can't do ...
-
 GPS Module Based Tracking Device Pcb
ESP32 GPS vehicle tracker using NEO 6M GPS module and Arduino IDE. With the help of this GPS tracker...
-
 Traffic Management for Emergency Vehicles using AT89S52 Microcontroller
These days’ traffic congestion is the biggest problem of densely populated cities. The project focus...
-
 Diy Multimeter Pcb
This is a project based on Arduino board which can measureresistance, diode, continuity[H1] , voltag...
-
 Live Instagram Followers Pcb
ESP8266 is capable of functioning reliably in industrial environments, with an operating temperature...
-
-
mammoth-3D SLM Voron Toolhead – Manual Drill & Tap Edition
88 0 0 -
-
AEL-2011 Power Supply Module
602 0 2 -
AEL-2011 50W Power Amplifier
542 0 2 -
-
-
Custom Mechanical Keyboard
746 0 0 -
Tester for Touch Screen Digitizer without using microcontroller
371 2 2 -
Audio reactive glow LED wristband/bracelet with NFC / RFID-Tags
346 0 1 -
-


