|
Arduino Web Editor |
How to make RMS to DC Converter using IC AD736

A True-RMS or TRMS is a type of converter which converts RMS value to equivalent DC value. Here in this tutorial, we will learn about true RMS to DC converter, how it works and how measurement methods can affect displayed results.
The IC AD736 has few functional subsections like the input amplifier, full-wave rectifier (FWR), RMS core, output amplifier, and bias section. The Input amplifier is constructed with MOSFETs, so it is responsible for the high impedance of this IC.
After the input amplifier, there is a precision full-wave rectifier which is responsible for driving the RMS core. The essential RMS operations of squaring, averaging, and square rooting are performed in the core with the help of an external averaging capacitor CAV. Please note that without CAV, the rectified input signal travels through the core unprocessed.
Finally, an output amplifier buffers the output from the RMS core and allows optional low-pass filtering to be performed via the external capacitor CF, which is connected across the feedback path of the amplifier.

True RMS to DC Measurements Methods
There are mainly three methods available which DVM’s use to measure AC, they are-
True-RMS Measurement
Average Rectified Measurement
True-RMS AC+DC Measurement
True-RMS Measurement
True-RMS is a pretty common and popular method to measure dynamic signals of all shapes and sizes. In a True-RMS multimeter, the multimeter calculates the RMS value of the input signal and shows the result. This is why it's a very accurate compare to an average rectified measurement method.
Average Rectified Measurement
In an average rectified DVM, it takes the average or the mean value of the input signal and multiplies it by 1.11 and displays the RMS value. So, we can say that it's an average rectified RMS display multimeter.
True-RMS AC+DC Measurement
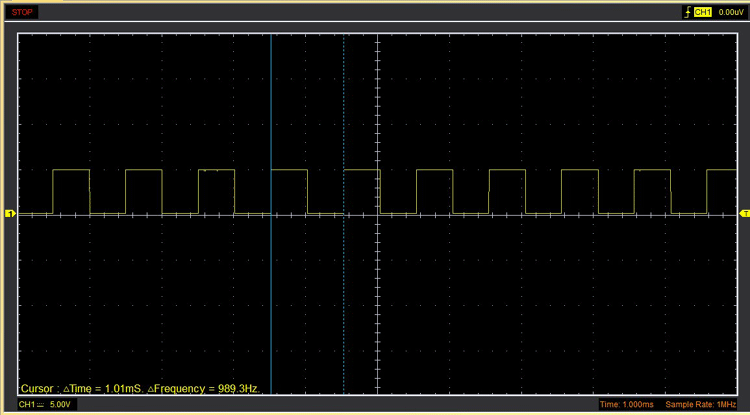
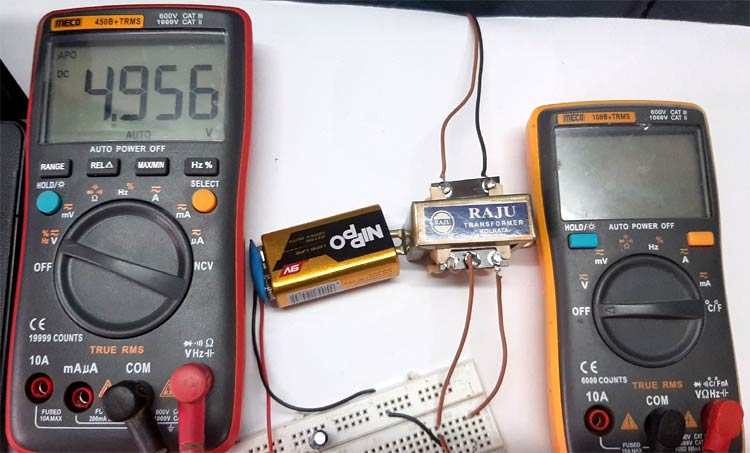
To overcome the loopholes in a True-RMS multimeter, there exists the True-RMS AC+DC measurement method. If you were to measure a PWM signal with a True-RMS multimeter,
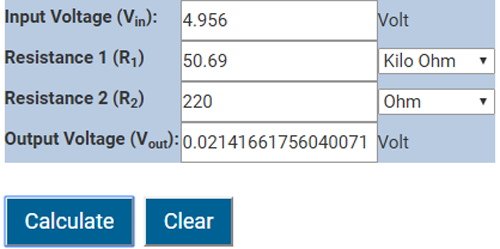
Value of Resistor R1: 50.75K
Value of Resistor R1: 220R

Input Voltage on the Arduino board

Now put these values in an online voltage divider calculator and calculate, we will get the output voltage of 0.02141V OR 21.41mV.

This is the peak voltage of the input PWM signal and to find the RMS voltage, we need to simply divide it by √2 so the calculation becomes
VRMS = Vm/√2 = 0.02141/√2 = 0.01514V or 15.14mV
int OUT_PIN = 2;  // square wave out with 50% duty cycle
void setup()
{
    pinMode(OUT_PIN, OUTPUT);// defining the pin as output
}
void loop()
{
  /*
   * if we convert 500 Microseconds to seconds we will get 0.0005S
   * now if we put it in the formula  F= 1/T
   * we will get F = 1/0.0005 = 2000
   * the pin is on for 500 uS and off for 500 us so the
   * frequency becomes F = 2000/2 = 1000Hz or 1Khz*
   */
  digitalWrite(OUT_PIN, HIGH);
  delayMicroseconds(500);
  digitalWrite(OUT_PIN, LOW);
  delayMicroseconds(500);
}

How to make RMS to DC Converter using IC AD736
- Comments(0)
- Likes(0)
- 0 USER VOTES
- YOUR VOTE 0.00 0.00
- 1
- 2
- 3
- 4
- 5
- 6
- 7
- 8
- 9
- 10
- 1
- 2
- 3
- 4
- 5
- 6
- 7
- 8
- 9
- 10
- 1
- 2
- 3
- 4
- 5
- 6
- 7
- 8
- 9
- 10
- 1
- 2
- 3
- 4
- 5
- 6
- 7
- 8
- 9
- 10
 More by electronicguru0007
-
 How to make an alarm clock with pic microcontroller
he five push buttons will act as an input for setting the alarm for the required time. So one end of...
-
 How to make RMS to DC Converter using IC AD736
A True-RMS or TRMS is a type of converter which converts RMS value to equivalent DC value. Here in t...
-
 STM32 SPI Communcation and Data Sent
SPI in STM32F103C8Comparing SPI bus in Arduino & STM32F103C8 Blue Pill board, STM32 has 2 SPI bu...
-
 How to Communicate Arduinos via RS-485
What project will you develop?The project consists of 3 Arduino's. We have an Arduino UNO, a Nano, a...
-
 PIC16F877A Temperature and Humidity Measurement Board
Temperature and Humidity measurement is often useful in many applications like Home Automation, Envi...
-
 Diy Buck Converter
n the field of DC-DC Converters, A single-ended primary-inductor converter or SEPIC converter is a t...
-
 Iot AC Current Measuring System
Smart power monitoring is getting increasingly popular to improve energy efficiency in medium/small ...
-
 ESP32 Weather Station
In this project, we will learn how to create a weather station, which will display reading from a BM...
-
 NRF Data Transfer Via 2 Boards
There are various wireless communication technologies used in building IoT applications and RF (Radi...
-
 Iot patient monitoring system
When we are talking about major vital signs of a human body, there are four major parameters that we...
-
 Setting up zigbee communication with nodemcu and arduino
Zigbee is a popular wireless communication protocol used to transfer a small amount of data with ver...
-
 Ac Dimmer Remote PCB
The brightness can be controlled using the IR remote of TV, DVD, etc. Dimming Control system using M...
-
 Esp32 Home Automation
There are relay modules whose electromagnet can be powered by 5V and with 3.3V. Both can be used wit...
-
 Lora Communication With Network
This was a very simple project and can come in handy for various applications. But what it can't do ...
-
 GPS Module Based Tracking Device Pcb
ESP32 GPS vehicle tracker using NEO 6M GPS module and Arduino IDE. With the help of this GPS tracker...
-
 Traffic Management for Emergency Vehicles using AT89S52 Microcontroller
These days’ traffic congestion is the biggest problem of densely populated cities. The project focus...
-
 Diy Multimeter Pcb
This is a project based on Arduino board which can measureresistance, diode, continuity[H1] , voltag...
-
 Live Instagram Followers Pcb
ESP8266 is capable of functioning reliably in industrial environments, with an operating temperature...
-
-
AEL-2011 Power Supply Module
515 0 2 -
AEL-2011 50W Power Amplifier
475 0 2 -
-
-
Custom Mechanical Keyboard
691 0 0 -
Tester for Touch Screen Digitizer without using microcontroller
323 2 2 -
Audio reactive glow LED wristband/bracelet with NFC / RFID-Tags
306 0 1 -
-
-


