|
|
ESP32-WROOM-32E(16MB)Espressif Systems
|
x 3 | |

|
DHT11 Temperature and Relative Humidity Sensor Module |
x 1 | |

|
Mini Breadboard |
x 1 | |

|
Bread Board 3.3/5V Power Supply Module |
x 1 |

|
arduino IDEArduino
|
Esp Now Data Sender
What is ESP-Now Protocol?
ESP-NOW is a wireless communication protocol developed by Espressif and capable of packet transmission. This protocol enables multiple devices to easily talk to each other and transfer information optimally between each other. This protocol is similar to the 2.4 GHz wireless connection, often used in wireless mice. Therefore, it is necessary to pair the devices before communicating. This means that the connection is stable after the devices are paired with each other. In other words, if one of your ESPs suddenly shuts down or resets, the connection is established automatically when you restart.

Advantages:
Data transfer up to 250 bytes
Benefit from encrypted communication
It works everywhere. It does not require a router or a DHCP server.
Use Call Back to inform different layers if data transfer is successful or not
Disadvantages:
Maximum limit of 250 payload bytes.
Support for 10 encrypted SoftAPs only
Maximum number of backups in unencrypted mode is 20
WeMOS D1 Wi-Fi Board
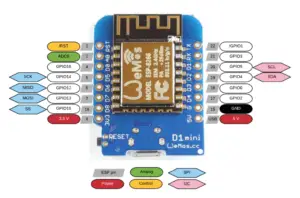
WeMOS D1 board is one of the most popular boards used in the field of IoT, one of the advantages of this board compared to boards such as Node MCU is its small size. The Wi-Fi chip used in this board is ESP8266.

Another advantage of this board is the existence of various shields for this board, which makes any project very easy and enjoyable for the user, shields such as battery shield, multi sensor, DHT22, relay, oled, a large number The shield has been developed for this board, which will leave you with a good IoT experience.
DHT11 Sensor
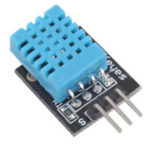
A variety of sensors are designed and manufactured to measure temperature and humidity. Each has a different range and sensitivity. The DHT11 sensor is one of the best sensors for measuring temperature and humidity. These sensors consist of two parts, capacitive humidity and a heat resistor. There is also an analog-to-digital converter unit in the DHT11, which generates digital output. With the help of this converter, the user can use it in microcontrollers to read values.
ESP32 Board
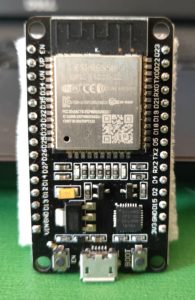
ESP32 is the advanced generation of ESP8266. One of the differences is its built-in Bluetooth capability. It also has a 2.4 GHz Wi-Fi and built-in Bluetooth with 40-nanometer technology from TSMC. This module has the best performance in energy consumption, which helps us to get best results from least energy consumption. If we want to take a closer look at this board is also called System on a chip (SoC) microcontrollers.
Working of this Project
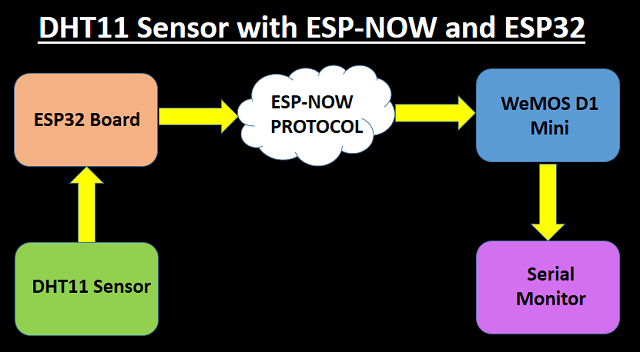
We are using DHT11 sensor to capture the temperature and humidity data. ESP32 board will be the sender and WeMOS D1 mini is the receiver. The ESP32 board will obtain the temperature and humidity values ??and send them to the Wemos board via the ESP-NOW protocol.
Installing Libraries
For this tutorial you need some Libraries in order to make the code working. Go to Sketch -> Include Library -> Manage Libraries. Search for the word “espnow” and install the library.


Now we need to install DHT sensor library and for that we need to type DHT and install it.

Finding MAC Address
Before we learn how to get these MAC addresses, it is better to learn the meaning and concept of MAC addresses and why they exist? Well, if a device is trying to connect to the Internet, it will be assigned with two addresses. First an IP address which is a logical address and then the MAC address, which is the physical address of our device. This MAC address us also know as a fingerprint.
The expansion of MAC is Media Access Control. MAC addresses consist of 48 bits with hexadecimal digits and are found with a structure like this xx: xx: xx: xx: xx: xx. Each xx is equal to 8 bits or one byte. The first 24 bits are specified by the manufacturer of the device and the second 24 bits of devices that can be numbered.

To communicate between ESP32 boards, we need to know the MAC address of other boards. In the process of transferring data or pairing each board, it checks the identity of the other board. Each ESP board has its own MAC address to authenticate. To get this MAC address, upload the following code in your WeMOS D1 mini
#ifdef ESP32
#include <WiFi.h>
#else
#include <ESP8266WiFi.h>
#endif
void setup(){
Serial.begin(115200);
Serial.println();
Serial.print("ESP Board MAC Address: ");
Serial.println(WiFi.macAddress());
}
void loop(){
}
After uploading the code, reset your WeMOS D1 to see your MAC address in Arduino IDE serial monitor.

Copy it and save the MAC address as we need it further. In transmitter code, we must specify the MAC address of the WeMOS D1 mini.
//Replace it with your ESP's MAC address in the transmitter code
uint8_t broadcastAddress1[] = {0xAA,0xDD,0xC1,0xB2,0xE3,0xD4};
Connection
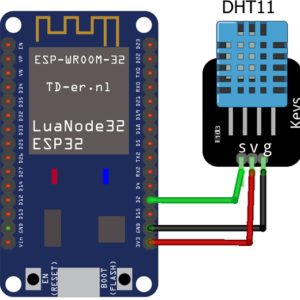
DHT11 signal pin is connected with D2 pin of ESP32, VCC to 3.3v of ESP32 and ground to GND pin respectively. The connection is simple and easy.
Using the functions makes it easy for you to use this library and allows you to create a responsive dashboard that is accessible via the module IP address. This library will allow the user to set up a web server using predefined functions, as well as a dashboard with graphical plugins to monitor values. You will be able to change the display of these values ??depending on the type of input data.
#include "DHT.h" #define DHTPIN 4 // Digital pin connected to the DHT sensor // Feather HUZZAH ESP8266 note: use pins 3, 4, 5, 12, 13 or 14 -- // Pin 15 can work but DHT must be disconnected during program upload. // Uncomment whatever type you're using! //#define DHTTYPE DHT11 // DHT 11 #define DHTTYPE DHT22 // DHT 22 (AM2302), AM2321 //#define DHTTYPE DHT21 // DHT 21 (AM2301) // Connect pin 1 (on the left) of the sensor to +5V // NOTE: If using a board with 3.3V logic like an Arduino Due connect pin 1 // to 3.3V instead of 5V! // Connect pin 2 of the sensor to whatever your DHTPIN is // Connect pin 4 (on the right) of the sensor to GROUND // Connect a 10K resistor from pin 2 (data) to pin 1 (power) of the sensor // Initialize DHT sensor. // Note that older versions of this library took an optional third parameter to // tweak the timings for faster processors. This parameter is no longer needed // as the current DHT reading algorithm adjusts itself to work on faster procs. DHT dht(DHTPIN, DHTTYPE); void setup() { Serial.begin(9600); Serial.println(F("DHTxx test!")); dht.begin(); } void loop() { // Wait a few seconds between measurements. delay(2000); // Reading temperature or humidity takes about 250 milliseconds! // Sensor readings may also be up to 2 seconds 'old' (its a very slow sensor) float h = dht.readHumidity(); // Read temperature as Celsius (the default) float t = dht.readTemperature(); // Read temperature as Fahrenheit (isFahrenheit = true) float f = dht.readTemperature(true); // Check if any reads failed and exit early (to try again). if (isnan(h) || isnan(t) || isnan(f)) { Serial.println(F("Failed to read from DHT sensor!")); return; } // Compute heat index in Fahrenheit (the default) float hif = dht.computeHeatIndex(f, h); // Compute heat index in Celsius (isFahreheit = false) float hic = dht.computeHeatIndex(t, h, false); Serial.print(F("Humidity: ")); Serial.print(h); Serial.print(F("% Temperature: ")); Serial.print(t); Serial.print(F("°C ")); Serial.print(f); Serial.print(F("°F Heat index: ")); Serial.print(hic); Serial.print(F("°C ")); Serial.print(hif); Serial.println(F("°F")); }
Esp Now Data Sender

Raspberry Pi 5 7 Inch Touch Screen IPS 1024x600 HD LCD HDMI-compatible Display for RPI 4B 3B+ OPI 5 AIDA64 PC Secondary Screen(Without Speaker)
BUY NOW
ESP32-S3 4.3inch Capacitive Touch Display Development Board, 800×480, 5-point Touch, 32-bit LX7 Dual-core Processor
BUY NOW
Raspberry Pi 5 7 Inch Touch Screen IPS 1024x600 HD LCD HDMI-compatible Display for RPI 4B 3B+ OPI 5 AIDA64 PC Secondary Screen(Without Speaker)
BUY NOW- Comments(0)
- Likes(1)
 Log in to post comments.
-
 Engineer
Sep 26,2022
- 0 USER VOTES
- YOUR VOTE 0.00 0.00
- 1
- 2
- 3
- 4
- 5
- 6
- 7
- 8
- 9
- 10
- 1
- 2
- 3
- 4
- 5
- 6
- 7
- 8
- 9
- 10
- 1
- 2
- 3
- 4
- 5
- 6
- 7
- 8
- 9
- 10
- 1
- 2
- 3
- 4
- 5
- 6
- 7
- 8
- 9
- 10
 More by electronicguru0007
-
 Esp32 Home Automation
There are relay modules whose electromagnet can be powered by 5V and with 3.3V. Both can be used wit...
-
 Lora Communication With Network
This was a very simple project and can come in handy for various applications. But what it can't do ...
-
 GPS Module Based Tracking Device Pcb
ESP32 GPS vehicle tracker using NEO 6M GPS module and Arduino IDE. With the help of this GPS tracker...
-
 Traffic Management for Emergency Vehicles using AT89S52 Microcontroller
These days’ traffic congestion is the biggest problem of densely populated cities. The project focus...
-
 Diy Multimeter Pcb
This is a project based on Arduino board which can measureresistance, diode, continuity[H1] , voltag...
-
 Live Instagram Followers Pcb
ESP8266 is capable of functioning reliably in industrial environments, with an operating temperature...
-
 How to make an alarm clock with pic microcontroller
he five push buttons will act as an input for setting the alarm for the required time. So one end of...
-
 How to make RMS to DC Converter using IC AD736
A True-RMS or TRMS is a type of converter which converts RMS value to equivalent DC value. Here in t...
-
 STM32 SPI Communcation and Data Sent
SPI in STM32F103C8Comparing SPI bus in Arduino & STM32F103C8 Blue Pill board, STM32 has 2 SPI bu...
-
 How to Communicate Arduinos via RS-485
What project will you develop?The project consists of 3 Arduino's. We have an Arduino UNO, a Nano, a...
-
 PIC16F877A Temperature and Humidity Measurement Board
Temperature and Humidity measurement is often useful in many applications like Home Automation, Envi...
-
 Diy Buck Converter
n the field of DC-DC Converters, A single-ended primary-inductor converter or SEPIC converter is a t...
-
 Iot AC Current Measuring System
Smart power monitoring is getting increasingly popular to improve energy efficiency in medium/small ...
-
 ESP32 Weather Station
In this project, we will learn how to create a weather station, which will display reading from a BM...
-
 NRF Data Transfer Via 2 Boards
There are various wireless communication technologies used in building IoT applications and RF (Radi...
-
 Iot patient monitoring system
When we are talking about major vital signs of a human body, there are four major parameters that we...
-
 Setting up zigbee communication with nodemcu and arduino
Zigbee is a popular wireless communication protocol used to transfer a small amount of data with ver...
-
 Ac Dimmer Remote PCB
The brightness can be controlled using the IR remote of TV, DVD, etc. Dimming Control system using M...
-
 Esp32 Home Automation
There are relay modules whose electromagnet can be powered by 5V and with 3.3V. Both can be used wit...
-
 Lora Communication With Network
This was a very simple project and can come in handy for various applications. But what it can't do ...
-
 GPS Module Based Tracking Device Pcb
ESP32 GPS vehicle tracker using NEO 6M GPS module and Arduino IDE. With the help of this GPS tracker...
-
 Traffic Management for Emergency Vehicles using AT89S52 Microcontroller
These days’ traffic congestion is the biggest problem of densely populated cities. The project focus...
-
 Diy Multimeter Pcb
This is a project based on Arduino board which can measureresistance, diode, continuity[H1] , voltag...
-
 Live Instagram Followers Pcb
ESP8266 is capable of functioning reliably in industrial environments, with an operating temperature...
-
 How to make an alarm clock with pic microcontroller
he five push buttons will act as an input for setting the alarm for the required time. So one end of...
-
 How to make RMS to DC Converter using IC AD736
A True-RMS or TRMS is a type of converter which converts RMS value to equivalent DC value. Here in t...
-
 STM32 SPI Communcation and Data Sent
SPI in STM32F103C8Comparing SPI bus in Arduino & STM32F103C8 Blue Pill board, STM32 has 2 SPI bu...
-
 How to Communicate Arduinos via RS-485
What project will you develop?The project consists of 3 Arduino's. We have an Arduino UNO, a Nano, a...
-
 PIC16F877A Temperature and Humidity Measurement Board
Temperature and Humidity measurement is often useful in many applications like Home Automation, Envi...
-
 Diy Buck Converter
n the field of DC-DC Converters, A single-ended primary-inductor converter or SEPIC converter is a t...
-
Modifying a Hotplate to a Reflow Solder Station
103 0 1 -
MPL3115A2 Barometric Pressure, Altitude, and Temperature Sensor
96 0 1 -
-
Nintendo 64DD Replacement Shell
168 0 1 -
V2 Commodore AMIGA USB-C Power Sink Delivery High Efficiency Supply Triple Output 5V ±12V OLED display ATARI compatible shark 100W
331 4 1 -
How to measure weight with Load Cell and HX711
401 0 3 -
-
Instrumentation Input, high impedance with 16 bit 1MSPS ADC for SPI
516 0 0


